User Manual
Page 1
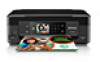
... × 6 inch (102 × 152 mm) XP-330/XP-430/XP-434 Small-in-One® Printer English Start Here Read these settings, press OK. Note for resale. If you are designed for printer setup and not for Spanish speakers/Nota para hispanohablantes: Para obtener... instrucciones de configuración en español, consulte la Guía de instalación en www.epson...
... × 6 inch (102 × 152 mm) XP-330/XP-430/XP-434 Small-in-One® Printer English Start Here Read these settings, press OK. Note for resale. If you are designed for printer setup and not for Spanish speakers/Nota para hispanohablantes: Para obtener... instrucciones de configuración en español, consulte la Guía de instalación en www.epson...
User Manual
Page 2
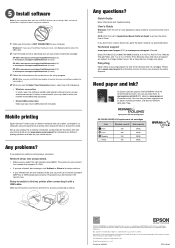
... product's software package: XP-330: www.epson.com/support/xp330downloads (U.S.) or www.epson.ca/support/xp330downloads (Canada) XP-430: www.epson.com/support/xp430downloads (U.S.) or www.epson.ca/support/xp430downloads (Canada) XP-434: www.epson.com/support/xp434downloads (U.S.) or www.epson.ca/support/xp434downloads (Canada) 3 Follow the instructions on your mobile device. If you experience problems during setup, see the Select...
... product's software package: XP-330: www.epson.com/support/xp330downloads (U.S.) or www.epson.ca/support/xp330downloads (Canada) XP-430: www.epson.com/support/xp430downloads (U.S.) or www.epson.ca/support/xp430downloads (Canada) XP-434: www.epson.com/support/xp434downloads (U.S.) or www.epson.ca/support/xp434downloads (Canada) 3 Follow the instructions on your mobile device. If you experience problems during setup, see the Select...
Quick Guide and Warranty
Page 5
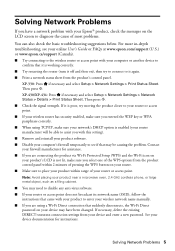
... Settings > Print Status Sheet. Contact your firewall manufacturer for instructions. XP-430/XP-434: Press if necessary and select Setup > Network Settings > Network Status > Details > Print Status Sheet. If necessary, delete the existing DIRECT-xxxxxxxx connection settings from your device...reinstall your product software. ■ Disable your computer's firewall temporarily to see your online User's Guide or FAQs at www.epson.com/support (U.S.) or www.epson.ca/support (Canada). ■ Try connecting to the wireless router or access point with your product to enter your wireless ...
... Settings > Print Status Sheet. Contact your firewall manufacturer for instructions. XP-430/XP-434: Press if necessary and select Setup > Network Settings > Network Status > Details > Print Status Sheet. If necessary, delete the existing DIRECT-xxxxxxxx connection settings from your device...reinstall your product software. ■ Disable your computer's firewall temporarily to see your online User's Guide or FAQs at www.epson.com/support (U.S.) or www.epson.ca/support (Canada). ■ Try connecting to the wireless router or access point with your product to enter your wireless ...
User Manual
Page 4
... Print Quality Options - Wi-Fi Networking ...36 Wi-Fi Infrastructure Mode Setup...36 Selecting Wireless Network Settings From the Control Panel 37 Wi-Fi Direct Mode Setup ...39 Enabling Wi-Fi Direct Mode ...40 Wi-Fi Protected Setup (WPS)...42 Using WPS to Connect to a Network 43 Printing a... Wi-Fi Features ...47 Loading Paper ...48 Loading Paper for Documents and Photos 48 Loading Envelopes ...51 Paper Loading Capacity ...54 Available Epson Papers ...55 Borderless Paper Type Compatibility 56 Paper or Media Type Settings - Product Software 58 Placing Originals on the Product ...59 Placing ...
... Print Quality Options - Wi-Fi Networking ...36 Wi-Fi Infrastructure Mode Setup...36 Selecting Wireless Network Settings From the Control Panel 37 Wi-Fi Direct Mode Setup ...39 Enabling Wi-Fi Direct Mode ...40 Wi-Fi Protected Setup (WPS)...42 Using WPS to Connect to a Network 43 Printing a... Wi-Fi Features ...47 Loading Paper ...48 Loading Paper for Documents and Photos 48 Loading Envelopes ...51 Paper Loading Capacity ...54 Available Epson Papers ...55 Borderless Paper Type Compatibility 56 Paper or Media Type Settings - Product Software 58 Placing Originals on the Product ...59 Placing ...

User Manual
Page 5
...Correction Options - Windows 78 Selecting Extended Settings - OS X 87 Print Quality Settings - Windows 76 Header/Footer Settings - OS X...91 Selecting Page Setup Settings - OS X 95 Printing Preferences - OS X 92 Managing Color - OS X...96 Printing Your Document or Photo - Multi-Page Printing Options...Starting a Scan...99 Starting a Scan Using the Product Control Panel 99 Changing Default Scan Button Settings 101 Starting a Scan Using the Epson Scan Icon 102 5 OS X 91 Selecting Print Layout Options - OS X 96 Checking Print Status - Windows 81 Checking Print Status...
...Correction Options - Windows 78 Selecting Extended Settings - OS X 87 Print Quality Settings - Windows 76 Header/Footer Settings - OS X...91 Selecting Page Setup Settings - OS X 95 Printing Preferences - OS X 92 Managing Color - OS X...96 Printing Your Document or Photo - Multi-Page Printing Options...Starting a Scan...99 Starting a Scan Using the Product Control Panel 99 Changing Default Scan Button Settings 101 Starting a Scan Using the Epson Scan Icon 102 5 OS X 91 Selecting Print Layout Options - OS X 96 Checking Print Status - Windows 81 Checking Print Status...
User Manual
Page 8
... Checking for Software Updates...220 Product Status Messages ...221 Running a Product Check ...222 Resetting Control Panel Defaults ...224 Solving Setup Problems ...225 Noise After Ink Installation ...226 Software Installation Problems ...226 Control Panel Setup Problems ...226 USB Connection Problems...227 Solving Network Problems ...227 8 OS X 199 Conserving Low Black Ink with Expended...
... Checking for Software Updates...220 Product Status Messages ...221 Running a Product Check ...222 Resetting Control Panel Defaults ...224 Solving Setup Problems ...225 Noise After Ink Installation ...226 Software Installation Problems ...226 Control Panel Setup Problems ...226 USB Connection Problems...227 Solving Network Problems ...227 8 OS X 199 Conserving Low Black Ink with Expended...
User Manual
Page 16
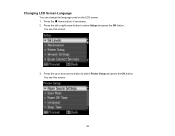
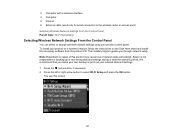
Press the up or down arrow button to select Setup and press the OK button. Press the home button, if necessary. 2. You see this screen: 3. You see this screen: 16 Changing LCD Screen Language You can change the language used on the LCD screen. 1. Press the left or right arrow button to select Printer Setup and press the OK button.
Press the up or down arrow button to select Setup and press the OK button. Press the home button, if necessary. 2. You see this screen: 3. You see this screen: 16 Changing LCD Screen Language You can change the language used on the LCD screen. 1. Press the left or right arrow button to select Printer Setup and press the OK button.
User Manual
Page 22
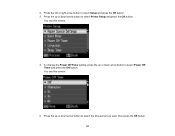
To change the Power Off Timer setting, press the up or down arrow button to select the time period you want, then press the OK button. 22 Press the up or down arrow button to select Printer Setup and press the OK button. You see this screen: 5. You see this screen: 4. 2. Press the left or right arrow button to select Power Off Timer and press the OK button. Press the up or down arrow button to select Setup and press the OK button. 3.
To change the Power Off Timer setting, press the up or down arrow button to select the time period you want, then press the OK button. 22 Press the up or down arrow button to select Printer Setup and press the OK button. You see this screen: 5. You see this screen: 4. 2. Press the left or right arrow button to select Power Off Timer and press the OK button. Press the up or down arrow button to select Setup and press the OK button. 3.
User Manual
Page 26
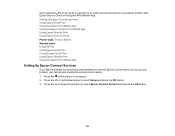
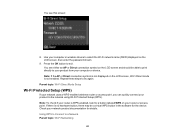
..., if necessary. 2. Press the up your product, you set up or down arrow button to select Setup and press the OK button. 3. Press the left or right arrow button to select Epson Connect Services and press the OK button. 26 Scan and send a file as an email or upload... it using the product control panel. 1. Setting Up Epson Connect Services Using Epson Email Print Using the Epson iPrint Mobile App Using the Epson Creative Print Mobile App Using Epson Remote Print Using Epson Scan to Cloud Parent topic: Product Basics Related tasks Using AirPrint Using...
..., if necessary. 2. Press the up your product, you set up or down arrow button to select Setup and press the OK button. 3. Press the left or right arrow button to select Epson Connect Services and press the OK button. 26 Scan and send a file as an email or upload... it using the product control panel. 1. Setting Up Epson Connect Services Using Epson Email Print Using the Epson iPrint Mobile App Using the Epson Creative Print Mobile App Using Epson Remote Print Using Epson Scan to Cloud Parent topic: Product Basics Related tasks Using AirPrint Using...

User Manual
Page 29
...Print software. 5. 2. See the link below. 2. Enter the email address and optional access key of your Epson product. Visit epsonconnect.com to learn more about Epson Creative Print and check the compatibility of your mobile device and your product to download the Remote Print Driver ...device to get creative with your mobile device and your Epson product during Remote Print setup. 6. Now you are ready to your product is using. 5. Connect your Epson product to print remotely. Note: Make a note of your Epson product. Select the print command in the world. 1....
...Print software. 5. 2. See the link below. 2. Enter the email address and optional access key of your Epson product. Visit epsonconnect.com to learn more about Epson Creative Print and check the compatibility of your mobile device and your product to download the Remote Print Driver ...device to get creative with your mobile device and your Epson product during Remote Print setup. 6. Now you are ready to your product is using. 5. Connect your Epson product to print remotely. Note: Make a note of your Epson product. Select the print command in the world. 1....

User Manual
Page 31
...Firmware Update option and follow the on-screen instructions. 10. Select the checkbox to agree to your Epson product to the Usage Advisory and click Next. 8. Connect your wireless network. Click OK to complete setup and print a test page. A separate browser window opens. 9. See the link below. 2. ...Cloud Print, or the Google Cloud Print website for a list of your Google Account username and password and click Sign in page. Visit Epson Support for more information on . Your product is now linked to the same wireless network as your product. 6. Turn on connecting to...
...Firmware Update option and follow the on-screen instructions. 10. Select the checkbox to agree to your Epson product to the Usage Advisory and click Next. 8. Connect your wireless network. Click OK to complete setup and print a test page. A separate browser window opens. 9. See the link below. 2. ...Cloud Print, or the Google Cloud Print website for a list of your Google Account username and password and click Sign in page. Visit Epson Support for more information on . Your product is now linked to the same wireless network as your product. 6. Turn on connecting to...
User Manual
Page 36
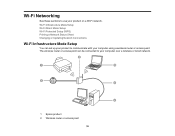
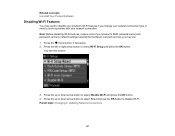
Wi-Fi Networking See these sections to your computer over a wireless or wired network. 1 Epson product 2 Wireless router or access point 36 The wireless router or access point can set up your product to communicate with your product on a Wi-Fi network. Wi-Fi Infrastructure Mode Setup Wi-Fi Direct Mode Setup Wi-Fi Protected Setup (WPS) Printing a Network Status Sheet Changing or Updating Network Connections Wi-Fi Infrastructure Mode Setup You can be connected to use your computer using a wireless router or access point.
Wi-Fi Networking See these sections to your computer over a wireless or wired network. 1 Epson product 2 Wireless router or access point 36 The wireless router or access point can set up your product to communicate with your product on a Wi-Fi network. Wi-Fi Infrastructure Mode Setup Wi-Fi Direct Mode Setup Wi-Fi Protected Setup (WPS) Printing a Network Status Sheet Changing or Updating Network Connections Wi-Fi Infrastructure Mode Setup You can be connected to use your computer using a wireless router or access point.
User Manual
Page 37
Epson is not responsible for wired connection to select Wi-Fi Setup and press the OK button. We recommend that you through network setup. You see this product may cause loss of this screen: 37 Note: Breakdown or repair of network data and settings. Press the home button, if ...
Epson is not responsible for wired connection to select Wi-Fi Setup and press the OK button. We recommend that you through network setup. You see this product may cause loss of this screen: 37 Note: Breakdown or repair of network data and settings. Press the home button, if ...

User Manual
Page 38
Press the OK button to select Wi-Fi Setup Wizard. 4. To print a network status report, select Yes, press the OK button, and press the start button. (Otherwise, select No and press the OK button.) ...
Press the OK button to select Wi-Fi Setup Wizard. 4. To print a network status report, select Yes, press the OK button, and press the start button. (Otherwise, select No and press the OK button.) ...

User Manual
Page 39
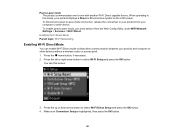
When operating in the upper right corner of these steps to try again. Parent topic: Wi-Fi Infrastructure Mode Setup Wi-Fi Direct Mode Setup You can set up to 4 devices. in this mode, your product displays an AP connection symbol on the LCD screen, you may have selected ... as the network access point for up your product to communicate directly with your computer or another device without requiring a wireless router or access point. 1 Epson product 2 Computer with a wireless interface 3 Other wireless device You can select one of Note: If the Wi-Fi icon is not displayed on the ...
When operating in the upper right corner of these steps to try again. Parent topic: Wi-Fi Infrastructure Mode Setup Wi-Fi Direct Mode Setup You can set up to 4 devices. in this mode, your product displays an AP connection symbol on the LCD screen, you may have selected ... as the network access point for up your product to communicate directly with your computer or another device without requiring a wireless router or access point. 1 Epson product 2 Computer with a wireless interface 3 Other wireless device You can select one of Note: If the Wi-Fi icon is not displayed on the ...
User Manual
Page 40
...other devices without a wireless router or access point. 1. Press the left or right arrow button to select Wi-Fi Direct Setup and press the OK button. 4. Make sure Connection Setup is highlighted, then press the OK button. 40 To enable peer-to your product from the Web Config Utility, under ...WiFi/Network Settings > Services > Wi-Fi Direct. Press the home button, if necessary. 2. Press the up or down arrow button to select Wi-Fi Setup and press the OK button. Peer-to-peer mode The product communicates one-to allow direct communication between your product and computer or other device...
...other devices without a wireless router or access point. 1. Press the left or right arrow button to select Wi-Fi Direct Setup and press the OK button. 4. Make sure Connection Setup is highlighted, then press the OK button. 40 To enable peer-to your product from the Web Config Utility, under ...WiFi/Network Settings > Services > Wi-Fi Direct. Press the home button, if necessary. 2. Press the up or down arrow button to select Wi-Fi Setup and press the OK button. Peer-to-peer mode The product communicates one-to allow direct communication between your product and computer or other device...
User Manual
Page 42
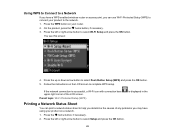
.... 9. Use your computer or device. If there is not enabled. Repeat these steps to the network using Wi-Fi Protected Setup (WPS). Parent topic: Wi-Fi Direct Mode Setup Wi-Fi Protected Setup (WPS) If your network uses a WPS-enabled wireless router or access point, you can quickly connect your network product documentation...
.... 9. Use your computer or device. If there is not enabled. Repeat these steps to the network using Wi-Fi Protected Setup (WPS). Parent topic: Wi-Fi Direct Mode Setup Wi-Fi Protected Setup (WPS) If your network uses a WPS-enabled wireless router or access point, you can quickly connect your network product documentation...
User Manual
Page 43
...) to connect your product to help you determine the causes of the LCD screen. Press the left or right arrow button to select Push Button Setup (WPS) and press the OK button. 5. On the product, press the home button, if necessary. 3. You see this screen: 4. Follow the instructions on a ...network. 1. Press the WPS button on your product on the LCD screen to select Setup and press the OK button. 43 Press the home button, if necessary. 2. Parent topic: Wi-Fi Protected Setup (WPS) is successful, a Wi-Fi icon with connection bars upper right corner of any problems...
...) to connect your product to help you determine the causes of the LCD screen. Press the left or right arrow button to select Push Button Setup (WPS) and press the OK button. 5. On the product, press the home button, if necessary. 3. You see this screen: 4. Follow the instructions on a ...network. 1. Press the WPS button on your product on the LCD screen to select Setup and press the OK button. 43 Press the home button, if necessary. 2. Parent topic: Wi-Fi Protected Setup (WPS) is successful, a Wi-Fi icon with connection bars upper right corner of any problems...
User Manual
Page 47
...-Fi features, make a note of your network connection. Press the home button, if necessary. 2. Press the left or right arrow button to select Wi-Fi Setup and press the OK button. Parent topic: Changing or Updating Network Connections 47 Press the up or down arrow button to select Yes and press... change your network connection type or need to solve a problem with your product's SSID (network name) and password, and any network settings selected for the Epson Connect services you may use. 1.
...-Fi features, make a note of your network connection. Press the home button, if necessary. 2. Press the left or right arrow button to select Wi-Fi Setup and press the OK button. Parent topic: Changing or Updating Network Connections 47 Press the up or down arrow button to select Yes and press... change your network connection type or need to solve a problem with your product's SSID (network name) and password, and any network settings selected for the Epson Connect services you may use. 1.

User Manual
Page 51
...Change and press the OK button. Do one of the following to select the size and type of paper you load paper, select the Setup > Printer Setup > Paper Source Settings > Paper Configuration setting and set it to Off. (This will also disable AirPrint.) Always follow these paper loading guidelines... paper above the arrow mark inside the edge guide. • Check the paper package for any additional loading instructions. Note: To prevent the paper setup screen from appearing automatically when you just loaded on plain paper envelopes in this size: No. 10 (4.1 × 9.5 inches [105 × 241...
...Change and press the OK button. Do one of the following to select the size and type of paper you load paper, select the Setup > Printer Setup > Paper Source Settings > Paper Configuration setting and set it to Off. (This will also disable AirPrint.) Always follow these paper loading guidelines... paper above the arrow mark inside the edge guide. • Check the paper package for any additional loading instructions. Note: To prevent the paper setup screen from appearing automatically when you just loaded on plain paper envelopes in this size: No. 10 (4.1 × 9.5 inches [105 × 241...


