User Manual
Page 44
... and press the OK button. 4. Copying option Density Layout Available settings Various levels Borderless With Border Reduce/Enlarge Actual Size Auto Fit Page Custom Size Paper Size Paper Type Quality Various sizes Plain Paper Photo Paper Standard Quality Draft Description Adjusts the lightness or darkness of copies Expands the image to the...
... and press the OK button. 4. Copying option Density Layout Available settings Various levels Borderless With Border Reduce/Enlarge Actual Size Auto Fit Page Custom Size Paper Size Paper Type Quality Various sizes Plain Paper Photo Paper Standard Quality Draft Description Adjusts the lightness or darkness of copies Expands the image to the...

User Manual
Page 55
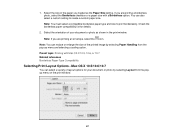
...at the edges of borderless images, select a Borderless option: • To adjust the automatic settings, select Auto Expand as the Enlargement Method setting. • To add a watermark to your printed photo. • To print the borderless image at its actual size without scaling, select Retain Size as the... Click the Shortcuts tab. Note: You can select a printing preset. • To change the size of your printed document or photo, select the Reduce/Enlarge Document checkbox and select sizing options. • To print on both sides of your own preset by clicking the Save Settings button...
...at the edges of borderless images, select a Borderless option: • To adjust the automatic settings, select Auto Expand as the Enlargement Method setting. • To add a watermark to your printed photo. • To print the borderless image at its actual size without scaling, select Retain Size as the... Click the Shortcuts tab. Note: You can select a printing preset. • To change the size of your printed document or photo, select the Reduce/Enlarge Document checkbox and select sizing options. • To print on both sides of your own preset by clicking the Save Settings button...
User Manual
Page 67
You can select a variety of your document or photo by selecting Paper Handling from the popup menu on the print window. 67 Select the orientation of layout options for details. 2. Note: You can reduce or enlarge the size of the paper you loaded as shown in the print window. Note:... If you are printing an envelope, select the icon. If you are printing a borderless photo, select the Borderless checkbox or a paper size with Mac OS ...
You can select a variety of your document or photo by selecting Paper Handling from the popup menu on the print window. 67 Select the orientation of layout options for details. 2. Note: You can reduce or enlarge the size of the paper you loaded as shown in the print window. Note:... If you are printing an envelope, select the icon. If you are printing a borderless photo, select the Borderless checkbox or a paper size with Mac OS ...

User Manual
Page 90
.... Auto Area Segmentation Makes grayscale images clearer and text recognition more accurate by separating the text from the Target Size list. In the EPSON Scan window, select the size you can use it to be from the graphics. Brightness Adjusts the overall lightness and darkness of the ...overall scanned image. You can reduce or enlarge the size of that size on your image as a common photo size like 4 × 6 inches (102 × 152 mm). Contrast Adjusts the difference between the light and ...
.... Auto Area Segmentation Makes grayscale images clearer and text recognition more accurate by separating the text from the Target Size list. In the EPSON Scan window, select the size you can use it to be from the graphics. Brightness Adjusts the overall lightness and darkness of the ...overall scanned image. You can reduce or enlarge the size of that size on your image as a common photo size like 4 × 6 inches (102 × 152 mm). Contrast Adjusts the difference between the light and ...
User Manual
Page 99
... use . Professional Mode Available Image Adjustments - Professional Mode Parent topic: Selecting EPSON Scan Settings Related concepts Scan Resolution Guidelines Image Preview Guidelines Related tasks Selecting Scan...Area - 2. Select the Document Source setting indicating where you want to use for documents or photos. 3. Before making adjustments, click the image or scanned image area in a separate Preview ... scanning as you scan, select the Target Size setting you want to reduce or enlarge your scanning program. Available Image Types - You see the file in the Windows ...
... use . Professional Mode Available Image Adjustments - Professional Mode Parent topic: Selecting EPSON Scan Settings Related concepts Scan Resolution Guidelines Image Preview Guidelines Related tasks Selecting Scan...Area - 2. Select the Document Source setting indicating where you want to use for documents or photos. 3. Before making adjustments, click the image or scanned image area in a separate Preview ... scanning as you scan, select the Target Size setting you want to reduce or enlarge your scanning program. Available Image Types - You see the file in the Windows ...
User Manual
Page 105
A marquee (dotted line) appears on the preview image so you can use it to rotate the orientation of your image as a common photo size like 4 × 6 inches (102 × 152 mm). This places a scan area of that size on your preview image proportioned for your image. 2. Note: If ... Mode You can also select a specific scan size, such as you selected. 105 In the EPSON Scan window, select the size you need to help crop the image in the correct proportions. 1. You can reduce or enlarge the size of the target size for the size you scan. Click the Preview button...
A marquee (dotted line) appears on the preview image so you can use it to rotate the orientation of your image as a common photo size like 4 × 6 inches (102 × 152 mm). This places a scan area of that size on your preview image proportioned for your image. 2. Note: If ... Mode You can also select a specific scan size, such as you selected. 105 In the EPSON Scan window, select the size you need to help crop the image in the correct proportions. 1. You can reduce or enlarge the size of the target size for the size you scan. Click the Preview button...
Quick Guide
Page 10
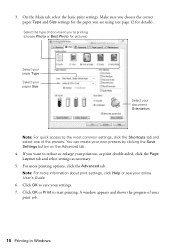
Make sure you choose the correct paper Type and Size settings for the paper you 're printing (choose Photo or Best Photo for details). Note: For more printing options, click the Advanced tab. Select the type of document you are using (see your printout, or print ...necessary. 5. You can create your print job. 10 Printing in Windows A window appears and shows the progress of the presets. Click OK to reduce or enlarge your online User's Guide. 6. On the Main tab, select the basic print settings. For more information about print settings, click Help or see page 12...
Make sure you choose the correct paper Type and Size settings for the paper you 're printing (choose Photo or Best Photo for details). Note: For more printing options, click the Advanced tab. Select the type of document you are using (see your printout, or print ...necessary. 5. You can create your print job. 10 Printing in Windows A window appears and shows the progress of the presets. Click OK to reduce or enlarge your online User's Guide. 6. On the Main tab, select the basic print settings. For more information about print settings, click Help or see page 12...


