Quick Guide
Page 3
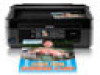
... Green light indicates that the product is connected to your wireless network Returns to the Home screen and lets you select Wi-Fi Setup, Copy, Print Photos, Scan, or Setup Cancels the current operation or returns to the previous screen l, r, u, d OK x Access more options or display more photos Confirms your product. The...
... Green light indicates that the product is connected to your wireless network Returns to the Home screen and lets you select Wi-Fi Setup, Copy, Print Photos, Scan, or Setup Cancels the current operation or returns to the previous screen l, r, u, d OK x Access more options or display more photos Confirms your product. The...

Quick Guide
Page 9
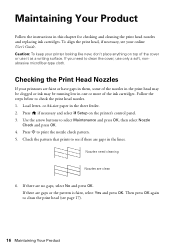
... is selected, then click the Preferences or Properties button. (If you see a window like this one: Select your EPSON product Click here to open your application. You see a Setup, Printer, or Options button, click it. Select the print command in Windows 1. Then click Preferences or Properties on printing, see the online User...
... is selected, then click the Preferences or Properties button. (If you see a window like this one: Select your EPSON product Click here to open your application. You see a Setup, Printer, or Options button, click it. Select the print command in Windows 1. Then click Preferences or Properties on printing, see the online User...
Quick Guide
Page 16
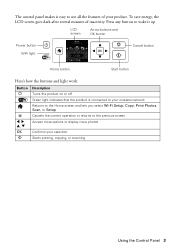
... and cleaning the print head nozzles and replacing ink cartridges. Use the arrow buttons to print the nozzle check pattern. 5. Press if necessary and select F Setup on top of the ink cartridges. If you need cleaning Nozzles are gaps or the pattern is faint, select Yes and press OK. Nozzles need...
... and cleaning the print head nozzles and replacing ink cartridges. Use the arrow buttons to print the nozzle check pattern. 5. Press if necessary and select F Setup on top of the ink cartridges. If you need cleaning Nozzles are gaps or the pattern is faint, select Yes and press OK. Nozzles need...

Quick Guide
Page 17
...need to clean it is low. If that the print head is expended, you can check ink cartridge levels by pressing if necessary and selecting F Setup, then pressing OK. Select Nozzle Check and press OK, then press x to maintain good print quality. You can clean the print head. Select ...after cleaning the print head four times, turn off the product and wait at least once a month to verify that doesn't help, contact Epson as described on your EPSON product often, it when a cartridge is a good idea to print a few pages at least six hours to continue printing temporarily with ...
...need to clean it is low. If that the print head is expended, you can check ink cartridge levels by pressing if necessary and selecting F Setup, then pressing OK. Select Nozzle Check and press OK, then press x to maintain good print quality. You can clean the print head. Select ...after cleaning the print head four times, turn off the product and wait at least once a month to verify that doesn't help, contact Epson as described on your EPSON product often, it when a cartridge is a good idea to print a few pages at least six hours to continue printing temporarily with ...
Quick Guide
Page 18
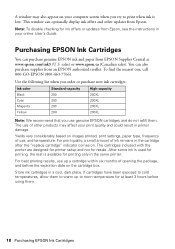
...in your print quality and could result in the cartridge after the "replace cartridge" indicator comes on your computer screen when you use genuine EPSON cartridges and do not refill them. You can optionally display ink offers and other products may also appear on . The cartridges included with ...the printer are designed for printer setup and not for printing only in a cool, dark place. Store ink cartridges in the same printer. If cartridges have been exposed to cold ...
...in your print quality and could result in the cartridge after the "replace cartridge" indicator comes on your computer screen when you use genuine EPSON cartridges and do not refill them. You can optionally display ink offers and other products may also appear on . The cartridges included with ...the printer are designed for printer setup and not for printing only in a cool, dark place. Store ink cartridges in the same printer. If cartridges have been exposed to cold ...
Quick Guide
Page 19
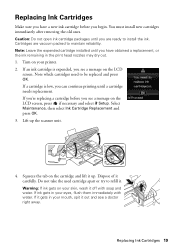
... is low, you can continue printing until you have a new ink cartridge before you see a message on the LCD screen, press if necessary and select F Setup. Select Maintenance, then select Ink Cartridge Replacement and press OK. 3. Replacing Ink Cartridges Make sure you have obtained a replacement, or the ink remaining in your...
... is low, you can continue printing until you have a new ink cartridge before you see a message on the LCD screen, press if necessary and select F Setup. Select Maintenance, then select Ink Cartridge Replacement and press OK. 3. Replacing Ink Cartridges Make sure you have obtained a replacement, or the ink remaining in your...
Quick Guide
Page 23
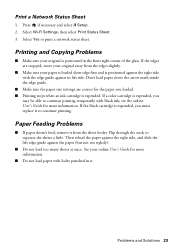
... with holes punched in the front right corner of the glass. Select Wi-Fi Settings, then select Print Status Sheet. 3. Press if necessary and select F Setup. 2. Select Yes to separate the sheets a little. If the edges are correct for more information. Problems and Solutions 23 See your paper is loaded short...
... with holes punched in the front right corner of the glass. Select Wi-Fi Settings, then select Print Status Sheet. 3. Press if necessary and select F Setup. 2. Select Yes to separate the sheets a little. If the edges are correct for more information. Problems and Solutions 23 See your paper is loaded short...

Start Here
Page 3
... below: Network setup was unsuccessful. • Make sure you select the right network name (SSID). • If you see a firewall alert message, click Unblock or Allow to wake your computer. Press to scroll through characters. See "EPSON technical support." Direct USB connection Make sure ... (SSID) and network password: • Network name • Network password If you will explain how to -videos at epson.com/support (U.S.) or epson.ca/support (Canada). Press any screen savers and virus protection software, before beginning this information, contact the person who set up...
... below: Network setup was unsuccessful. • Make sure you select the right network name (SSID). • If you see a firewall alert message, click Unblock or Allow to wake your computer. Press to scroll through characters. See "EPSON technical support." Direct USB connection Make sure ... (SSID) and network password: • Network name • Network password If you will explain how to -videos at epson.com/support (U.S.) or epson.ca/support (Canada). Press any screen savers and virus protection software, before beginning this information, contact the person who set up...
Start Here
Page 4
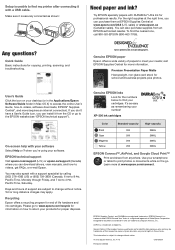
...). General Notice: Other product names used herein are registered trademarks, EPSON Connect is a trademark and EPSON Exceed Your Vision is a registered logomark of Epson America, Inc. Setup is unable to find my printer after connecting it with DURABrite® Ultra Ink for professional results. XP-300 ink cartridges Color Black Cyan Magenta Yellow Standard-capacity 200...
...). General Notice: Other product names used herein are registered trademarks, EPSON Connect is a trademark and EPSON Exceed Your Vision is a registered logomark of Epson America, Inc. Setup is unable to find my printer after connecting it with DURABrite® Ultra Ink for professional results. XP-300 ink cartridges Color Black Cyan Magenta Yellow Standard-capacity 200...

User Guide
Page 4
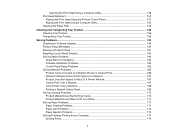
... - Mac OS X ...67 Color Matching and Color Options - Copying 43 Paper Size Settings - Windows 54 Printing Your Document or Photo - Mac OS X ...65 Selecting Page Setup Settings - Mac OS X 65 Selecting Print Layout Options - Windows 55 Checking Print Status - Copying 44 Copying Options ...44 Printing From a Computer ...46 Printing with Mac...
... - Mac OS X ...67 Color Matching and Color Options - Copying 43 Paper Size Settings - Windows 54 Printing Your Document or Photo - Mac OS X ...65 Selecting Page Setup Settings - Mac OS X 65 Selecting Print Layout Options - Windows 55 Checking Print Status - Copying 44 Copying Options ...44 Printing From a Computer ...46 Printing with Mac...
User Guide
Page 7
... for Software Updates...159 Product Status Messages ...160 Running a Product Check ...161 Resetting Control Panel Defaults ...163 Solving Setup Problems ...164 Noise After Ink Installation ...164 Software Installation Problems ...165 Control Panel Setup Problems ...165 Solving Network Problems ...165 Product Cannot Connect to a Wireless Router or Access Point 166 Network Software Cannot...
... for Software Updates...159 Product Status Messages ...160 Running a Product Check ...161 Resetting Control Panel Defaults ...163 Solving Setup Problems ...164 Noise After Ink Installation ...164 Software Installation Problems ...165 Control Panel Setup Problems ...165 Solving Network Problems ...165 Product Cannot Connect to a Wireless Router or Access Point 166 Network Software Cannot...

User Guide
Page 13
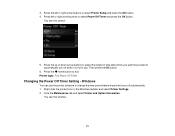
You see this screen: 13 Press the home button, if necessary. 2. Press the arrow buttons to select Printer Setup and press the OK button. Parent topic: Setting Up the Control Panel Changing LCD Screen Language You can adjust the position of the control panel .... 1. Caution: Do not lower the control panel without first squeezing the release bar or you may damage your product. Press the arrow buttons to select Setup and press the OK button. 3.
You see this screen: 13 Press the home button, if necessary. 2. Press the arrow buttons to select Printer Setup and press the OK button. Parent topic: Setting Up the Control Panel Changing LCD Screen Language You can adjust the position of the control panel .... 1. Caution: Do not lower the control panel without first squeezing the release bar or you may damage your product. Press the arrow buttons to select Setup and press the OK button. 3.
User Guide
Page 14
... product CD. The installer program guides you make your own backup or print out your network data and settings. 1. To install your product control panel. Epson is not responsible for backing up or recovering data and settings during or after the warranty period. Press the home button to select a language and... screen: 14 Note: Breakdown or repair of network data and settings. Press the arrow buttons to exit. 4. Press the arrow buttons to select Wi-Fi Setup and press the OK button. Press the home button, if necessary. 2. We recommend that you through network...
... product CD. The installer program guides you make your own backup or print out your network data and settings. 1. To install your product control panel. Epson is not responsible for backing up or recovering data and settings during or after the warranty period. Press the home button to select a language and... screen: 14 Note: Breakdown or repair of network data and settings. Press the arrow buttons to exit. 4. Press the arrow buttons to select Wi-Fi Setup and press the OK button. Press the home button, if necessary. 2. We recommend that you through network...

User Guide
Page 15
... select the name of your wireless password (or network name and then password). • Press the up and down arrow buttons to select Wi-Fi Setup Wizard and press the OK button. 4. 3. Press the arrow buttons to the next character. 15 Enter your wireless network's name, you can enter it manually...
... select the name of your wireless password (or network name and then password). • Press the up and down arrow buttons to select Wi-Fi Setup Wizard and press the OK button. 4. 3. Press the arrow buttons to the next character. 15 Enter your wireless network's name, you can enter it manually...

User Guide
Page 16
... - The WiFi light should now be on your product. Parent topic: Setting Up the Control Panel Product Parts Locations See these steps to print a network setup report, press the start button. (Otherwise, press the stop button.) 7. Product Parts - If you want to try again. Inside Product Parts - • To switch between...
... - The WiFi light should now be on your product. Parent topic: Setting Up the Control Panel Product Parts Locations See these steps to print a network setup report, press the start button. (Otherwise, press the stop button.) 7. Product Parts - If you want to try again. Inside Product Parts - • To switch between...

User Guide
Page 20
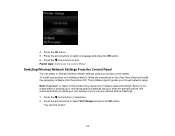
... Power Off Timer The product turns off , but increasing the time reduces the product's energy efficiency. You can use the product's control panel to select Setup and press the OK button. 20 Press the home button, if necessary. 2. Changing the Power Off Timer Setting From the Control Panel Changing the Power...
... Power Off Timer The product turns off , but increasing the time reduces the product's energy efficiency. You can use the product's control panel to select Setup and press the OK button. 20 Press the home button, if necessary. 2. Changing the Power Off Timer Setting From the Control Panel Changing the Power...
User Guide
Page 21
... of time after which you want the product to select Power Off Timer and press the OK button. Press the home button to select Printer Setup and press the OK button. 4. Windows You can use . Press the left or right arrow buttons to automatically turn off automatically. 1. Press left or right...
... of time after which you want the product to select Power Off Timer and press the OK button. Press the home button to select Printer Setup and press the OK button. 4. Windows You can use . Press the left or right arrow buttons to automatically turn off automatically. 1. Press left or right...
User Guide
Page 24
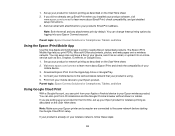
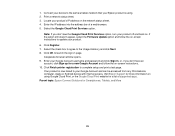
... any attachments print by logging into your Epson product. Parent topic: Epson Connect Solutions for network printing as described on the Start Here sheet. 2. 1. Visit www.epson.com/connect to the same network before starting the Google Cloud Print setup. You can change these steps: 24 ...Cloud Print With a Google Account, you are connected to learn more about Email Print, check compatibility, and get detailed setup instructions. 3. Set up your Epson wireless product. Print from the Apple App Store or Google Play. 4. Send an email with attachments to nearby...
... any attachments print by logging into your Epson product. Parent topic: Epson Connect Solutions for network printing as described on the Start Here sheet. 2. 1. Visit www.epson.com/connect to the same network before starting the Google Cloud Print setup. You can change these steps: 24 ...Cloud Print With a Google Account, you are connected to learn more about Email Print, check compatibility, and get detailed setup instructions. 3. Set up your Epson wireless product. Print from the Apple App Store or Google Play. 4. Send an email with attachments to nearby...
User Guide
Page 25
Enter the IP address into the address bar of supported apps. Click OK to complete setup and print a test page. Click Finish printer registration to launch the sign-in , or, if you don't see the Google Cloud Print Services option, turn ... instructions to your product's IP address on . Enter your Google Account username and password and click Sign in page. Print a network status sheet. 3. Connect your Epson product is now linked to update your product off and back on the network status sheet. 4. Select the Google Cloud Print Services option. Select the...
Enter the IP address into the address bar of supported apps. Click OK to complete setup and print a test page. Click Finish printer registration to launch the sign-in , or, if you don't see the Google Cloud Print Services option, turn ... instructions to your product's IP address on . Enter your Google Account username and password and click Sign in page. Print a network status sheet. 3. Connect your Epson product is now linked to update your product off and back on the network status sheet. 4. Select the Google Cloud Print Services option. Select the...
User Guide
Page 61
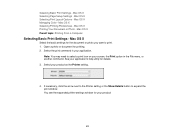
... OS X Select the basic settings for printing. 2. See your application. Select your product as the Printer setting. 4. Selecting Basic Print Settings - Mac OS X Selecting Page Setup Settings - Mac OS X Managing Color -
... OS X Select the basic settings for printing. 2. See your application. Select your product as the Printer setting. 4. Selecting Basic Print Settings - Mac OS X Selecting Page Setup Settings - Mac OS X Managing Color -


