Quick Guide
Page 2
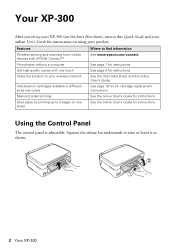
...and colors Manual 2-sided printing Save paper by printing up your XP-300 (see the Start Here sheet), turn to this Quick Guide and your product. Squeeze the release bar underneath to find information See www.epson.com/connect. See page 7 for ink cartridge replacement instructions. ...See page 18 for instructions. See the Start Here sheet and the online User's Guide. See the online User's Guide for instructions on one sheet Where to raise or lower it as shown. 2 Your XP-300 Your XP-300 After you set...
...and colors Manual 2-sided printing Save paper by printing up your XP-300 (see the Start Here sheet), turn to this Quick Guide and your product. Squeeze the release bar underneath to find information See www.epson.com/connect. See page 7 for ink cartridge replacement instructions. ...See page 18 for instructions. See the Start Here sheet and the online User's Guide. See the online User's Guide for instructions on one sheet Where to raise or lower it as shown. 2 Your XP-300 Your XP-300 After you set...
Quick Guide
Page 6
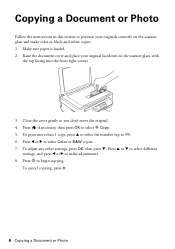
... OK, then press d. Make sure paper is loaded. 2. Press if necessary, then press OK to begin copying. Press u or d to select different settings, and press l or r to make color or black-and-white copies. 1. To cancel copying, press y. 6 Copying a Document or Photo Press x to select r Copy. 5. Raise the ...
... OK, then press d. Make sure paper is loaded. 2. Press if necessary, then press OK to begin copying. Press u or d to select different settings, and press l or r to make color or black-and-white copies. 1. To cancel copying, press y. 6 Copying a Document or Photo Press x to select r Copy. 5. Raise the ...

Quick Guide
Page 8
see page 4). 2. Press u or d to select the number of copies you view them on the LCD screen. 1. Press OK and change settings as you want to scroll through your photos and display one that photo. 5. To cancel printing, press y . 8 Printing Photos From the LCD Screen... Printing Photos From the LCD Screen You can select individual photos for printing as necessary. 7. When you want of 4 × 6-inch (102 × 152 mm) EPSON photo paper (various types available; Press if necessary, then select Print photos and press OK. 3. Press l or r to print. 4. Repeat steps 3 and 4 to...
see page 4). 2. Press u or d to select the number of copies you view them on the LCD screen. 1. Press OK and change settings as you want to scroll through your photos and display one that photo. 5. To cancel printing, press y . 8 Printing Photos From the LCD Screen... Printing Photos From the LCD Screen You can select individual photos for printing as necessary. 7. When you want of 4 × 6-inch (102 × 152 mm) EPSON photo paper (various types available; Press if necessary, then select Print photos and press OK. 3. Press l or r to print. 4. Repeat steps 3 and 4 to...

Quick Guide
Page 10
...your document Orientation Note: For quick access to the most common settings, click the Shortcuts tab and select one of your own presets by clicking the Save Settings button on the Advanced tab. 4. For more information about print settings, click Help or see page 12 for pictures) Select your... paper Type Select your paper Size Select your printout, or print double-sided, click the Page Layout tab and select settings as necessary. 5. Make sure you choose the ...
...your document Orientation Note: For quick access to the most common settings, click the Shortcuts tab and select one of your own presets by clicking the Save Settings button on the Advanced tab. 4. For more information about print settings, click Help or see page 12 for pictures) Select your... paper Type Select your paper Size Select your printout, or print double-sided, click the Page Layout tab and select settings as necessary. 5. Make sure you choose the ...
Quick Guide
Page 11
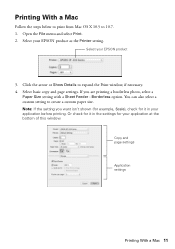
... X 10.5 to create a custom paper size. If you want isn't shown (for example, Scale), check for your application before printing. You can also select a custom setting to 10.7. 1. Select your EPSON product 3. Click the arrow or Show Details to expand the Print window, if necessary. 4. Or check for it in the...
... X 10.5 to create a custom paper size. If you want isn't shown (for example, Scale), check for your application before printing. You can also select a custom setting to 10.7. 1. Select your EPSON product 3. Click the arrow or Show Details to expand the Print window, if necessary. 4. Or check for it in the...
Quick Guide
Page 12
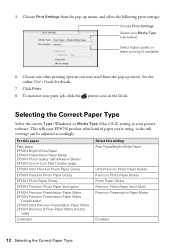
... Media Type (see below) Select higher quality or faster printing (if available) 6. Click Print. 8. See the online User's Guide for details. 7. Choose Print Settings from the pop-up menu, and select the following print settings: Choose Print Settings Select your EPSON product what kind of paper you may need from the pop-up menu.
... Media Type (see below) Select higher quality or faster printing (if available) 6. Click Print. 8. See the online User's Guide for details. 7. Choose Print Settings from the pop-up menu, and select the following print settings: Choose Print Settings Select your EPSON product what kind of paper you may need from the pop-up menu.

Quick Guide
Page 13
... documents. ■ To PC (Email) automatically scans a photo, resizes it automatically included in an email message. Scanning a Document or Photo You can use EPSON Scan to restore faded colors in old photos (see page 15). Note: For detailed scanning instructions, see "Scanning with MAPI-type email such as Microsoft... file and saves it to quickly scan a photo or document and save it on page 6. 2. The u Scan function lets you scan quickly using preselected settings, or you don't move the original. 3. Quick Scanning From the Control Panel Use the u Scan function to your computer;
... documents. ■ To PC (Email) automatically scans a photo, resizes it automatically included in an email message. Scanning a Document or Photo You can use EPSON Scan to restore faded colors in old photos (see page 15). Note: For detailed scanning instructions, see "Scanning with MAPI-type email such as Microsoft... file and saves it to quickly scan a photo or document and save it on page 6. 2. The u Scan function lets you scan quickly using preselected settings, or you don't move the original. 3. Quick Scanning From the Control Panel Use the u Scan function to your computer;
Quick Guide
Page 14
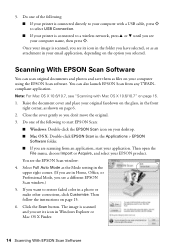
...page 6. 2. Do one of the following to a wireless network, press u or d until you don't move the original. 3. Note: For Mac OS X 10.6/10.7, see your EPSON product. If you are scanning from any TWAINcompliant application. Select Full Auto Mode as shown on your email application, depending on page 15. 6. Do one... connected directly to restore faded color in Home, Office, or Professional Mode, you see its icon in the front right corner, as the Mode setting in the upper right corner. (If you want to your computer with Mac OS X 10.6/10.7" on your application.
...page 6. 2. Do one of the following to a wireless network, press u or d until you don't move the original. 3. Note: For Mac OS X 10.6/10.7, see your EPSON product. If you are scanning from any TWAINcompliant application. Select Full Auto Mode as shown on your email application, depending on page 15. 6. Do one... connected directly to restore faded color in Home, Office, or Professional Mode, you see its icon in the front right corner, as the Mode setting in the upper right corner. (If you want to your computer with Mac OS X 10.6/10.7" on your application.

Quick Guide
Page 15
...correction features for enhancing scanned images, and provides an interface for information about all the available settings. To download EPSON Scan, visit Epson's driver download site epson.com/support (U.S.) or epson.ca/support (Canada). Full Auto Mode Click the Customize button, click Dust Removal and/or... original documents and photos and save settings, click Show Details. 3. Automatically orients your EPSON product from images with Mac OS X 10.6/10.7 15 Scanning with Mac OS X 10.6/10.7 You can also click Help on the EPSON Scan screen for TWAIN-compliant OCR ...
...correction features for enhancing scanned images, and provides an interface for information about all the available settings. To download EPSON Scan, visit Epson's driver download site epson.com/support (U.S.) or epson.ca/support (Canada). Full Auto Mode Click the Customize button, click Dust Removal and/or... original documents and photos and save settings, click Show Details. 3. Automatically orients your EPSON product from images with Mac OS X 10.6/10.7 15 Scanning with Mac OS X 10.6/10.7 You can also click Help on the EPSON Scan screen for TWAIN-compliant OCR ...
Quick Guide
Page 18
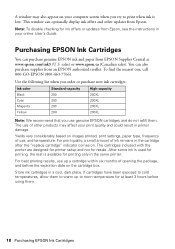
... them to warm up a cartridge within six months of opening the package, and before the expiration date on images printed, print settings, paper type, frequency of other updates from Epson, see the instructions in your print quality and could result in the cartridge after the "replace cartridge" indicator comes on your computer...
... them to warm up a cartridge within six months of opening the package, and before the expiration date on images printed, print settings, paper type, frequency of other updates from Epson, see the instructions in your print quality and could result in the cartridge after the "replace cartridge" indicator comes on your computer...
Quick Guide
Page 21
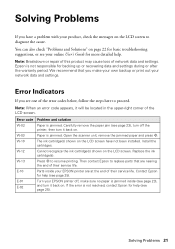
... jam (see page 23), turn it back on the LCD screen to diagnose the cause. W-13 Press x to resume printing. Contact Epson for backing up or recovering data and settings during or after the warranty period. Note: Breakdown or repair of this product may cause loss of their service life. Error Indicators... an error code appears, it back on page 22 for help (see page 25). If the error is jammed inside your EPSON printer are nearing the end of network data and settings. We recommend that are at the end of their service life. Open the scanner unit, remove the jammed paper and...
... jam (see page 23), turn it back on the LCD screen to diagnose the cause. W-13 Press x to resume printing. Contact Epson for backing up or recovering data and settings during or after the warranty period. Note: Breakdown or repair of this product may cause loss of their service life. Error Indicators... an error code appears, it back on page 22 for help (see page 25). If the error is jammed inside your EPSON printer are nearing the end of network data and settings. We recommend that are at the end of their service life. Open the scanner unit, remove the jammed paper and...
Quick Guide
Page 22
... computer after a few seconds. If it after installing the product software. Make sure EPSON Event Manager is poor, try restarting EPSON Scan. Try turning off the firewall. ■ If you with this setting). ■ Remove and reinsert the CD to reinstall your product software. ■ ...WEP key or WPA passphrase correctly. ■ When using your router or access point. Check the Timeout Setting in EPSON Scan Settings. ■ Make sure EPSON Event Manager is not set up to confirm that may occur. Contact your firewall manufacturer for instructions on , and then try moving ...
... computer after a few seconds. If it after installing the product software. Make sure EPSON Event Manager is poor, try restarting EPSON Scan. Try turning off the firewall. ■ If you with this setting). ■ Remove and reinsert the CD to reinstall your product software. ■ ...WEP key or WPA passphrase correctly. ■ When using your router or access point. Check the Timeout Setting in EPSON Scan Settings. ■ Make sure EPSON Event Manager is not set up to confirm that may occur. Contact your firewall manufacturer for instructions on , and then try moving ...
Quick Guide
Page 23
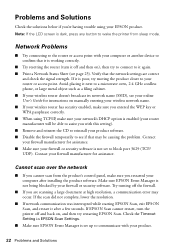
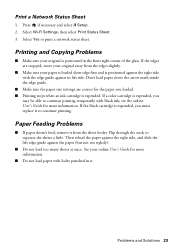
... the right side, and slide the left side. Don't load paper above the arrow mark inside the edge guide. ■ Make sure the paper size settings are cropped, move your original is expended, you may be able to continue printing. Select Yes to separate the sheets a little. see the online User... is positioned against the paper (but not too tightly). ■ Do not load too many sheets at once. Problems and Solutions 23 Select Wi-Fi Settings, then select Print Status Sheet. 3. Print a Network Status Sheet 1.
... the right side, and slide the left side. Don't load paper above the arrow mark inside the edge guide. ■ Make sure the paper size settings are cropped, move your original is expended, you may be able to continue printing. Select Yes to separate the sheets a little. see the online User... is positioned against the paper (but not too tightly). ■ Do not load too many sheets at once. Problems and Solutions 23 Select Wi-Fi Settings, then select Print Status Sheet. 3. Print a Network Status Sheet 1.
Quick Guide
Page 24
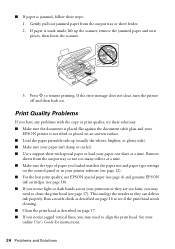
... head as described on the control panel or in your printer software (see page 12). ■ For the best print quality, use EPSON special paper (see page 4) and genuine EPSON ink cartridges (see page 17). Remove sheets from the output tray or sheet feeder. 2. Press x to align the print head. &#...; Make sure the type of paper you loaded matches the paper size and paper type settings on page 17. ■ If you notice jagged vertical lines, you notice light or dark bands across your EPSON printer is placed flat against the document table glass and your printouts or they can deliver...
... head as described on the control panel or in your printer software (see page 12). ■ For the best print quality, use EPSON special paper (see page 4) and genuine EPSON ink cartridges (see page 17). Remove sheets from the output tray or sheet feeder. 2. Press x to align the print head. &#...; Make sure the type of paper you loaded matches the paper size and paper type settings on page 17. ■ If you notice jagged vertical lines, you notice light or dark bands across your EPSON printer is placed flat against the document table glass and your printouts or they can deliver...

Start Here
Page 2
... out the output tray, then raise the paper stopper. 4 Slide the edge guide to the left edge guide, with the printer are designed for printer set up the extension and tilt it short edge first. 2 Raise the paper support, if necessary. After some ink is used for priming, the rest is...
... out the output tray, then raise the paper stopper. 4 Slide the edge guide to the left edge guide, with the printer are designed for printer set up the extension and tilt it short edge first. 2 Raise the paper support, if necessary. After some ink is used for priming, the rest is...

Start Here
Page 3
.... See "EPSON technical support." Press to move to the next character, and to scroll through characters. Press any screen savers and virus protection software, before beginning this information, contact the person who set up your printer's wireless network connection, you can view how-to ...wake your connection. Caution: Be sure to close your other programs, including any button to -videos at epson.com/support (U.S.) or epson.ca/support (Canada). You can download...
.... See "EPSON technical support." Press to move to the next character, and to scroll through characters. Press any screen savers and virus protection software, before beginning this information, contact the person who set up your printer's wireless network connection, you can view how-to ...wake your connection. Caution: Be sure to close your other programs, including any button to -videos at epson.com/support (U.S.) or epson.ca/support (Canada). You can download...
User Guide
Page 3
... Power Off Timer ...20 Changing the Power Off Timer Setting From the Control Panel 20 Changing the Power Off Timer Setting - Windows 21 Changing the Power Off Timer Setting - Contents XP-300 User's Guide...11 Product Basics ...12 Setting Up the Control Panel ...12 Control Panel Buttons and ...Loading Paper for Documents ...26 Loading Paper for Photos ...29 Loading Envelopes ...32 Paper Loading Capacity ...35 Available EPSON Papers...35 Borderless Paper Type Compatibility 37 Paper or Media Type Settings ...38 Placing Originals on the Product ...39 Placing Originals on the Scanner Glass 39 3
... Power Off Timer ...20 Changing the Power Off Timer Setting From the Control Panel 20 Changing the Power Off Timer Setting - Windows 21 Changing the Power Off Timer Setting - Contents XP-300 User's Guide...11 Product Basics ...12 Setting Up the Control Panel ...12 Control Panel Buttons and ...Loading Paper for Documents ...26 Loading Paper for Photos ...29 Loading Envelopes ...32 Paper Loading Capacity ...35 Available EPSON Papers...35 Borderless Paper Type Compatibility 37 Paper or Media Type Settings ...38 Placing Originals on the Product ...39 Placing Originals on the Scanner Glass 39 3

User Guide
Page 4
... OS X ...67 Color Matching and Color Options - Mac OS X 69 Printing Preferences - Mac OS X 71 4 Windows 48 Selecting Advanced Print Settings - Windows 52 Color Management Options - Windows 52 Selecting Print Layout Options - Windows 55 Checking Print Status - Mac OS X 66 Managing Color -... Copying ...41 Copying Documents or Photos...41 Selecting Print Settings for Copies 42 Paper Type Settings - Windows 57 Changing the Language of the Printer Software Screens 58 Changing Automatic Update Options 60 Printing with Windows ...
... OS X ...67 Color Matching and Color Options - Mac OS X 69 Printing Preferences - Mac OS X 71 4 Windows 48 Selecting Advanced Print Settings - Windows 52 Color Management Options - Windows 52 Selecting Print Layout Options - Windows 55 Checking Print Status - Mac OS X 66 Managing Color -... Copying ...41 Copying Documents or Photos...41 Selecting Print Settings for Copies 42 Paper Type Settings - Windows 57 Changing the Language of the Printer Software Screens 58 Changing Automatic Update Options 60 Printing with Windows ...

User Guide
Page 5
... Scanning ...72 Starting a Scan...72 Starting a Scan Using the Product Control Panel 72 Changing Default Scan Button Settings 74 Starting a Scan Using the Epson Scan Icon 74 Starting a Scan from a Scanning Program 76 Selecting Epson Scan Settings ...78 Scan Modes...78 Selecting the Scan Mode...78 Scanning in Home Mode ...82 Selecting a Scan Area...
... Scanning ...72 Starting a Scan...72 Starting a Scan Using the Product Control Panel 72 Changing Default Scan Button Settings 74 Starting a Scan Using the Epson Scan Icon 74 Starting a Scan from a Scanning Program 76 Selecting Epson Scan Settings ...78 Scan Modes...78 Selecting the Scan Mode...78 Scanning in Home Mode ...82 Selecting a Scan Area...

User Guide
Page 6
Mac OS X 139 Conserving Low Black Ink with Mac OS X 130 Purchase Epson Ink Cartridges...132 Ink Cartridge Part Numbers ...132 Removing and Installing Ink Cartridges 133 Replacing Ink Cartridges Using a Computer Utility 137 Printing ...Specifications 119 Removing a Memory Card...119 Printing from a Memory Card ...120 Viewing and Printing Photos...120 Viewing and Printing Individual Photos 120 Selecting Print Settings for Photo Transfers From Your Computer 123 Transferring Photos from a Memory Card to Your Computer 124 Replacing Ink Cartridges ...125 Check Cartridge Status ...125...
Mac OS X 139 Conserving Low Black Ink with Mac OS X 130 Purchase Epson Ink Cartridges...132 Ink Cartridge Part Numbers ...132 Removing and Installing Ink Cartridges 133 Replacing Ink Cartridges Using a Computer Utility 137 Printing ...Specifications 119 Removing a Memory Card...119 Printing from a Memory Card ...120 Viewing and Printing Photos...120 Viewing and Printing Individual Photos 120 Selecting Print Settings for Photo Transfers From Your Computer 123 Transferring Photos from a Memory Card to Your Computer 124 Replacing Ink Cartridges ...125 Check Cartridge Status ...125...


