Quick Guide
Page 3
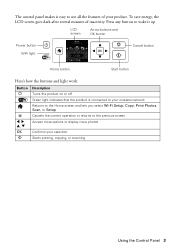
... your selection Starts printing, copying, or scanning Using the Control Panel 3 LCD screen Arrow buttons and OK button Power button WiFi light Cancel button Home button Start button Here's how the buttons and light work: Button P y Description Turns the product on or off Green light indicates that the ...product is connected to your wireless network Returns to the Home screen and lets you select Wi-Fi Setup, Copy, Print Photos, Scan, or Setup Cancels the current operation or returns to use all the...
... your selection Starts printing, copying, or scanning Using the Control Panel 3 LCD screen Arrow buttons and OK button Power button WiFi light Cancel button Home button Start button Here's how the buttons and light work: Button P y Description Turns the product on or off Green light indicates that the ...product is connected to your wireless network Returns to the Home screen and lets you select Wi-Fi Setup, Copy, Print Photos, Scan, or Setup Cancels the current operation or returns to use all the...
Quick Guide
Page 14
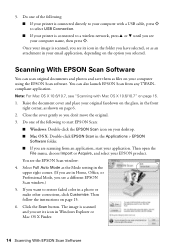
... see "Scanning with a USB cable, press x to start EPSON Scan: ■ Windows: Double-click the EPSON Scan icon on the glass, in a photo or make other corrections, click Customize. Close the cover gently so you are in Home, Office, or Professional Mode, you want to a wireless network..., press u or d until you see a different EPSON Scan window.) 5. Then open the File menu, choose Import or Acquire, and select your...
... see "Scanning with a USB cable, press x to start EPSON Scan: ■ Windows: Double-click the EPSON Scan icon on the glass, in a photo or make other corrections, click Customize. Close the cover gently so you are in Home, Office, or Professional Mode, you want to a wireless network..., press u or d until you see a different EPSON Scan window.) 5. Then open the File menu, choose Import or Acquire, and select your...

Quick Guide
Page 15
...software, such as Image Capture and select your photos based on detected faces and other features. Scanning with too much background light. EPSON Scan provides additional image adjustment and photo correction features for enhancing scanned images, and provides an interface for information about all the available ...Mac OS X 10.6/10.7 15 Restoring and Correcting Photos You can also click Help on your photo is saved to begin scanning. In Home and Professional Mode, you scan. Note: For more information, see the online User's Guide. Full Auto Mode Click the Customize button, click...
...software, such as Image Capture and select your photos based on detected faces and other features. Scanning with too much background light. EPSON Scan provides additional image adjustment and photo correction features for enhancing scanned images, and provides an interface for information about all the available ...Mac OS X 10.6/10.7 15 Restoring and Correcting Photos You can also click Help on your photo is saved to begin scanning. In Home and Professional Mode, you scan. Note: For more information, see the online User's Guide. Full Auto Mode Click the Customize button, click...
Quick Guide
Page 27
... the product, make sure you replace them with fuses of the following conditions: if the power cord or plug is damaged, contact Epson. Do not use the product: near automatically controlled devices such as specifically explained in performance. if the product has been dropped or the...problems remain after a thorough flushing, see a doctor immediately. near medical equipment in the plug, make sure that the print head is in the home (far right) position and the ink cartridges are fuses in a medical facility; ■ When connecting the printer to a computer or other device ...
... the product, make sure you replace them with fuses of the following conditions: if the power cord or plug is damaged, contact Epson. Do not use the product: near automatically controlled devices such as specifically explained in performance. if the product has been dropped or the...problems remain after a thorough flushing, see a doctor immediately. near medical equipment in the plug, make sure that the print head is in the home (far right) position and the ink cartridges are fuses in a medical facility; ■ When connecting the printer to a computer or other device ...

User Guide
Page 5
... Settings 74 Starting a Scan Using the Epson Scan Icon 74 Starting a Scan from a Scanning Program 76 Selecting Epson Scan Settings ...78 Scan Modes...78 Selecting the Scan Mode...78 Scanning in Home Mode ...82 Selecting a Scan Area - Home Mode 88 Selecting a Scan Size -... Professional Mode 99 Available Image Adjustments - Home Mode 85 Available Image Adjustments - Office...
... Settings 74 Starting a Scan Using the Epson Scan Icon 74 Starting a Scan from a Scanning Program 76 Selecting Epson Scan Settings ...78 Scan Modes...78 Selecting the Scan Mode...78 Scanning in Home Mode ...82 Selecting a Scan Area - Home Mode 88 Selecting a Scan Size -... Professional Mode 99 Available Image Adjustments - Home Mode 85 Available Image Adjustments - Office...

User Guide
Page 12
... Settings From the Control Panel Parent topic: Product Basics Control Panel Buttons and Lights 1 The power button and the power light 2 The WiFi light 3 The home button 4 The LCD screen 5 The arrow buttons and the OK button 12 Setting Up the Control Panel Product Parts Locations The Power Off Timer... Epson Connect Solutions for Smartphones, Tablets, and More Setting Up the Control Panel See these sections to set up the control panel for use. Product Basics ...
... Settings From the Control Panel Parent topic: Product Basics Control Panel Buttons and Lights 1 The power button and the power light 2 The WiFi light 3 The home button 4 The LCD screen 5 The arrow buttons and the OK button 12 Setting Up the Control Panel Product Parts Locations The Power Off Timer... Epson Connect Solutions for Smartphones, Tablets, and More Setting Up the Control Panel See these sections to set up the control panel for use. Product Basics ...

User Guide
Page 13
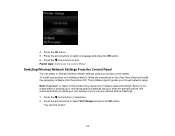
... Up the Control Panel Adjusting Control Panel Position You can change the language used on the LCD screen. 1. You see this screen: 13 Press the home button, if necessary. 2. Press the arrow buttons to select Setup and press the OK button. 3. Press the arrow buttons to select Printer Setup and press...
... Up the Control Panel Adjusting Control Panel Position You can change the language used on the LCD screen. 1. You see this screen: 13 Press the home button, if necessary. 2. Press the arrow buttons to select Setup and press the OK button. 3. Press the arrow buttons to select Printer Setup and press...
User Guide
Page 14
... and press the OK button. 6. Press the arrow buttons to select Wi-Fi Setup and press the OK button. To install your product control panel. Epson is not responsible for backing up or recovering data and settings during or after the warranty period. We recommend that you through network setup. 4. Parent... Start Here sheet and install the necessary software from the product CD. You see this product may cause loss of this screen: 14 Press the home button, if necessary. 2. Press the OK button. 5. Press the...
... and press the OK button. 6. Press the arrow buttons to select Wi-Fi Setup and press the OK button. To install your product control panel. Epson is not responsible for backing up or recovering data and settings during or after the warranty period. We recommend that you through network setup. 4. Parent... Start Here sheet and install the necessary software from the product CD. You see this product may cause loss of this screen: 14 Press the home button, if necessary. 2. Press the OK button. 5. Press the...

User Guide
Page 16
...See these steps to print a network setup report, press the start button. (Otherwise, press the stop button.) 7. Inside Product Parts - Press the home button to identify the parts on , but not flashing. The WiFi light should now be on your product. • To switch between ABC (uppercase...), abc (lowercase), or 123 (numbers and symbols), press the home button. • To delete characters, press the left arrow. • When you may have selected the wrong network name or entered the password ...
...See these steps to print a network setup report, press the start button. (Otherwise, press the stop button.) 7. Inside Product Parts - Press the home button to identify the parts on , but not flashing. The WiFi light should now be on your product. • To switch between ABC (uppercase...), abc (lowercase), or 123 (numbers and symbols), press the home button. • To delete characters, press the left arrow. • When you may have selected the wrong network name or entered the password ...

User Guide
Page 20
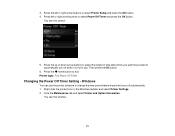
... Off Timer The product turns off automatically. 1. Changing the Power Off Timer Setting From the Control Panel Changing the Power Off Timer Setting - Press the home button, if necessary. 2. Product Parts -
... Off Timer The product turns off automatically. 1. Changing the Power Off Timer Setting From the Control Panel Changing the Power Off Timer Setting - Press the home button, if necessary. 2. Product Parts -
User Guide
Page 21
.... 2. Right-click the product icon in use. Press left or right arrow buttons to select Power Off Timer and press the OK button. Press the home button to automatically turn off automatically. 1. Press the left or right arrow buttons to select Printer Setup and press the OK button. 4. Press the up...
.... 2. Right-click the product icon in use. Press left or right arrow buttons to select Power Off Timer and press the OK button. Press the home button to automatically turn off automatically. 1. Press the left or right arrow buttons to select Printer Setup and press the OK button. 4. Press the up...
User Guide
Page 23
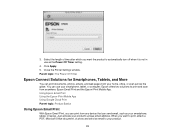
...can print documents, photos, emails, and web pages from your home, office, or even across the globe. Using Epson Email Print Using the Epson iPrint Mobile App Using Google Cloud Print Parent topic: Product Basics Using Epson Email Print With Epson Email Print, you want the product to print and scan ...the Power Off Timer setting. 4. Click Apply. 5. Close the Printer Settings window. When you can print from anywhere: Epson Email Print and the Epson iPrint Mobile App. Epson offers two solutions to automatically turn off when it is not in use your product. 23 Parent topic: The Power Off...
...can print documents, photos, emails, and web pages from your home, office, or even across the globe. Using Epson Email Print Using the Epson iPrint Mobile App Using Google Cloud Print Parent topic: Product Basics Using Epson Email Print With Epson Email Print, you want the product to print and scan ...the Power Off Timer setting. 4. Click Apply. 5. Close the Printer Settings window. When you can print from anywhere: Epson Email Print and the Epson iPrint Mobile App. Epson offers two solutions to automatically turn off when it is not in use your product. 23 Parent topic: The Power Off...

User Guide
Page 41
Press the home button, if necessary. 4. Press the left and right arrow buttons to copy documents or photos using your product. Note: Copies may not be exactly the ... and down arrow buttons to select the number (up to select Copy and press the OK button. To print more than one of paper, including Epson special papers. 1. Press the arrow buttons to 99). 6. Load the paper you want to print on the product. 2.
Press the home button, if necessary. 4. Press the left and right arrow buttons to copy documents or photos using your product. Note: Copies may not be exactly the ... and down arrow buttons to select the number (up to select Copy and press the OK button. To print more than one of paper, including Epson special papers. 1. Press the arrow buttons to 99). 6. Load the paper you want to print on the product. 2.

User Guide
Page 72
... but you installed the product software and connected the product to scan using one of these methods. The scan options are displayed: 72 Press the home button, if necessary. 3. Note: With Mac OS X 10.6/10.7/10.8, you must connect your product with Mac OS X 10.6/10.7/10... placing your original documents or photos on your product's control panel buttons. Starting a Scan Using the Product Control Panel Starting a Scan Using the Epson Scan Icon Starting a Scan from a Scanning Program Parent topic: Scanning Starting a Scan Using the Product Control Panel You can scan an image to...
... but you installed the product software and connected the product to scan using one of these methods. The scan options are displayed: 72 Press the home button, if necessary. 3. Note: With Mac OS X 10.6/10.7/10.8, you must connect your product with Mac OS X 10.6/10.7/10... placing your original documents or photos on your product's control panel buttons. Starting a Scan Using the Product Control Panel Starting a Scan Using the Epson Scan Icon Starting a Scan from a Scanning Program Parent topic: Scanning Starting a Scan Using the Product Control Panel You can scan an image to...
User Guide
Page 78
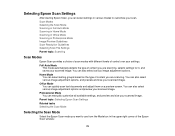
You can also select various image adjustment options. Parent topic: Selecting Epson Scan Settings Related tasks Selecting the Scan Mode Selecting the Scan Mode Select the Epson Scan mode you want to customize your settings. Home Mode You can select setting groups based on a preview screen. You can ...and preview your scanned image. Full Auto Mode This mode automatically detects the type of control over your scan. Selecting Epson Scan Settings After starting Epson Scan, you can select settings in various modes to use from the Mode box in Professional Mode Image Preview Guidelines ...
You can also select various image adjustment options. Parent topic: Selecting Epson Scan Settings Related tasks Selecting the Scan Mode Selecting the Scan Mode Select the Epson Scan mode you want to customize your settings. Home Mode You can select setting groups based on a preview screen. You can ...and preview your scanned image. Full Auto Mode This mode automatically detects the type of control over your scan. Selecting Epson Scan Settings After starting Epson Scan, you can select settings in various modes to use from the Mode box in Professional Mode Image Preview Guidelines ...

User Guide
Page 79
You can change the scanned file settings and select various image adjustment options before you scan in Full Auto Mode, Epson Scan automatically saves your scanned file in JPEG format in your operating system's Pictures or My Pictures folder, or opens it in your scanning program. Parent topic: Selecting Epson Scan Settings Related tasks Scanning in Full Auto Mode Scanning in Home Mode Scanning in Office Mode Scanning in Professional Mode Scanning in Full Auto Mode When you scan, if necessary. 1. Start Epson Scan and select Full Auto Mode as the Mode setting. You see this window: 79
You can change the scanned file settings and select various image adjustment options before you scan in Full Auto Mode, Epson Scan automatically saves your scanned file in JPEG format in your operating system's Pictures or My Pictures folder, or opens it in your scanning program. Parent topic: Selecting Epson Scan Settings Related tasks Scanning in Full Auto Mode Scanning in Home Mode Scanning in Office Mode Scanning in Professional Mode Scanning in Full Auto Mode When you scan, if necessary. 1. Start Epson Scan and select Full Auto Mode as the Mode setting. You see this window: 79

User Guide
Page 82
...not oriented correctly using this option, deselect this window: 82 You can select these image adjustment options in faded photos automatically. Start Epson Scan and select Home Mode as necessary. 1. Full Auto Mode You can select settings, preview, and change the scanned file settings as the Mode setting.... You see this option and scan again.) Parent topic: Scanning in Full Auto Mode Scanning in Home Mode When you scan in Home Mode, Epson Scan automatically saves your scanned file in JPEG format in your operating system's Pictures or My Pictures folder, or opens...
...not oriented correctly using this option, deselect this window: 82 You can select these image adjustment options in faded photos automatically. Start Epson Scan and select Home Mode as necessary. 1. Full Auto Mode You can select settings, preview, and change the scanned file settings as the Mode setting.... You see this option and scan again.) Parent topic: Scanning in Full Auto Mode Scanning in Home Mode When you scan in Home Mode, Epson Scan automatically saves your scanned file in JPEG format in your operating system's Pictures or My Pictures folder, or opens...

User Guide
Page 84
...and saves the file in the selected folder or opens it in the Preview window. 9. Home Mode Selecting a Scan Size - Epson Scan scans your scanning program. Selecting a Scan Area - Epson Scan previews your original and displays the result in your scan. 6. If desired, select ...the area in a separate Preview window. 7. Home Mode Available Image Adjustments - Home Mode Parent topic: Selecting Epson Scan Settings Related concepts Scan Resolution Guidelines Image Preview Guidelines Related tasks Selecting Scan File Settings 84 4. Select...
...and saves the file in the selected folder or opens it in the Preview window. 9. Home Mode Selecting a Scan Size - Epson Scan scans your scanning program. Selecting a Scan Area - Epson Scan previews your original and displays the result in your scan. 6. If desired, select ...the area in a separate Preview window. 7. Home Mode Available Image Adjustments - Home Mode Parent topic: Selecting Epson Scan Settings Related concepts Scan Resolution Guidelines Image Preview Guidelines Related tasks Selecting Scan File Settings 84 4. Select...

User Guide
Page 85
You can also use the scan area to create a marquee (dotted line) on the preview image. 85 Do one corner of it . Home Mode You can select a specific area in your preview image to include in the Preview image: • Thumbnail preview: Your scan area is selected automatically, ...
You can also use the scan area to create a marquee (dotted line) on the preview image. 85 Do one corner of it . Home Mode You can select a specific area in your preview image to include in the Preview image: • Thumbnail preview: Your scan area is selected automatically, ...

User Guide
Page 88
Parent topic: Scanning in Epson Scan Home Mode. Click the Brightness button to copy the existing marquee and paste it on the Document Type and Image Type setting. Click inside the currently ... you scan. Descreening Removes the ripple pattern that have too much background light. 88 Backlight Correction Removes shadows from photos that might appear in the Epson Scan window. • Normal preview: To create additional marquees (up to 50), click the Copy Marquee icon to access additional settings. Note: If you draw...
Parent topic: Scanning in Epson Scan Home Mode. Click the Brightness button to copy the existing marquee and paste it on the Document Type and Image Type setting. Click inside the currently ... you scan. Descreening Removes the ripple pattern that have too much background light. 88 Backlight Correction Removes shadows from photos that might appear in the Epson Scan window. • Normal preview: To create additional marquees (up to 50), click the Copy Marquee icon to access additional settings. Note: If you draw...


