Quick Guide
Page 16
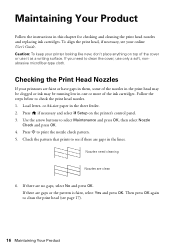
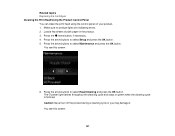
... it as a writing surface. Check the pattern that prints to clean the print head (see if there are gaps in this chapter for checking and cleaning the print head nozzles and replacing ink cartridges. If you need cleaning ...Nozzles are gaps or the pattern is faint, select Yes and press OK. Checking the Print Head Nozzles If your printouts are no gaps, select No and press OK. Load letter- or... A4-size paper in one or more of the nozzles in the print head may be clogged or ink may be running low in the sheet feeder. 2. If there are clean...
... it as a writing surface. Check the pattern that prints to clean the print head (see if there are gaps in this chapter for checking and cleaning the print head nozzles and replacing ink cartridges. If you need cleaning ...Nozzles are gaps or the pattern is faint, select Yes and press OK. Checking the Print Head Nozzles If your printouts are no gaps, select No and press OK. Load letter- or... A4-size paper in one or more of the nozzles in the print head may be clogged or ink may be running low in the sheet feeder. 2. If there are clean...

Quick Guide
Page 17
...You must replace it to be able to maintain good print quality. Cleaning the Print Head If print quality has declined and the nozzle check pattern indicates clogged nozzles, you see a message on your EPSON product often, it is a good idea to print a few pages at least six hours to clean it ...when a cartridge is low. Cleaning the Print Head 17 When it's finished, you may damage it only if necessary. ...
...You must replace it to be able to maintain good print quality. Cleaning the Print Head If print quality has declined and the nozzle check pattern indicates clogged nozzles, you see a message on your EPSON product often, it is a good idea to print a few pages at least six hours to clean it ...when a cartridge is low. Cleaning the Print Head 17 When it's finished, you may damage it only if necessary. ...
Quick Guide
Page 19
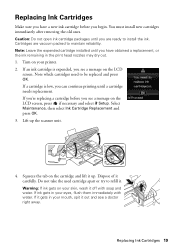
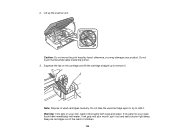
...cartridge apart or try to be replaced and press OK. Replacing Ink Cartridges Make sure you have obtained a replacement, or the ink remaining in the print head nozzles may dry out. 1. Dispose of it out and see a message on the LCD screen, press if necessary and select F Setup. If ...water. Turn on the LCD screen. If an ink cartridge is low, you begin. If you're replacing a cartridge before you can continue printing until you are vacuum packed to install the ink. Select Maintenance, then select Ink Cartridge Replacement and press OK. 3. Replacing Ink Cartridges 19 You...
...cartridge apart or try to be replaced and press OK. Replacing Ink Cartridges Make sure you have obtained a replacement, or the ink remaining in the print head nozzles may dry out. 1. Dispose of it out and see a message on the LCD screen, press if necessary and select F Setup. If ...water. Turn on the LCD screen. If an ink cartridge is low, you begin. If you're replacing a cartridge before you can continue printing until you are vacuum packed to install the ink. Select Maintenance, then select Ink Cartridge Replacement and press OK. 3. Replacing Ink Cartridges 19 You...
Quick Guide
Page 24
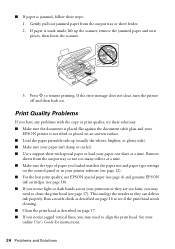
...software (see page 12). ■ For the best print quality, use EPSON special paper (see page 4) and genuine EPSON ink cartridges (see page 17). Run a nozzle check as described on page 16 to see if the print head needs cleaning. ■ Clean the print head as described on page 17. ■ If you notice...can deliver ink properly. Gently pull out jammed paper from the output tray so not too many collect at a time. Press x to align the print head. Remove sheets from the output tray or sheet feeder. 2. If paper is jammed, follow these solutions: ■ Make sure the document is placed...
...software (see page 12). ■ For the best print quality, use EPSON special paper (see page 4) and genuine EPSON ink cartridges (see page 17). Run a nozzle check as described on page 16 to see if the print head needs cleaning. ■ Clean the print head as described on page 17. ■ If you notice...can deliver ink properly. Gently pull out jammed paper from the output tray so not too many collect at a time. Press x to align the print head. Remove sheets from the output tray or sheet feeder. 2. If paper is jammed, follow these solutions: ■ Make sure the document is placed...
Quick Guide
Page 27
...cover. if liquid has entered the product; Adjust only those controls that contain flammable gases inside the product. ■ Do not move the print head by hand; if the product does not operate normally or exhibits a distinct change in the home (far right) position and the ink ...LCD screen. Do not use the product: near automatically controlled devices such as specifically explained in the plug, make sure that the print head is damaged, contact Epson. If the liquid crystal solution gets into your hands, wash them with wet hands. ■ Do not use aerosol products ...
...cover. if liquid has entered the product; Adjust only those controls that contain flammable gases inside the product. ■ Do not move the print head by hand; if the product does not operate normally or exhibits a distinct change in the home (far right) position and the ink ...LCD screen. Do not use the product: near automatically controlled devices such as specifically explained in the plug, make sure that the print head is damaged, contact Epson. If the liquid crystal solution gets into your hands, wash them with wet hands. ■ Do not use aerosol products ...

Quick Guide
Page 28
... ink is expended and black ink still remains, you can continue printing temporarily with black ink only. ■ To maintain optimum print head performance, some ink may still be ink remaining around the ink supply port. This could damage the print head. ■ Store ink cartridges in the printer. If ink gets... on its package. ■ Do not dismantle an ink cartridge. this can dry out the print head and may prevent the product from the printer before it in your mouth, spit it . ■ Store ink cartridges with water. Even if ...
... ink is expended and black ink still remains, you can continue printing temporarily with black ink only. ■ To maintain optimum print head performance, some ink may still be ink remaining around the ink supply port. This could damage the print head. ■ Store ink cartridges in the printer. If ink gets... on its package. ■ Do not dismantle an ink cartridge. this can dry out the print head and may prevent the product from the printer before it in your mouth, spit it . ■ Store ink cartridges with water. Even if ...

User Guide
Page 6
...Ink with Mac OS X 130 Purchase Epson Ink Cartridges...132 Ink Cartridge Part Numbers ...132 Removing and Installing Ink Cartridges 133 Replacing Ink Cartridges Using a Computer Utility 137 Printing With Black Ink and Expended Color Cartridges 138 Printing With Expended Color Cartridges - Using ... LCD Screen 125 Checking Cartridge Status with Windows 127 Checking Cartridge Status with Windows 140 Adjusting Print Quality...142 Print Head Maintenance...142 Print Head Nozzle Check...142 Checking the Nozzles Using the Product Control Panel 142 Checking the Nozzles Using a Computer ...
...Ink with Mac OS X 130 Purchase Epson Ink Cartridges...132 Ink Cartridge Part Numbers ...132 Removing and Installing Ink Cartridges 133 Replacing Ink Cartridges Using a Computer Utility 137 Printing With Black Ink and Expended Color Cartridges 138 Printing With Expended Color Cartridges - Using ... LCD Screen 125 Checking Cartridge Status with Windows 127 Checking Cartridge Status with Windows 140 Adjusting Print Quality...142 Print Head Maintenance...142 Print Head Nozzle Check...142 Checking the Nozzles Using the Product Control Panel 142 Checking the Nozzles Using a Computer ...
User Guide
Page 7
Cleaning the Print Head Using a Computer Utility 148 Print Head Alignment ...150 Aligning the Print Head Using the Product Control Panel 151 Aligning the Print Head Using a Computer Utility 153 Cleaning the Paper Path ...154 Cleaning and Transporting Your Product 156 Cleaning Your Product ...156 ...Software Cannot Find Product on a Network 167 Product Does Not Appear in Mac OS X Printer Window 167 Cannot Print Over a Network...167 Cannot Scan Over a Network ...168 Printing a Network Status Sheet 169 Solving Copying Problems ...170 Product Makes Noise, But Nothing Copies 170 Product Makes ...
Cleaning the Print Head Using a Computer Utility 148 Print Head Alignment ...150 Aligning the Print Head Using the Product Control Panel 151 Aligning the Print Head Using a Computer Utility 153 Cleaning the Paper Path ...154 Cleaning and Transporting Your Product 156 Cleaning Your Product ...156 ...Software Cannot Find Product on a Network 167 Product Does Not Appear in Mac OS X Printer Window 167 Cannot Print Over a Network...167 Cannot Scan Over a Network ...168 Printing a Network Status Sheet 169 Solving Copying Problems ...170 Product Makes Noise, But Nothing Copies 170 Product Makes ...
User Guide
Page 125
... to return your printouts do not look their best, even after cleaning and aligning the print head. Note: Please dispose of your ink cartridges using your used ink cartridges to Epson for proper disposal, please go to replace a cartridge that is expended, you know when...cartridge is more information. Press the arrow buttons to replace it. Check Cartridge Status Purchase Epson Ink Cartridges Removing and Installing Ink Cartridges Replacing Ink Cartridges Using a Computer Utility Printing With Black Ink and Expended Color Cartridges Conserving Low Black Ink with local requirements.
... to return your printouts do not look their best, even after cleaning and aligning the print head. Note: Please dispose of your ink cartridges using your used ink cartridges to Epson for proper disposal, please go to replace a cartridge that is expended, you know when...cartridge is more information. Press the arrow buttons to replace it. Check Cartridge Status Purchase Epson Ink Cartridges Removing and Installing Ink Cartridges Replacing Ink Cartridges Using a Computer Utility Printing With Black Ink and Expended Color Cartridges Conserving Low Black Ink with local requirements.
User Guide
Page 133
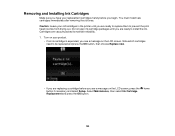
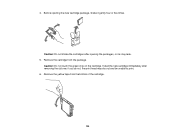
.... • If you are replacing a cartridge before you begin. Do not open ink cartridge packages until you are ready to replace them to prevent the print head nozzles from drying out. Select Maintenance, then select Ink Cartridge Replacement and press the OK button. Removing and Installing Ink Cartridges Make sure you have...
.... • If you are replacing a cartridge before you begin. Do not open ink cartridge packages until you are ready to replace them to prevent the print head nozzles from drying out. Select Maintenance, then select Ink Cartridge Replacement and press the OK button. Removing and Installing Ink Cartridges Make sure you have...
User Guide
Page 134
... apart or try to remove it . If ink gets into your skin, wash it out and see a doctor right away. Caution: Do not move the print head by hand; Squeeze the tab on your mouth, spit it thoroughly with water. Do not touch the flat white cable inside the printer. 3. Do not...
... apart or try to remove it . If ink gets into your skin, wash it out and see a doctor right away. Caution: Do not move the print head by hand; Squeeze the tab on your mouth, spit it thoroughly with water. Do not touch the flat white cable inside the printer. 3. Do not...
User Guide
Page 135
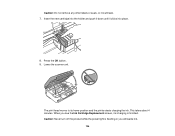
4. Caution: Do not shake the cartridges after removing the old one; Remove the cartridge from the bottom of the cartridge. 135 if you do not, the print head may leak. 5. Caution: Do not touch the green chip on the cartridge. Before opening the packages, or ink may dry out and be unable to print. 6. Install the new cartridge immediately after opening the new cartridge package, shake it gently four or five times. Remove the yellow tape from the package.
4. Caution: Do not shake the cartridges after removing the old one; Remove the cartridge from the bottom of the cartridge. 135 if you do not, the print head may leak. 5. Caution: Do not touch the green chip on the cartridge. Before opening the packages, or ink may dry out and be unable to print. 6. Install the new cartridge immediately after opening the new cartridge package, shake it gently four or five times. Remove the yellow tape from the package.
User Guide
Page 136
Press the OK button. 9. The print head moves to its home position and the printer starts charging the ink. Caution: Never turn off the product while the power light is flashing or you see the Ink Cartridge Replacement screen, ink charging is finished. Lower the scanner unit. This takes about 4 minutes. Insert the new cartridge into the holder and push it down until it clicks into place. 8. Caution: Do not remove any other labels or seals, or ink will waste ink. 136 When you will leak. 7.
Press the OK button. 9. The print head moves to its home position and the printer starts charging the ink. Caution: Never turn off the product while the power light is flashing or you see the Ink Cartridge Replacement screen, ink charging is finished. Lower the scanner unit. This takes about 4 minutes. Insert the new cartridge into the holder and push it down until it clicks into place. 8. Caution: Do not remove any other labels or seals, or ink will waste ink. 136 When you will leak. 7.

User Guide
Page 142
...2. Cleaning uses ink, so clean the nozzles only if print quality declines. Adjusting Print Quality If your print quality declines, you may need to clean the print head nozzles. Note: You cannot clean the print head if an ink cartridge is low. If running these utilities ...able to check for clogged nozzles before you clean them unnecessarily. Print Head Nozzle Check Print Head Cleaning Parent topic: Adjusting Print Quality Related topics Replacing Ink Cartridges Print Head Nozzle Check You can check the print head nozzles using the control panel on your product. 1. Checking the...
...2. Cleaning uses ink, so clean the nozzles only if print quality declines. Adjusting Print Quality If your print quality declines, you may need to clean the print head nozzles. Note: You cannot clean the print head if an ink cartridge is low. If running these utilities ...able to check for clogged nozzles before you clean them unnecessarily. Print Head Nozzle Check Print Head Cleaning Parent topic: Adjusting Print Quality Related topics Replacing Ink Cartridges Print Head Nozzle Check You can check the print head nozzles using the control panel on your product. 1. Checking the...
User Guide
Page 144
... Yes and press the OK button to continue. 9. Parent topic: Print Head Nozzle Check Related concepts Print Head Cleaning Checking the Nozzles Using a Computer Utility You can check the print head nozzles using a utility on the screen to clean the print head. 10. Do one of the ink cartridges may be old or ...and wait at least 6 hours. If quality still does not improve, one of plain paper in the lines. Check the printed pattern to see any improvement after cleaning the print head up to exit. • If there are gaps in the product. 144 Load a few sheets of the following: ...
... Yes and press the OK button to continue. 9. Parent topic: Print Head Nozzle Check Related concepts Print Head Cleaning Checking the Nozzles Using a Computer Utility You can check the print head nozzles using a utility on the screen to clean the print head. 10. Do one of the ink cartridges may be old or ...and wait at least 6 hours. If quality still does not improve, one of plain paper in the lines. Check the printed pattern to see any improvement after cleaning the print head up to exit. • If there are gaps in the product. 144 Load a few sheets of the following: ...

User Guide
Page 145
.... 2. Select Print & Fax, select your product, and select Options & Supplies. Click Print. 5. Select Print & Fax or Print & Scan, select your product, and select Open Print Queue. Select Utility. 3. Do one of the following: • Windows: Right-click the product icon in the lines. Check the printed pattern to see a window like this: 4. Select Nozzle Check. Print head is...
.... 2. Select Print & Fax, select your product, and select Options & Supplies. Click Print. 5. Select Print & Fax or Print & Scan, select your product, and select Open Print Queue. Select Utility. 3. Do one of the following: • Windows: Right-click the product icon in the lines. Check the printed pattern to see a window like this: 4. Select Nozzle Check. Print head is...

User Guide
Page 146
... when a cartridge is faint, clean the print head. Parent topic: Print Head Nozzle Check Related concepts Print Head Cleaning Print Head Cleaning If print quality has declined and the nozzle check pattern indicates clogged nozzles, you can clean the print head. Cleaning the Print Head Using the Product Control Panel Cleaning the Print Head Using a Computer Utility Parent topic: Print Head Maintenance 146 If there are gaps...
... when a cartridge is faint, clean the print head. Parent topic: Print Head Nozzle Check Related concepts Print Head Cleaning Print Head Cleaning If print quality has declined and the nozzle check pattern indicates clogged nozzles, you can clean the print head. Cleaning the Print Head Using the Product Control Panel Cleaning the Print Head Using a Computer Utility Parent topic: Print Head Maintenance 146 If there are gaps...
User Guide
Page 147
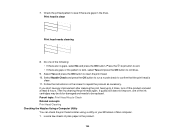
Load a few sheets of plain paper in the product. 3. Press the arrow buttons to select Head Cleaning and press the OK button. Press the arrow buttons to select Setup and press the OK button. 5. You see this screen: 147 Press the ... cycle or you may damage it. You see this screen: 6. Make sure no product lights are indicating errors. 2. Related topics Replacing Ink Cartridges Cleaning the Print Head Using the Product Control Panel You can clean the print head using the control panel on green when the cleaning cycle is finished.
Load a few sheets of plain paper in the product. 3. Press the arrow buttons to select Head Cleaning and press the OK button. Press the arrow buttons to select Setup and press the OK button. 5. You see this screen: 147 Press the ... cycle or you may damage it. You see this screen: 6. Make sure no product lights are indicating errors. 2. Related topics Replacing Ink Cartridges Cleaning the Print Head Using the Product Control Panel You can clean the print head using the control panel on green when the cleaning cycle is finished.

User Guide
Page 148
If you don't see any improvement after cleaning the print head up to confirm that the print head is clean. Then try cleaning the print head again. Do one of the ink cartridges may be old or damaged and needs to be replaced. If ... Utility. 148 Parent topic: Print Head Cleaning Related concepts Print Head Nozzle Check Related topics Replacing Ink Cartridges Cleaning the Print Head Using a Computer Utility You can clean the print head using a utility on your product, and select Options & Supplies. Select Print & Fax, select your product, and select Open Print Queue. 7. Load a few...
If you don't see any improvement after cleaning the print head up to confirm that the print head is clean. Then try cleaning the print head again. Do one of the ink cartridges may be old or damaged and needs to be replaced. If ... Utility. 148 Parent topic: Print Head Cleaning Related concepts Print Head Nozzle Check Related topics Replacing Ink Cartridges Cleaning the Print Head Using a Computer Utility You can clean the print head using a utility on your product, and select Options & Supplies. Select Print & Fax, select your product, and select Open Print Queue. 7. Load a few...

User Guide
Page 149
click Print Nozzle Check Pattern and click Print. 6. Check the printed pattern to see a window like this: 4. You see if there are clean; Click Start to see if the nozzles are gaps in the lines. 3. Select Head Cleaning. Print head is finished. The power light flashes throughout the cleaning cycle and stays on , you may damage it. 5. Caution: Never turn off the product during a cleaning cycle or you can check to begin the cleaning cycle. When the power light stops flashing and remains on when the cleaning cycle is clean 149
click Print Nozzle Check Pattern and click Print. 6. Check the printed pattern to see a window like this: 4. You see if there are clean; Click Start to see if the nozzles are gaps in the lines. 3. Select Head Cleaning. Print head is finished. The power light flashes throughout the cleaning cycle and stays on , you may damage it. 5. Caution: Never turn off the product during a cleaning cycle or you can check to begin the cleaning cycle. When the power light stops flashing and remains on when the cleaning cycle is clean 149


