User Manual
Page 1
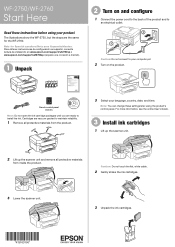
...your language, country, date, and time. Note for the WF-2760. Caution: Do not connect to your computer yet. 2 ...instalación en www.epson.com/support/wf2750sp o www.epson.com/support/wf2760sp (requiere una conexión a Inernet). 1 Unpack 2 Turn on the product. The illustrations show the WF-2750, but the ...scanner unit. 3 Unpack the ink cartridges. *413163100* *413163100* Note: You can change these instructions before using the product's control panel. For more information, see the online User's Guide. 3 Install ink cartridges 1 Lift up the scanner unit. 2 Lift up the scanner...
...your language, country, date, and time. Note for the WF-2760. Caution: Do not connect to your computer yet. 2 ...instalación en www.epson.com/support/wf2750sp o www.epson.com/support/wf2760sp (requiere una conexión a Inernet). 1 Unpack 2 Turn on the product. The illustrations show the WF-2750, but the ...scanner unit. 3 Unpack the ink cartridges. *413163100* *413163100* Note: You can change these instructions before using the product's control panel. For more information, see the online User's Guide. 3 Install ink cartridges 1 Lift up the scanner unit. 2 Lift up the scanner...
User Manual
Page 2
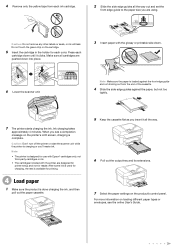
When you are designed for printer setup and not for printing. 4 Load paper 1 Make sure the product is designed for use with Epson® cartridges only, not third-party cartridges or ink. • The cartridges included with the glossy or printable side down until it all the... tray and its extensions. 7 Select the paper settings on the printer's LCD screen, charging is available for resale. Press each cartridge down . 6 Lower the scanner unit. 4 Remove only the yellow tape from the end of the cassette. 4 Slide the side edge guides against the paper, but not too tightly. 7 ...
When you are designed for printer setup and not for printing. 4 Load paper 1 Make sure the product is designed for use with Epson® cartridges only, not third-party cartridges or ink. • The cartridges included with the glossy or printable side down until it all the... tray and its extensions. 7 Select the paper settings on the printer's LCD screen, charging is available for resale. Press each cartridge down . 6 Lower the scanner unit. 4 Remove only the yellow tape from the end of the cassette. 4 Slide the side edge guides against the paper, but not too tightly. 7 ...
User Manual
Page 4
... Selecting Universal Print Settings 74 Universal Print Settings Options 75 Placing Originals on the Product ...76 Placing Originals on the Scanner Glass 76 4 Control Panel 69 Paper Type Settings - Using Epson Print and Scan App with Windows Tablets 36 Printing and Scanning with NFC from Your Android Device 36 Wi-Fi or... for Documents in the Cassette 51 Loading Paper for Photos in the Cassette 57 Loading Envelopes in the Cassette ...62 Paper Loading Capacity ...65 Available Epson Papers ...66 Borderless Paper Type Compatibility 68 Paper or Media Type Settings -
... Selecting Universal Print Settings 74 Universal Print Settings Options 75 Placing Originals on the Product ...76 Placing Originals on the Scanner Glass 76 4 Control Panel 69 Paper Type Settings - Using Epson Print and Scan App with Windows Tablets 36 Printing and Scanning with NFC from Your Android Device 36 Wi-Fi or... for Documents in the Cassette 51 Loading Paper for Photos in the Cassette 57 Loading Envelopes in the Cassette ...62 Paper Loading Capacity ...65 Available Epson Papers ...66 Borderless Paper Type Compatibility 68 Paper or Media Type Settings -

User Manual
Page 76
...Place your original facedown on the product. Placing Originals on the Product Follow the instructions here to place your original documents or photos on the scanner glass with the top facing into the corner. Slide the original to the edges of your product or use its cover as a writing surface ...to this size on top of the indicated corner. 76 Placing Originals on the Scanner Glass Placing Originals in the Automatic Document Feeder Placing Originals on the Scanner Glass You can place originals up to avoid damaging it. Caution: Do not place anything on the...
...Place your original facedown on the product. Placing Originals on the Product Follow the instructions here to place your original documents or photos on the scanner glass with the top facing into the corner. Slide the original to the edges of your product or use its cover as a writing surface ...to this size on top of the indicated corner. 76 Placing Originals on the Scanner Glass Placing Originals in the Automatic Document Feeder Placing Originals on the Scanner Glass You can place originals up to avoid damaging it. Caution: Do not place anything on the...

User Manual
Page 77
... topic: Placing Originals on the Product Related topics Copying Scanning Faxing Placing Originals in the Automatic Document Feeder You can place multiple originals on the scanner glass. Slide the ADF edge guide outward. 77 Caution: Make sure your original in place. Just make sure they are not creased or folded, and...
... topic: Placing Originals on the Product Related topics Copying Scanning Faxing Placing Originals in the Automatic Document Feeder You can place multiple originals on the scanner glass. Slide the ADF edge guide outward. 77 Caution: Make sure your original in place. Just make sure they are not creased or folded, and...

User Manual
Page 80
... one copy, press a number key on the product's control panel, or select copies and use the displayed keypad to enter the number of paper, including Epson special papers. 1. Copying See the information here to print on. 3. Press the home button, if necessary. 4. You see a screen like this: 5. Copying Documents or Photos... documents or photos using your product. Select Copy. Note: Copies may not be exactly the same size as your original document or photo on the scanner glass, or place multi-page documents in the ADF. 2.
... one copy, press a number key on the product's control panel, or select copies and use the displayed keypad to enter the number of paper, including Epson special papers. 1. Copying See the information here to print on. 3. Press the home button, if necessary. 4. You see a screen like this: 5. Copying Documents or Photos... documents or photos using your product. Select Copy. Note: Copies may not be exactly the same size as your original document or photo on the scanner glass, or place multi-page documents in the ADF. 2.
User Manual
Page 115
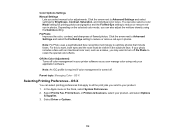
... for Brightness, Contrast, Saturation, and individual color tones. For this to your application software. Parent topic: Managing Color - Select Print & Fax, Print & Scan, or Printers & Scanners, select your printer software so you send to work, both eyes and the nose must be visible in photos. Note: An ICC profile is required...
... for Brightness, Contrast, Saturation, and individual color tones. For this to your application software. Parent topic: Managing Color - Select Print & Fax, Print & Scan, or Printers & Scanners, select your printer software so you send to work, both eyes and the nose must be visible in photos. Note: An ICC profile is required...
User Manual
Page 121
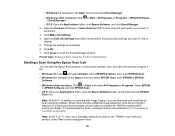
Change the settings as necessary. 6. Open the Scanner (Windows) or Select Scanner (OS X) drop-down list and select the scan button settings you want to use TWAIN to scan using Epson Scan. 121 Epson Scan provides additional image adjustment and photo correction features for enhancing scanned images,.... Click Make Job Settings. 4. Parent topic: Starting a Scan Using the Product Control Panel Starting a Scan Using the Epson Scan Icon You can download and install Epson Scan scanning software. Note: With OS X, in addition to scanning with your product, if necessary. 3. Open the Edit...
Change the settings as necessary. 6. Open the Scanner (Windows) or Select Scanner (OS X) drop-down list and select the scan button settings you want to use TWAIN to scan using Epson Scan. 121 Epson Scan provides additional image adjustment and photo correction features for enhancing scanned images,.... Click Make Job Settings. 4. Parent topic: Starting a Scan Using the Product Control Panel Starting a Scan Using the Epson Scan Icon You can download and install Epson Scan scanning software. Note: With OS X, in addition to scanning with your product, if necessary. 3. Open the Edit...

User Manual
Page 127
You see this window: 2. Note: If you placed your original. Select the Document Source setting indicating where you are using the ADF, remove any documents from the scanner glass. 127
You see this window: 2. Note: If you placed your original. Select the Document Source setting indicating where you are using the ADF, remove any documents from the scanner glass. 127

User Manual
Page 129
... You can select the entire image area or a portion of different areas. Just be sure to select specific Image Adjustments settings for scanning. Scanner Glass Selects the scanner glass as the location where the originals are placed on your product for scanning. You can even select multiple scan areas to include in...
... You can select the entire image area or a portion of different areas. Just be sure to select specific Image Adjustments settings for scanning. Scanner Glass Selects the scanner glass as the location where the originals are placed on your product for scanning. You can even select multiple scan areas to include in...

User Manual
Page 135
...file in a separate Preview window. 8. Professional Mode Selecting a Scan Size - Professional Mode Parent topic: Selecting Epson Scan Settings Related concepts Image Preview Guidelines 135 Select the Document Source setting indicating where you want to reduce or... original you can view and print the image, if desired. Professional Mode Selecting a Scan Area - Epson Scan previews your original. Select the specific type of your original and how you placed your original and...Professional Mode Available Image Adjustments - Change any documents from the scanner glass. 4. 2.
...file in a separate Preview window. 8. Professional Mode Selecting a Scan Size - Professional Mode Parent topic: Selecting Epson Scan Settings Related concepts Image Preview Guidelines 135 Select the Document Source setting indicating where you want to reduce or... original you can view and print the image, if desired. Professional Mode Selecting a Scan Area - Epson Scan previews your original. Select the specific type of your original and how you placed your original and...Professional Mode Available Image Adjustments - Change any documents from the scanner glass. 4. 2.

User Manual
Page 136
...as charts or graphs. 8-bit Grayscale Select this setting for black text documents or line art. Just be sure to include in Epson Scan Professional Mode. 24-bit Color Select this setting for black-and-white photos. Scan Resolution Guidelines Related tasks Selecting Scan File...a specific area in your product for color photos. Parent topic: Scanning in Epson Scan Professional Mode. Note: In Professional Mode, the default Preview mode is Normal Preview mode. Scanner Glass Selects the scanner glass as the location where the originals are placed on your scanned image. Professional...
...as charts or graphs. 8-bit Grayscale Select this setting for black text documents or line art. Just be sure to include in Epson Scan Professional Mode. 24-bit Color Select this setting for black-and-white photos. Scan Resolution Guidelines Related tasks Selecting Scan File...a specific area in your product for color photos. Parent topic: Scanning in Epson Scan Professional Mode. Note: In Professional Mode, the default Preview mode is Normal Preview mode. Scanner Glass Selects the scanner glass as the location where the originals are placed on your scanned image. Professional...
User Manual
Page 149
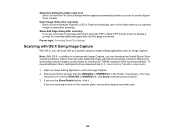
...or SHARED list in addition to scanning with Image Capture, you are scanning an item on the scanner glass, your product begins a preview scan. 149 To download Epson Scan, visit Epson's driver download site (U.S. If you are scanning a multi-page document using an image-editing application...scan with your product using the PDF or Multi-TIFF format, select to display a prompt for TWAIN-compliant OCR scanning software. Epson Scan provides additional image adjustment and photo correction features for enhancing scanned images, and provides an interface for scanning additional pages after...
...or SHARED list in addition to scanning with Image Capture, you are scanning an item on the scanner glass, your product begins a preview scan. 149 To download Epson Scan, visit Epson's driver download site (U.S. If you are scanning a multi-page document using an image-editing application...scan with your product using the PDF or Multi-TIFF format, select to display a prompt for TWAIN-compliant OCR scanning software. Epson Scan provides additional image adjustment and photo correction features for enhancing scanned images, and provides an interface for scanning additional pages after...
User Manual
Page 152
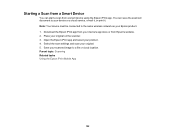
...be connected to the same wireless network as your device's app store or from a smart device using the Epson iPrint app. Select the scan settings and scan your product. 4. Open the Epson iPrint app and select your original. 5. Place your device or a cloud service, e-mail it, or ...print it. Parent topic: Scanning Related tasks Using the Epson iPrint Mobile App 152 You can start a scan from Epson's website. 2. Save your scanned image to your original on the scanner. 3. Starting a Scan from a Smart Device You can save the scanned document to a ...
...be connected to the same wireless network as your device's app store or from a smart device using the Epson iPrint app. Select the scan settings and scan your product. 4. Open the Epson iPrint app and select your original. 5. Place your device or a cloud service, e-mail it, or ...print it. Parent topic: Scanning Related tasks Using the Epson iPrint Mobile App 152 You can start a scan from Epson's website. 2. Save your scanned image to your original on the scanner. 3. Starting a Scan from a Smart Device You can save the scanned document to a ...

User Manual
Page 176
... Fax Settings. 5. OS X You can set up your fax header and select your product, and select Options & Supplies. Select Print & Fax, Print & Scan, or Printers & Scanners, select the FAX option for your fax settings using the FAX Utility for OS X. 1. Select Utility and select Open Printer Utility. 176 Follow the prompts...
... Fax Settings. 5. OS X You can set up your fax header and select your product, and select Options & Supplies. Select Print & Fax, Print & Scan, or Printers & Scanners, select the FAX option for your fax settings using the FAX Utility for OS X. 1. Select Utility and select Open Printer Utility. 176 Follow the prompts...

User Manual
Page 189
... from the MacAddress Book and back up fax numbers to 60 speed dial and group dial entries combined. 1. Select Print & Fax, Print & Scan, or Printers & Scanners, select the FAX option for your product's memory. Double-click FAX Utility, if necessary. Select your speed dial and group dial lists using the FAX...
... from the MacAddress Book and back up fax numbers to 60 speed dial and group dial entries combined. 1. Select Print & Fax, Print & Scan, or Printers & Scanners, select the FAX option for your product's memory. Double-click FAX Utility, if necessary. Select your speed dial and group dial lists using the FAX...
User Manual
Page 209
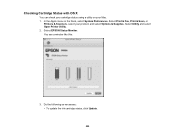
In the Apple menu or the Dock, select System Preferences. You see a window like this: 3. Select Utility and select Open Printer Utility. 2. Do the following as necessary: • To update the ink cartridge status, click Update. 209 Select Print & Fax, Print & Scan, or Printers & Scanners, select your Mac. 1. Select EPSON Status Monitor. Checking Cartridge Status with OS X You can check your cartridge status using a utility on your product, and select Options & Supplies.
In the Apple menu or the Dock, select System Preferences. You see a window like this: 3. Select Utility and select Open Printer Utility. 2. Do the following as necessary: • To update the ink cartridge status, click Update. 209 Select Print & Fax, Print & Scan, or Printers & Scanners, select your Mac. 1. Select EPSON Status Monitor. Checking Cartridge Status with OS X You can check your cartridge status using a utility on your product, and select Options & Supplies.

User Manual
Page 212
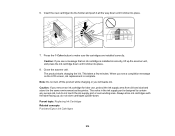
Squeeze the tab on the cartridge and lift the cartridge straight up the scanner unit. Do not take the used cartridges carefully. Lift up to refill it . Caution: Do not touch the flat white cable inside the printer. Do not lift the scanner unit while the document cover is open. 3. Note: Dispose of used cartridge apart or try to remove it . 212 2.
Squeeze the tab on the cartridge and lift the cartridge straight up the scanner unit. Do not take the used cartridges carefully. Lift up to refill it . Caution: Do not touch the flat white cable inside the printer. Do not lift the scanner unit while the document cover is open. 3. Note: Dispose of used cartridge apart or try to remove it . 212 2.
User Manual
Page 214
...remove an ink cartridge for later use, protect the ink supply area from dirt and dust and store it clicks into place. 8. Close the scanner unit. Note: Do not turn off the product while charging or you see a message that an ink cartridge is installed incorrectly, lift up ;... The valve in the same environment as the printer. Parent topic: Replacing Ink Cartridges Related concepts Purchase Epson Ink Cartridges 214 When you will waste ink. do not touch the ink supply port or surrounding area. Press the Color button to contain...
...remove an ink cartridge for later use, protect the ink supply area from dirt and dust and store it clicks into place. 8. Close the scanner unit. Note: Do not turn off the product while charging or you see a message that an ink cartridge is installed incorrectly, lift up ;... The valve in the same environment as the printer. Parent topic: Replacing Ink Cartridges Related concepts Purchase Epson Ink Cartridges 214 When you will waste ink. do not touch the ink supply port or surrounding area. Press the Color button to contain...
User Manual
Page 216
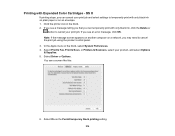
... or the Dock, select System Preferences. 4. Note: If the message screen appears on another computer on an envelope. 1. Select Print & Fax, Print & Scan, or Printers & Scanners, select your print job. You see a screen like this: 6. Select On as the Permit temporary black printing setting. 216 Click the printer icon in the...
... or the Dock, select System Preferences. 4. Note: If the message screen appears on another computer on an envelope. 1. Select Print & Fax, Print & Scan, or Printers & Scanners, select your print job. You see a screen like this: 6. Select On as the Permit temporary black printing setting. 216 Click the printer icon in the...


