Quick Guide
Page 2
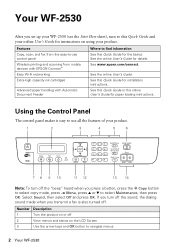
... The control panel makes it easy to use control panel Wireless printing and scanning from mobile devices with EPSON Connect™ Easy Wi-Fi networking Extra-high capacity ink cartridges Advanced paper handling with Automatic Document Feeder Where to navigate menus 2 Your WF-2530 See the online User's Guide for paper loading instructions. Select...
... The control panel makes it easy to use control panel Wireless printing and scanning from mobile devices with EPSON Connect™ Easy Wi-Fi networking Extra-high capacity ink cartridges Advanced paper handling with Automatic Document Feeder Where to navigate menus 2 Your WF-2530 See the online User's Guide for paper loading instructions. Select...
Quick Guide
Page 3
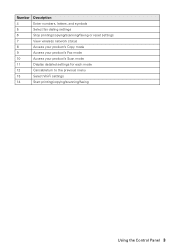
Number Description 4 Enter numbers, letters, and symbols 5 Select fax dialing settings 6 Stop printing/copying/scanning/faxing or reset settings 7 View wireless network status 8 Access your product's Copy mode 9 Access your product's Fax mode 10 Access your product's Scan mode 11 Display detailed settings for each mode 12 Cancel/return to the previous menu 13 Select Wi-Fi settings 14 Start printing/copying/scanning/faxing Using the Control Panel 3
Number Description 4 Enter numbers, letters, and symbols 5 Select fax dialing settings 6 Stop printing/copying/scanning/faxing or reset settings 7 View wireless network status 8 Access your product's Copy mode 9 Access your product's Fax mode 10 Access your product's Scan mode 11 Display detailed settings for each mode 12 Cancel/return to the previous menu 13 Select Wi-Fi settings 14 Start printing/copying/scanning/faxing Using the Control Panel 3
Quick Guide
Page 5
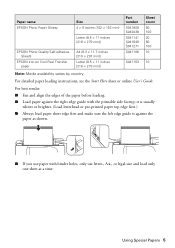
...detailed paper loading instructions, see the Start Here sheet or online User's Guide. it is usually whiter or brighter. (Load letterhead or pre-printed paper top edge first.) ■ Always load paper short edge first and make sure the left edge guide is against the right edge guide ... loading. ■ Load paper against the paper as shown. ■ If you use paper with the printable side faceup; Paper name EPSON Photo Paper Glossy EPSON Photo Quality Self-adhesive Sheets EPSON Iron-on Cool Peel Transfer paper Size 4 × 6 inches (102 × 152 mm) Letter (8.5 × 11 inches [216 &#...
...detailed paper loading instructions, see the Start Here sheet or online User's Guide. it is usually whiter or brighter. (Load letterhead or pre-printed paper top edge first.) ■ Always load paper short edge first and make sure the left edge guide is against the right edge guide ... loading. ■ Load paper against the paper as shown. ■ If you use paper with the printable side faceup; Paper name EPSON Photo Paper Glossy EPSON Photo Quality Self-adhesive Sheets EPSON Iron-on Cool Peel Transfer paper Size 4 × 6 inches (102 × 152 mm) Letter (8.5 × 11 inches [216 &#...
Quick Guide
Page 8
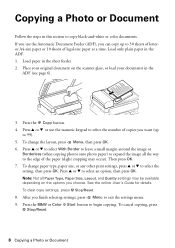
... image or Borderless (when copying photos onto photo paper) to select the setting, then press OK. To change paper type, paper size, or any other print settings, press u or d to expand the image all Paper Type, Paper Size, Layout, and Quality settings may occur). To cancel copying, press y Stop/Reset. 8 Copying...
... image or Borderless (when copying photos onto photo paper) to select the setting, then press OK. To change paper type, paper size, or any other print settings, press u or d to expand the image all Paper Type, Paper Size, Layout, and Quality settings may occur). To cancel copying, press y Stop/Reset. 8 Copying...
Quick Guide
Page 9
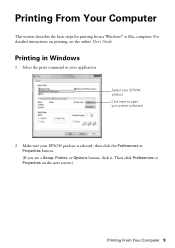
Printing in your application. Make sure your printer software 2. Select your EPSON product Click here to open your EPSON product is selected, then click the Preferences or Properties button. (If you see the online User's Guide. Select the print command in Windows 1. Printing From Your Computer This section describes the basic steps for printing from a Windows® or Mac computer. For detailed instructions on the next screen.) Printing From Your Computer 9 Then click Preferences or Properties on printing, see a Setup, Printer, or Options button, click it.
Printing in your application. Make sure your printer software 2. Select your EPSON product Click here to open your EPSON product is selected, then click the Preferences or Properties button. (If you see the online User's Guide. Select the print command in Windows 1. Printing From Your Computer This section describes the basic steps for printing from a Windows® or Mac computer. For detailed instructions on the next screen.) Printing From Your Computer 9 Then click Preferences or Properties on printing, see a Setup, Printer, or Options button, click it.
Quick Guide
Page 10
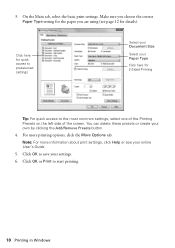
...'s Guide. 5. You can delete these presets or create your settings. 6. Click OK to the most common settings, select one of the Printing Presets on the left side of the screen. 3. Click here for quick access to preselected settings Select your Document Size Select your Paper Type...for details). Note: For more printing options, click the More Options tab. On the Main tab, select the basic print settings. Click OK or Print to start printing. 10 Printing in Windows For more information about print settings, click Help or see page 12 for 2-Sided Printing Tip: For quick access to...
...'s Guide. 5. You can delete these presets or create your settings. 6. Click OK to the most common settings, select one of the Printing Presets on the left side of the screen. 3. Click here for quick access to preselected settings Select your Document Size Select your Paper Type...for details). Note: For more printing options, click the More Options tab. On the Main tab, select the basic print settings. Click OK or Print to start printing. 10 Printing in Windows For more information about print settings, click Help or see page 12 for 2-Sided Printing Tip: For quick access to...
Quick Guide
Page 11
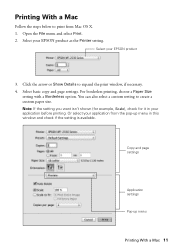
... the arrow or Show Details to create a custom paper size. For borderless printing, choose a Paper Size setting with a Borderless option. Select your EPSON product as the Printer setting. Printing With a Mac Follow the steps below to print from the pop-up menu Printing With a Mac 11 Note: If the setting you want isn't shown (for...
... the arrow or Show Details to create a custom paper size. For borderless printing, choose a Paper Size setting with a Borderless option. Select your EPSON product as the Printer setting. Printing With a Mac Follow the steps below to print from the pop-up menu Printing With a Mac 11 Note: If the setting you want isn't shown (for...
Quick Guide
Page 12
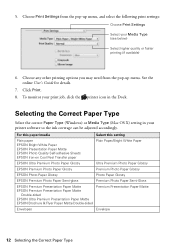
... Paper Type (Windows) or Media Type (Mac OS X) setting in your print job, click the printer icon in the Dock. For this paper/media Select this setting Plain paper EPSON Bright White Paper EPSON Presentation Paper Matte EPSON Photo Quality Self-adhesive Sheets EPSON Iron-on Cool Peel Transfer paper Plain Paper/Bright White Paper...
... Paper Type (Windows) or Media Type (Mac OS X) setting in your print job, click the printer icon in the Dock. For this paper/media Select this setting Plain paper EPSON Bright White Paper EPSON Presentation Paper Matte EPSON Photo Quality Self-adhesive Sheets EPSON Iron-on Cool Peel Transfer paper Plain Paper/Bright White Paper...

Quick Guide
Page 16
... loss of legal-size paper at a time. Use the following procedure to use the Automatic Document Feeder (ADF), you make your own backup or print out your network settings and fax data. Load only plain paper in its memory even when the power is not responsible for the necessary filter...also send or receive a fax from the wall jack to store names, telephone numbers, and fax data in the ADF. Contact your computer using the Epson FAX Utility. Telephone wall jack 16 Faxing a Document For more information, see the online User's Guide. Faxing a Document Your product lets you to the...
... loss of legal-size paper at a time. Use the following procedure to use the Automatic Document Feeder (ADF), you make your own backup or print out your network settings and fax data. Load only plain paper in its memory even when the power is not responsible for the necessary filter...also send or receive a fax from the wall jack to store names, telephone numbers, and fax data in the ADF. Contact your computer using the Epson FAX Utility. Telephone wall jack 16 Faxing a Document For more information, see the online User's Guide. Faxing a Document Your product lets you to the...
Quick Guide
Page 19
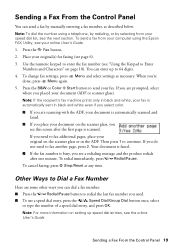
... the product redials after the first page is automatically sent in the ADF. Then press 1 to 64 digits. 4. Note: To dial the number using the Epson FAX Utility, see your fax. If you are prompted, select where you 're done, press x Menu again. 5. Use the numeric keypad to fax another page... faxing (see this screen after one minute. To send a fax from your speed dial list, see the next section. Note: If the recipient's fax machine prints only in black and white, your fax is scanned: If you do not need to enter the fax number (see the online User's Guide. Sending...
... the product redials after the first page is automatically sent in the ADF. Then press 1 to 64 digits. 4. Note: To dial the number using the Epson FAX Utility, see your fax. If you are prompted, select where you 're done, press x Menu again. 5. Use the numeric keypad to fax another page... faxing (see this screen after one minute. To send a fax from your speed dial list, see the next section. Note: If the recipient's fax machine prints only in black and white, your fax is scanned: If you do not need to enter the fax number (see the online User's Guide. Sending...
Quick Guide
Page 20
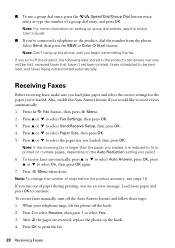
... to the product, dial the number from the phone. Press u or d to select On, then press OK again. 7. If you run out of paper during printing, you 've loaded. Receiving Faxes Before receiving faxes, make sure you load plain paper and select the correct settings for the paper you see page... 18. Press u or d to be lost: received faxes that haven't yet been printed, faxes scheduled to select Fax Settings, then press OK. 3. ■ To use a group dial entry, press the Speed Dial/Group Dial button twice, select or...
... to the product, dial the number from the phone. Press u or d to select On, then press OK again. 7. If you run out of paper during printing, you 've loaded. Receiving Faxes Before receiving faxes, make sure you load plain paper and select the correct settings for the paper you see page... 18. Press u or d to be lost: received faxes that haven't yet been printed, faxes scheduled to select Fax Settings, then press OK. 3. ■ To use a group dial entry, press the Speed Dial/Group Dial button twice, select or...

Quick Guide
Page 21
... If your product looking like new, don't place anything on top of letter- Nozzles are gaps in one or more of the nozzles in the print head may be clogged or ink may be running low in the lines. Maintaining Your Product 21 If there are gaps or the pattern is... clean. If there are no gaps, the print head is faint, press 2 to clean the cover, use it as a writing surface. Follow the steps below to select Maintenance, then press OK. 4. Press u or...
... If your product looking like new, don't place anything on top of letter- Nozzles are gaps in one or more of the nozzles in the print head may be clogged or ink may be running low in the lines. Maintaining Your Product 21 If there are gaps or the pattern is... clean. If there are no gaps, the print head is faint, press 2 to clean the cover, use it as a writing surface. Follow the steps below to select Maintenance, then press OK. 4. Press u or...
Quick Guide
Page 22
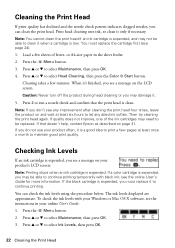
... To check the ink levels with black ink; Press the x Menu button. 3. Press u or d to select Ink Levels, then press OK. 22 Cleaning the Print Head Press the x Menu button. 2. Caution: Never turn off the product during head cleaning or you see a message on the LCD screen. Press u or d...Cleaning takes a few sheets of the ink cartridges may not be replaced. Press 2 to run a nozzle check and confirm that doesn't help, contact Epson as described on page 31. Note: If you can check the ink levels using the procedure below. If a color cartridge is expended, you may ...
... To check the ink levels with black ink; Press the x Menu button. 3. Press u or d to select Ink Levels, then press OK. 22 Cleaning the Print Head Press the x Menu button. 2. Caution: Never turn off the product during head cleaning or you see a message on the LCD screen. Press u or d...Cleaning takes a few sheets of the ink cartridges may not be replaced. Press 2 to run a nozzle check and confirm that doesn't help, contact Epson as described on page 31. Note: If you can check the ink levels using the procedure below. If a color cartridge is expended, you may ...
Quick Guide
Page 23
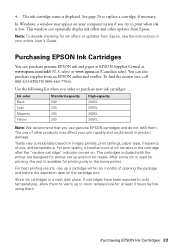
... the package and before using them . For best printing results, use of ink remains in the same printer. 4. Note: To disable checking for resale. Purchasing EPSON Ink Cartridges You can purchase genuine EPSON ink and paper at EPSON Supplies Central at least 3 hours before the expiration date... designed for printer set up a cartridge within six months of use genuine EPSON cartridges and do not refill them . Purchasing EPSON Ink Cartridges 23 See page 24 to room temperature for printing only in the cartridge after the "replace cartridge" indicator comes on the cartridge...
... the package and before using them . For best printing results, use of ink remains in the same printer. 4. Note: To disable checking for resale. Purchasing EPSON Ink Cartridges You can purchase genuine EPSON ink and paper at EPSON Supplies Central at least 3 hours before the expiration date... designed for printer set up a cartridge within six months of use genuine EPSON cartridges and do not refill them . Purchasing EPSON Ink Cartridges 23 See page 24 to room temperature for printing only in the cartridge after the "replace cartridge" indicator comes on the cartridge...

Quick Guide
Page 24
... Dispose of it . Do not take the used cartridge apart or try to select Ink Cartridge Replacement, then press OK. 3. If ink gets in the print head nozzles may dry out. 1. Caution: Do not open ink cartridge packages until you have a new ink cartridge before you begin. Note which color to...
... Dispose of it . Do not take the used cartridge apart or try to select Ink Cartridge Replacement, then press OK. 3. If ink gets in the print head nozzles may dry out. 1. Caution: Do not open ink cartridge packages until you have a new ink cartridge before you begin. Note which color to...

Quick Guide
Page 25
.... Insert the new ink cartridge into place. 8. This takes about 1 1/2 minutes. Lower the scanner unit. 9. Before you replaced a cartridge while copying a document or photo, cancel printing and make sure your original again.
.... Insert the new ink cartridge into place. 8. This takes about 1 1/2 minutes. Lower the scanner unit. 9. Before you replaced a cartridge while copying a document or photo, cancel printing and make sure your original again.
Quick Guide
Page 26
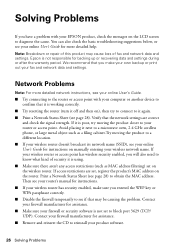
...are set on ), then try moving the product to a different location. ■ If your router or access point. Print a Network Status Sheet (see your fax and network data and settings. Epson is poor, try to connect to it next to a microwave oven, 2.4 GHz cordless phone, or large metal object ...such as MAC address filtering) set , register the product's MAC address on the LCD screen to block port 3629 (TCP/ UDP). Avoid placing it again. ■ Print a Network...
...are set on ), then try moving the product to a different location. ■ If your router or access point. Print a Network Status Sheet (see your fax and network data and settings. Epson is poor, try to connect to it next to a microwave oven, 2.4 GHz cordless phone, or large metal object ...such as MAC address filtering) set , register the product's MAC address on the LCD screen to block port 3629 (TCP/ UDP). Avoid placing it again. ■ Print a Network...
Quick Guide
Page 27
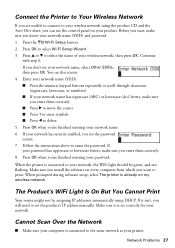
... password. When prompted during software setup, select The printer is set the product's IP address manually. The Product's WiFi Light Is On But You Cannot Print Your router might not be green, and not flashing. Network Problems 27 Press the Wi-Fi Setup button. 2. Follow the instructions above to select Wi... Network If you are unable to connect to your wireless network using DHCP. If it is already on every computer from which you want to print.
... password. When prompted during software setup, select The printer is set the product's IP address manually. The Product's WiFi Light Is On But You Cannot Print Your router might not be green, and not flashing. Network Problems 27 Press the Wi-Fi Setup button. 2. Follow the instructions above to select Wi... Network If you are unable to connect to your wireless network using DHCP. If it is already on every computer from which you want to print.
Quick Guide
Page 28
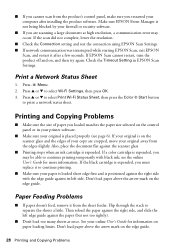
... edge guide. Flip through the stack to select Wi-Fi Settings, then press OK. 3. If EPSON Scan cannot restart, turn the product off and on paper loading limits. Press u or d to separate the sheets a little. Press u or d to select Print Wi-Fi Status Sheet, then press the Color x Start button to continue...
... edge guide. Flip through the stack to select Wi-Fi Settings, then press OK. 3. If EPSON Scan cannot restart, turn the product off and on paper loading limits. Press u or d to separate the sheets a little. Press u or d to select Print Wi-Fi Status Sheet, then press the Color x Start button to continue...

Quick Guide
Page 29
...: Do not touch the flat white cable inside , including any torn pieces. If paper has jammed: 1. Open the ADF cover and remove any torn pieces. Printing and Copying Problems 29 Open the ADF and remove all of the paper inside, including any jammed paper. Carefully remove any paper trapped inside the...
...: Do not touch the flat white cable inside , including any torn pieces. If paper has jammed: 1. Open the ADF cover and remove any torn pieces. Printing and Copying Problems 29 Open the ADF and remove all of the paper inside, including any jammed paper. Carefully remove any paper trapped inside the...


