Network Installation Guide
Page 2
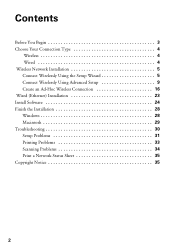
Contents Before You Begin 3 Choose Your Connection Type 4 Wireless 4 Wired 4 Wireless Network Installation 5 Connect Wirelessly Using the Setup Wizard 5 Connect Wirelessly Using Advanced Setup 9 Create an Ad-Hoc Wireless Connection 16 Wired (Ethernet) Installation 23 Install Software 24 Finish the Installation 28 Windows 28 Macintosh 29 Troubleshooting 30 Setup Problems 31 Printing Problems 33 Scanning Problems 34 Print a Network Status Sheet 35 Copyright Notice 35 2
Contents Before You Begin 3 Choose Your Connection Type 4 Wireless 4 Wired 4 Wireless Network Installation 5 Connect Wirelessly Using the Setup Wizard 5 Connect Wirelessly Using Advanced Setup 9 Create an Ad-Hoc Wireless Connection 16 Wired (Ethernet) Installation 23 Install Software 24 Finish the Installation 28 Windows 28 Macintosh 29 Troubleshooting 30 Setup Problems 31 Printing Problems 33 Scanning Problems 34 Print a Network Status Sheet 35 Copyright Notice 35 2
Network Installation Guide
Page 3
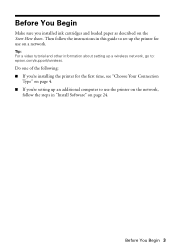
Tip: For a video tutorial and other information about setting up a wireless network, go to: epson.com/support/wireless. Before You Begin 3 Then follow the instructions in this guide to set up the printer for the first time, see "Choose Your Connection Type" on page 4. ■ If you installed ink ...cartridges and loaded paper as described on the Start Here sheet. Do one of the following: ■ If you're installing the printer for use the printer on the network, follow the steps in "Install Software" on a network. Before You Begin Make sure you 're setting up an ...
Tip: For a video tutorial and other information about setting up a wireless network, go to: epson.com/support/wireless. Before You Begin 3 Then follow the instructions in this guide to set up the printer for the first time, see "Choose Your Connection Type" on page 4. ■ If you installed ink ...cartridges and loaded paper as described on the Start Here sheet. Do one of the following: ■ If you're installing the printer for use the printer on the network, follow the steps in "Install Software" on a network. Before You Begin Make sure you 're setting up an ...
Network Installation Guide
Page 8
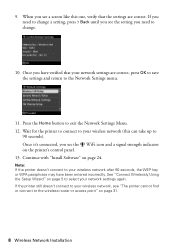
...If the printer still doesn't connect to the Network Settings menu. 11. Press the Home button to 90 seconds). Wait for the printer to connect ... See "Connect Wirelessly Using the Setup Wizard" on the printer's control panel. 13. Continue with "Install Software" on page 31. 8 Wireless Network Installation If you need... to change a setting, press y Back until you see "The printer cannot ...router or access point" on page 24. Note: If the printer doesn't connect to select your wireless network after 90 seconds, ...
...If the printer still doesn't connect to the Network Settings menu. 11. Press the Home button to 90 seconds). Wait for the printer to connect ... See "Connect Wirelessly Using the Setup Wizard" on the printer's control panel. 13. Continue with "Install Software" on page 31. 8 Wireless Network Installation If you need... to change a setting, press y Back until you see "The printer cannot ...router or access point" on page 24. Note: If the printer doesn't connect to select your wireless network after 90 seconds, ...
Network Installation Guide
Page 16
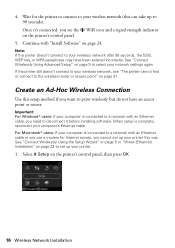
... "Connect Wirelessly Using the Setup Wizard" on page 5 or "Wired (Ethernet) Installation" on page 31. Wait for Internet access, you see "The printer cannot find or connect to the wireless router or access point" on page 23 to your wireless network (this can take up your...connect to print wirelessly but do not have been entered incorrectly. 4. When setup is connected to a network with "Install Software" on page 9 to your computer's Ethernet cable. If the printer still doesn't connect to select your wireless network after 90 seconds, the SSID, WEP key, or WPA passphrase may have...
... "Connect Wirelessly Using the Setup Wizard" on page 5 or "Wired (Ethernet) Installation" on page 31. Wait for Internet access, you see "The printer cannot find or connect to the wireless router or access point" on page 23 to your wireless network (this can take up your...connect to print wirelessly but do not have been entered incorrectly. 4. When setup is connected to a network with "Install Software" on page 9 to your computer's Ethernet cable. If the printer still doesn't connect to select your wireless network after 90 seconds, the SSID, WEP key, or WPA passphrase may have...
Network Installation Guide
Page 22
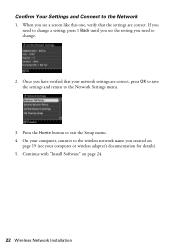
... button to the Network 1. Confirm Your Settings and Connect to exit the Setup menu. 4. Once you need to the Network Settings menu. 3. Continue with "Install Software" on page 19 (see your network settings are correct. If you need to change a setting, press y Back until you see a screen like this...
... button to the Network 1. Confirm Your Settings and Connect to exit the Setup menu. 4. Once you need to the Network Settings menu. 3. Continue with "Install Software" on page 19 (see your network settings are correct. If you need to change a setting, press y Back until you see a screen like this...
Network Installation Guide
Page 23
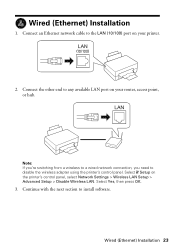
... cable to disable the wireless adapter using the printer's control panel. Note: If you're switching from a wireless to a wired network connection, you need to the LAN (10/100) port on your router, access point, or hub. Select F Setup on your printer. 2. Select Yes, then press OK. 3.... Continue with the next section to any available LAN port on the printer's control panel, select Network Settings > Wireless LAN Setup > Advanced Setup > Disable Wireless LAN. ...
... cable to disable the wireless adapter using the printer's control panel. Note: If you're switching from a wireless to a wired network connection, you need to the LAN (10/100) port on your router, access point, or hub. Select F Setup on your printer. 2. Select Yes, then press OK. 3.... Continue with the next section to any available LAN port on the printer's control panel, select Network Settings > Wireless LAN Setup > Advanced Setup > Disable Wireless LAN. ...
Network Installation Guide
Page 24
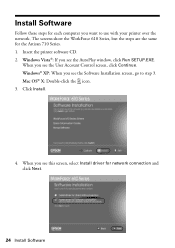
... 3. Windows Vista®: If you see the AutoPlay window, click Run SETUP.EXE. Insert the printer software CD. 2. Windows® XP: When you see the Software Installation screen, go to use with your printer over the network. The screens show the WorkForce 610 Series, but the steps are the same for the Artisan 710 Series. 1.
... 3. Windows Vista®: If you see the AutoPlay window, click Run SETUP.EXE. Insert the printer software CD. 2. Windows® XP: When you see the Software Installation screen, go to use with your printer over the network. The screens show the WorkForce 610 Series, but the steps are the same for the Artisan 710 Series. 1.
Network Installation Guide
Page 25
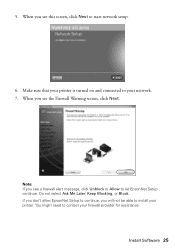
Do not select Ask Me Later, Keep Blocking, or Block. You might need to let EpsonNet Setup continue. 5. Note: If you see this screen, click Next to your printer is turned on and connected to start network setup. 6. When you see the Firewall Warning screen, click Next. Install Software 25 Make sure that your network. 7. When you will not be able to install your firewall provider for assistance. If you don't allow EpsonNet Setup to continue, you see a firewall alert message, click Unblock or Allow to contact your printer.
Do not select Ask Me Later, Keep Blocking, or Block. You might need to let EpsonNet Setup continue. 5. Note: If you see this screen, click Next to your printer is turned on and connected to start network setup. 6. When you see the Firewall Warning screen, click Next. Install Software 25 Make sure that your network. 7. When you will not be able to install your firewall provider for assistance. If you don't allow EpsonNet Setup to continue, you see a firewall alert message, click Unblock or Allow to contact your printer.
Network Installation Guide
Page 26
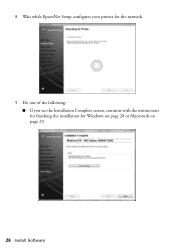
Wait while EpsonNet Setup configures your printer for Windows on page 28 or Macintosh on page 29. 26 Install Software 8. Do one of the following: ■ If you see the Installation Complete screen, continue with the instructions for finishing the installation for the network. 9.
Wait while EpsonNet Setup configures your printer for Windows on page 28 or Macintosh on page 29. 26 Install Software 8. Do one of the following: ■ If you see the Installation Complete screen, continue with the instructions for finishing the installation for the network. 9.
Network Installation Guide
Page 27
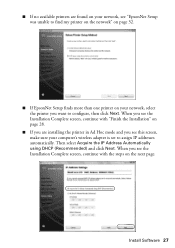
... using DHCP (Recommended) and click Next. Install Software 27 When you want to assign IP addresses automatically. ■ If no available printers are installing the printer in Ad Hoc mode and you see this screen, make sure your network, select the printer you see "EpsonNet Setup was unable to find... my printer on the network" on page 32. ■ If EpsonNet Setup finds more than one printer on the next page. When you see the Installation Complete screen, continue ...
... using DHCP (Recommended) and click Next. Install Software 27 When you want to assign IP addresses automatically. ■ If no available printers are installing the printer in Ad Hoc mode and you see this screen, make sure your network, select the printer you see "EpsonNet Setup was unable to find... my printer on the network" on page 32. ■ If EpsonNet Setup finds more than one printer on the next page. When you see the Installation Complete screen, continue ...
Network Installation Guide
Page 28
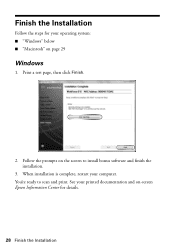
Follow the prompts on -screen Epson Information Center for your operating system: ■ "Windows" below ■ "Macintosh" on page 29 Windows 1. When installation is complete, restart your printed documentation and on the screen to scan and print. You're ready to install bonus software and finish the installation. 3. Print a test page, then click Finish. 2. See your computer. Finish the Installation Follow the steps for details. 28 Finish the Installation
Follow the prompts on -screen Epson Information Center for your operating system: ■ "Windows" below ■ "Macintosh" on page 29 Windows 1. When installation is complete, restart your printed documentation and on the screen to scan and print. You're ready to install bonus software and finish the installation. 3. Print a test page, then click Finish. 2. See your computer. Finish the Installation Follow the steps for details. 28 Finish the Installation

Network Installation Guide
Page 30
... the network. 6. When installation is complete, restart your computer to find the EPSON TCP/IP printer on the screen to print a test page, install bonus software, and finish the installation. 7. See your printed documentation and on-screen Epson Information Center for help: ■ "Setup Problems" below ■ "Printing ...to 90 seconds for your computer. Troubleshooting If you see page 35). 30 Troubleshooting Note: It may take up or using your EPSON TCP/IP printer. Follow the steps on page 34 This section also explains how to scan and print. You're ready to print a Network...
... the network. 6. When installation is complete, restart your computer to find the EPSON TCP/IP printer on the screen to print a test page, install bonus software, and finish the installation. 7. See your printed documentation and on-screen Epson Information Center for help: ■ "Setup Problems" below ■ "Printing ...to 90 seconds for your computer. Troubleshooting If you see page 35). 30 Troubleshooting Note: It may take up or using your EPSON TCP/IP printer. Follow the steps on page 34 This section also explains how to scan and print. You're ready to print a Network...
Network Installation Guide
Page 31
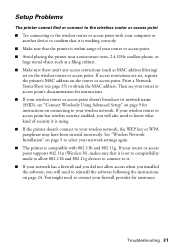
...printer is within range of security it is working correctly. ■ Make sure that it is set to compatibility mode to allow 802.11b and 802.11g devices to connect to it. ■ If your network has a firewall and you did not allow access when you installed the software,...incorrectly. If access restrictions are set on page 24. You might need to contact your firewall provider for instructions on connecting to reinstall the software following the instructions on the wireless router or access point. Then see your router or access point's documentation for instructions. ■ If ...
...printer is within range of security it is working correctly. ■ Make sure that it is set to compatibility mode to allow 802.11b and 802.11g devices to connect to it. ■ If your network has a firewall and you did not allow access when you installed the software,...incorrectly. If access restrictions are set on page 24. You might need to contact your firewall provider for instructions on connecting to reinstall the software following the instructions on the wireless router or access point. Then see your router or access point's documentation for instructions. ■ If ...
Network Installation Guide
Page 33
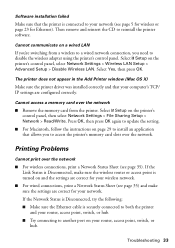
... > Network > Read/Write. Troubleshooting 33 Then remove and reinsert the CD to disable the wireless adapter using the printer's control panel. Printing Problems Cannot print over the network. Software installation failed Make sure that the printer is connected to your computer's TCP/ IP settings are configured correctly. Select F Setup on your network. Cannot...
... > Network > Read/Write. Troubleshooting 33 Then remove and reinsert the CD to disable the wireless adapter using the printer's control panel. Printing Problems Cannot print over the network. Software installation failed Make sure that the printer is connected to your computer's TCP/ IP settings are configured correctly. Select F Setup on your network. Cannot...
Network Installation Guide
Page 34
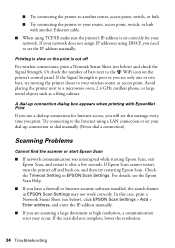
...the Timeout Setting in EPSON Scan Settings may occur. ■ Try connecting the printer to another Ethernet cable. ■ When using TCP/IP, make sure the printer's IP address is poor or you have a firewall or Internet security software installed, the search feature in EPSON Scan Settings. Or ...a LAN connection or set correctly for Internet access, you will see this case, print a Network Status Sheet (see only one or two bars, try restarting Epson Scan. A dial-up connection to your dial-up connection dialog box appears when printing with another router, access point, switch,...
...the Timeout Setting in EPSON Scan Settings may occur. ■ Try connecting the printer to another Ethernet cable. ■ When using TCP/IP, make sure the printer's IP address is poor or you have a firewall or Internet security software installed, the search feature in EPSON Scan Settings. Or ...a LAN connection or set correctly for Internet access, you will see this case, print a Network Status Sheet (see only one or two bars, try restarting Epson Scan. A dial-up connection to your dial-up connection dialog box appears when printing with another router, access point, switch,...
Network Installation Guide
Page 35
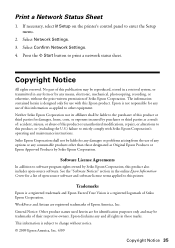
... is not responsible for a list of this printer. No part of open -source software. Epson is a registered logomark of Epson America, Inc. See the "Software Notices" section in those designated as applied to strictly comply with this information as Original Epson Products or Epson Approved Products by Seiko Epson Corporation. WorkForce and Artisan are for identification purposes only and...
... is not responsible for a list of this printer. No part of open -source software. Epson is a registered logomark of Epson America, Inc. See the "Software Notices" section in those designated as applied to strictly comply with this information as Original Epson Products or Epson Approved Products by Seiko Epson Corporation. WorkForce and Artisan are for identification purposes only and...
Start Here
Page 5
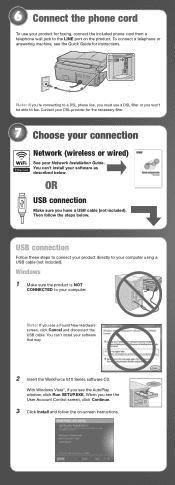
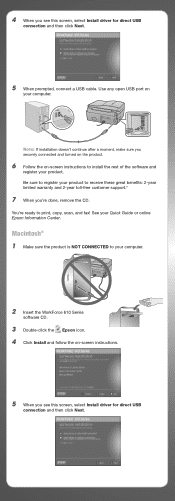
...screen instructions. With Windows Vista®, if you see the AutoPlay window, click Run SETUP.EXE. You can 't install your software that way. 2 Insert the WorkForce 610 Series software CD. 6 Connect the phone cord To use a DSL filter or you see the Quick Guide for instructions. When you see ... won't be able to fax. You can 't install your computer using a USB cable (not included). Note: If you're connecting to your software as described below . USB connection Follow these steps to connect your product directly to a DSL phone line, you must use your product for the ...
...screen instructions. With Windows Vista®, if you see the AutoPlay window, click Run SETUP.EXE. You can 't install your software that way. 2 Insert the WorkForce 610 Series software CD. 6 Connect the phone cord To use a DSL filter or you see the Quick Guide for instructions. When you see ... won't be able to fax. You can 't install your computer using a USB cable (not included). Note: If you're connecting to your software as described below . USB connection Follow these steps to connect your product directly to a DSL phone line, you must use your product for the ...
Start Here
Page 6
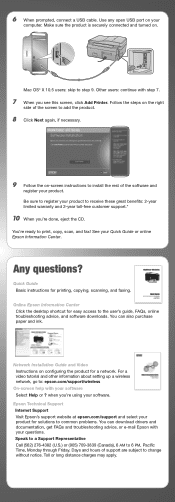
... Center. Macintosh® 1 Make sure the product is NOT CONNECTED to register your computer. See your computer. 2 Insert the WorkForce 610 Series software CD. 3 Double-click the Epson icon. 4 Click Install and follow the on -screen instructions to print, copy, scan, and fax! Note: If installation doesn't continue after a moment, make sure you...
... Center. Macintosh® 1 Make sure the product is NOT CONNECTED to register your computer. See your computer. 2 Insert the WorkForce 610 Series software CD. 3 Double-click the Epson icon. 4 Click Install and follow the on -screen instructions to print, copy, scan, and fax! Note: If installation doesn't continue after a moment, make sure you...
Start Here
Page 7
...great benefits: 2-year limited warranty and 2-year toll-free customer support.* 10 When you see this screen, click Add Printer. Epson Technical Support Internet Support Visit Epson's support website at epson.com/support and select your questions. Mac OS® X 10.5 users: skip to 6 PM, Pacific Time, ... can also purchase paper and ink. Any questions? You can download drivers and documentation, get FAQs and troubleshooting advice, or e-mail Epson with your software. 6 When prompted, connect a USB cable. Use any open USB port on -screen instructions to install the rest of the screen...
...great benefits: 2-year limited warranty and 2-year toll-free customer support.* 10 When you see this screen, click Add Printer. Epson Technical Support Internet Support Visit Epson's support website at epson.com/support and select your questions. Mac OS® X 10.5 users: skip to 6 PM, Pacific Time, ... can also purchase paper and ink. Any questions? You can download drivers and documentation, get FAQs and troubleshooting advice, or e-mail Epson with your software. 6 When prompted, connect a USB cable. Use any open USB port on -screen instructions to install the rest of the screen...
Start Here
Page 8
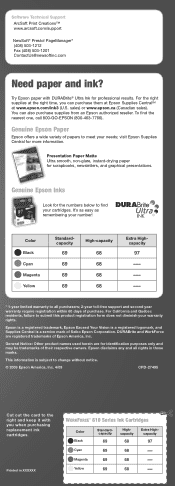
...in XXXXXX WORKFORCE® 610 Series Ink Cartridges Color Black Standardcapacity 69 Highcapacity 68 Extra Highcapacity 97 Cyan 69 68 -- Genuine Epson Paper Epson offers a wide variety of purchase. Epson is a registered trademark, Epson Exceed ...Software Technical Support ArcSoft Print Creations™ www.arcsoft.com/support NewSoft® Presto! For the right supplies at www.epson.com/ink3 (U.S. Epson disclaims any and all purchasers; 2-year toll-free support and second year warranty require registration within 60 days of papers to find the nearest one, call 800-GO-EPSON...
...in XXXXXX WORKFORCE® 610 Series Ink Cartridges Color Black Standardcapacity 69 Highcapacity 68 Extra Highcapacity 97 Cyan 69 68 -- Genuine Epson Paper Epson offers a wide variety of purchase. Epson is a registered trademark, Epson Exceed ...Software Technical Support ArcSoft Print Creations™ www.arcsoft.com/support NewSoft® Presto! For the right supplies at www.epson.com/ink3 (U.S. Epson disclaims any and all purchasers; 2-year toll-free support and second year warranty require registration within 60 days of papers to find the nearest one, call 800-GO-EPSON...


