Network Installation Guide
Page 2
Contents Before You Begin 3 Choose Your Connection Type 4 Wireless 4 Wired 4 Wireless Network Installation 5 Connect Wirelessly Using the Setup Wizard 5 Connect Wirelessly Using Advanced Setup 9 Create an Ad-Hoc Wireless Connection 16 Wired (Ethernet) Installation 23 Install Software 24 Finish the Installation 28 Windows 28 Macintosh 29 Troubleshooting 30 Setup Problems 31 Printing Problems 33 Scanning Problems 34 Print a Network Status Sheet 35 Copyright Notice 35 2
Contents Before You Begin 3 Choose Your Connection Type 4 Wireless 4 Wired 4 Wireless Network Installation 5 Connect Wirelessly Using the Setup Wizard 5 Connect Wirelessly Using Advanced Setup 9 Create an Ad-Hoc Wireless Connection 16 Wired (Ethernet) Installation 23 Install Software 24 Finish the Installation 28 Windows 28 Macintosh 29 Troubleshooting 30 Setup Problems 31 Printing Problems 33 Scanning Problems 34 Print a Network Status Sheet 35 Copyright Notice 35 2
Network Installation Guide
Page 16
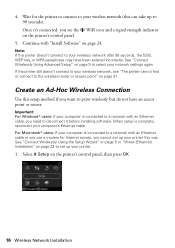
...Ethernet cable, you see "The printer cannot find or connect to your printer. 1. Note: If the printer doesn't connect to print wirelessly but do not have been entered incorrectly. 4. Important: For Windows® users: If your computer is complete, reconnect your printer this setup method if you cannot... Wireless Connection Use this way. See "Connect Wirelessly Using the Setup Wizard" on page 5 or "Wired (Ethernet) Installation" on the printer's control panel, then press OK. 16 Wireless Network Installation Select F Setup on page 23 to set up to your wireless network (this...
...Ethernet cable, you see "The printer cannot find or connect to your printer. 1. Note: If the printer doesn't connect to print wirelessly but do not have been entered incorrectly. 4. Important: For Windows® users: If your computer is complete, reconnect your printer this setup method if you cannot... Wireless Connection Use this way. See "Connect Wirelessly Using the Setup Wizard" on page 5 or "Wired (Ethernet) Installation" on the printer's control panel, then press OK. 16 Wireless Network Installation Select F Setup on page 23 to set up to your wireless network (this...
Network Installation Guide
Page 24
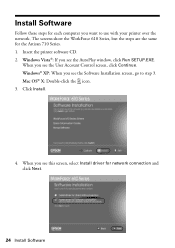
... see the Software Installation screen, go to use with your printer over the network. When you see the AutoPlay window, click Run SETUP.EXE. Windows® XP: When you want to step 3. The screens show the WorkForce 610 Series, but the steps are the same for each computer ...you see the User Account Control screen, click Continue. Insert the printer software CD. 2. Click ...
... see the Software Installation screen, go to use with your printer over the network. When you see the AutoPlay window, click Run SETUP.EXE. Windows® XP: When you want to step 3. The screens show the WorkForce 610 Series, but the steps are the same for each computer ...you see the User Account Control screen, click Continue. Insert the printer software CD. 2. Click ...
Network Installation Guide
Page 26
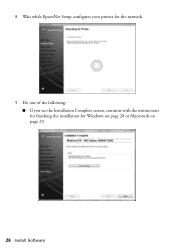
8. Do one of the following: ■ If you see the Installation Complete screen, continue with the instructions for finishing the installation for the network. 9. Wait while EpsonNet Setup configures your printer for Windows on page 28 or Macintosh on page 29. 26 Install Software
8. Do one of the following: ■ If you see the Installation Complete screen, continue with the instructions for finishing the installation for the network. 9. Wait while EpsonNet Setup configures your printer for Windows on page 28 or Macintosh on page 29. 26 Install Software
Network Installation Guide
Page 28
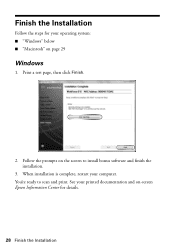
Follow the prompts on page 29 Windows 1. Print a test page, then click Finish. 2. See your printed documentation and on-screen Epson Information Center for your computer. You're ready to install bonus software and finish the installation. 3. Finish the Installation Follow the steps for details. 28 Finish the Installation When installation is complete, restart your operating system: ■ "Windows" below ■ "Macintosh" on the screen to scan and print.
Follow the prompts on page 29 Windows 1. Print a test page, then click Finish. 2. See your printed documentation and on-screen Epson Information Center for your computer. You're ready to install bonus software and finish the installation. 3. Finish the Installation Follow the steps for details. 28 Finish the Installation When installation is complete, restart your operating system: ■ "Windows" below ■ "Macintosh" on the screen to scan and print.
Network Installation Guide
Page 32
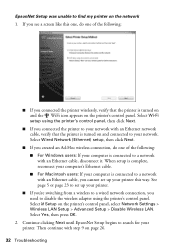
...you're switching from a wireless to a wired network connection, you need to a network with an Ethernet cable, you cannot set up your printer this one, do one of the following : ■ If you see a screen like this way. Select F Setup on page 26. 32 Troubleshooting Select Wired Network...connected to disable the wireless adapter using the printer's control panel, then click Next. ■ If you created an Ad-Hoc wireless connection, do one of the following : ■ For Windows users: If your computer is connected to search for your printer. Select Yes, then press OK. 2....
...you're switching from a wireless to a wired network connection, you need to a network with an Ethernet cable, you cannot set up your printer this one, do one of the following : ■ If you see a screen like this way. Select F Setup on page 26. 32 Troubleshooting Select Wired Network...connected to disable the wireless adapter using the printer's control panel, then click Next. ■ If you created an Ad-Hoc wireless connection, do one of the following : ■ For Windows users: If your computer is connected to search for your printer. Select Yes, then press OK. 2....
Network Installation Guide
Page 33
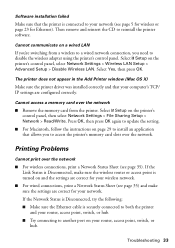
... wired connections, print a Network Status Sheet (see page 35). Select F Setup on the printer's control panel, then select Network Settings > File Sharing Setup > Network > Read/Write. The printer does not appear in the Add Printer window (Mac OS X) Make sure the printer driver was installed correctly and that your computer's TCP/ IP settings are correct...
... wired connections, print a Network Status Sheet (see page 35). Select F Setup on the printer's control panel, then select Network Settings > File Sharing Setup > Network > Read/Write. The printer does not appear in the Add Printer window (Mac OS X) Make sure the printer driver was installed correctly and that your computer's TCP/ IP settings are correct...
Product Brochure
Page 2
... to all -in -one , see www.epson.com/cartridgeinfo Ink fade resistance ratings based on plain paper. Microsoft, Windows, Windows Vista and the Windows logos are trademarks of prints. and Canada Two-year limited with registration7 WorkForce 610 color all -in -one . Actual print times ...(10/100 Mbps) Windows® 7, Windows Vista®, Windows XP, Windows XP Professional x64, Windows 2000 Mac OS® X 10.3.9, 10.4.11, 10.5.x and 10.6.x For the latest information regarding Snow Leopard, please visit www.epson.com/support/snowleopard Epson printer driver, Web to...
... to all -in -one , see www.epson.com/cartridgeinfo Ink fade resistance ratings based on plain paper. Microsoft, Windows, Windows Vista and the Windows logos are trademarks of prints. and Canada Two-year limited with registration7 WorkForce 610 color all -in -one . Actual print times ...(10/100 Mbps) Windows® 7, Windows Vista®, Windows XP, Windows XP Professional x64, Windows 2000 Mac OS® X 10.3.9, 10.4.11, 10.5.x and 10.6.x For the latest information regarding Snow Leopard, please visit www.epson.com/support/snowleopard Epson printer driver, Web to...
Quick Guide
Page 2
... Fax Features 17 Sending a Fax 22 Receiving Faxes 24 Printing From a Memory Card 25 Inserting the Card 25 Printing From Your Computer 28 Printing in Windows 28 Printing With a Macintosh 30 Selecting the Correct Paper Type 34 Scanning a Document or Photo 35 Basic Scanning 35 Scanning Multiple Pages 37 2 Contents
... Fax Features 17 Sending a Fax 22 Receiving Faxes 24 Printing From a Memory Card 25 Inserting the Card 25 Printing From Your Computer 28 Printing in Windows 28 Printing With a Macintosh 30 Selecting the Correct Paper Type 34 Scanning a Document or Photo 35 Basic Scanning 35 Scanning Multiple Pages 37 2 Contents
Quick Guide
Page 16
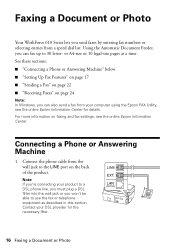
...a Fax" on page 22 ■ "Receiving Faxes" on page 24 Note: In Windows, you can also send a fax from the wall jack to the LINE port on faxing and fax settings, see the online Epson Information Center for the necessary filter. 16 Faxing a Document or Photo For more information ...Epson Information Center. Note: If you're connecting your DSL provider for details. Contact your product to a DSL phone line, you must plug a DSL filter into the wall jack or you send faxes by entering fax numbers or selecting entries from a speed dial list. Faxing a Document or Photo Your WorkForce 610...
...a Fax" on page 22 ■ "Receiving Faxes" on page 24 Note: In Windows, you can also send a fax from the wall jack to the LINE port on faxing and fax settings, see the online Epson Information Center for the necessary filter. 16 Faxing a Document or Photo For more information ...Epson Information Center. Note: If you're connecting your DSL provider for details. Contact your product to a DSL phone line, you must plug a DSL filter into the wall jack or you send faxes by entering fax numbers or selecting entries from a speed dial list. Faxing a Document or Photo Your WorkForce 610...
Quick Guide
Page 28
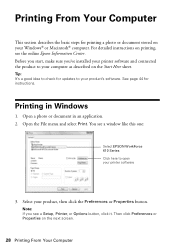
See page 44 for updates to your Windows® or Macintosh® computer. You see a window like this one: Select EPSON WorkForce 610 Series Click here to your computer as described on your product's software. Printing in an application. 2. Select your printer software 3. Note: If you 've installed your printer software and connected the product to open your product...
See page 44 for updates to your Windows® or Macintosh® computer. You see a window like this one: Select EPSON WorkForce 610 Series Click here to your computer as described on your product's software. Printing in an application. 2. Select your printer software 3. Note: If you 've installed your printer software and connected the product to open your product...

Quick Guide
Page 29
... button on the Advanced tab. For more information about print settings, click Help or see your online Epson Information Center. 5. You can create your settings. If you are using (see your online Epson Information Center. 9. 4. Note: For more printing options, click the Advanced tab. To reduce or ...remove red-eye effects in Windows 29 Click OK to the most common settings, click the Shortcuts tab and select one of the presets. Select the type of...
... button on the Advanced tab. For more information about print settings, click Help or see your online Epson Information Center. 5. You can create your settings. If you are using (see your online Epson Information Center. 9. 4. Note: For more printing options, click the Advanced tab. To reduce or ...remove red-eye effects in Windows 29 Click OK to the most common settings, click the Shortcuts tab and select one of the presets. Select the type of...
Quick Guide
Page 30
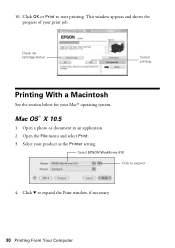
Mac OS® X 10.5 1. Open the File menu and select Print. 3. Click d to expand 4. Check ink cartridge status Cancel printing Printing With a Macintosh See the section below for your product as the Printer setting. Open a photo or document in an application. 2. Select your Mac® operating system. This window appears and shows the progress of your print job. Select EPSON WorkForce 610 Click to expand the Print window, if necessary. 30 Printing From Your Computer 10. Click OK or Print to start printing.
Mac OS® X 10.5 1. Open the File menu and select Print. 3. Click d to expand 4. Check ink cartridge status Cancel printing Printing With a Macintosh See the section below for your product as the Printer setting. Open a photo or document in an application. 2. Select your Mac® operating system. This window appears and shows the progress of your print job. Select EPSON WorkForce 610 Click to expand the Print window, if necessary. 30 Printing From Your Computer 10. Click OK or Print to start printing.

Quick Guide
Page 31
... Select higher quality or faster printing (if available) Select Automatic mode Printing With a Macintosh 31 Or check for your application at the bottom of this window. (If you want isn't shown (for example, Scale), check for it in the settings for it in your paper type (see the settings shown below...
... Select higher quality or faster printing (if available) Select Automatic mode Printing With a Macintosh 31 Or check for your application at the bottom of this window. (If you want isn't shown (for example, Scale), check for it in the settings for it in your paper type (see the settings shown below...

Quick Guide
Page 32
See the online Epson Information Center for your paper size. 3. To monitor your print job, click the printer icon in the Paper Size list for details. Borderless option in the dock. Click OK to cancel, pause, or resume printing, if necessary. Cancel ...10.4 1. Select Page Setup from the pop-up menu. Click Print. 9. Select the following settings: Select WorkForce 610 Select your Paper Size Select your print job, then select an option to close the Page Setup window. 32 Printing From Your Computer Note: To reduce or remove red-eye effects in an application. 2. Choose...
See the online Epson Information Center for your paper size. 3. To monitor your print job, click the printer icon in the Paper Size list for details. Borderless option in the dock. Click OK to cancel, pause, or resume printing, if necessary. Cancel ...10.4 1. Select Page Setup from the pop-up menu. Click Print. 9. Select the following settings: Select WorkForce 610 Select your Paper Size Select your print job, then select an option to close the Page Setup window. 32 Printing From Your Computer Note: To reduce or remove red-eye effects in an application. 2. Choose...
Quick Guide
Page 33
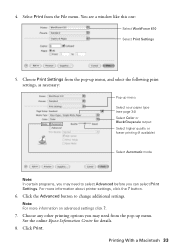
...(if available) Select Automatic mode Note: In certain programs, you may need from the pop-up menu Select your paper type (see a window like this one: Select WorkForce 610 Select Print Settings 5. Click Print. 4. Click the Advanced button to select Advanced before you may need to change additional settings. Choose Print Settings...menu. Choose any other printing options you can select Print Settings. For more information on advanced settings click ?. 7. Note: For more information about printer settings, click the ? Printing With a Macintosh 33 button. 6. See the online...
...(if available) Select Automatic mode Note: In certain programs, you may need from the pop-up menu Select your paper type (see a window like this one: Select WorkForce 610 Select Print Settings 5. Click Print. 4. Click the Advanced button to select Advanced before you may need to change additional settings. Choose Print Settings...menu. Choose any other printing options you can select Print Settings. For more information on advanced settings click ?. 7. Note: For more information about printer settings, click the ? Printing With a Macintosh 33 button. 6. See the online...

Quick Guide
Page 35
...your product to scan original documents and photos and save your image to start Epson Scan directly from any TWAIN-compliant application using Epson Scan. Note: For detailed scanning instructions, see the online Epson Information Center. Open the document cover and place your original face-down on ... digital files on page 9. 2. Or you don't move the original. 3. Basic Scanning You can start Epson Scan: ■ Windows: Double-click the EPSON Scan icon on your application. Do one of tools. Close the cover gently so you can scan from your computer and save them as shown on...
...your product to scan original documents and photos and save your image to start Epson Scan directly from any TWAIN-compliant application using Epson Scan. Note: For detailed scanning instructions, see the online Epson Information Center. Open the document cover and place your original face-down on ... digital files on page 9. 2. Or you don't move the original. 3. Basic Scanning You can start Epson Scan: ■ Windows: Double-click the EPSON Scan icon on your application. Do one of tools. Close the cover gently so you can scan from your computer and save them as shown on...

Quick Guide
Page 36
... as PDF) for your scanned image appears in the application's window. 36 Scanning a Document or Photo If you see a File Save Settings window. Click Scan. 4. Epson Scan opens in Office Mode the first time you started Epson Scan from another application, your scanned document, then click OK.... 6. If you use Home mode to change the scan mode using the Mode selector in Windows Explorer or Macintosh ...
... as PDF) for your scanned image appears in the application's window. 36 Scanning a Document or Photo If you see a File Save Settings window. Click Scan. 4. Epson Scan opens in Office Mode the first time you started Epson Scan from another application, your scanned document, then click OK.... 6. If you use Home mode to change the scan mode using the Mode selector in Windows Explorer or Macintosh ...

Quick Guide
Page 37
... Center for your desktop. ■ Macintosh: Double-click EPSON Scan in PDF or another format. Then click OK. Do one of the originals and their Orientation on your scanned document. Select the Size of the following to start Epson Scan: ■ Windows: Double-click the EPSON Scan icon on the scanner. 7. Adjust the image quality...
... Center for your desktop. ■ Macintosh: Double-click EPSON Scan in PDF or another format. Then click OK. Do one of the originals and their Orientation on your scanned document. Select the Size of the following to start Epson Scan: ■ Windows: Double-click the EPSON Scan icon on the scanner. 7. Adjust the image quality...
Quick Guide
Page 40
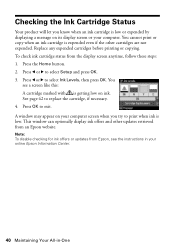
... ink cartridge status from an Epson website. Press l or r to replace the cartridge, if necessary. 4. See page 42 to select Setup and press OK. 3. A window may appear on your computer... try to select Ink Levels, then press OK. Press the Home button. 2. This window can optionally display ink offers and other cartridges are not expended. Press l or r ...computer. Press OK to exit. Note: To disable checking for ink offers or updates from Epson, see a screen like this: A cartridge marked with is expended even if the other ... online Epson Information Center. 40 Maintaining Your All-in...
... ink cartridge status from an Epson website. Press l or r to replace the cartridge, if necessary. 4. See page 42 to select Setup and press OK. 3. A window may appear on your computer... try to select Ink Levels, then press OK. Press the Home button. 2. This window can optionally display ink offers and other cartridges are not expended. Press l or r ...computer. Press OK to exit. Note: To disable checking for ink offers or updates from Epson, see a screen like this: A cartridge marked with is expended even if the other ... online Epson Information Center. 40 Maintaining Your All-in...


