

Network Installation Guide
Page 27
Follow the on -screen instructions to print a test page and finish the installation. Wait for the software installation to scan and print. When installation is complete, you 're finished selecting settings, click Next. 3. Finish the Installation 27 Follow the on -screen instructions.... system: ■ "Windows" below , you can do the following: ■ Enter a new name for the printer in the Printer Name text box (optional) ■ Select Set as default to make the printer your printed documentation and on page 28 Windows 1. When you 're ready to complete, then click Next. 4. When...
Follow the on -screen instructions to print a test page and finish the installation. Wait for the software installation to scan and print. When installation is complete, you 're finished selecting settings, click Next. 3. Finish the Installation 27 Follow the on -screen instructions.... system: ■ "Windows" below , you can do the following: ■ Enter a new name for the printer in the Printer Name text box (optional) ■ Select Set as default to make the printer your printed documentation and on page 28 Windows 1. When you 're ready to complete, then click Next. 4. When...
Network Installation Guide
Page 29
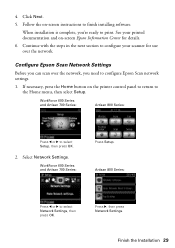
... Follow the on the printer control panel to return to the Home menu, then select Setup. Select Network Settings. Finish the Installation 29 Continue with the steps in the next section to select Network Settings, then press OK. WorkForce 600 Series and Artisan 700 ..., press the Home button on -screen instructions to configure Epson Scan network settings. 1. See your scanner for details. 6. WorkForce 600 Series and Artisan 700 Series: Artisan 800 Series: Press l or r to print. Click Next. 5. Configure Epson Scan Network Settings Before you 're ready to select Setup, ...
... Follow the on the printer control panel to return to the Home menu, then select Setup. Select Network Settings. Finish the Installation 29 Continue with the steps in the next section to select Network Settings, then press OK. WorkForce 600 Series and Artisan 700 ..., press the Home button on -screen instructions to configure Epson Scan network settings. 1. See your scanner for details. 6. WorkForce 600 Series and Artisan 700 Series: Artisan 800 Series: Press l or r to print. Click Next. 5. Configure Epson Scan Network Settings Before you 're ready to select Setup, ...
Network Installation Guide
Page 30
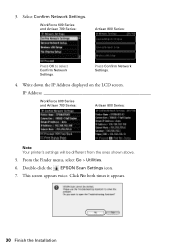
Write down the IP Address displayed on the LCD screen. Double-click the EPSON Scan Settings icon. 7. Click No both times it appears. 30 Finish the Installation Select Confirm Network Settings. From the Finder menu, select Go > Utilities. 6. 3. WorkForce 600 Series and Artisan 700 Series: Artisan 800 Series: Press OK to select Confirm Network Settings. Press Confirm Network Settings. 4. This screen appears twice. IP Address WorkForce 600 Series and Artisan 700 Series: Artisan 800 Series: Note: Your printer's settings will be different from the ones shown above. 5.
Write down the IP Address displayed on the LCD screen. Double-click the EPSON Scan Settings icon. 7. Click No both times it appears. 30 Finish the Installation Select Confirm Network Settings. From the Finder menu, select Go > Utilities. 6. 3. WorkForce 600 Series and Artisan 700 Series: Artisan 800 Series: Press OK to select Confirm Network Settings. Press Confirm Network Settings. 4. This screen appears twice. IP Address WorkForce 600 Series and Artisan 700 Series: Artisan 800 Series: Note: Your printer's settings will be different from the ones shown above. 5.
Network Installation Guide
Page 32
...it is working correctly. ■ Make sure that the printer is within range of your printed documentation and on-screen Epson Information Center for help: ■ "Setup Problems" below ■ "Printing Problems" on page 34 ■ "Scanning Problems" on a network, check these sections for details.... Click OK again to scan and print. 11. You're ready to close the EPSON Scan Settings window. See your wireless router or access point. ■ Avoid placing the printer near a microwave oven, 2.4 GHz cordless phone, or large metal object ...
...it is working correctly. ■ Make sure that the printer is within range of your printed documentation and on-screen Epson Information Center for help: ■ "Setup Problems" below ■ "Printing Problems" on page 34 ■ "Scanning Problems" on a network, check these sections for details.... Click OK again to scan and print. 11. You're ready to close the EPSON Scan Settings window. See your wireless router or access point. ■ Avoid placing the printer near a microwave oven, 2.4 GHz cordless phone, or large metal object ...
Network Installation Guide
Page 35
...interrupted while starting Epson Scan, exit Epson Scan, and restart it 's poor, try restarting Epson Scan. A dial-up connection dialog box appears when printing with EpsonNet Print If you use a dial-up connection to dial manually (Never dial a connection). If Epson Scan cannot restart, turn the printer off Print a... Network Status Sheet (see page 36) and check the Signal Condition. Scanning Problems Cannot find the scanner or start Epson Scan ■ If you're using a LAN connection ...
...interrupted while starting Epson Scan, exit Epson Scan, and restart it 's poor, try restarting Epson Scan. A dial-up connection dialog box appears when printing with EpsonNet Print If you use a dial-up connection to dial manually (Never dial a connection). If Epson Scan cannot restart, turn the printer off Print a... Network Status Sheet (see page 36) and check the Signal Condition. Scanning Problems Cannot find the scanner or start Epson Scan ■ If you're using a LAN connection ...
Network Installation Guide
Page 36
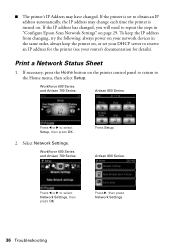
... . If necessary, press the Home button on page 29. WorkForce 600 Series and Artisan 700 Series: Press Setup. ■ The printer's IP Address may change each time the printer is set to obtain an IP address automatically, the IP address...WorkForce 600 Series and Artisan 700 Series: Artisan 800 Series: Press l or r to select Network Settings, then press OK. Press r, then press Network Settings. 36 Troubleshooting To keep the IP address from changing, try the following: always power on your router's documentation for the printer (see your network devices in "Configure Epson Scan...
... . If necessary, press the Home button on page 29. WorkForce 600 Series and Artisan 700 Series: Press Setup. ■ The printer's IP Address may change each time the printer is set to obtain an IP address automatically, the IP address...WorkForce 600 Series and Artisan 700 Series: Artisan 800 Series: Press l or r to select Network Settings, then press OK. Press r, then press Network Settings. 36 Troubleshooting To keep the IP address from changing, try the following: always power on your router's documentation for the printer (see your network devices in "Configure Epson Scan...

Using the Control Panel for Wireless Network Installation
Page 16
Follow the on -screen instructions to scan and print. Wait for the printer in the Printer Name text box (optional) ■ Select Set as default to complete, then click Next. 4. See your operating system: ■ "Windows" below , you see ...your printed documentation and on-screen Epson Information Center for details. 16 Finishing the Installation When you 're ready to print a test page and finish the installation. When you can do the following: ■ Enter a new name for the software installation to make the printer your default printer (optional) 2. When installation is...
Follow the on -screen instructions to scan and print. Wait for the printer in the Printer Name text box (optional) ■ Select Set as default to complete, then click Next. 4. See your operating system: ■ "Windows" below , you see ...your printed documentation and on-screen Epson Information Center for details. 16 Finishing the Installation When you 're ready to print a test page and finish the installation. When you can do the following: ■ Enter a new name for the software installation to make the printer your default printer (optional) 2. When installation is...
Using the Control Panel for Wireless Network Installation
Page 18
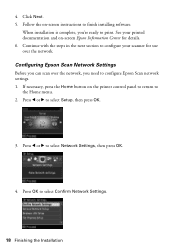
...the Home button on the printer control panel to return to select Network Settings, then press OK. 4. Press l or r to the Home menu. 2. Follow the on -screen Epson Information Center for use over the network, you 're ready to configure Epson Scan network settings. 1. Press ...finish installing software. See your scanner for details. 6. When installation is complete, you need to print. 4. Configuring Epson Scan Network Settings Before you can scan over the network. Continue with the steps in the next section to select Confirm Network Settings. 18 Finishing the Installation...
...the Home button on the printer control panel to return to select Network Settings, then press OK. 4. Press l or r to the Home menu. 2. Follow the on -screen Epson Information Center for use over the network, you 're ready to configure Epson Scan network settings. 1. Press ...finish installing software. See your scanner for details. 6. When installation is complete, you need to print. 4. Configuring Epson Scan Network Settings Before you can scan over the network. Continue with the steps in the next section to select Confirm Network Settings. 18 Finishing the Installation...
Using the Control Panel for Wireless Network Installation
Page 19
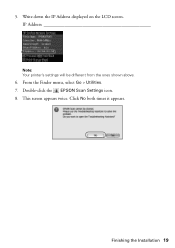
5. Write down the IP Address displayed on the LCD screen. This screen appears twice. Click No both times it appears. From the Finder menu, select Go > Utilities. 7. IP Address Note: Your printer's settings will be different from the ones shown above. 6. Double-click the EPSON Scan Settings icon. 8. Finishing the Installation 19
5. Write down the IP Address displayed on the LCD screen. This screen appears twice. Click No both times it appears. From the Finder menu, select Go > Utilities. 7. IP Address Note: Your printer's settings will be different from the ones shown above. 6. Double-click the EPSON Scan Settings icon. 8. Finishing the Installation 19
Using the Control Panel for Wireless Network Installation
Page 21
... of your printed documentation and on-screen Epson Information Center for help: ■ "Setup Problems" below ■ "Printing Problems" on page 23 ■ "Scanning Problems" on a network, check these sections for details. Note: If the printer's IP address changes, you have problems setting... up or using your product on page 24 This section also explains how to reconfigure Epson Scan network settings. Troubleshooting 21 ...
... of your printed documentation and on-screen Epson Information Center for help: ■ "Setup Problems" below ■ "Printing Problems" on page 23 ■ "Scanning Problems" on a network, check these sections for details. Note: If the printer's IP address changes, you have problems setting... up or using your product on page 24 This section also explains how to reconfigure Epson Scan network settings. Troubleshooting 21 ...
Using the Control Panel for Wireless Network Installation
Page 24
... Troubleshooting In this case, print a Network Status Sheet (see the Epson Scan Help. ■ If you are scanning a large document at high resolution, a communication error may change each time the printer is set your network devices in EPSON Scan Settings. If Epson Scan cannot restart, turn the printer off and back on, and then try the following: always power...
... Troubleshooting In this case, print a Network Status Sheet (see the Epson Scan Help. ■ If you are scanning a large document at high resolution, a communication error may change each time the printer is set your network devices in EPSON Scan Settings. If Epson Scan cannot restart, turn the printer off and back on, and then try the following: always power...

Product Brochure
Page 1
...and Ethernet networking • Print more • Save paper - One-touch copying with registration†, plus quick product exchange OCR and creativity...speed without a computer - Epson PreferredSM program with 2-year limited warranty and 2-year toll-free support, with high quality scanning; Highcapacity Black, Cyan,..., fade, and water resistant, highlighter friendly documents rival those from a laser printer and photos rival those from the lab • Send faxes fast, even in... WorkForce™ 600 Print | Copy | Scan | Fax | Photo | Wi-Fi® Engineered for small business...
...and Ethernet networking • Print more • Save paper - One-touch copying with registration†, plus quick product exchange OCR and creativity...speed without a computer - Epson PreferredSM program with 2-year limited warranty and 2-year toll-free support, with high quality scanning; Highcapacity Black, Cyan,..., fade, and water resistant, highlighter friendly documents rival those from a laser printer and photos rival those from the lab • Send faxes fast, even in... WorkForce™ 600 Print | Copy | Scan | Fax | Photo | Wi-Fi® Engineered for small business...
Product Brochure
Page 2
... graph papers, personalized stationery with registration WorkForce 600 color all purchasers; as fast as of March 2008. Based on Epson testing of power estimated to be used for more information about two times faster compared to ink jet printers priced at $199 or less available ... card, Auto Photo Correction, print your print quality and longevity and could result in all rights in -one damage. See www.epson.com/ printspeed for priming the printer. WorkForce 600 Print | Copy | Scan | Fax | Photo | Wi-Fi® Printing Technology 4-color (CMYK) drop-on-demand MicroPiezo®...
... graph papers, personalized stationery with registration WorkForce 600 color all purchasers; as fast as of March 2008. Based on Epson testing of power estimated to be used for more information about two times faster compared to ink jet printers priced at $199 or less available ... card, Auto Photo Correction, print your print quality and longevity and could result in all rights in -one damage. See www.epson.com/ printspeed for priming the printer. WorkForce 600 Print | Copy | Scan | Fax | Photo | Wi-Fi® Printing Technology 4-color (CMYK) drop-on-demand MicroPiezo®...
Product Support Bulletin(s)
Page 5
... by download package (executable file). -There is no problem in the setting file and the printer name searched with EpsonNet SetupManager is partially different. 3) It is possible to install a printer driver by the script feature using an IPP port on Windows Vista (64 bit). 1.6aE ... the operation system. 1) An error message is displayed in the case where it tries to distribute a new EPSON Scan, and EPSON Scan already has registered 50 (the upper limit) IP addresses. 2) It is possible to install a printer driver, even if the printer name in the installation of 5 PSB.2009.01.004
... by download package (executable file). -There is no problem in the setting file and the printer name searched with EpsonNet SetupManager is partially different. 3) It is possible to install a printer driver by the script feature using an IPP port on Windows Vista (64 bit). 1.6aE ... the operation system. 1) An error message is displayed in the case where it tries to distribute a new EPSON Scan, and EPSON Scan already has registered 50 (the upper limit) IP addresses. 2) It is possible to install a printer driver, even if the printer name in the installation of 5 PSB.2009.01.004
Quick Guide
Page 1
Epson WorkForce® 600 Series Quick Guide Basic Printing, Copying, Scanning, and Faxing Maintaining Your All-in-One Solving Problems
Epson WorkForce® 600 Series Quick Guide Basic Printing, Copying, Scanning, and Faxing Maintaining Your All-in-One Solving Problems
Quick Guide
Page 2
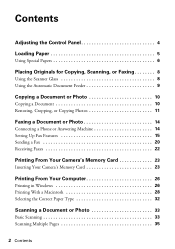
Contents Adjusting the Control Panel 4 Loading Paper 5 Using Special Papers 6 Placing Originals for Copying, Scanning, or Faxing 8 Using the Scanner Glass 8 Using the Automatic Document Feeder 9 Copying a Document or Photo 10 Copying a Document 10 Restoring, Cropping, or Copying Photos 11 ... Inserting Your Camera's Memory Card 23 Printing From Your Computer 26 Printing in Windows 26 Printing With a Macintosh 28 Selecting the Correct Paper Type 32 Scanning a Document or Photo 33 Basic Scanning 33 Scanning Multiple Pages 35 2 Contents
Contents Adjusting the Control Panel 4 Loading Paper 5 Using Special Papers 6 Placing Originals for Copying, Scanning, or Faxing 8 Using the Scanner Glass 8 Using the Automatic Document Feeder 9 Copying a Document or Photo 10 Copying a Document 10 Restoring, Cropping, or Copying Photos 11 ... Inserting Your Camera's Memory Card 23 Printing From Your Computer 26 Printing in Windows 26 Printing With a Macintosh 28 Selecting the Correct Paper Type 32 Scanning a Document or Photo 33 Basic Scanning 33 Scanning Multiple Pages 35 2 Contents

Quick Guide
Page 8
or 4 × 6-inch photos, you can place one or two photos or a document up to make color or black and white copies...the back left corner. Open the document cover and place your documents or photos on the scanner glass. If you copy, scan, or fax, place your original face-down on the scanner glass to two at least 1/4 inch (5 mm) apart. 1/4 ...inch (5 mm) 2. Placing Originals for Copying, Scanning, or Faxing 1/4 inch (5 mm) Place them at a time on the scanner glass (below) or in the Automatic Document Feeder ...
or 4 × 6-inch photos, you can place one or two photos or a document up to make color or black and white copies...the back left corner. Open the document cover and place your documents or photos on the scanner glass. If you copy, scan, or fax, place your original face-down on the scanner glass to two at least 1/4 inch (5 mm) apart. 1/4 ...inch (5 mm) 2. Placing Originals for Copying, Scanning, or Faxing 1/4 inch (5 mm) Place them at a time on the scanner glass (below) or in the Automatic Document Feeder ...
Quick Guide
Page 13
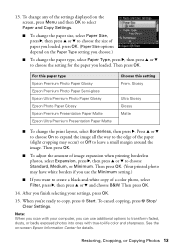
... white borders if you use the Minimum setting.) ■ If you can use additional options to transform faded, dusty, or badly exposed photos into ones with true-to leave a small margin around the image. Then press OK. (Your printed photo may occur) or Off to -life color and ...then press r. Restoring, Cropping, or Copying Photos 13 press OK. (Paper Size options depend on -screen Epson Information Center for the paper you 're ready to choose Standard, Medium, or Minimum. Note: When you scan with your settings, press OK. 15. Then press OK. 14. To cancel copying, press y Stop/ ...
... white borders if you use the Minimum setting.) ■ If you can use additional options to transform faded, dusty, or badly exposed photos into ones with true-to leave a small margin around the image. Then press OK. (Your printed photo may occur) or Off to -life color and ...then press r. Restoring, Cropping, or Copying Photos 13 press OK. (Paper Size options depend on -screen Epson Information Center for the paper you 're ready to choose Standard, Medium, or Minimum. Note: When you scan with your settings, press OK. 15. Then press OK. 14. To cancel copying, press y Stop/ ...
Quick Guide
Page 15
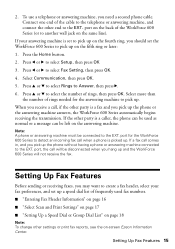
... Epson Information Center. port for the answering machine to Answer, then press r. 6. port, the call , if the other end to the EXT. Select more than the number of the WorkForce 600 ...one end of the cable to the telephone or answering machine, and connect the other party is set to pick up a speed dial list of rings, then press OK. If your fax preferences, and set the WorkForce 600...of frequently used fax numbers. ■ "Entering Fax Header Information" on page 16 ■ "Select Scan and Print Settings" on page 17 ■ "Setting Up a Speed Dial or Group Dial List" ...
... Epson Information Center. port for the answering machine to Answer, then press r. 6. port, the call , if the other end to the EXT. Select more than the number of the WorkForce 600 ...one end of the cable to the telephone or answering machine, and connect the other party is set to pick up a speed dial list of rings, then press OK. If your fax preferences, and set the WorkForce 600...of frequently used fax numbers. ■ "Entering Fax Header Information" on page 16 ■ "Select Scan and Print Settings" on page 17 ■ "Setting Up a Speed Dial or Group Dial List" ...
Quick Guide
Page 17
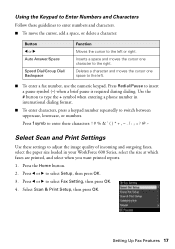
... and moves the cursor one character to the right. Select Scan & Print Setup, then press OK. Press l or r to select Setup, then press OK. 3. Press the Home button. 2. Use the # button to type the + symbol when entering a phone number in your WorkForce 600 Series, select the size... at which faxes are printed, and select when you want printed reports. 1. Press 1symb to enter these characters Select Scan and Print Settings Use these guidelines to enter numbers and characters. &#...
... and moves the cursor one character to the right. Select Scan & Print Setup, then press OK. Press l or r to select Setup, then press OK. 3. Press the Home button. 2. Use the # button to type the + symbol when entering a phone number in your WorkForce 600 Series, select the size... at which faxes are printed, and select when you want printed reports. 1. Press 1symb to enter these characters Select Scan and Print Settings Use these guidelines to enter numbers and characters. &#...


