
Product Brochure
Page 1
...others - smudge, fade and water resistant prints; connect to your all-in-one with two Black cartridges6 save up to 180 pages • Protect important documents...than a laser printer4 • Save paper - highlighter friendly too • Save energy - get about 2x more done - 30-page Auto Document Feeder to 2x the speed of originals &#...save paper by faxing documents directly from a laser printer; as fast as fast - built-in black and color - documents rival those from your paper supply with wireless networking capabilities; WorkForce® 310 Print ...
...others - smudge, fade and water resistant prints; connect to your all-in-one with two Black cartridges6 save up to 180 pages • Protect important documents...than a laser printer4 • Save paper - highlighter friendly too • Save energy - get about 2x more done - 30-page Auto Document Feeder to 2x the speed of originals &#...save paper by faxing documents directly from a laser printer; as fast as fast - built-in black and color - documents rival those from your paper supply with wireless networking capabilities; WorkForce® 310 Print ...
Quick Guide
Page 2
Contents Introduction 4 Installing Your WorkForce 310 Series on a Network 5 Connect an Ethernet Network Cable 5 Install Software 6 Loading Paper 14 Using Special Papers 15 Placing Originals for Copying, Scanning, or Faxing 17 Using the Scanner Glass 17 Using the Automatic Document Feeder 18 Copying a Document or Photo 20 Copying a Document 20 Copying a Photo 21 Faxing a Document 22... 28 Sending a Fax From Windows 29 Receiving Faxes 31 Printing From Your Computer 32 Printing in Windows 32 Printing With a Macintosh 34 Selecting the Correct Paper Type 38 2 Contents
Contents Introduction 4 Installing Your WorkForce 310 Series on a Network 5 Connect an Ethernet Network Cable 5 Install Software 6 Loading Paper 14 Using Special Papers 15 Placing Originals for Copying, Scanning, or Faxing 17 Using the Scanner Glass 17 Using the Automatic Document Feeder 18 Copying a Document or Photo 20 Copying a Document 20 Copying a Photo 21 Faxing a Document 22... 28 Sending a Fax From Windows 29 Receiving Faxes 31 Printing From Your Computer 32 Printing in Windows 32 Printing With a Macintosh 34 Selecting the Correct Paper Type 38 2 Contents
Quick Guide
Page 14
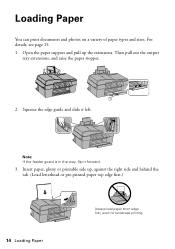
Open the paper support and pull up , against the right side and behind the tab. (Load letterhead or pre-printed paper top edge first.) FPO 14 Loading Paper Always load paper short edge first, even for landscape printing. Note: If the feeder guard is in the way, flip it left. Insert paper, glossy or printable side up the extensions. Then pull out the output tray extensions, and raise the paper stopper. 2. For details, see page 15. 1. Squeeze the edge guide and slide it forward. 3. Loading Paper You can print documents and photos on a variety of paper types and sizes.
Open the paper support and pull up , against the right side and behind the tab. (Load letterhead or pre-printed paper top edge first.) FPO 14 Loading Paper Always load paper short edge first, even for landscape printing. Note: If the feeder guard is in the way, flip it left. Insert paper, glossy or printable side up the extensions. Then pull out the output tray extensions, and raise the paper stopper. 2. For details, see page 15. 1. Squeeze the edge guide and slide it forward. 3. Loading Paper You can print documents and photos on a variety of paper types and sizes.

Quick Guide
Page 18
Slide the edge guide outward. 4. Insert the originals face-up to even the edges. 2. Using the Automatic Document Feeder You can place up . 18 Placing Originals for Copying, Scanning, or Faxing Open the ADF paper support. 3. Fan the originals, then tap them on a flat surface to 30 letter-size (or A4) sheets or 10 legal-size sheets in the Automatic Document Feeder (ADF). 1.
Slide the edge guide outward. 4. Insert the originals face-up to even the edges. 2. Using the Automatic Document Feeder You can place up . 18 Placing Originals for Copying, Scanning, or Faxing Open the ADF paper support. 3. Fan the originals, then tap them on a flat surface to 30 letter-size (or A4) sheets or 10 legal-size sheets in the Automatic Document Feeder (ADF). 1.

Quick Guide
Page 19
5. Note: When you copy a legal-size document, the image will be cut off. Press u or d to select Legal->Letter, then press OK. Using the Automatic Document Feeder 19 To copy a legal-size document on letter-size paper, press x Menu, select Reduce/Enlarge, then press OK. Slide the edge guide against the originals, but not too tightly. If you use the Copy function, letter-size paper is automatically selected for your printed copies.
5. Note: When you copy a legal-size document, the image will be cut off. Press u or d to select Legal->Letter, then press OK. Using the Automatic Document Feeder 19 To copy a legal-size document on letter-size paper, press x Menu, select Reduce/Enlarge, then press OK. Slide the edge guide against the originals, but not too tightly. If you use the Copy function, letter-size paper is automatically selected for your printed copies.
Quick Guide
Page 20
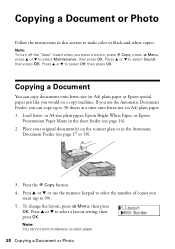
Load letter- or A4-size plain paper, Epson Bright White Paper, or Epson Presentation Paper Matte in the sheet feeder (see page 17 or 18). 3. Copying a Document You can copy up to 99). 5. If you use the numeric keypad to select the number of copies..., then press OK. Copying a Document or Photo Follow the instructions in the Automatic Document Feeder (see page 14). 2. Press u or d or use the Automatic Document Feeder, you can copy documents onto letter-size (or A4) plain paper or Epson special paper just like you would on a copy machine. Press u or d to select a layout setting, ...
Load letter- or A4-size plain paper, Epson Bright White Paper, or Epson Presentation Paper Matte in the sheet feeder (see page 17 or 18). 3. Copying a Document You can copy up to 99). 5. If you use the numeric keypad to select the number of copies..., then press OK. Copying a Document or Photo Follow the instructions in the Automatic Document Feeder (see page 14). 2. Press u or d or use the Automatic Document Feeder, you can copy documents onto letter-size (or A4) plain paper or Epson special paper just like you would on a copy machine. Press u or d to select a layout setting, ...
Quick Guide
Page 21
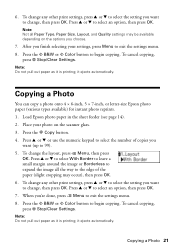
... copying, press y Stop/Clear Settings. Copying a Photo You can copy a photo onto 4 × 6-inch, 5 × 7-inch, or letter-size Epson photo paper (various types available) for instant photo reprints. 1. Place your settings, press Menu to the edge of copies you want to begin copying. When you want... (up to select an option, then press OK. 7. Press u or d to exit the settings menu. 8. Load Epson photo paper in the sheet feeder (see page 14). 2. Press the x B&W or x Color button to change any other print settings, press u or d to select the setting...
... copying, press y Stop/Clear Settings. Copying a Photo You can copy a photo onto 4 × 6-inch, 5 × 7-inch, or letter-size Epson photo paper (various types available) for instant photo reprints. 1. Place your settings, press Menu to the edge of copies you want to begin copying. When you want... (up to select an option, then press OK. 7. Press u or d to exit the settings menu. 8. Load Epson photo paper in the sheet feeder (see page 14). 2. Press the x B&W or x Color button to change any other print settings, press u or d to select the setting...

Quick Guide
Page 35
... or Black/ Grayscale output Select higher quality or faster printing (if available) Select Automatic mode Printing With a Macintosh 35 For borderless photos, choose a Paper Size setting with a Sheet Feeder - Or check for your application at the bottom of this window. (If you're printing from the pop-up menu, and select the...
... or Black/ Grayscale output Select higher quality or faster printing (if available) Select Automatic mode Printing With a Macintosh 35 For borderless photos, choose a Paper Size setting with a Sheet Feeder - Or check for your application at the bottom of this window. (If you're printing from the pop-up menu, and select the...
Quick Guide
Page 36
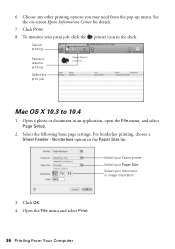
...Open the File menu and select Print. 36 Printing From Your Computer Select your Epson printer Select your Paper Size Select your print job, click the printer icon in the Paper Size list. Select the following basic page settings. Borderless option in the dock. ...Choose any other printing options you may need from the pop-up menu. Open a photo or document in an application, open the File menu, and select Page Setup. 2. For borderless printing, choose a Sheet Feeder - See the on-screen Epson...
...Open the File menu and select Print. 36 Printing From Your Computer Select your Epson printer Select your Paper Size Select your print job, click the printer icon in the Paper Size list. Select the following basic page settings. Borderless option in the dock. ...Choose any other printing options you may need from the pop-up menu. Open a photo or document in an application, open the File menu, and select Page Setup. 2. For borderless printing, choose a Sheet Feeder - See the on-screen Epson...
Quick Guide
Page 42
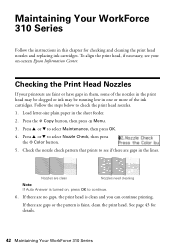
... or ink may be running low in the lines. Maintaining Your WorkForce 310 Series Follow the instructions in the sheet feeder. 2. Follow the steps below to select Maintenance, then press OK... to select Nozzle Check, then press the x Color button. 5. If there are gaps in one or more of the ink cartridges. Press u or d to see your printouts are clean Nozzles...Epson Information Center. To align the print head, if necessary, see if there are gaps or the pattern is faint, clean the print head. Load letter-size plain paper in this chapter for details. 42 Maintaining Your WorkForce 310...
... or ink may be running low in the lines. Maintaining Your WorkForce 310 Series Follow the instructions in the sheet feeder. 2. Follow the steps below to select Maintenance, then press OK... to select Nozzle Check, then press the x Color button. 5. If there are gaps in one or more of the ink cartridges. Press u or d to see your printouts are clean Nozzles...Epson Information Center. To align the print head, if necessary, see if there are gaps or the pattern is faint, clean the print head. Load letter-size plain paper in this chapter for details. 42 Maintaining Your WorkForce 310...
Quick Guide
Page 43
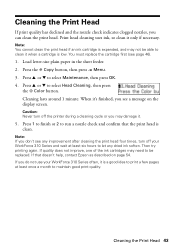
... press x Menu. 3. If quality does not improve, one of the ink cartridges may need to be able to ...paper in the sheet feeder. 2. Cleaning the Print Head 43 Caution: Never turn off the printer during a cleaning cycle or you don't see page 46). 1. Press 1 to finish or 2 to let any improvement after cleaning the print head four times, turn off your WorkForce 310... Series often, it only if necessary. Then try printing again. If you do not use your WorkForce 310 Series and wait at least six hours to run a nozzle check and confirm that doesn't help, contact Epson...
... press x Menu. 3. If quality does not improve, one of the ink cartridges may need to be able to ...paper in the sheet feeder. 2. Cleaning the Print Head 43 Caution: Never turn off the printer during a cleaning cycle or you don't see page 46). 1. Press 1 to finish or 2 to let any improvement after cleaning the print head four times, turn off your WorkForce 310... Series often, it only if necessary. Then try printing again. If you do not use your WorkForce 310 Series and wait at least six hours to run a nozzle check and confirm that doesn't help, contact Epson...
Quick Guide
Page 50
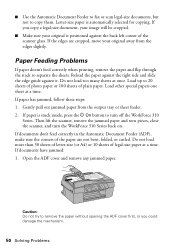
...documents don't feed correctly in the Automatic Document Feeder (ADF), make sure the corners of the scanner glass. Open the ADF cover and remove any jammed paper. Paper Feeding Problems If paper doesn't feed correctly when printing, remove the paper and flip through the stack to copy them.... the WorkForce 310 Series back on. Letter-size paper is positioned against it. Reload the paper against the right side and slide the edge guide against the back left corner of the paper are cropped, move your original is automatically selected for copying. Load other special papers one sheet ...
...documents don't feed correctly in the Automatic Document Feeder (ADF), make sure the corners of the scanner glass. Open the ADF cover and remove any jammed paper. Paper Feeding Problems If paper doesn't feed correctly when printing, remove the paper and flip through the stack to copy them.... the WorkForce 310 Series back on. Letter-size paper is positioned against it. Reload the paper against the right side and slide the edge guide against the back left corner of the paper are cropped, move your original is automatically selected for copying. Load other special papers one sheet ...

Start Here
Page 4
always load it left. Note: If you are using legal-size paper, do not raise the stopper. 3 Squeeze the edge guide and slide it short edge first. 5 Slide the edge guide over. 5 Load paper 1 Open the paper support and pull up . Tip: If the feeder guard is in the way, flip it forward. 4 Load paper against the right edge and behind the tab, with the printable side face up the extensions. 2 Pull out the output tray extensions, and raise the stopper. Note: Don't load the paper sideways;
always load it left. Note: If you are using legal-size paper, do not raise the stopper. 3 Squeeze the edge guide and slide it short edge first. 5 Slide the edge guide over. 5 Load paper 1 Open the paper support and pull up . Tip: If the feeder guard is in the way, flip it forward. 4 Load paper against the right edge and behind the tab, with the printable side face up the extensions. 2 Pull out the output tray extensions, and raise the stopper. Note: Don't load the paper sideways;


