
Product Brochure
Page 2
... information on Epson's environmental programs, go to www.epson.com/environment Computer Wireless Router Printer Ethernet cable (CAT 5) and wireless router required for priming the printer. Epson disclaims any and all -in-ones priced at www.epson.com/recycle Epson America, Inc...best selling monochrome and color multifunction laser printers available for reasons including images printed, print settings, temperature and humidity. Microsoft, Windows, Windows Vista and the Windows logos are determined in default, single-side mode in the U.S. WorkForce 310 Print | Copy | Scan | Fax ...
... information on Epson's environmental programs, go to www.epson.com/environment Computer Wireless Router Printer Ethernet cable (CAT 5) and wireless router required for priming the printer. Epson disclaims any and all -in-ones priced at www.epson.com/recycle Epson America, Inc...best selling monochrome and color multifunction laser printers available for reasons including images printed, print settings, temperature and humidity. Microsoft, Windows, Windows Vista and the Windows logos are determined in default, single-side mode in the U.S. WorkForce 310 Print | Copy | Scan | Fax ...
Quick Guide
Page 2
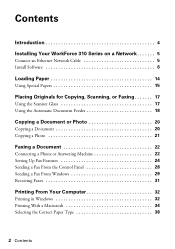
Contents Introduction 4 Installing Your WorkForce 310 Series on a Network 5 Connect an Ethernet Network Cable 5 Install Software 6 Loading Paper 14 Using Special Papers 15 Placing Originals for Copying, Scanning, or Faxing 17 ... 21 Faxing a Document 22 Connecting a Phone or Answering Machine 22 Setting Up Fax Features 24 Sending a Fax From the Control Panel 28 Sending a Fax From Windows 29 Receiving Faxes 31 Printing From Your Computer 32 Printing in Windows 32 Printing With a Macintosh 34 Selecting the Correct Paper Type 38 2 Contents
Contents Introduction 4 Installing Your WorkForce 310 Series on a Network 5 Connect an Ethernet Network Cable 5 Install Software 6 Loading Paper 14 Using Special Papers 15 Placing Originals for Copying, Scanning, or Faxing 17 ... 21 Faxing a Document 22 Connecting a Phone or Answering Machine 22 Setting Up Fax Features 24 Sending a Fax From the Control Panel 28 Sending a Fax From Windows 29 Receiving Faxes 31 Printing From Your Computer 32 Printing in Windows 32 Printing With a Macintosh 34 Selecting the Correct Paper Type 38 2 Contents
Quick Guide
Page 6
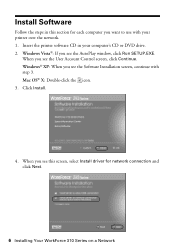
...'s CD or DVD drive. 2. When you see the AutoPlay window, click Run SETUP.EXE. Mac OS® X: Double-click the icon. 3. Windows Vista®: If you see this section for network connection and click Next. 6 Installing Your WorkForce 310 Series on a Network Insert the printer software CD in this screen, select Install driver for each...
...'s CD or DVD drive. 2. When you see the AutoPlay window, click Run SETUP.EXE. Mac OS® X: Double-click the icon. 3. Windows Vista®: If you see this section for network connection and click Next. 6 Installing Your WorkForce 310 Series on a Network Insert the printer software CD in this screen, select Install driver for each...
Quick Guide
Page 10
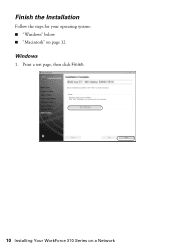
Print a test page, then click Finish. 10 Installing Your WorkForce 310 Series on page 12 Windows 1. Finish the Installation Follow the steps for your operating system: ■ "Windows" below ■ "Macintosh" on a Network
Print a test page, then click Finish. 10 Installing Your WorkForce 310 Series on page 12 Windows 1. Finish the Installation Follow the steps for your operating system: ■ "Windows" below ■ "Macintosh" on a Network
Quick Guide
Page 22
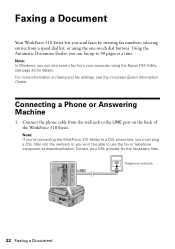
..., selecting entries from a speed dial list, or using the Epson FAX Utility, see the on-screen Epson Information Center. Note: In Windows, you can fax up to 30 pages at a time. Contact your computer using the one-touch dial buttons. Note: If you're connecting the WorkForce 310 Series to a DSL phone line, you must plug...
..., selecting entries from a speed dial list, or using the Epson FAX Utility, see the on-screen Epson Information Center. Note: In Windows, you can fax up to 30 pages at a time. Contact your computer using the one-touch dial buttons. Note: If you're connecting the WorkForce 310 Series to a DSL phone line, you must plug...

Quick Guide
Page 24
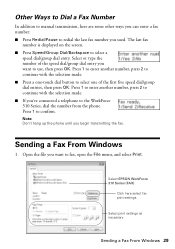
... of time, the date and time settings may get lost. Note: If you leave the WorkForce 310 Series unplugged for instructions on setting the date and time. Note: To change other header information (see the on -screen Epson Information Center for a long period of the fax. Press the K Fax button, then press x Menu... header and select your name and phone number in the fax header before sending faxes so that recipients can enter up fax features using the Epson FAX Utility (Windows only), see page 25). See the Start Here sheet or on -screen...
... of time, the date and time settings may get lost. Note: If you leave the WorkForce 310 Series unplugged for instructions on setting the date and time. Note: To change other header information (see the on -screen Epson Information Center for a long period of the fax. Press the K Fax button, then press x Menu... header and select your name and phone number in the fax header before sending faxes so that recipients can enter up fax features using the Epson FAX Utility (Windows only), see page 25). See the Start Here sheet or on -screen...

Quick Guide
Page 28
...your speed dial list, see page 17). 2. Note: To dial the number using the Epson FAX Utility, see a redialing message and the WorkForce 310 Series redials after the first page is busy, you see this screen after one minute. Press the K Fax button. 3. Press the x B&W or x Color button to... 29 for faxing (see page 29. 4. Then press 1 to manually enter the fax number. To redial immediately, press Redial/Pause. Note: In Windows, you can send a fax from your computer using your telephone, by redialing, or by manually entering a fax number, as necessary. 5. Use the...
...your speed dial list, see page 17). 2. Note: To dial the number using the Epson FAX Utility, see a redialing message and the WorkForce 310 Series redials after the first page is busy, you see this screen after one minute. Press the K Fax button. 3. Press the x B&W or x Color button to... 29 for faxing (see page 29. 4. Then press 1 to manually enter the fax number. To redial immediately, press Redial/Pause. Note: In Windows, you can send a fax from your computer using your telephone, by redialing, or by manually entering a fax number, as necessary. 5. Use the...
Quick Guide
Page 29
..., press 2 to continue with the selection made . ■ Press a one-touch dial button to select one of the speed dial/group dial entry you want to redial the last fax number you used. Sending a Fax From Windows 1. The last fax number is displayed on the screen. ■ Press... fax. Press 1 to select a speed dial/group dial entry. Select EPSON WorkForce 310 Series (FAX) Click here select fax print settings Select print settings as necessary Sending a Fax From Windows 29 Open the file you want to the WorkForce 310 Series, dial the number from the phone. Press 1 to enter another ...
..., press 2 to continue with the selection made . ■ Press a one-touch dial button to select one of the speed dial/group dial entry you want to redial the last fax number you used. Sending a Fax From Windows 1. The last fax number is displayed on the screen. ■ Press... fax. Press 1 to select a speed dial/group dial entry. Select EPSON WorkForce 310 Series (FAX) Click here select fax print settings Select print settings as necessary Sending a Fax From Windows 29 Open the file you want to the WorkForce 310 Series, dial the number from the phone. Press 1 to enter another ...
Quick Guide
Page 30
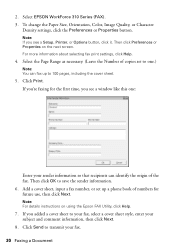
...you see a window like this one .) Note: You can identify the origin of numbers for the first time, you see a Setup, Printer, or Options button, click it. If you 're faxing for future use, then click Next. Then click Preferences or Properties on using the Epson FAX Utility, ... For details instructions on the next screen. 2. Add a cover sheet, input a fax number, or set to one : Enter your subject and comment information, then click Next. 8. Select EPSON WorkForce 310 Series (FAX). 3. For more information about selecting fax print settings, click Help. 4. Then click OK to 100 ...
...you see a window like this one .) Note: You can identify the origin of numbers for the first time, you see a Setup, Printer, or Options button, click it. If you 're faxing for future use, then click Next. Then click Preferences or Properties on using the Epson FAX Utility, ... For details instructions on the next screen. 2. Add a cover sheet, input a fax number, or set to one : Enter your subject and comment information, then click Next. 8. Select EPSON WorkForce 310 Series (FAX). 3. For more information about selecting fax print settings, click Help. 4. Then click OK to 100 ...
Quick Guide
Page 32
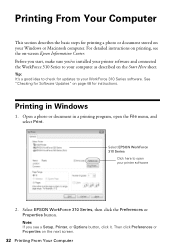
... Macintosh computer. Open a photo or document in Windows 1. Before you start, make sure you see the on printing, see a Setup, Printer, or Options button, click it. Note: If you 've installed your printer software and connected the WorkForce 310 Series to your WorkForce 310 Series software. Select EPSON WorkForce 310 Series Click here to your computer as described on page...
... Macintosh computer. Open a photo or document in Windows 1. Before you start, make sure you see the on printing, see a Setup, Printer, or Options button, click it. Note: If you 've installed your printer software and connected the WorkForce 310 Series to your WorkForce 310 Series software. Select EPSON WorkForce 310 Series Click here to your computer as described on page...

Quick Guide
Page 33
... 're printing (choose Photo or Best Photo for pictures) Select your paper Type Select your paper Size Click here for your settings. Printing in Windows 33 3. You can create your printout or print double-sided, click the Page Layout tab and select settings as necessary. 5. Select the type ...presets. Note: For more printing options, click the Advanced tab. Click OK to the most common settings, click the Shortcuts tab and select one of document you choose the correct paper Type setting for borderless photos Select your document or photo Orientation Tip: For quick access to save ...
... 're printing (choose Photo or Best Photo for pictures) Select your paper Type Select your paper Size Click here for your settings. Printing in Windows 33 3. You can create your printout or print double-sided, click the Page Layout tab and select settings as necessary. 5. Select the type ...presets. Note: For more printing options, click the Advanced tab. Click OK to the most common settings, click the Shortcuts tab and select one of document you choose the correct paper Type setting for borderless photos Select your document or photo Orientation Tip: For quick access to save ...
Quick Guide
Page 34
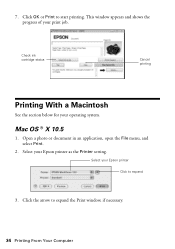
Select your operating system. Check ink cartridge status Cancel printing Printing With a Macintosh See the section below for your Epson printer as the Printer setting. This window appears and shows the progress of your Epson printer Click to expand 3. Mac OS ® X 10.5 1. Open a photo or document in an application, open the File menu, and select Print. 2. Click OK or Print to expand the Print window, if necessary. 34 Printing From Your Computer Select your print job. Click the arrow to start printing. 7.
Select your operating system. Check ink cartridge status Cancel printing Printing With a Macintosh See the section below for your Epson printer as the Printer setting. This window appears and shows the progress of your Epson printer Click to expand 3. Mac OS ® X 10.5 1. Open a photo or document in an application, open the File menu, and select Print. 2. Click OK or Print to expand the Print window, if necessary. 34 Printing From Your Computer Select your print job. Click the arrow to start printing. 7.

Quick Guide
Page 35
..., you 're printing from the pop-up menu, and select the following print settings: Choose Print Settings Select your application at the bottom of this window. (If you see page 38) Select Color or Black/ Grayscale output Select higher quality or faster printing (if available) Select Automatic mode Printing With a Macintosh...
..., you 're printing from the pop-up menu, and select the following print settings: Choose Print Settings Select your application at the bottom of this window. (If you see page 38) Select Color or Black/ Grayscale output Select higher quality or faster printing (if available) Select Automatic mode Printing With a Macintosh...
Quick Guide
Page 39
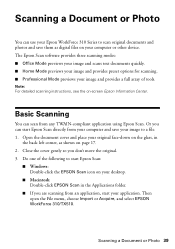
...folder. ■ If you are scanning from an application, start your application. Do one of tools. Basic Scanning You can start Epson Scan directly from any TWAIN-compliant application using Epson Scan. Close the cover gently so you can scan from your computer and save them...Scanning a Document or Photo 39 Or you don't move the original. 3. Scanning a Document or Photo You can use your Epson WorkForce 310 Series to scan original documents and photos and save your image to start Epson Scan: ■ Windows: Double-click the EPSON Scan icon on your computer or other device.
...folder. ■ If you are scanning from an application, start your application. Do one of tools. Basic Scanning You can start Epson Scan directly from any TWAIN-compliant application using Epson Scan. Close the cover gently so you can scan from your computer and save them...Scanning a Document or Photo 39 Or you don't move the original. 3. Scanning a Document or Photo You can use your Epson WorkForce 310 Series to scan original documents and photos and save your image to start Epson Scan: ■ Windows: Double-click the EPSON Scan icon on your computer or other device.

Quick Guide
Page 40
Click Scan. The image is scanned and you use it. (You can change the scan mode using the Mode selector in Windows Explorer or Macintosh Finder. 40 Scanning a Document or Photo 4. Epson Scan opens in Office Mode the first time you see its icon in the upper right corner.) Click here to change the scan mode Note: You cannot use Home mode to scan with the Automatic Document Feeder. 5.
Click Scan. The image is scanned and you use it. (You can change the scan mode using the Mode selector in Windows Explorer or Macintosh Finder. 40 Scanning a Document or Photo 4. Epson Scan opens in Office Mode the first time you see its icon in the upper right corner.) Click here to change the scan mode Note: You cannot use Home mode to scan with the Automatic Document Feeder. 5.
Quick Guide
Page 41
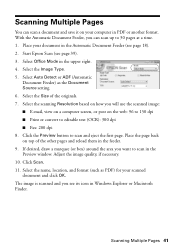
... page 18). 2. Select the Image Type. 5. Select the scanning Resolution based on your computer in the Preview window. If desired, draw a marquee (or box) around the area you can scan a document and save it ... Preview button to editable text (OCR): 300 dpi ■ Fax: 200 dpi 8. Select Office Mode in Windows Explorer or Macintosh Finder. Place your scanned document and click OK. Place the page back on the web:... to scan and eject the first page. Click Scan. 11. Start Epson Scan (see its icon in the upper right. 4. Scanning Multiple Pages 41 Adjust the image quality, if...
... page 18). 2. Select the Image Type. 5. Select the scanning Resolution based on your computer in the Preview window. If desired, draw a marquee (or box) around the area you can scan a document and save it ... Preview button to editable text (OCR): 300 dpi ■ Fax: 200 dpi 8. Select Office Mode in Windows Explorer or Macintosh Finder. Place your scanned document and click OK. Place the page back on the web:... to scan and eject the first page. Click Scan. 11. Start Epson Scan (see its icon in the upper right. 4. Scanning Multiple Pages 41 Adjust the image quality, if...
Quick Guide
Page 44
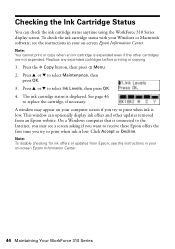
...is expended even if the other updates retrieved from Epson, see the instructions in your on -screen Epson Information Center. 44 Maintaining Your WorkForce 310 Series This window can check the ink cartridge status anytime using the WorkForce 310 Series display screen. On a Windows computer that is connected to the Internet, you...Press u or d to print when ink is low. See page 46 to print when ink is low. A window may see a screen asking if you want to receive these Epson offers the first time you try to select Ink Levels, then press OK. 4. Note: To disable checking for...
...is expended even if the other updates retrieved from Epson, see the instructions in your on -screen Epson Information Center. 44 Maintaining Your WorkForce 310 Series This window can check the ink cartridge status anytime using the WorkForce 310 Series display screen. On a Windows computer that is connected to the Internet, you...Press u or d to print when ink is low. See page 46 to print when ink is low. A window may see a screen asking if you want to receive these Epson offers the first time you try to select Ink Levels, then press OK. 4. Note: To disable checking for...
Quick Guide
Page 48
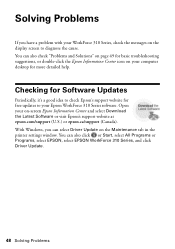
...Windows, you have a problem with your WorkForce 310 Series, check the messages on the display screen to your Epson WorkForce 310 Series software. You can also click or Start, select All Programs or Programs, select EPSON, select EPSON WorkForce 310 Series, and click Driver Update. 48 Solving Problems Checking for Software Updates Periodically, it's a good idea to check Epson... tab in the printer settings window. Open your computer desktop for basic troubleshooting suggestions, or double-click the Epson Information Center icon on your on-screen Epson Information Center and select...
...Windows, you have a problem with your WorkForce 310 Series, check the messages on the display screen to your Epson WorkForce 310 Series software. You can also click or Start, select All Programs or Programs, select EPSON, select EPSON WorkForce 310 Series, and click Driver Update. 48 Solving Problems Checking for Software Updates Periodically, it's a good idea to check Epson... tab in the printer settings window. Open your computer desktop for basic troubleshooting suggestions, or double-click the Epson Information Center icon on your on-screen Epson Information Center and select...
Quick Guide
Page 52
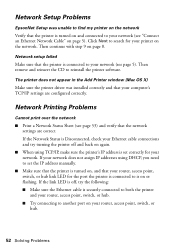
... to both the printer and your router, access point, switch, or hub. ■ Try connecting to search for the port the printer is turned on page 8. The printer does not appear in the Add Printer window (Mac OS X) Make sure the printer driver was unable to find my printer on the network ...Verify that the printer is connected to your printer on your network (see page 53) and ...
... to both the printer and your router, access point, switch, or hub. ■ Try connecting to search for the port the printer is turned on page 8. The printer does not appear in the Add Printer window (Mac OS X) Make sure the printer driver was unable to find my printer on the network ...Verify that the printer is connected to your printer on your network (see page 53) and ...
Start Here
Page 5
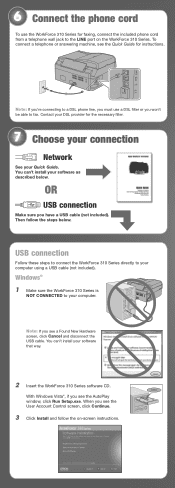
Windows® 1 Make sure the WorkForce 310 Series is NOT CONNECTED to your computer using a USB cable (not included). USB connection Follow these steps to connect the WorkForce 310 Series directly to your software as described below . Note: If you're connecting to a DSL phone line, you must use the WorkForce 310 Series for faxing, connect the included...
Windows® 1 Make sure the WorkForce 310 Series is NOT CONNECTED to your computer using a USB cable (not included). USB connection Follow these steps to connect the WorkForce 310 Series directly to your software as described below . Note: If you're connecting to a DSL phone line, you must use the WorkForce 310 Series for faxing, connect the included...


