UB-E03 Users Manual
Page 2
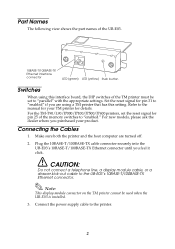
...'s 10BASE-T/100BASE-TX Ethernet connector. For the TM-T90/L90/J7000/J7100/J7500/J7600 printers, set to "parallel" with the appropriate settings. Connecting the Cables 1. Make sure both the printer and the host computer are using a TM printer that has this interface board, the DIP switches of the TM printer must be used when the UB-E03...
...'s 10BASE-T/100BASE-TX Ethernet connector. For the TM-T90/L90/J7000/J7100/J7500/J7600 printers, set to "parallel" with the appropriate settings. Connecting the Cables 1. Make sure both the printer and the host computer are using a TM printer that has this interface board, the DIP switches of the TM printer must be used when the UB-E03...

UB-E04 Users Manual
Page 6
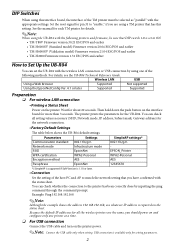
... the Technical Reference Guide of the printer or the interface board. Connecting the Cables 1. Printer settings If the TM printer has a memory switch or a dip switch for "#25 pin reset signal" or "#31 pin reset signal" setting, do not change the setting from or install the interface board into the UB-E04's Ethernet connector until you feel...
... the Technical Reference Guide of the printer or the interface board. Connecting the Cables 1. Printer settings If the TM printer has a memory switch or a dip switch for "#25 pin reset signal" or "#31 pin reset signal" setting, do not change the setting from or install the interface board into the UB-E04's Ethernet connector until you feel...
UB-R04 Technical Reference Guide
Page 24
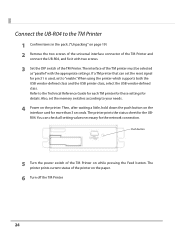
... necessary for the network connection. The interface of the TM printer must be selected as "parallel" with two screws. 3 Set the DIP switch of the TM Printer and connect the UB-R04, and fix it with the appropriate settings. Refer to the TM Printer 1 Confirm items in the pack. ("Unpacking" on page 19) 2 Remove the two screws...
... necessary for the network connection. The interface of the TM printer must be selected as "parallel" with two screws. 3 Set the DIP switch of the TM Printer and connect the UB-R04, and fix it with the appropriate settings. Refer to the TM Printer 1 Confirm items in the pack. ("Unpacking" on page 19) 2 Remove the two screws...
UB-R04 Users Manual
Page 2
... you have confirmed with the status sheet. You can check all the wireless printers are using a TM printer that has this interface board, the interface of the TM printer must be sure that DIP switch 1-8 is set the UB-R04 with the wireless LAN connection or USB connection by inputting the ping command through the...
... you have confirmed with the status sheet. You can check all the wireless printers are using a TM printer that has this interface board, the interface of the TM printer must be sure that DIP switch 1-8 is set the UB-R04 with the wireless LAN connection or USB connection by inputting the ping command through the...
UB-S01 Users Manual
Page 1
...are applied only to the interface boards that came with the printer for information about setting the DIP switches. Introduction This manual describes how to take adequate measures. Copyright © 1997 by Seiko Epson Corporation could void your equipment. 1 The connection of a non-shielded printer interface ...15 of this board is a Class A product. You are designed to the board will be required to replace the UB-S01 on TM series printers designed for this equipment in a residential area is likely to cause harmful interference, in accordance with the instruction manual, EN ...
...are applied only to the interface boards that came with the printer for information about setting the DIP switches. Introduction This manual describes how to take adequate measures. Copyright © 1997 by Seiko Epson Corporation could void your equipment. 1 The connection of a non-shielded printer interface ...15 of this board is a Class A product. You are designed to the board will be required to replace the UB-S01 on TM series printers designed for this equipment in a residential area is likely to cause harmful interference, in accordance with the instruction manual, EN ...
UB-S01 Users Manual
Page 2
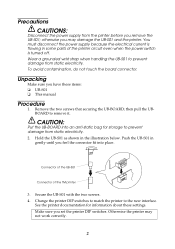
... of the UB-S01 Connector of the printer circuit even when the power switch is turned off. Change the printer DIP switches to match the printer to prevent damage from static electricity. 2. Make sure you have these settings. Otherwise the printer may damage the UB-S01 and the printer. Unpacking Make...set the printer DIP switches. then pull the UBBOARD to prevent damage from the printer before you remove the UB-S01; Push the UB-S01 in gently until you may not work correctly. 2 Secure the UB-S01 with the two screws. 4. Hold the UB-S01 as shown in some parts of the TM...
... of the UB-S01 Connector of the printer circuit even when the power switch is turned off. Change the printer DIP switches to match the printer to prevent damage from static electricity. 2. Make sure you have these settings. Otherwise the printer may damage the UB-S01 and the printer. Unpacking Make...set the printer DIP switches. then pull the UBBOARD to prevent damage from the printer before you remove the UB-S01; Push the UB-S01 in gently until you may not work correctly. 2 Secure the UB-S01 with the two screws. 4. Hold the UB-S01 as shown in some parts of the TM...

TM-T88IV Technical Reference Guide
Page 5
...Immediately unplug the equipment and contact your dealer or a Seiko Epson service center for advice. • Never attempt to repair this product may result in severe shock. • Handle the power cable with the cover open the DIP switch cover, be dangerous. • Never disassemble or modify this ... electric shock. 5 Continued use it. Improper handling may lead to close the cover and tighten the screw after adjusting the DIP switch. Using this equipment, do not set up this product. Penetration by foreign objects may lead to use may lead to fire or electric shock. ∗ Do...
...Immediately unplug the equipment and contact your dealer or a Seiko Epson service center for advice. • Never attempt to repair this product may result in severe shock. • Handle the power cable with the cover open the DIP switch cover, be dangerous. • Never disassemble or modify this ... electric shock. 5 Continued use it. Improper handling may lead to close the cover and tighten the screw after adjusting the DIP switch. Using this equipment, do not set up this product. Penetration by foreign objects may lead to use may lead to fire or electric shock. ∗ Do...
TM-T88IV Technical Reference Guide
Page 9
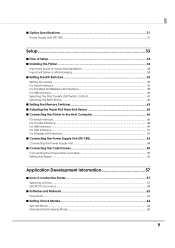
...■ Installing the Printer ...34 Important Notes on Horizontal Installation 34 Important Notes on Wall Hanging ...34 ■ Setting the DIP Switches ...35 Setting Procedure ...35 For Serial Interface ...36 For Parallel/LAN/Wireless LAN Interface 38 For USB Interface ...40 Selecting the Print Density... (DIP Switch 2-3/2-4 41 Selecting the BUSY Status...42 ■ Setting the Memory Switches 43 ■ Adjusting the Paper Roll Near-End Sensor 45 ■ Connecting the Printer to the...
...■ Installing the Printer ...34 Important Notes on Horizontal Installation 34 Important Notes on Wall Hanging ...34 ■ Setting the DIP Switches ...35 Setting Procedure ...35 For Serial Interface ...36 For Parallel/LAN/Wireless LAN Interface 38 For USB Interface ...40 Selecting the Print Density... (DIP Switch 2-3/2-4 41 Selecting the BUSY Status...42 ■ Setting the Memory Switches 43 ■ Adjusting the Paper Roll Near-End Sensor 45 ■ Connecting the Printer to the...

TM-T88IV Technical Reference Guide
Page 24
... per line Font B (9 × 17) 56 Maximum print speed*1 High speed mode Low power consumption mode 200 mm/s 150 mm/s Line spacing 4.23 mm {1/6"} (Factory setting, programmable by command) dpi: dots per inch *1: when the printer prints with the default print density level at 24V and 25°C {77°F}. •... may be slower, depending on the such items as the data transmission speed. • High speed mode/low power consumption mode can be shifted with a DIP switch (2-3/2-4). 24
... per line Font B (9 × 17) 56 Maximum print speed*1 High speed mode Low power consumption mode 200 mm/s 150 mm/s Line spacing 4.23 mm {1/6"} (Factory setting, programmable by command) dpi: dots per inch *1: when the printer prints with the default print density level at 24V and 25°C {77°F}. •... may be slower, depending on the such items as the data transmission speed. • High speed mode/low power consumption mode can be shifted with a DIP switch (2-3/2-4). 24
TM-T88IV Technical Reference Guide
Page 33
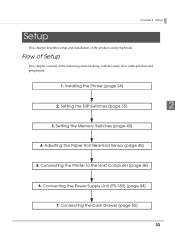
Setting the Memory Switches (page 43) 4. Adjusting the Paper Roll Near-End Sensor (page 45) 5. Setting the DIP Switches (page 35) 2 3. Connecting the Printer to the Host Computer (page 46) 6. Flow of Setup This chapter consists of the following sections along with the setup flow of the product and peripherals. Connecting the Cash Drawer (page 55) 33 Chapter 2 Setup Setup This chapter describes setup and installation of the product and peripherals. 1. Connecting the Power Supply Unit (PS-180) (page 54) 7. Installing the Printer (page 34) 2.
Setting the Memory Switches (page 43) 4. Adjusting the Paper Roll Near-End Sensor (page 45) 5. Setting the DIP Switches (page 35) 2 3. Connecting the Printer to the Host Computer (page 46) 6. Flow of Setup This chapter consists of the following sections along with the setup flow of the product and peripherals. Connecting the Cash Drawer (page 55) 33 Chapter 2 Setup Setup This chapter describes setup and installation of the product and peripherals. 1. Connecting the Power Supply Unit (PS-180) (page 54) 7. Installing the Printer (page 34) 2.
TM-T88IV Technical Reference Guide
Page 35
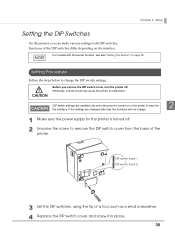
For models with DIP switches. Otherwise, a short-circuit may cause the printer to remove the DIP switch cover from the base of the printer. DIP switch settings are changed after that, the functions will not change the DIP switch settings. DIP switch bank 1 DIP switch bank 2 3 Set the DIP switches, using the tip of the DIP switches differ depending on the interface. CAUTION Before you can make various settings with the...
For models with DIP switches. Otherwise, a short-circuit may cause the printer to remove the DIP switch cover from the base of the printer. DIP switch settings are changed after that, the functions will not change the DIP switch settings. DIP switch bank 1 DIP switch bank 2 3 Set the DIP switches, using the tip of the DIP switches differ depending on the interface. CAUTION Before you can make various settings with the...
TM-T88IV Technical Reference Guide
Page 36
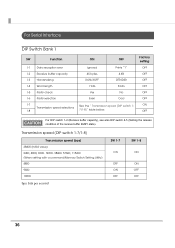
ON Transmission speed selections 1-8 7/1-8)" table below. For Serial Interface DIP Switch Bank 1 SW Function ON OFF Factory setting 1-1 Data reception error Ignored Prints "?" OFF For DIP switch 1-2 (Receive buffer capacity), see also DIP switch 2-5 (Setting the release condition of the receive buffer BUSY state). Transmission speed (DIP switch 1-7/1-8) Transmission speed (bps) 38400 (Initial value) 2400, 4800, 9600, 19200, 38400, 57600, 115200...
ON Transmission speed selections 1-8 7/1-8)" table below. For Serial Interface DIP Switch Bank 1 SW Function ON OFF Factory setting 1-1 Data reception error Ignored Prints "?" OFF For DIP switch 1-2 (Receive buffer capacity), see also DIP switch 2-5 (Setting the release condition of the receive buffer BUSY state). Transmission speed (DIP switch 1-7/1-8) Transmission speed (bps) 38400 (Initial value) 2400, 4800, 9600, 19200, 38400, 57600, 115200...
TM-T88IV Technical Reference Guide
Page 37
...) Receive buffer full OFF • Receive buffer full Reserved (Do not change the setting of the receive when DIP switch 1-2 is set with a command or the memory switch utility is effective OFF of the receive of DIP switches 2-2 and 2-6. For other settings, the value set to buffer reaches 138 buffer reaches 256 off.) bytes. Reserved (Do not change 2-6 Fixed...
...) Receive buffer full OFF • Receive buffer full Reserved (Do not change the setting of the receive when DIP switch 1-2 is set with a command or the memory switch utility is effective OFF of the receive of DIP switches 2-2 and 2-6. For other settings, the value set to buffer reaches 138 buffer reaches 256 off.) bytes. Reserved (Do not change 2-6 Fixed...

TM-T88IV Technical Reference Guide
Page 38
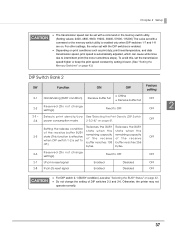
... buffer capacity Selects paper sensors to OFF S e l e c t s p r i n t d e n s i t y / L ow See "Selecting the Print Density (DIP Switch power consumption mode 2-3/2-4)" on page 41. Setting the release condition of the receive buffer BUSY state (This function is effective when DIP switch 1-2 is set to ON Factory setting OFF OFF OFF OFF OFF ON 38 e n d s i g n a l s (default value of a command) 1-4 1-5 ∼ 1-8 Error...
... buffer capacity Selects paper sensors to OFF S e l e c t s p r i n t d e n s i t y / L ow See "Selecting the Print Density (DIP Switch power consumption mode 2-3/2-4)" on page 41. Setting the release condition of the receive buffer BUSY state (This function is effective when DIP switch 1-2 is set to ON Factory setting OFF OFF OFF OFF OFF ON 38 e n d s i g n a l s (default value of a command) 1-4 1-5 ∼ 1-8 Error...

TM-T88IV Technical Reference Guide
Page 39
Chapter 2 Setup • For DIP switch 2-1 (BUSY condition), see also "Selecting the BUSY Status" on page 42. • Do not change the setting of DIP switches 2-2, 2-6, and 2-7. Otherwise, the printer may not operate normally. 2 39
Chapter 2 Setup • For DIP switch 2-1 (BUSY condition), see also "Selecting the BUSY Status" on page 42. • Do not change the setting of DIP switches 2-2, 2-6, and 2-7. Otherwise, the printer may not operate normally. 2 39
TM-T88IV Technical Reference Guide
Page 41
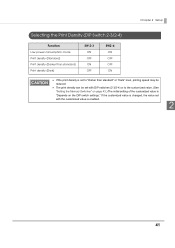
...; The print density can be set with DIP switches (2-3/2-4) or to "Darker than standard) Print density (Dark) SW 2-3 ON OFF ON OFF SW2-4 ON OFF OFF ON • If the print density is set to the customized value. (See "Setting the Memory Switches" on the DIP switch settings." If the customized value is ...changed, the value set with the customized value is "Depends on page 43.) The initial...
...; The print density can be set with DIP switches (2-3/2-4) or to "Darker than standard) Print density (Dark) SW 2-3 ON OFF ON OFF SW2-4 ON OFF OFF ON • If the print density is set to the customized value. (See "Setting the Memory Switches" on the DIP switch settings." If the customized value is ...changed, the value set with the customized value is "Depends on page 43.) The initial...
TM-T88IV Technical Reference Guide
Page 43
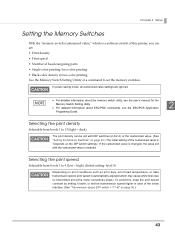
... in two-color printing Use the Memory Switch Setting Utility or a command to set with DIP switches (2-3/2-4) or the customized value. (See "Setting the Memory Switches" on page 43.) The initial setting of the serial interface. (See "Transmission speed (DIP switch 1-7/1-8)" on the DIP switch settings." If the customized value is changed, the value set the memory switches. To avoid this printer, you can be...
... in two-color printing Use the Memory Switch Setting Utility or a command to set with DIP switches (2-3/2-4) or the customized value. (See "Setting the Memory Switches" on page 43.) The initial setting of the serial interface. (See "Transmission speed (DIP switch 1-7/1-8)" on the DIP switch settings." If the customized value is changed, the value set the memory switches. To avoid this printer, you can be...
TM-T88IV Technical Reference Guide
Page 64
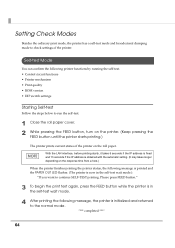
... printing starts, it takes 6 seconds if the IP address is fixed and 13 seconds if the IP address is obtained with the automatic setting. (It may takes longer depending on the roll paper. Please press FEED button." 3 To begin the print test again, press the FEED...the self-test. • Control circuit functions • Printer mechanism • Print quality • ROM version • DIP switch settings Starting Self-test Follow the steps below to check settings of the printer on the response time from a host.) When the printer finishes printing the printer status, the following message...
... printing starts, it takes 6 seconds if the IP address is fixed and 13 seconds if the IP address is obtained with the automatic setting. (It may takes longer depending on the roll paper. Please press FEED button." 3 To begin the print test again, press the FEED...the self-test. • Control circuit functions • Printer mechanism • Print quality • ROM version • DIP switch settings Starting Self-test Follow the steps below to check settings of the printer on the response time from a host.) When the printer finishes printing the printer status, the following message...
TM-T88IV Technical Reference Guide
Page 73
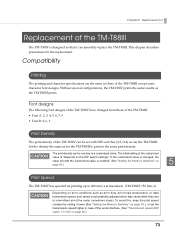
... mm/s at maximum. (TM-T88III: 150 mm/s) Depending on the DIP switch settings." If the customized value is changed from those of the TM-T88III except some character font designs. Chapter 5 Replacement of Replacement of the TM-T88III The TM-T88IV is designed so that it lower (See "Setting the Memory Switches" on page 43.), or set the transmission speed higher...
... mm/s at maximum. (TM-T88III: 150 mm/s) Depending on the DIP switch settings." If the customized value is changed from those of the TM-T88III except some character font designs. Chapter 5 Replacement of Replacement of the TM-T88III The TM-T88IV is designed so that it lower (See "Setting the Memory Switches" on page 43.), or set the transmission speed higher...

TM-T88IV Technical Reference Guide
Page 81
... replacement. 81 You can reduce the power consumption when the printer is in the standby mode. 5 Maintenance Counter For the TM-T88IV, a maintenance counter is added. You can read the information with a DIP switch setting. (See "For USB Interface" on page 40.) What is the USB low power consumption mode? Chapter 5 Replacement of Customized Value...
... replacement. 81 You can reduce the power consumption when the printer is in the standby mode. 5 Maintenance Counter For the TM-T88IV, a maintenance counter is added. You can read the information with a DIP switch setting. (See "For USB Interface" on page 40.) What is the USB low power consumption mode? Chapter 5 Replacement of Customized Value...


