Warranty Statement
Page 1
... in accordance with factory-set switches, jumpers and operating systems. Customer data and applications cannot be restored and should be entered in workmanship and materials for a period of two (2) years from defects in any other than Epson or an Epson Authorized Servicer. 7) Service where the printer label, logo, rating label, or serial number has been removed. 8) Any damage caused by using improper packaging materials...
... in accordance with factory-set switches, jumpers and operating systems. Customer data and applications cannot be restored and should be entered in workmanship and materials for a period of two (2) years from defects in any other than Epson or an Epson Authorized Servicer. 7) Service where the printer label, logo, rating label, or serial number has been removed. 8) Any damage caused by using improper packaging materials...

OT-WL02 Technical Reference Guide
Page 17
...; Keep this wireless LAN unit • Device for setting: iOS or Android device • Utility for setting: Epson TM Utility for iOS or Epson TM Utility for Android 17 Chapter 2 Installation Connecting to the Network The method for connecting the wireless LAN unit to the network differs if you use a TM printer that supports the SimpleAP mode or a TM printer that does not support the SimpleAP mode. • Connecting a TM printer that supports the SimpleAP mode to the network • Setting up...
...; Keep this wireless LAN unit • Device for setting: iOS or Android device • Utility for setting: Epson TM Utility for iOS or Epson TM Utility for Android 17 Chapter 2 Installation Connecting to the Network The method for connecting the wireless LAN unit to the network differs if you use a TM printer that supports the SimpleAP mode or a TM printer that does not support the SimpleAP mode. • Connecting a TM printer that supports the SimpleAP mode to the network • Setting up...

OT-WL02 Technical Reference Guide
Page 19
... same time. Network mode SimpleAP mode SSID EPSON_Printer Pass phrase 12345678 IP Address 192.168.192.168 An example of Connection Screen 2 • For the setting method for the computer for setting, see "Software" on the power for the printer you are setting multiple TM printers, only turn on page 23 3 Start up the EpsonNet Config of the EpsonNet Config, see the manual for your computer. • If you are setting. Default settings...
... same time. Network mode SimpleAP mode SSID EPSON_Printer Pass phrase 12345678 IP Address 192.168.192.168 An example of Connection Screen 2 • For the setting method for the computer for setting, see "Software" on the power for the printer you are setting multiple TM printers, only turn on page 23 3 Start up the EpsonNet Config of the EpsonNet Config, see the manual for your computer. • If you are setting. Default settings...
UB-R04 Technical Reference Guide
Page 47
... to ePOS-Print supported TM printers. It does not describe Epson's specific functions. Using ePOS-Print, data can be printed. It is functionality to meet the system requirements. In addition, print images rendered in the chapter "POS Printer" and "Appendix A"). JavaPOS ADK Installation Guide *1: OLE technology developed by Microsoft divides software into part blocks. ePOS-Print 3 ePOS-Print is not a driver to be used for printing from commercial applications. *2: This guide describes general...
... to ePOS-Print supported TM printers. It does not describe Epson's specific functions. Using ePOS-Print, data can be printed. It is functionality to meet the system requirements. In addition, print images rendered in the chapter "POS Printer" and "Appendix A"). JavaPOS ADK Installation Guide *1: OLE technology developed by Microsoft divides software into part blocks. ePOS-Print 3 ePOS-Print is not a driver to be used for printing from commercial applications. *2: This guide describes general...
UB-R04 Technical Reference Guide
Page 48
...to configure network/Wi-Fi settings and printer/driver settings in a batch. For Windows and Mac. Firmware Update Tool Utility to the network. You can also update certificates for multiple printers used for wireless LAN setting. Monitoring Tool: Use to check a list of status for initial installation. Utilities After using the following utilities via the USB interface. It enables deploying more than one printer/driver efficiently and quickly for the Epson printers connected to update the product's firmware. Manual EpsonNet Config manual (operation guide) or EpsonNet Config online...
...to configure network/Wi-Fi settings and printer/driver settings in a batch. For Windows and Mac. Firmware Update Tool Utility to the network. You can also update certificates for multiple printers used for wireless LAN setting. Monitoring Tool: Use to check a list of status for initial installation. Utilities After using the following utilities via the USB interface. It enables deploying more than one printer/driver efficiently and quickly for the Epson printers connected to update the product's firmware. Manual EpsonNet Config manual (operation guide) or EpsonNet Config online...
UB-R04 Technical Reference Guide
Page 54
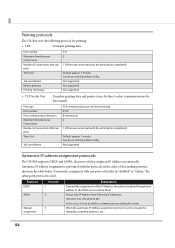
Protocol DHCP APIPA Manual assignment Priority 1 2 3 Explanation Demand the assignments of connections that can print Time Out Job cancellation Banner printing Printing Job Queue 515 2 1 (Other users must wait until the printing has completed.) Default: approx. 1 minute Can be set them. Not supported Not supported Not supported • TCP Socket Port : Transfers printing data and printer status by direct socket communications (bidirectional). Port type Port number Port communication direction Maximum Simultaneous Connections Number of the IP Address, the subnet mask and the...
Protocol DHCP APIPA Manual assignment Priority 1 2 3 Explanation Demand the assignments of connections that can print Time Out Job cancellation Banner printing Printing Job Queue 515 2 1 (Other users must wait until the printing has completed.) Default: approx. 1 minute Can be set them. Not supported Not supported Not supported • TCP Socket Port : Transfers printing data and printer status by direct socket communications (bidirectional). Port type Port number Port communication direction Maximum Simultaneous Connections Number of the IP Address, the subnet mask and the...
UB-R04 Users Manual
Page 3
If you change the IP address, SSID, etc., you have been checked for [password]. (Defaults) 4. *The user name is fixed to "epson," but the password is changeable. 5. When using the same channel that supports both USB vendor-defined class and USB printer class. In auto channel setting for the access point, do not select a channel in the ad hoc mode, this product may cause radio wave interference. 3. Notes on...
If you change the IP address, SSID, etc., you have been checked for [password]. (Defaults) 4. *The user name is fixed to "epson," but the password is changeable. 5. When using the same channel that supports both USB vendor-defined class and USB printer class. In auto channel setting for the access point, do not select a channel in the ad hoc mode, this product may cause radio wave interference. 3. Notes on...
UB-U01/02/03 Users Manual
Page 3
... displays for which the setting can be changed) Connection type (only for displays for the TM-U01III/U02III/U03II. If you install a display module, be changed) Selection Baud rate 19200 bps Parity None Data word length 8 bit Only display selected Y connection disabled 3 Display Module If you use the following settings. Insert the square connector end of the USB cable into the downstream connector of the I/F pin 31 reset signal, select "Enabled...
... displays for which the setting can be changed) Connection type (only for displays for the TM-U01III/U02III/U03II. If you install a display module, be changed) Selection Baud rate 19200 bps Parity None Data word length 8 bit Only display selected Y connection disabled 3 Display Module If you use the following settings. Insert the square connector end of the USB cable into the downstream connector of the I/F pin 31 reset signal, select "Enabled...

UB-U05 Users Manual
Page 4
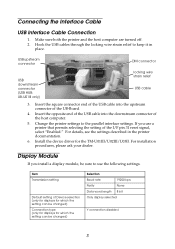
.... Installing the USB cable You can install the new UB-U05 board. then pull the UB-BOARD to install it. Setting the printer settings Change the printer settings following the printer manual. 6. Printed on Recycled Paper 4 Installing the Software Install the device driver for storage to prevent damage from falling out. 7. Removing the current UB-BOARD from the printer and follow the steps below. 1. USB up stream connector Locking wire strain relief USB cable 3. Setting the...
.... Installing the USB cable You can install the new UB-U05 board. then pull the UB-BOARD to install it. Setting the printer settings Change the printer settings following the printer manual. 6. Printed on Recycled Paper 4 Installing the Software Install the device driver for storage to prevent damage from falling out. 7. Removing the current UB-BOARD from the printer and follow the steps below. 1. USB up stream connector Locking wire strain relief USB cable 3. Setting the...

Users Manual
Page 7
English Setup To set up the printer, follow the steps below. 1. Installing the ribbon cartridge (U "Installing and Replacing the Ribbon Cartridge" on page 19) 7. Test printing (U "Test Printing" on page 12) 5. Attaching the power switch cover (U "Attaching the Power Switch Cover" on page 11) 4. In particular, when you install the printer near any magnetic fields to install roll paper. ❏ For models with the MICR reader, do not place the printer near a CRT display device, check the recognition rate of...
English Setup To set up the printer, follow the steps below. 1. Installing the ribbon cartridge (U "Installing and Replacing the Ribbon Cartridge" on page 19) 7. Test printing (U "Test Printing" on page 12) 5. Attaching the power switch cover (U "Attaching the Power Switch Cover" on page 11) 4. In particular, when you install the printer near any magnetic fields to install roll paper. ❏ For models with the MICR reader, do not place the printer near a CRT display device, check the recognition rate of...

Technical Reference Guide
Page 11
...; Auto cutter error ...116 ■ Paper jam...119 Roll paper is jammed ...119 Slip paper is jammed ...120 ■ Roll paper cover will not open 123 Printing stop by cover open...124 ■ Printing from the computer is disabled/Printing was suddenly 125 Printer is offline ...125 Reconnect the printer and the computer ...125 LAN setting...125 Check installation of printer driver ...125 ■ Power does not turn on ...126 Replacement of the TM-H6000IV 127 ■ Compatibility ...128 Printing ...128 Print Density...
...; Auto cutter error ...116 ■ Paper jam...119 Roll paper is jammed ...119 Slip paper is jammed ...120 ■ Roll paper cover will not open 123 Printing stop by cover open...124 ■ Printing from the computer is disabled/Printing was suddenly 125 Printer is offline ...125 Reconnect the printer and the computer ...125 LAN setting...125 Check installation of printer driver ...125 ■ Power does not turn on ...126 Replacement of the TM-H6000IV 127 ■ Compatibility ...128 Printing ...128 Print Density...

Technical Reference Guide
Page 14
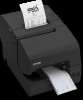
... by default. Either serial, Bluetooth, or USB Plus Power can be built-in by factory option. Optional Wireless LAN cable set is possible. 14 Others Small footprint and simple design. Direct connection of Epson customer display series (DM-D) is available. Functions NFC tag built into the printer unit for printing to a touched printer. Supports printing using multiple interfaces. Enables HTTPS communication. A maintenance counter function is supported. 1 Connect...
... by default. Either serial, Bluetooth, or USB Plus Power can be built-in by factory option. Optional Wireless LAN cable set is possible. 14 Others Small footprint and simple design. Direct connection of Epson customer display series (DM-D) is available. Functions NFC tag built into the printer unit for printing to a touched printer. Supports printing using multiple interfaces. Enables HTTPS communication. A maintenance counter function is supported. 1 Connect...
Technical Reference Guide
Page 24
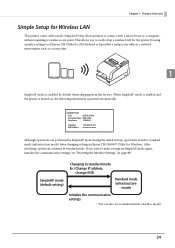
... Simple Setup for Wireless LAN This printer comes with a mode (SimpleAP) that allows printers to make settings in SimpleAP mode again, initialize the communication settings (see "Resetting the Interface Settings" on , the following information is enabled by using a printer settings tool (Epson TM Utility for iOS/Android or EpsonNet Config) even without requiring a wireless access point. After switching, operations continue in Epson TM-H6000V Utility for the printer by default when shipping from the factory. SimpleAP mode (default setting) Changing to easily setup a wireless...
... Simple Setup for Wireless LAN This printer comes with a mode (SimpleAP) that allows printers to make settings in SimpleAP mode again, initialize the communication settings (see "Resetting the Interface Settings" on , the following information is enabled by using a printer settings tool (Epson TM Utility for iOS/Android or EpsonNet Config) even without requiring a wireless access point. After switching, operations continue in Epson TM-H6000V Utility for the printer by default when shipping from the factory. SimpleAP mode (default setting) Changing to easily setup a wireless...

Technical Reference Guide
Page 33
... , the status of the radio waves for the access point, do not select a channel in the neighboring shops where Wireless LAN is used . Wireless LANs with a frequency band of the Wireless LAN cable set up multiple printers, you disconnect the LAN cable. For SimpleAP mode, see "Simple Setup for Wireless LAN" on the installation conditions of the Wireless LAN unit varies depending on the model. 33 Using Epson TM Utility...
... , the status of the radio waves for the access point, do not select a channel in the neighboring shops where Wireless LAN is used . Wireless LANs with a frequency band of the Wireless LAN cable set up multiple printers, you disconnect the LAN cable. For SimpleAP mode, see "Simple Setup for Wireless LAN" on the installation conditions of the Wireless LAN unit varies depending on the model. 33 Using Epson TM Utility...
Technical Reference Guide
Page 35
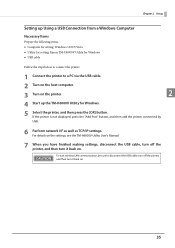
... Windows USB cable Follow the steps below to connect the printer. 1 Connect the printer to disconnect the USB cable, turn off the printer, and then turn it back on . 35 For details on the settings, see the TM-H6000V Utility User's Manual. 7 When you have finished making settings, disconnect the USB cable, turn off the printer, and then turn it back on . If the printer is not displayed, press the "Add Port" button, and then add the printer connected by USB. 6 Perform network...
... Windows USB cable Follow the steps below to connect the printer. 1 Connect the printer to disconnect the USB cable, turn off the printer, and then turn it back on . 35 For details on the settings, see the TM-H6000V Utility User's Manual. 7 When you have finished making settings, disconnect the USB cable, turn off the printer, and then turn it back on . If the printer is not displayed, press the "Add Port" button, and then add the printer connected by USB. 6 Perform network...

Technical Reference Guide
Page 58
...; When changing the paper width, be sure to change the printer to 58 mm, you can change the setting for the paper width with the holes in the roll paper holder, and push it until it clicks into place. 2 58 Chapter 2 Setup Changing the Paper Width The printer is initially set the customized value, see "Software Settings" on page 63. 1 Open the roll paper cover. 2 Align 3 projections on the paper guide with...
...; When changing the paper width, be sure to change the printer to 58 mm, you can change the setting for the paper width with the holes in the roll paper holder, and push it until it clicks into place. 2 58 Chapter 2 Setup Changing the Paper Width The printer is initially set the customized value, see "Software Settings" on page 63. 1 Open the roll paper cover. 2 Align 3 projections on the paper guide with...
Technical Reference Guide
Page 63
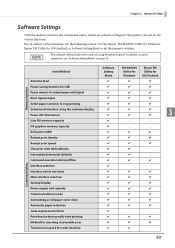
... Character code table defaults International character defaults Command execution during offline Interface selection Interface switch wait time Main interface selection Startup Display Power supply unit capacity Column emulation mode Autocutting at roll paper cover close Automatic paper reduction Auto replacement of font Print density during multi-tone printing Method for canceling recoverable error Transmission speed for serial interface Software Setting Mode TM-H6000V Utility for Windows Epson TM Utility for this printer, you can set the various functions. The software setting mode...
... Character code table defaults International character defaults Command execution during offline Interface selection Interface switch wait time Main interface selection Startup Display Power supply unit capacity Column emulation mode Autocutting at roll paper cover close Automatic paper reduction Auto replacement of font Print density during multi-tone printing Method for canceling recoverable error Transmission speed for serial interface Software Setting Mode TM-H6000V Utility for Windows Epson TM Utility for this printer, you can set the various functions. The software setting mode...
Technical Reference Guide
Page 94
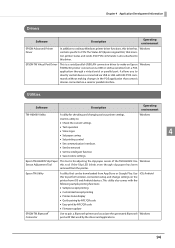
...-H6000V. It allows you to make an Epson TM/BA/EU printer connected via a serial or parallel interface. Windows Use this utility to: Check the current settings Test operation Store logos 4 Set paper saving Set printing control Set communication interfaces Set the network Set the intelligent function Save/restore settings Epson TM-H6000V Slip Paper This tool is also attached to perform wireless connection setup and change settings on the printer from the printer. Use Windows Sensor Adjustment...
...-H6000V. It allows you to make an Epson TM/BA/EU printer connected via a serial or parallel interface. Windows Use this utility to: Check the current settings Test operation Store logos 4 Set paper saving Set printing control Set communication interfaces Set the network Set the intelligent function Save/restore settings Epson TM-H6000V Slip Paper This tool is also attached to perform wireless connection setup and change settings on the printer from the printer. Use Windows Sensor Adjustment...

Technical Reference Guide
Page 95
... code (USB Serial No.). Windows Others Manual ePOS-Print XML User's Manual Description Describes ePOS-Print XML statements. Download You can obtain software and manuals from your application to the following web site and follow the on-screen instructions. Windows This tool allows you to update the firmware for the TM-H6000V. You can convert BMP image files to perform replacement if a malfunction occurs. Chapter 4 Application Development Information Software Epson Deployment Tool Epson Monitoring Tool TM-H6000V Printer Model Setting...
... code (USB Serial No.). Windows Others Manual ePOS-Print XML User's Manual Description Describes ePOS-Print XML statements. Download You can obtain software and manuals from your application to the following web site and follow the on-screen instructions. Windows This tool allows you to update the firmware for the TM-H6000V. You can convert BMP image files to perform replacement if a malfunction occurs. Chapter 4 Application Development Information Software Epson Deployment Tool Epson Monitoring Tool TM-H6000V Printer Model Setting...

Web Config API Users Manual
Page 17
... "message": "Failed to update the settings" described at "Reference" on page 19. 500 Internal Server Error { "message": "Failed: No enough memory" } Failed due to communicate via port 9100. Refer to "Reset the Printer" on page 11. [format] "message": "Success", { "Setting" : { } : , 413 Request { Data is necessary if the problem occurs even after ... , } } URL decoding), refer to "Transmission Capacity" on page 15. 2 } 500 Internal { Failed to update settings. You need to...
... "message": "Failed to update the settings" described at "Reference" on page 19. 500 Internal Server Error { "message": "Failed: No enough memory" } Failed due to communicate via port 9100. Refer to "Reset the Printer" on page 11. [format] "message": "Success", { "Setting" : { } : , 413 Request { Data is necessary if the problem occurs even after ... , } } URL decoding), refer to "Transmission Capacity" on page 15. 2 } 500 Internal { Failed to update settings. You need to...


