
Preferred Warranty Booklet
Page 8
... the following items: a) Checking and cleaning the print head, cleaner wiper and cap unit surroundings b) Performing periodic nozzle checks and nozzle cleanings to maintain, improper packing or shipping, disasters such as documented in the Epson Stylus Pro GS6000 User's Guide. EPSON® PreferredSM Limited Warranty Program for the Epson Stylus® Pro GS6000 64-inch wide Solvent Printer What This Warranty...
... the following items: a) Checking and cleaning the print head, cleaner wiper and cap unit surroundings b) Performing periodic nozzle checks and nozzle cleanings to maintain, improper packing or shipping, disasters such as documented in the Epson Stylus Pro GS6000 User's Guide. EPSON® PreferredSM Limited Warranty Program for the Epson Stylus® Pro GS6000 64-inch wide Solvent Printer What This Warranty...
Product Brochure
Page 3
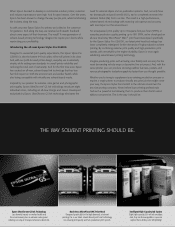
... eliminates the need for the most demanding vehicle wrap or decorative fine art project. Developed specifically for the Epson Stylus Pro GS6000, our latest print head technology has been completely redesigned for extreme color gamut and photographic print quality, Epson UltraChrome® GS Ink technology introduces eight individual colors, including an all -new Dual-Array MicroPiezo® AMC...
... eliminates the need for the most demanding vehicle wrap or decorative fine art project. Developed specifically for the Epson Stylus Pro GS6000, our latest print head technology has been completely redesigned for extreme color gamut and photographic print quality, Epson UltraChrome® GS Ink technology introduces eight individual colors, including an all -new Dual-Array MicroPiezo® AMC...

Product Brochure
Page 5
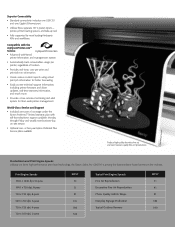
...tune adjustments of both standard and heavy media weights Manually adjustable head height (platen gap) - 1.5 mm or 2.5 mm Compatible with built-in support and profiles for more information. Introducing Epson UltraChrome GS Ink Technology Industry-Defining 8-Color Solvent-Based Ink System... on virtually any special handling requirements The Future of Solvent Print Head Technology High-Performance Dual-Array MicroPiezo AMC Print Head Unique dual print head design capable of handling eight separate ink channels One-inch wide print head with 360 nozzles per color Advanced Meniscus Control (AMC)...
...tune adjustments of both standard and heavy media weights Manually adjustable head height (platen gap) - 1.5 mm or 2.5 mm Compatible with built-in support and profiles for more information. Introducing Epson UltraChrome GS Ink Technology Industry-Defining 8-Color Solvent-Based Ink System... on virtually any special handling requirements The Future of Solvent Print Head Technology High-Performance Dual-Array MicroPiezo AMC Print Head Unique dual print head design capable of handling eight separate ink channels One-inch wide print head with 360 nozzles per color Advanced Meniscus Control (AMC)...
Product Brochure
Page 6
... decorative fine art, and even museum-quality fine art reproductions. © 2008 Michael Godard Production-Level Print Engine Speeds Utilizing our latest high-performance print head technology, the Epson Stylus Pro GS6000 is among the fastest solvent-based printers in the industry. Print Engine Speeds 1440 x 1440 dpi, 16-pass 1440 x 720 dpi, 8-pass 720 x 720 dpi, 8-pass...
... decorative fine art, and even museum-quality fine art reproductions. © 2008 Michael Godard Production-Level Print Engine Speeds Utilizing our latest high-performance print head technology, the Epson Stylus Pro GS6000 is among the fastest solvent-based printers in the industry. Print Engine Speeds 1440 x 1440 dpi, 16-pass 1440 x 720 dpi, 8-pass 720 x 720 dpi, 8-pass...
Product Brochure
Page 7
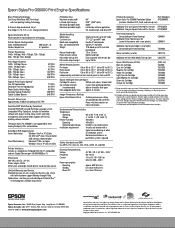
Epson Stylus Pro GS6000 Print Engine Specifications Base Printing Technology Dual-Array MicroPiezo AMC Print Head with Ink-repelling Coating Technology 8-channel, drop-on -site, usually next business day service with toll-free phone support Monday through Friday Optional one -year, on -demand, ink jet 8 cartridges (C, M, Y, K, Lc, Lm, Orange and Green) Epson... from the first cartridges is also supported by most leading third-party RIPs and workflows. The Epson Stylus Pro GS6000 is used for purchase Printable Area Maximum media width Left and right margins Maximum printable width Maximum...
Epson Stylus Pro GS6000 Print Engine Specifications Base Printing Technology Dual-Array MicroPiezo AMC Print Head with Ink-repelling Coating Technology 8-channel, drop-on -site, usually next business day service with toll-free phone support Monday through Friday Optional one -year, on -demand, ink jet 8 cartridges (C, M, Y, K, Lc, Lm, Orange and Green) Epson... from the first cartridges is also supported by most leading third-party RIPs and workflows. The Epson Stylus Pro GS6000 is used for purchase Printable Area Maximum media width Left and right margins Maximum printable width Maximum...
Quick Reference Guide
Page 1
Loading, Removing, and Configuring Media Checking and Cleaning the Print Head Maintaining the Printer Control Panel Maps and Menus Ordering Supplies and Getting Help Media Configuration Log Epson Stylus® Pro GS6000 QUICK REFERENCE GUIDE
Loading, Removing, and Configuring Media Checking and Cleaning the Print Head Maintaining the Printer Control Panel Maps and Menus Ordering Supplies and Getting Help Media Configuration Log Epson Stylus® Pro GS6000 QUICK REFERENCE GUIDE
Quick Reference Guide
Page 4
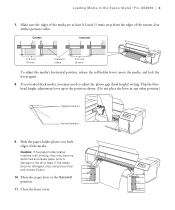
Caution: If the paper holder plates interfere with printing, they may need to the print head. Flip the blue head height adjustment lever up to the Secured position. 11. Loading Media in any other position.) Highest position Normal position 9. If the plates become ...deformed and cause paper jams or damage to adjust the platen gap (head height) setting. Move the paper lever to the position shown. (Do not place the lever in the Epson Stylus® Pro GS6000 | 3 7. If you loaded thick media, you may become damaged, stop using the printer and...
Caution: If the paper holder plates interfere with printing, they may need to the print head. Flip the blue head height adjustment lever up to the Secured position. 11. Loading Media in any other position.) Highest position Normal position 9. If the plates become ...deformed and cause paper jams or damage to adjust the platen gap (head height) setting. Move the paper lever to the position shown. (Do not place the lever in the Epson Stylus® Pro GS6000 | 3 7. If you loaded thick media, you may become damaged, stop using the printer and...

Quick Reference Guide
Page 9
... PRE HEATER PLATEN HEATER POST HEATER PAPER SUCTION DRYING TIME CARRIAGE MOVEMENT PRINT MULTIPLE LAYER • Print a nozzle check pattern and clean the print heads, if necessary. See page 10. • Select the paper configuration number and print. Press Menu, press d to highlight PAPER SETUP again, then press Menu again. 3. See page 10. • Perform...
... PRE HEATER PLATEN HEATER POST HEATER PAPER SUCTION DRYING TIME CARRIAGE MOVEMENT PRINT MULTIPLE LAYER • Print a nozzle check pattern and clean the print heads, if necessary. See page 10. • Select the paper configuration number and print. Press Menu, press d to highlight PAPER SETUP again, then press Menu again. 3. See page 10. • Perform...

Quick Reference Guide
Page 11
...the print heads; Press Menu. 5. Examine the printed pattern to determine if the print heads need to select the number, then press . Press d to highlight TEST PRINT, and press Menu again. 2. Checking and Cleaning the Print Heads If your prints show a color shift or horizontal lines, check the print head nozzles ... for instructions. 10 | Checking and Cleaning the Print Heads Aligning the Print Head 1. Determine which pattern in each print job using one of the pattern sets, then press the Pause button to exit. Clean the print heads Repeat step 6 for the loaded media, then ...
...the print heads; Press Menu. 5. Examine the printed pattern to determine if the print heads need to select the number, then press . Press d to highlight TEST PRINT, and press Menu again. 2. Checking and Cleaning the Print Heads If your prints show a color shift or horizontal lines, check the print head nozzles ... for instructions. 10 | Checking and Cleaning the Print Heads Aligning the Print Head 1. Determine which pattern in each print job using one of the pattern sets, then press the Pause button to exit. Clean the print heads Repeat step 6 for the loaded media, then ...

Quick Reference Guide
Page 12
..., you have a new cartridge Ink is low (example shows the yellow cartridge) Ink is getting low; see page 13 • Clean the cleaning wiper and print head casing (once a month or more often, as needed ); see page 14 • Replace the ink flushing pad (once a year or more often, as needed ); see...
..., you have a new cartridge Ink is low (example shows the yellow cartridge) Ink is getting low; see page 13 • Clean the cleaning wiper and print head casing (once a month or more often, as needed ); see page 14 • Replace the ink flushing pad (once a year or more often, as needed ); see...

Quick Reference Guide
Page 15
... or gaps in the Maintenance Kit, and the metal tray included with your prints after cleaning the print head. Put on a plastic glove, then use a cleaning swab to prevent the print head from the top of the cleaning wiper. Clean the top and rubber surrounds ...assemblies and their surrounds. 14 | Cleaning the Cleaning Wiper, Capping Assemblies, and Print Head Casings Cleaning the Cleaning Wiper, Capping Assemblies, and Print Head Casings Clean the print head cleaning wiper, capping assemblies, and print head casings at least once a month. See the page 23 for ordering information. ...
... or gaps in the Maintenance Kit, and the metal tray included with your prints after cleaning the print head. Put on a plastic glove, then use a cleaning swab to prevent the print head from the top of the cleaning wiper. Clean the top and rubber surrounds ...assemblies and their surrounds. 14 | Cleaning the Cleaning Wiper, Capping Assemblies, and Print Head Casings Cleaning the Cleaning Wiper, Capping Assemblies, and Print Head Casings Clean the print head cleaning wiper, capping assemblies, and print head casings at least once a month. See the page 23 for ordering information. ...

Quick Reference Guide
Page 16
...ink on the cleaning wiper and/or capping assemblies, and cannot be removed, you need to clean it may damage the print head. Print head casings Caution: Do not touch the print heads or the tip of the printer or it may stain it with ink. dirt or ink from the swab may damage the... as shown. See page 23 for ordering information and the Setup and Use Guide for instructions. 6. Cleaning the Cleaning Wiper, Capping Assemblies, and Print Head Casings | 15 Caution: Do not touch the cleaning wiper or any other internal part with your hands to prevent oil from your skin from damaging...
...ink on the cleaning wiper and/or capping assemblies, and cannot be removed, you need to clean it may damage the print head. Print head casings Caution: Do not touch the print heads or the tip of the printer or it may stain it with ink. dirt or ink from the swab may damage the... as shown. See page 23 for ordering information and the Setup and Use Guide for instructions. 6. Cleaning the Cleaning Wiper, Capping Assemblies, and Print Head Casings | 15 Caution: Do not touch the cleaning wiper or any other internal part with your hands to prevent oil from your skin from damaging...

Quick Reference Guide
Page 18
... for ordering information • A set of Additional Cleaning Cartridges from Epson; If you can use an optional Epson waste ink bottle, part number CBOTTLE; Washing the Ink System | 17 Washing the Ink System If you still have print quality problems after cleaning the print head using the heaviest level of cleaning cycle, you see a COVER...
... for ordering information • A set of Additional Cleaning Cartridges from Epson; If you can use an optional Epson waste ink bottle, part number CBOTTLE; Washing the Ink System | 17 Washing the Ink System If you still have print quality problems after cleaning the print head using the heaviest level of cleaning cycle, you see a COVER...

Quick Reference Guide
Page 20
...on page 21) MAINTENANCE Item SIDE MARGIN PAPER SIZE CHECK PAPER SKEW CHECK PRINT NOZZLE PATTERN HEATING TIME FLUSH ONTO PAPER FLUSHING FREQUENCY PAPER ORIGIN SETUP AUTO TAKE-UP REEL HEAD FAN REGULAR CLEANING INITIALIZE SETTINGS PAPER TYPE PAPER SETUP CLEANING (VERY LIGHT) ...the printer STANDARD, 1 to 30 Starts a very light print head cleaning cycle Starts a standard print head cleaning cycle Starts a strong print head cleaning cycle Starts the strongest print head cleaning cycle Starts the print head washing cycle Moves the print head to enter menu mode and select the settings summarized here....
...on page 21) MAINTENANCE Item SIDE MARGIN PAPER SIZE CHECK PAPER SKEW CHECK PRINT NOZZLE PATTERN HEATING TIME FLUSH ONTO PAPER FLUSHING FREQUENCY PAPER ORIGIN SETUP AUTO TAKE-UP REEL HEAD FAN REGULAR CLEANING INITIALIZE SETTINGS PAPER TYPE PAPER SETUP CLEANING (VERY LIGHT) ...the printer STANDARD, 1 to 30 Starts a very light print head cleaning cycle Starts a standard print head cleaning cycle Starts a strong print head cleaning cycle Starts the strongest print head cleaning cycle Starts the print head washing cycle Moves the print head to enter menu mode and select the settings summarized here....

Quick Reference Guide
Page 22
... | 21 Paper Setup Option Summary In the PAPER SETUP menu, select your media instructions Pre Heater see page 10 for instructions BI-D ALL Aligns the print head; see page 9 for instructions OFF 30°C to 50°C (86 °F to 122 °F) Sets the temperature of the heater that media type: Option...
... | 21 Paper Setup Option Summary In the PAPER SETUP menu, select your media instructions Pre Heater see page 10 for instructions BI-D ALL Aligns the print head; see page 9 for instructions OFF 30°C to 50°C (86 °F to 122 °F) Sets the temperature of the heater that media type: Option...

Quick Reference Guide
Page 23
...the ink; see your media instructions Selects a drying time for ink to avoid smearing Moves the print head to the width of the print data Moves the print head to the maximum width Sets printing to overwrite lines a select number of times (also called "multiple hit") see your media ...WIDTH OFF 2 to 8 Minimizes the affect of the MicroWeave adjustment Prints areas between print head passes with a wave form pattern Prints like MEDIUM, but slower to improve print quality Prints like HIGH, but only on half of the print head nozzles Adjusts the suction pressure used when feeding the media; 22 |...
...the ink; see your media instructions Selects a drying time for ink to avoid smearing Moves the print head to the width of the print data Moves the print head to the maximum width Sets printing to overwrite lines a select number of times (also called "multiple hit") see your media ...WIDTH OFF 2 to 8 Minimizes the affect of the MicroWeave adjustment Prints areas between print head passes with a wave form pattern Prints like MEDIUM, but slower to improve print quality Prints like HIGH, but only on half of the print head nozzles Adjusts the suction pressure used when feeding the media; 22 |...

Quick Reference Guide
Page 24
... Warranty Plan. Or you experience difficulty with your Unit ID number, call 800-GO-EPSON (800-463-7766). Ordering Supplies | 23 Ordering Supplies Part Ink Cartridges Additional Printer Maintenance Kit (one-year supply) Additional Cleaning Cartridges (8 cartridges) Print Head Cleaning Kit (used for periodic cleaning) Additional Waste Ink Bottle Additional 64-inch Wide...
... Warranty Plan. Or you experience difficulty with your Unit ID number, call 800-GO-EPSON (800-463-7766). Ordering Supplies | 23 Ordering Supplies Part Ink Cartridges Additional Printer Maintenance Kit (one-year supply) Additional Cleaning Cartridges (8 cartridges) Print Head Cleaning Kit (used for periodic cleaning) Additional Waste Ink Bottle Additional 64-inch Wide...

Setup and User's Guide
Page 5
... Setting Up the Printer 12 Using the Printer 13 Handling Ink Cartridges 15 Handling Waste Ink 16 1 Setting Up the Printer Unpacking and Assembling the Pro GS6000 17 Unpacking and Assembling the Stand 18 Installing the Printer on the Stand 21 Installing the Auto Take-Up Reel 24 Removing the Printer Packing... Your Printer 41 Loading Media 42 Placing the Roll on the Printer 43 Attaching the Media to the Auto Take-Up Reel 49 Checking the Print Quality 53 Adjusting the Print Head Height 54 5
... Setting Up the Printer 12 Using the Printer 13 Handling Ink Cartridges 15 Handling Waste Ink 16 1 Setting Up the Printer Unpacking and Assembling the Pro GS6000 17 Unpacking and Assembling the Stand 18 Installing the Printer on the Stand 21 Installing the Auto Take-Up Reel 24 Removing the Printer Packing... Your Printer 41 Loading Media 42 Placing the Roll on the Printer 43 Attaching the Media to the Auto Take-Up Reel 49 Checking the Print Quality 53 Adjusting the Print Head Height 54 5

Setup and User's Guide
Page 6
...Paper Configurations 56 Creating Paper Configurations 56 Printing a List of Your Paper Configurations 57 Printing Using a Paper Configuration 57 Pre-Printing Checklist 58 Adjusting the Paper Feeding Position 59 Aligning the Print Head 61 Cutting Off Prints 62 Removing Prints From the Auto Take-Up Reel 64...Maintaining the Printer Checking the Ink Status 70 Checking the Printer Status 70 Printing Status Information 71 Viewing Status Information 71 Checking the Print Head Nozzles 73 Cleaning the Print Head 74 Replacing Ink Cartridges 75 Disposing of Waste Ink 78 Cleaning the ...
...Paper Configurations 56 Creating Paper Configurations 56 Printing a List of Your Paper Configurations 57 Printing Using a Paper Configuration 57 Pre-Printing Checklist 58 Adjusting the Paper Feeding Position 59 Aligning the Print Head 61 Cutting Off Prints 62 Removing Prints From the Auto Take-Up Reel 64...Maintaining the Printer Checking the Ink Status 70 Checking the Printer Status 70 Printing Status Information 71 Viewing Status Information 71 Checking the Print Head Nozzles 73 Cleaning the Print Head 74 Replacing Ink Cartridges 75 Disposing of Waste Ink 78 Cleaning the ...

Setup and User's Guide
Page 10
... (Canadian sales). 10 see page 78 Additional Cleaning Cartridges (8 cartridges); see page 86 Print Head Cleaning Kit (used for periodic cleaning); To find the nearest reseller, visit www.proimaging.epson.com (U.S. Options and Supplies Your Epson Stylus® Pro GS6000 offers these supplies: Consumables and user-replaceable parts Part Ink Cartridges Additional Printer Maintenance Kit (one-year...
... (Canadian sales). 10 see page 78 Additional Cleaning Cartridges (8 cartridges); see page 86 Print Head Cleaning Kit (used for periodic cleaning); To find the nearest reseller, visit www.proimaging.epson.com (U.S. Options and Supplies Your Epson Stylus® Pro GS6000 offers these supplies: Consumables and user-replaceable parts Part Ink Cartridges Additional Printer Maintenance Kit (one-year...


