Pre-Installation Guide
Page 1
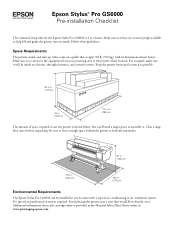
.... No special air purification system is required. Epson Stylus® Pro GS6000 Pre-installation Checklist The estimated setup time for the Epson Stylus Pro GS6000 is 2 to help lift and guide the printer onto its dimensions shown below , but you can be installed in the Material Safety Data Sheets online at www.proimaging.epson.com. Follow these guidelines: Space Requirements The printer, stand, and take-up roller come on...
.... No special air purification system is required. Epson Stylus® Pro GS6000 Pre-installation Checklist The estimated setup time for the Epson Stylus Pro GS6000 is 2 to help lift and guide the printer onto its dimensions shown below , but you can be installed in the Material Safety Data Sheets online at www.proimaging.epson.com. Follow these guidelines: Space Requirements The printer, stand, and take-up roller come on...
Preferred Warranty Booklet
Page 6
... limited warranty period, please call the toll-free Epson Preferred support line identified in this booklet. If service is being setup. What Epson Will Do To Correct Problems: Should your printer needs repair, diagnose the issue and determine what parts may also need to provide proof of purchase if warranty coverage cannot be required. Epson also warrants that the Epson Stylus Pro GS6000 64-inch wide solvent printer covered by the serial number.
... limited warranty period, please call the toll-free Epson Preferred support line identified in this booklet. If service is being setup. What Epson Will Do To Correct Problems: Should your printer needs repair, diagnose the issue and determine what parts may also need to provide proof of purchase if warranty coverage cannot be required. Epson also warrants that the Epson Stylus Pro GS6000 64-inch wide solvent printer covered by the serial number.

Preferred Warranty Booklet
Page 8
... such as documented in the Epson Stylus Pro GS6000 User's Guide. The user level maintenance includes the following items: a) Checking and cleaning the print head, cleaner wiper and cap unit surroundings b) Performing periodic nozzle checks and nozzle cleanings to prevent ink build up around the print head and cap unit area c) Checking and replacing the Flushing Pad d) Checking and cleaning the secondary roller e) Properly discharging the Waste ink. 2) Any damage caused by using non-Epson inks or ink cartridges, or any ink delivery...
... such as documented in the Epson Stylus Pro GS6000 User's Guide. The user level maintenance includes the following items: a) Checking and cleaning the print head, cleaner wiper and cap unit surroundings b) Performing periodic nozzle checks and nozzle cleanings to prevent ink build up around the print head and cap unit area c) Checking and replacing the Flushing Pad d) Checking and cleaning the secondary roller e) Properly discharging the Waste ink. 2) Any damage caused by using non-Epson inks or ink cartridges, or any ink delivery...
Product Brochure
Page 3
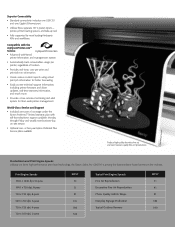
... need for extreme color gamut and photographic print quality, Epson UltraChrome® GS Ink technology introduces eight individual colors, including an all -new Epson Stylus Pro GS6000. For unsurpassed print quality up to 91 square-foot-per-hour (SFPH) or everyday production quality printing up to produce virtually any size printing company. By combining extreme print quality and high-production print speeds, with the same printer, you can replace them to -roll printer in overall printer...
... need for extreme color gamut and photographic print quality, Epson UltraChrome® GS Ink technology introduces eight individual colors, including an all -new Epson Stylus Pro GS6000. For unsurpassed print quality up to 91 square-foot-per-hour (SFPH) or everyday production quality printing up to produce virtually any size printing company. By combining extreme print quality and high-production print speeds, with the same printer, you can replace them to -roll printer in overall printer...

Product Brochure
Page 5
... centigrade Temperatures can be controlled via front control panel or via front-end RIP software Intelligent Preventative Maintenance System Four-mode automatic cleaning system for maintaining optimum print quality Simple user-focused maintenance process for incredibly sharp text and line art Variable-sized droplet technology as small as Apple® and Windows client workstations Introducing Epson UltraChrome GS Ink Technology Industry-Defining 8-Color Solvent-Based Ink System Unique solvent...
... centigrade Temperatures can be controlled via front control panel or via front-end RIP software Intelligent Preventative Maintenance System Four-mode automatic cleaning system for maintaining optimum print quality Simple user-focused maintenance process for incredibly sharp text and line art Variable-sized droplet technology as small as Apple® and Windows client workstations Introducing Epson UltraChrome GS Ink Technology Industry-Defining 8-Color Solvent-Based Ink System Unique solvent...
Product Brochure
Page 6
... USB 2.0 and one -year of coverage under the Epson PreferredSM limited warranty plan with the myEpsonPrinter.comSM Service Advanced web-based printer information and management system Automatically track consumables usage per printer, regardless of location Provides real-time, cost-per-print and print-job-run information Create various custom reports using actual print job information for better forecasting Easily access technical support information, including printer firmware and driver updates, real-time...
... USB 2.0 and one -year of coverage under the Epson PreferredSM limited warranty plan with the myEpsonPrinter.comSM Service Advanced web-based printer information and management system Automatically track consumables usage per printer, regardless of location Provides real-time, cost-per-print and print-job-run information Create various custom reports using actual print job information for better forecasting Easily access technical support information, including printer firmware and driver updates, real-time...
Product Brochure
Page 7
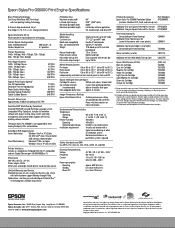
... Epson Stylus Pro GS6000 Print Engine Specifications Base Printing Technology Dual-Array MicroPiezo AMC Print Head with Ink-repelling Coating Technology 8-channel, drop-on images printed, print settings, paper type, frequency of use and temperature. Includes full workflow software with layout, nesting, tiling, custom spot color management and custom media support with 350 ml cartridges. ColorBurst RIP Requirements Server Workstation: Windows Vista® or XP (32-bit) 2.8 GHz Intel® Core 2 Duo or better 4GB memory recommended...
... Epson Stylus Pro GS6000 Print Engine Specifications Base Printing Technology Dual-Array MicroPiezo AMC Print Head with Ink-repelling Coating Technology 8-channel, drop-on images printed, print settings, paper type, frequency of use and temperature. Includes full workflow software with layout, nesting, tiling, custom spot color management and custom media support with 350 ml cartridges. ColorBurst RIP Requirements Server Workstation: Windows Vista® or XP (32-bit) 2.8 GHz Intel® Core 2 Duo or better 4GB memory recommended...

Quick Reference Guide
Page 3
Release both levers, move the center of the media does not extend beyond the media limit line. Open the front cover, then carefully feed the media into the slot and through to the d mark, and lock the levers again. 2 | Loading Media in the Epson Stylus® Pro GS6000 4. Turn the roll backward to remove any slack and make sure the edge of the roll to the front and out about 3 ft (1 m). 6. Lever is behind roll Center mark 5. Media limit line
Release both levers, move the center of the media does not extend beyond the media limit line. Open the front cover, then carefully feed the media into the slot and through to the d mark, and lock the levers again. 2 | Loading Media in the Epson Stylus® Pro GS6000 4. Turn the roll backward to remove any slack and make sure the edge of the roll to the front and out about 3 ft (1 m). 6. Lever is behind roll Center mark 5. Media limit line

Quick Reference Guide
Page 20
... 6h, 9h, 12h, 18h, 24h Resets PRINTER SETUP menu settings to their default values Media type loaded in the printer STANDARD, 1 to 30 Starts a very light print head cleaning cycle Starts a standard print head cleaning cycle Starts a strong print head cleaning cycle Starts the strongest print head cleaning cycle Starts the print head washing cycle Moves the print head to enter menu mode and select the settings summarized here. Control Panel Menus | 19 Control Panel Menus Press the Menu button to the maintenance position Sets the printer date and time settings Adjusts the contrast of the LCD...
... 6h, 9h, 12h, 18h, 24h Resets PRINTER SETUP menu settings to their default values Media type loaded in the printer STANDARD, 1 to 30 Starts a very light print head cleaning cycle Starts a standard print head cleaning cycle Starts a strong print head cleaning cycle Starts the strongest print head cleaning cycle Starts the print head washing cycle Moves the print head to enter menu mode and select the settings summarized here. Control Panel Menus | 19 Control Panel Menus Press the Menu button to the maintenance position Sets the printer date and time settings Adjusts the contrast of the LCD...

Quick Reference Guide
Page 21
... ENABLE, DISABLE AUTO, PANEL IP address, subnet mask, default gateway ON, OFF Resets network settings to their default values 20 | Control Panel Menus Menu TEST PRINT PRINTER STATUS NETWORK SETUP Item NOZZLE CHECK STATUS SHEET NETWORK STATUS SHEET JOB INFORMATION CUSTOM PAPER VERSION PRINTABLE PAGES INK LEVEL USAGE COUNT CLEAR USAGE COUNT JOB HISTORY TOTAL PRINTS EDM STATUS NETWORK SETUP IP ADDRESS SETTING IP, SM, DG SETTING BONJOUR INIT NETWORK SETTING Settings Prints a nozzle check pattern, firmware version and ink usage count Prints a sheet showing status of various printer parts and...
... ENABLE, DISABLE AUTO, PANEL IP address, subnet mask, default gateway ON, OFF Resets network settings to their default values 20 | Control Panel Menus Menu TEST PRINT PRINTER STATUS NETWORK SETUP Item NOZZLE CHECK STATUS SHEET NETWORK STATUS SHEET JOB INFORMATION CUSTOM PAPER VERSION PRINTABLE PAGES INK LEVEL USAGE COUNT CLEAR USAGE COUNT JOB HISTORY TOTAL PRINTS EDM STATUS NETWORK SETUP IP ADDRESS SETTING IP, SM, DG SETTING BONJOUR INIT NETWORK SETTING Settings Prints a nozzle check pattern, firmware version and ink usage count Prints a sheet showing status of various printer parts and...

Setup and User's Guide
Page 5
... Printer Packing Materials 27 Connecting the Power Cord 31 Installing Ink 33 Installing Your Software 37 Connecting to Your System 37 Updating Your Printer Firmware 38 Checking the Current Firmware Version 38 Downloading the Firmware 38 Updating the Firmware 38 Configuring the Printer for Your Network 39 2 Handling Media and Printouts Selecting Media for Your Printer 41 Loading Media 42 Placing the Roll on the Printer 43 Attaching the Media to the Auto Take-Up Reel 49 Checking the Print Quality 53 Adjusting the Print Head...
... Printer Packing Materials 27 Connecting the Power Cord 31 Installing Ink 33 Installing Your Software 37 Connecting to Your System 37 Updating Your Printer Firmware 38 Checking the Current Firmware Version 38 Downloading the Firmware 38 Updating the Firmware 38 Configuring the Printer for Your Network 39 2 Handling Media and Printouts Selecting Media for Your Printer 41 Loading Media 42 Placing the Roll on the Printer 43 Attaching the Media to the Auto Take-Up Reel 49 Checking the Print Quality 53 Adjusting the Print Head...

Setup and User's Guide
Page 61
... banding appears on and media is the most important thing you can also align the print head using the EPSON LFP Remote Panel utility. Also check that the print head alignment patterns print correctly. See page 54 for each print mode you need to run a nozzle check before aligning the print head (see misregistration or "ghosting," you use. Press u or d to highlight PAPER TYPE, then press Menu. 5. The configuration number you haven't already done so, it's a good idea to align the print head for...
... banding appears on and media is the most important thing you can also align the print head using the EPSON LFP Remote Panel utility. Also check that the print head alignment patterns print correctly. See page 54 for each print mode you need to run a nozzle check before aligning the print head (see misregistration or "ghosting," you use. Press u or d to highlight PAPER TYPE, then press Menu. 5. The configuration number you haven't already done so, it's a good idea to align the print head for...

Setup and User's Guide
Page 101
... Remove the bracket securing the print head; see page 75. see page 75. see page 75. Close the front cover. Replace the ink cartridge(s) indicated on the LCD display; Damaged data was sent to select ACCEPT may be using the wrong printer driver. COMMAND ERROR CHECK DRIVER SETTINGS You may cause damage not covered by your printer. Make sure you installed the correct driver for three seconds to select YES. FRONT COVER OPEN Front cover is locked. Solving Problems...
... Remove the bracket securing the print head; see page 75. see page 75. see page 75. Close the front cover. Replace the ink cartridge(s) indicated on the LCD display; Damaged data was sent to select ACCEPT may be using the wrong printer driver. COMMAND ERROR CHECK DRIVER SETTINGS You may cause damage not covered by your printer. Make sure you installed the correct driver for three seconds to select YES. FRONT COVER OPEN Front cover is locked. Solving Problems...

Setup and User's Guide
Page 102
INSTALL INK CARTRIDGE Response Remove the cartridge and make sure there is low. Set the paper lever to the Secured position. Install ink cartridge(s); LEVER RELEASED Paper is released. Make sure you just replaced a cartridge when this error message, install a new cartridge. Start printing again from the beginning for instructions. Note the code number and contact Epson as described on it . MAINT COVER OPEN CLOSE LEFT MAINT COVER MAINTENANCE REQUEST A printer part may decline when ink is no condensation on page 11. Leave the cartridge uninstalled for...
INSTALL INK CARTRIDGE Response Remove the cartridge and make sure there is low. Set the paper lever to the Secured position. Install ink cartridge(s); LEVER RELEASED Paper is released. Make sure you just replaced a cartridge when this error message, install a new cartridge. Start printing again from the beginning for instructions. Note the code number and contact Epson as described on it . MAINT COVER OPEN CLOSE LEFT MAINT COVER MAINTENANCE REQUEST A printer part may decline when ink is no condensation on page 11. Leave the cartridge uninstalled for...
Setup and User's Guide
Page 105
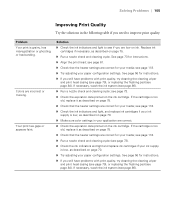
... banding. If necessary, wash the ink system (see page 84). Solution ◗ Check the ink indicators and light to improve print quality. See page 73 for instructions. ◗ Align the print head; See page 56 for instructions. ◗ If you are correct for your media; see page 61. ◗ Check that the heater settings are low on page 75. ◗ Run a nozzle check and cleaning cycle. Problem Your print is too old, replace it as described on ink. Solving Problems...
... banding. If necessary, wash the ink system (see page 84). Solution ◗ Check the ink indicators and light to improve print quality. See page 73 for instructions. ◗ Align the print head; See page 56 for instructions. ◗ If you are correct for your media; see page 61. ◗ Check that the heater settings are low on page 75. ◗ Run a nozzle check and cleaning cycle. Problem Your print is too old, replace it as described on ink. Solving Problems...
Setup and User's Guide
Page 106
... specifications. • Make sure no foreign objects are correct for your media. see page 86). See page 121 for more of the following solutions: • Try adjusting the Paper Suction, heater settings, and other settings for your media. Load new media. ◗ Check that the heater settings are inside the paper path and no paper dust has accumulated on the pressure rollers. See page 89 for cleaning instructions. ◗ The print head height adjustment lever...
... specifications. • Make sure no foreign objects are correct for your media. see page 86). See page 121 for more of the following solutions: • Try adjusting the Paper Suction, heater settings, and other settings for your media. Load new media. ◗ Check that the heater settings are inside the paper path and no paper dust has accumulated on the pressure rollers. See page 89 for cleaning instructions. ◗ The print head height adjustment lever...

Setup and User's Guide
Page 115
... setting turned ON. MAINTENANCE menu CLEANING (VERY LIGHT) Starts a very light print head cleaning cycle (uses less ink than LIGHT cleaning cycle); see page 74 for details. REGULAR CLEANING Selects the interval at which to automatically clean the print head after completing a print job to their default settings. OFF 1h to 6h, 9h, 12h, 18h, 24h INITIALIZE SETTINGS Resets the PRINTER SETUP menu settings to retain print quality (in hours). PAPER SETUP Selects whether to print with default settings for all media setup options (STANDARD) or to set up a paper number (1 to 800mm) AUTO...
... setting turned ON. MAINTENANCE menu CLEANING (VERY LIGHT) Starts a very light print head cleaning cycle (uses less ink than LIGHT cleaning cycle); see page 74 for details. REGULAR CLEANING Selects the interval at which to automatically clean the print head after completing a print job to their default settings. OFF 1h to 6h, 9h, 12h, 18h, 24h INITIALIZE SETTINGS Resets the PRINTER SETUP menu settings to retain print quality (in hours). PAPER SETUP Selects whether to print with default settings for all media setup options (STANDARD) or to set up a paper number (1 to 800mm) AUTO...

Setup and User's Guide
Page 116
...Displays the printer's firmware version number. TEST PRINT menu NOZZLE CHECK Prints a nozzle check pattern, including the firmware version and ink usage count; see page 79 for details. CUSTOM PAPER Prints information about the last 10 print jobs. PRINTER STATUS menu (see page 74 for details. USAGE COUNT Displays the approximate amount of ink and media used in the last 10 print jobs. JOB HISTORY Displays the approximate amount of various printer parts and settings; 116 | Printer Parts and Controls Summary Menu setting Description CLEANING (HEAVY) Starts the strongest print...
...Displays the printer's firmware version number. TEST PRINT menu NOZZLE CHECK Prints a nozzle check pattern, including the firmware version and ink usage count; see page 79 for details. CUSTOM PAPER Prints information about the last 10 print jobs. PRINTER STATUS menu (see page 74 for details. USAGE COUNT Displays the approximate amount of ink and media used in the last 10 print jobs. JOB HISTORY Displays the approximate amount of various printer parts and settings; 116 | Printer Parts and Controls Summary Menu setting Description CLEANING (HEAVY) Starts the strongest print...

Setup and User's Guide
Page 125
..., 11 Cartridges, see Ink cartridges, or Cleaning cartridges Check ink light, 70, 77, 100 Check paper light, 100, 108 Checking error messages, 100 to 103 ink status, 70 lights, 100 nozzles, 53, 73 printer status, 70 to 72 waste ink status, 78 Cleaning cleaning wiper and print head casing, 79 to 84 print head nozzles, 74 to 75 printer, 89 to 90 125 Cleaning cartridges installing, 33 to 35, 86 to 87 ordering, 10 Cleaning wiper, cleaning, 79 to 84 Color problems, 105 Configuring media, 56 to 58 Connecting printer, 37 Control panel buttons, 100...
..., 11 Cartridges, see Ink cartridges, or Cleaning cartridges Check ink light, 70, 77, 100 Check paper light, 100, 108 Checking error messages, 100 to 103 ink status, 70 lights, 100 nozzles, 53, 73 printer status, 70 to 72 waste ink status, 78 Cleaning cleaning wiper and print head casing, 79 to 84 print head nozzles, 74 to 75 printer, 89 to 90 125 Cleaning cartridges installing, 33 to 35, 86 to 87 ordering, 10 Cleaning wiper, cleaning, 79 to 84 Color problems, 105 Configuring media, 56 to 58 Connecting printer, 37 Control panel buttons, 100...

Setup and User's Guide
Page 126
... light, 100, 111 Ink cartridges checking status, 70 installing, 33 to 36, 86 to 87 ordering, 75 removing for transportation, 93, 95 replacing, 75 to 77 safety instructions, 15 to 16 specifications, 123 Ink cleaning, using, 81 to 84 Ink light, 70, 111 126 Ink system maintaining, 69 to 87 washing, 86 to 87, 95 Ink, waste see Waste ink Interface specifications, 122 J Jams, media, 107 to 108 Job history, 72 L Language, control panel, 120 LCD display...
... light, 100, 111 Ink cartridges checking status, 70 installing, 33 to 36, 86 to 87 ordering, 75 removing for transportation, 93, 95 replacing, 75 to 77 safety instructions, 15 to 16 specifications, 123 Ink cleaning, using, 81 to 84 Ink light, 70, 111 126 Ink system maintaining, 69 to 87 washing, 86 to 87, 95 Ink, waste see Waste ink Interface specifications, 122 J Jams, media, 107 to 108 Job history, 72 L Language, control panel, 120 LCD display...


