Product Information Guide
Page 6
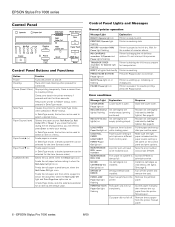
.... A printer part will need to be used to READY status, when pressed in the printer. EPSON Stylus Pro 7000 series 8/00 Ink cartridge(s) are empty (printing stops). Paper has jammed in SelecType mode. Remove the jammed paper. Cleaning Runs print head cleaning when pressed for the number of minutes shown. In SelecType mode, sets the selected parameter for the item...
.... A printer part will need to be used to READY status, when pressed in the printer. EPSON Stylus Pro 7000 series 8/00 Ink cartridge(s) are empty (printing stops). Paper has jammed in SelecType mode. Remove the jammed paper. Cleaning Runs print head cleaning when pressed for the number of minutes shown. In SelecType mode, sets the selected parameter for the item...
Product Information Guide
Page 7
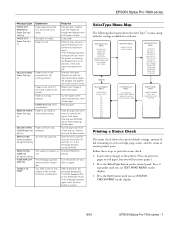
...printouts or paper remaining in the printer. (You can print test pages on . Restart print job for each cartridge, page count, and the status of ink remaining in the printer. If the message remains, contact EPSON. SelecType Menu Map The following illustration shows the SelecType... reload paper. Paper is not fully ejected. Contact EPSON for print head cleaning. If the message appears again, clear the error before you clear a paper jam. PRINTER SETTING MENU: PLATEN GAP PAGE LINE INTERFACE PARA. EPSON Stylus Pro 7000 series Message/Light PAPER NOT STRAIGHT/ Paper Out light...
...printouts or paper remaining in the printer. (You can print test pages on . Restart print job for each cartridge, page count, and the status of ink remaining in the printer. If the message remains, contact EPSON. SelecType Menu Map The following illustration shows the SelecType... reload paper. Paper is not fully ejected. Contact EPSON for print head cleaning. If the message appears again, clear the error before you clear a paper jam. PRINTER SETTING MENU: PLATEN GAP PAGE LINE INTERFACE PARA. EPSON Stylus Pro 7000 series Message/Light PAPER NOT STRAIGHT/ Paper Out light...
Product Information Guide
Page 8
...carriage motor) PF MOTOR (paper feed motor) HEAD UNIT (print head) CLEANER (cleaning unit) CUTTER LIFE (paper cutter) 4. Damage to your printer. 3. Locate the slot containing the empty ink cartridge (corresponding to display the amount remaining for each...printing a status check. Continue pressing the Item button to the Ink Out light). You must replace the cartridge before you start, make sure the printer is not covered by an authorized EPSON service center. Caution: For best results, use non-EPSON inks. Use only the following 110 ml EPSON ink cartridges: EPSON Stylus Pro 7000...
...carriage motor) PF MOTOR (paper feed motor) HEAD UNIT (print head) CLEANER (cleaning unit) CUTTER LIFE (paper cutter) 4. Damage to your printer. 3. Locate the slot containing the empty ink cartridge (corresponding to display the amount remaining for each...printing a status check. Continue pressing the Item button to the Ink Out light). You must replace the cartridge before you start, make sure the printer is not covered by an authorized EPSON service center. Caution: For best results, use non-EPSON inks. Use only the following 110 ml EPSON ink cartridges: EPSON Stylus Pro 7000...

Product Information Guide
Page 9
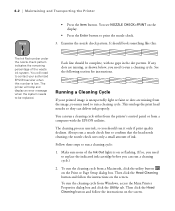
...cartridge into the slot until the cleaning cycle is finished and the Pause light has stopped flashing. 8/00 EPSON Stylus Pro 7000 series - 9 If dots are missing from the printer's control panel, press the SelecType button repeatedly until you see if any dots are clogged. You will use more paper.) 2. Running a Nozzle Check The nozzle check prints... the Head Cleaning button and follow the instructions on the screen. The cleaning cycle takes about three minutes. If you're using pigment ink (EPSON Stylus Pro 7500), shake the cartridge gently before you can run a cleaning cycle.)...
...cartridge into the slot until the cleaning cycle is finished and the Pause light has stopped flashing. 8/00 EPSON Stylus Pro 7000 series - 9 If dots are missing from the printer's control panel, press the SelecType button repeatedly until you see if any dots are clogged. You will use more paper.) 2. Running a Nozzle Check The nozzle check prints... the Head Cleaning button and follow the instructions on the screen. The cleaning cycle takes about three minutes. If you're using pigment ink (EPSON Stylus Pro 7500), shake the cartridge gently before you can run a cleaning cycle.)...

Product Information Guide
Page 12
...need to run a cleaning cycle and realign the print head to remove the ink cartridges. 2. Keep the printer level while you move the printer, you may need to maintain print quality. Carefully roll ...cartridges. 3. Caution: Do not roll the printer on its new location. Have two or more people lift it . Warning: The printer weighs approximately 96 lb (43.5 kg). Related Documentation CPD-10836 CPD-10837 4011817 4012672 EPSON Stylus Pro 7000 series Printer Guide EPSON Stylus Pro 7000 series Quick Reference Guide EPSON Stylus Pro 7000 Assembly and Setup Instructions EPSON Stylus Pro...
...need to run a cleaning cycle and realign the print head to remove the ink cartridges. 2. Keep the printer level while you move the printer, you may need to maintain print quality. Carefully roll ...cartridges. 3. Caution: Do not roll the printer on its new location. Have two or more people lift it . Warning: The printer weighs approximately 96 lb (43.5 kg). Related Documentation CPD-10836 CPD-10837 4011817 4012672 EPSON Stylus Pro 7000 series Printer Guide EPSON Stylus Pro 7000 series Quick Reference Guide EPSON Stylus Pro 7000 Assembly and Setup Instructions EPSON Stylus Pro...
Printer Guide
Page 7
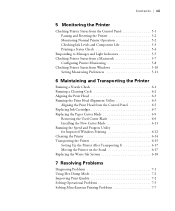
... Status from Windows 5-10 Setting Monitoring Preferences 5-11 6 Maintaining and Transporting the Printer Running a Nozzle Check 6-1 Running a Cleaning Cycle 6-2 Aligning the Print Head 6-3 Running the Print Head Alignment Utility 6-3 Aligning the Print Head from the Control Panel 6-5 Replacing Ink Cartridges 6-7 Replacing the Paper Cutter Blade 6-9 Removing the Used Cutter Blade 6-9 Installing the New Cutter Blade 6-11 Running the...
... Status from Windows 5-10 Setting Monitoring Preferences 5-11 6 Maintaining and Transporting the Printer Running a Nozzle Check 6-1 Running a Cleaning Cycle 6-2 Aligning the Print Head 6-3 Running the Print Head Alignment Utility 6-3 Aligning the Print Head from the Control Panel 6-5 Replacing Ink Cartridges 6-7 Replacing the Paper Cutter Blade 6-9 Removing the Used Cutter Blade 6-9 Installing the New Cutter Blade 6-11 Running the...
Printer Guide
Page 10
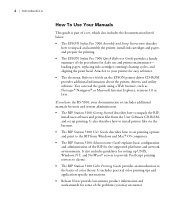
...also includes the documentation listed below. • The EPSON Stylus Pro 7000 Assembly and Setup Instructions describe how to unpack and assemble the printer, install ink cartridges and paper, and prepare for printing. • The EPSON Stylus Pro 7000 Quick Reference Guide provides a handy summary of the ... PostScript printing services to clients. • The RIP Station 5100 Color Printing Guide provides an introduction to the RIP from the User Software CD-ROM, and set up printing. loading paper, replacing ink cartridges, running cleaning cycles, and aligning the print head. It...
...also includes the documentation listed below. • The EPSON Stylus Pro 7000 Assembly and Setup Instructions describe how to unpack and assemble the printer, install ink cartridges and paper, and prepare for printing. • The EPSON Stylus Pro 7000 Quick Reference Guide provides a handy summary of the ... PostScript printing services to clients. • The RIP Station 5100 Color Printing Guide provides an introduction to the RIP from the User Software CD-ROM, and set up printing. loading paper, replacing ink cartridges, running cleaning cycles, and aligning the print head. It...
Printer Guide
Page 11
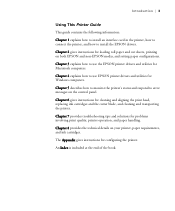
... and utilities for loading roll paper and cut sheets, printing on both EPSON and non-EPSON media, and setting paper configurations. Chapter 2 gives instructions for Windows computers. Chapter 7 provides troubleshooting tips and solutions for cleaning and aligning the print head, replacing ink cartridges and the cutter blade, and cleaning and transporting the printer. An Index is included at...
... and utilities for loading roll paper and cut sheets, printing on both EPSON and non-EPSON media, and setting paper configurations. Chapter 2 gives instructions for Windows computers. Chapter 7 provides troubleshooting tips and solutions for cleaning and aligning the print head, replacing ink cartridges and the cutter blade, and cleaning and transporting the printer. An Index is included at...
Printer Guide
Page 83
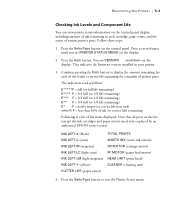
...SelecType button on the list (except the ink cartridges and paper cutter) need to be replaced by an authorized EPSON service center. This indicates the firmware version installed in each of the 6 inks or service life remaining for each cartridge, page count, and the status of the...) INK LEFT-LM (light magenta) INK LEFT-Y (yellow) CUTTER LIFE (paper cutter) TOTAL PRINTS WASTE INK (waste ink system) CR MOTOR (carriage motor) PF MOTOR (paper feed motor) HEAD UNIT (print head) CLEANER (cleaning unit) 4. Monitoring the Printer | 5-3 Checking Ink Levels and Component Life You can view printer...
...SelecType button on the list (except the ink cartridges and paper cutter) need to be replaced by an authorized EPSON service center. This indicates the firmware version installed in each of the 6 inks or service life remaining for each cartridge, page count, and the status of the...) INK LEFT-LM (light magenta) INK LEFT-Y (yellow) CUTTER LIFE (paper cutter) TOTAL PRINTS WASTE INK (waste ink system) CR MOTOR (carriage motor) PF MOTOR (paper feed motor) HEAD UNIT (print head) CLEANER (cleaning unit) 4. Monitoring the Printer | 5-3 Checking Ink Levels and Component Life You can view printer...

Printer Guide
Page 93
... procedures: • Running a nozzle check • Running a cleaning cycle • Aligning the print head • Replacing ink cartridges • Replacing the paper cutter blade • Running the Speed and Progress utility • Cleaning the printer • Transporting the printer • Replacing the waste... the utility button on roll paper, but you see if any dots are clogged. To run a cleaning cycle to print a nozzle check: 1. Chapter 6: Maintaining and Transporting the Printer The EPSON Stylus Pro 7000 requires very little maintenance to keep working at its best.
... procedures: • Running a nozzle check • Running a cleaning cycle • Aligning the print head • Replacing ink cartridges • Replacing the paper cutter blade • Running the Speed and Progress utility • Cleaning the printer • Transporting the printer • Replacing the waste... the utility button on roll paper, but you see if any dots are clogged. To run a cleaning cycle to print a nozzle check: 1. Chapter 6: Maintaining and Transporting the Printer The EPSON Stylus Pro 7000 requires very little maintenance to keep working at its best.
Printer Guide
Page 94
...print the nozzle check. 3. To run a cleaning cycle. Then click the Head Cleaning button and follow the instructions on the screen. Each line should be replaced. If any dots are missing from a Macintosh, click the utility button on or flashing. (If so, you need to replace the indicated ink cartridge... to run a cleaning cycle. Follow these steps to be complete, with the EPSON utilities. The printer will need to contact your printed image is low. the nozzle check uses only a small amount of the waste ink system. Then click the Head Cleaning button and follow ...
...print the nozzle check. 3. To run a cleaning cycle. Then click the Head Cleaning button and follow the instructions on the screen. Each line should be replaced. If any dots are missing from a Macintosh, click the utility button on or flashing. (If so, you need to replace the indicated ink cartridge... to run a cleaning cycle. Follow these steps to be complete, with the EPSON utilities. The printer will need to contact your printed image is low. the nozzle check uses only a small amount of the waste ink system. Then click the Head Cleaning button and follow ...

Printer Guide
Page 109
...EPSON recommends installing new cartridges after moving the printer, the print head nozzles may need to run a cleaning cycle (see page 6-2) and realign the print head (see the Assembly and Setup Instructions. Moving the Printer on the Stand If you're using the printer stand and you need to ensure good print...knobs after transporting the printer. Whenever you start printing after transporting it is almost identical to its casters. Follow these steps: 1. The first time you set up the printer, see page 6-3) to remove the ink cartridges. 2. Carefully roll the printer to setting it...
...EPSON recommends installing new cartridges after moving the printer, the print head nozzles may need to run a cleaning cycle (see page 6-2) and realign the print head (see the Assembly and Setup Instructions. Moving the Printer on the Stand If you're using the printer stand and you need to ensure good print...knobs after transporting the printer. Whenever you start printing after transporting it is almost identical to its casters. Follow these steps: 1. The first time you set up the printer, see page 6-3) to remove the ink cartridges. 2. Carefully roll the printer to setting it...
Printer Guide
Page 113
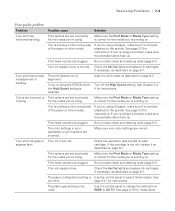
...the spindle. Print options are correct. If you 're printing on page 6-3. Check the Ink Out lights and replace ink cartridges if necessary, as described on page 6-7. Your print has vertical misalignment or banding. The print head is selected. If you 're using the EPSON driver, ...print head, as described on . Make sure the Print Mode or Media Type setting is too old, replace it as described on . If you 're printing on page 6-7. Run a nozzle check and cleaning cycle (page 6-1). Make sure your application or print options are clogged. If the cartridge...
...the spindle. Print options are correct. If you 're printing on page 6-3. Check the Ink Out lights and replace ink cartridges if necessary, as described on page 6-7. Your print has vertical misalignment or banding. The print head is selected. If you 're using the EPSON driver, ...print head, as described on . Make sure the Print Mode or Media Type setting is too old, replace it as described on . If you 're printing on page 6-7. Run a nozzle check and cleaning cycle (page 6-1). Make sure your application or print options are clogged. If the cartridge...

Printer Guide
Page 131
... at 140 °F Freezing 14 °F (-10 °C); Yield of ink charging. 8-5 Specifications | 8-5 Ink Cartridges Print capacity Approx. 28 pages/A1 (720 dpi, 40% duty) Approx. 3,800 pages/A4 (360 dpi, 5% duty) Cartridge life 2 years from production date Temperature Storage (uninstalled) -22 to 104 °F (-30 to 40 °C) ...99 in. (25.1 mm) Depth 5.6 in. (141.1 mm) Height 4.15 in. (105.3 mm) Weight Approximately 0.44 lb (200 g) Capacity 3.7 oz (110 ml) Print yield may vary, depending on how often you run print head cleaning cycles and how much you use the printer.
... at 140 °F Freezing 14 °F (-10 °C); Yield of ink charging. 8-5 Specifications | 8-5 Ink Cartridges Print capacity Approx. 28 pages/A1 (720 dpi, 40% duty) Approx. 3,800 pages/A4 (360 dpi, 5% duty) Cartridge life 2 years from production date Temperature Storage (uninstalled) -22 to 104 °F (-30 to 40 °C) ...99 in. (25.1 mm) Depth 5.6 in. (141.1 mm) Height 4.15 in. (105.3 mm) Weight Approximately 0.44 lb (200 g) Capacity 3.7 oz (110 ml) Print yield may vary, depending on how often you run print head cleaning cycles and how much you use the printer.

Printer Guide
Page 139
..., paper Belt, roll paper, 2-7 Blank pages, 7-8 Blurry prints, 7-4 Buttons, control panel, 2-10, 5-1 to 5-4, A-1 to A-4 C Cable problems, 7-6, 7-7, 7-15 Canceling print jobs control panel, 5-2 Macintosh, 3-11, 3-12 Windows, 4-11 Cartridges, see Ink cartridges Casters, 6-17 Checking, 1-12 Chooser, selecting printer, 1-7 Cleaner (cleaning unit), 5-3 Cleaning paper hammock, 6-14 print head, 6-2 to 6-3 printer, 6-14 Cleaning button, 6-2, 6-3 Cleaning cycle, running, 6-2 to 6-3 Code page setting, A-3 Color...
..., paper Belt, roll paper, 2-7 Blank pages, 7-8 Blurry prints, 7-4 Buttons, control panel, 2-10, 5-1 to 5-4, A-1 to A-4 C Cable problems, 7-6, 7-7, 7-15 Canceling print jobs control panel, 5-2 Macintosh, 3-11, 3-12 Windows, 4-11 Cartridges, see Ink cartridges Casters, 6-17 Checking, 1-12 Chooser, selecting printer, 1-7 Cleaner (cleaning unit), 5-3 Cleaning paper hammock, 6-14 print head, 6-2 to 6-3 printer, 6-14 Cleaning button, 6-2, 6-3 Cleaning cycle, running, 6-2 to 6-3 Code page setting, A-3 Color...


