Product Brochure
Page 1
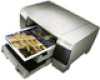
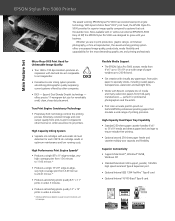
... card. EPSON Stylus® Pro 5000 Printer Main Feature Set The award winning EPSON Stylus Pro 5000 has revolutionized print engine technology. True Print Engine Consistency Technology • Proprietary ASIC technology controls the printing process. ...paper type, from 4"x 6" up to 13"x19" on paper size, print resolution and ink coverage. High-Capacity Dual Paper Tray Capability • Standard 250-sheet paper cassette handles 4"x 6" to 13"x19"media and detects paper level and type to ensure mistake-free printing. • Optional second 250-sheet paper feeder and cassette...
... card. EPSON Stylus® Pro 5000 Printer Main Feature Set The award winning EPSON Stylus Pro 5000 has revolutionized print engine technology. True Print Engine Consistency Technology • Proprietary ASIC technology controls the printing process. ...paper type, from 4"x 6" up to 13"x19" on paper size, print resolution and ink coverage. High-Capacity Dual Paper Tray Capability • Standard 250-sheet paper cassette handles 4"x 6" to 13"x19"media and detects paper level and type to ensure mistake-free printing. • Optional second 250-sheet paper feeder and cassette...

Product Brochure
Page 2
... OS 7.x or higher, Windows 95, 98 and NT Print Engine Memory Buffer 64kb Standard; EPSON Stylus Pro 5000 Printer Specifications Product Ordering Information EPSON Stylus Pro 5000 with EFI Fiery Printing System Product code EPSON Stylus Pro 5000 Printer Product code Optional EPSON RS-5000 Fiery LX RIP Product code Optional 250 sheet lower paper tray Product code Optional EPSON Color Calibrator System Product code Internal IEEE 1394 FireWire...
... OS 7.x or higher, Windows 95, 98 and NT Print Engine Memory Buffer 64kb Standard; EPSON Stylus Pro 5000 Printer Specifications Product Ordering Information EPSON Stylus Pro 5000 with EFI Fiery Printing System Product code EPSON Stylus Pro 5000 Printer Product code Optional EPSON RS-5000 Fiery LX RIP Product code Optional 250 sheet lower paper tray Product code Optional EPSON Color Calibrator System Product code Internal IEEE 1394 FireWire...
Product Information Guide
Page 3
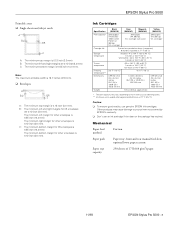
...inch (3.0 mm). Mechanical Paper feed method Friction Paper path Paper tray capacity Paper tray, front and rear manual feed slots, optional lower paper cassette 250 sheets of 17 lb (64 g/m2) paper 11/98 EPSON Stylus Pro 5000 - 3 t Don't use genuine EPSON ink cartridges. B: ...margin is 0.55 inch (14.0 mm). The minimum right margin for C5 envelopes is 0.12 inch (3.0 mm). EPSON Stylus Pro 5000 Ink Cartridges Specification Print capacity* Cartridge life Storage temperature Transit temperature Freezing temperature** Dimensions Weight Black (S020118) Cyan (S020147) Magenta (S020143...
...inch (3.0 mm). Mechanical Paper feed method Friction Paper path Paper tray capacity Paper tray, front and rear manual feed slots, optional lower paper cassette 250 sheets of 17 lb (64 g/m2) paper 11/98 EPSON Stylus Pro 5000 - 3 t Don't use genuine EPSON ink cartridges. B: ...margin is 0.55 inch (14.0 mm). The minimum right margin for C5 envelopes is 0.12 inch (3.0 mm). EPSON Stylus Pro 5000 Ink Cartridges Specification Print capacity* Cartridge life Storage temperature Transit temperature Freezing temperature** Dimensions Weight Black (S020118) Cyan (S020147) Magenta (S020143...

Product Information Guide
Page 4
EPSON Stylus Pro 5000 11/98 EPSON Stylus Pro 5000 Dimensions Weight Storage Width: 25.2 inches (640 mm) Depth: 17.3 inches (439 mm) maximum Height: 8.8 inches (224 mm) Printing (A3 size paper) Width: 25.2 inches (640 mm) Depth: 27.7 inches (704 mm) maximum Height: 8.8 inches (224 mm) Printing (letter size paper, lower paper cassette installed) Width: 25.2 inches (640 mm) Depth: 21.4 inches (544 mm...
EPSON Stylus Pro 5000 11/98 EPSON Stylus Pro 5000 Dimensions Weight Storage Width: 25.2 inches (640 mm) Depth: 17.3 inches (439 mm) maximum Height: 8.8 inches (224 mm) Printing (A3 size paper) Width: 25.2 inches (640 mm) Depth: 27.7 inches (704 mm) maximum Height: 8.8 inches (224 mm) Printing (letter size paper, lower paper cassette installed) Width: 25.2 inches (640 mm) Depth: 21.4 inches (544 mm...

Product Information Guide
Page 10
...paper cassette before you load paper in a tray: t Place the printable side of the printer. t Press the Eject button if you should run a printer check to Other on the printer. Press the cleaning button and hold it off . EPSON Stylus Pro 5000 Paper Tray Tips Keep these tips in mind when you send your print job. t Load paper... before you 're using thick paper or if ink smears on and the H ink out lights are off...
...paper cassette before you load paper in a tray: t Place the printable side of the printer. t Press the Eject button if you should run a printer check to Other on the printer. Press the cleaning button and hold it off . EPSON Stylus Pro 5000 Paper Tray Tips Keep these tips in mind when you send your print job. t Load paper... before you 're using thick paper or if ink smears on and the H ink out lights are off...
Product Information Guide
Page 11
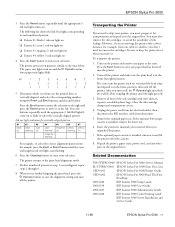
... printer: 1. Ink out light indicators for transportation and repack it . If the optional lower paper cassette is in the original box. When you are misaligned, repeat steps 2 through 6. 8. Press the Eject button to select the vertically aligned pattern. EPSON Stylus Pro 5000 3. The following list shows the Ink Out lights corresponding to each numbered pattern: t Pattern...
... printer: 1. Ink out light indicators for transportation and repack it . If the optional lower paper cassette is in the original box. When you are misaligned, repeat steps 2 through 6. 8. Press the Eject button to select the vertically aligned pattern. EPSON Stylus Pro 5000 3. The following list shows the Ink Out lights corresponding to each numbered pattern: t Pattern...

Product Support Bulletin(s)
Page 47
Select the PPD for your Printer (Note PPD Names) and click OK to continue with the driver installation. 10. (Stylus Pro 5000 only): If you have the optional Lower Paper Cassette and you get to the screen for configuring options, select yes for configuring options and click next to complete the install. 3 9. Click Finish to bring up the printer properties. 11. Set the Lower Tray to True, click OK. 12.
Select the PPD for your Printer (Note PPD Names) and click OK to continue with the driver installation. 10. (Stylus Pro 5000 only): If you have the optional Lower Paper Cassette and you get to the screen for configuring options, select yes for configuring options and click next to complete the install. 3 9. Click Finish to bring up the printer properties. 11. Set the Lower Tray to True, click OK. 12.

User Manual
Page 24
... Unpacking the Printer 1-1 Installing the Optional Lower Paper Cassette 1-3 Installing the Paper Tray 1-5 Installing the Ink Cartridges 1-5 Loading Paper 1-8 Running a Printer Check 1-14 Aligning the Print Head 1-15 Chapter 2: Printing on Various Substrates ___________ Selecting a Paper Path 2-1 Using the Standard and Optional Paper Trays 2-2 Setting the Paper Tray Levers 2-3 Paper Tray Tips 2-5 Loading Paper in the Optional Lower Tray 2-6 Using the...
... Unpacking the Printer 1-1 Installing the Optional Lower Paper Cassette 1-3 Installing the Paper Tray 1-5 Installing the Ink Cartridges 1-5 Loading Paper 1-8 Running a Printer Check 1-14 Aligning the Print Head 1-15 Chapter 2: Printing on Various Substrates ___________ Selecting a Paper Path 2-1 Using the Standard and Optional Paper Trays 2-2 Setting the Paper Tray Levers 2-3 Paper Tray Tips 2-5 Loading Paper in the Optional Lower Tray 2-6 Using the...

User Manual
Page 33
...the optional lower paper cassette • Installing the paper tray • Installing the ink cartridges • Loading paper • Running a printer check • Aligning the print head Unpacking the Printer Here's what is included in the box: paper size and media type cards printer paper tray ink cartridges... 11-1 Unpacking the Printer Chapter 1: Setting Up the Printer To set up your EPSON Stylus Pro 5000, you need to load paper, run a printer check, and align the print head. Then you need...
...the optional lower paper cassette • Installing the paper tray • Installing the ink cartridges • Loading paper • Running a printer check • Aligning the print head Unpacking the Printer Here's what is included in the box: paper size and media type cards printer paper tray ink cartridges... 11-1 Unpacking the Printer Chapter 1: Setting Up the Printer To set up your EPSON Stylus Pro 5000, you need to load paper, run a printer check, and align the print head. Then you need...

User Manual
Page 34
... such as a large appliance. TO UNPACK THE PRINTER: 1. Do not use it . See the RIP Station 5000 Setup Guide for removing the paper tray. 4. The optional lower paper cassette is packed in the Introduction. Save all packaging so you need to remove the tape and protective materials. 11...-2 Setting Up the Printer CAUTION: The printer weighs approximately 50 lb. Do not try to install the lower cassette. If you purchased the optional lower paper cassette, you can erase the printer's memory and damage the power supply. 3. Locate the printer on a flat, stable surface...
... such as a large appliance. TO UNPACK THE PRINTER: 1. Do not use it . See the RIP Station 5000 Setup Guide for removing the paper tray. 4. The optional lower paper cassette is packed in the Introduction. Save all packaging so you need to remove the tape and protective materials. 11...-2 Setting Up the Printer CAUTION: The printer weighs approximately 50 lb. Do not try to install the lower cassette. If you purchased the optional lower paper cassette, you can erase the printer's memory and damage the power supply. 3. Locate the printer on a flat, stable surface...

User Manual
Page 35
... the box to use the printer, with the paper tray slot facing forward. 3. 11-3 Installing the Optional Lower Paper Cassette Installing the Optional Lower Paper Cassette The lower paper cassette provides an additional paper source, so you can have two different substrates available for printing at the depression on top of the cassette as shown: WARNING: Hold the bottom of...
... the box to use the printer, with the paper tray slot facing forward. 3. 11-3 Installing the Optional Lower Paper Cassette Installing the Optional Lower Paper Cassette The lower paper cassette provides an additional paper source, so you can have two different substrates available for printing at the depression on top of the cassette as shown: WARNING: Hold the bottom of...

User Manual
Page 36
If you attach the cassette, see the illustration below. Use the hexagonal wrench that come apart and cause injury. 11-4 Setting Up the Printer 4. WARNING: Do not try to move the printer after you need to tighten the screws. Attach the printer and cassette using the two screws that comes with the cassette. otherwise the cassette and printer may come with the cassette to move the paper cassette or printer without securing the screws; Have one person on each side of the printer hold the bottom of the cassette at the depression.
If you attach the cassette, see the illustration below. Use the hexagonal wrench that come apart and cause injury. 11-4 Setting Up the Printer 4. WARNING: Do not try to move the printer after you need to tighten the screws. Attach the printer and cassette using the two screws that comes with the cassette. otherwise the cassette and printer may come with the cassette to move the paper cassette or printer without securing the screws; Have one person on each side of the printer hold the bottom of the cassette at the depression.

User Manual
Page 37
...it . NOTE: The first time you installed the lower paper cassette, insert the paper tray that came with it on by pressing the P Operate button. Smudges and dirt on . 11-5 Installing the Paper Tray Installing the Paper Tray Insert the paper tray into the slots at the front of the printer ... not to touch the black pad at the right end of ink remaining. Plug in the printer, the power supply may cause a paper feeding problem. Installing the Ink Cartridges Always use new ink cartridges. Reinstalling partially empty ink cartridges prevents the ink counter from accurately indicating ...
...it . NOTE: The first time you installed the lower paper cassette, insert the paper tray that came with it on by pressing the P Operate button. Smudges and dirt on . 11-5 Installing the Paper Tray Installing the Paper Tray Insert the paper tray into the slots at the front of the printer ... not to touch the black pad at the right end of ink remaining. Plug in the printer, the power supply may cause a paper feeding problem. Installing the Ink Cartridges Always use new ink cartridges. Reinstalling partially empty ink cartridges prevents the ink counter from accurately indicating ...

User Manual
Page 40
... Printer Loading Paper Your EPSON Stylus Pro 5000 printer has four paper paths: two for the manual feed slots, one for the standard paper tray, and one for instructions on using the manual feed slots. However, in the standard tray. You can use Photo Quality Ink Jet (coated) paper. NOTE: ... print head, load coated paper in order to print the Test Page from the RIP control panel, you feel some resistance. TO LOAD PAPER: 1. Raise the paper tray cover. See Chapter 2 for the optional lower paper cassette. Before you run a printer check and align the print head. Pull the paper ...
... Printer Loading Paper Your EPSON Stylus Pro 5000 printer has four paper paths: two for the manual feed slots, one for the standard paper tray, and one for instructions on using the manual feed slots. However, in the standard tray. You can use Photo Quality Ink Jet (coated) paper. NOTE: ... print head, load coated paper in order to print the Test Page from the RIP control panel, you feel some resistance. TO LOAD PAPER: 1. Raise the paper tray cover. See Chapter 2 for the optional lower paper cassette. Before you run a printer check and align the print head. Pull the paper ...

User Manual
Page 55
22-6 Printing on paper in the lower tray, make sure you select it (or select Auto) in the lower tray, pull out the tray and cover extensions of the upper paper tray, so your print options before you send the print job. To print on Various Substrates Loading Paper in the Optional Lower Tray Always pull the paper tray completely out of the printer. NOTE: If you use paper longer than letter size in your printouts will be supported when they come out of the lower paper cassette before you insert paper.
22-6 Printing on paper in the lower tray, make sure you select it (or select Auto) in the lower tray, pull out the tray and cover extensions of the upper paper tray, so your print options before you send the print job. To print on Various Substrates Loading Paper in the Optional Lower Tray Always pull the paper tray completely out of the printer. NOTE: If you use paper longer than letter size in your printouts will be supported when they come out of the lower paper cassette before you insert paper.

User Manual
Page 65
If you can't get the jammed paper out, follow the next step. If your printer has the lower paper cassette installed, remove the lower paper tray and check the inside . 7. paper guide paper path cover If the jammed paper comes out, replace the paper tray, turn the printer back on, and press the Eject button to make sure paper is feeding properly. Gently pull out the jammed paper. 33-4 Monitoring the Printer 4. Open the paper path cover, and if necessary, open the paper guide inside of the paper cassette. 5. Open the rear manual feed cover. 6.
If you can't get the jammed paper out, follow the next step. If your printer has the lower paper cassette installed, remove the lower paper tray and check the inside . 7. paper guide paper path cover If the jammed paper comes out, replace the paper tray, turn the printer back on, and press the Eject button to make sure paper is feeding properly. Gently pull out the jammed paper. 33-4 Monitoring the Printer 4. Open the paper path cover, and if necessary, open the paper guide inside of the paper cassette. 5. Open the rear manual feed cover. 6.

User Manual
Page 75
If the optional lower paper cassette is installed, unscrew it and lift the printer off of the cassette. Insert the protective materials you removed when you unpacked the printer. 8. 44-9 Transporting the Printer 5. Remove the standard paper tray. If the optional lower paper cassette is installed, remove the lower tray. 7. Unplug the power cord from the printer. 6. then disconnect the RIP interface cable from the electrical outlet;
If the optional lower paper cassette is installed, unscrew it and lift the printer off of the cassette. Insert the protective materials you removed when you unpacked the printer. 8. 44-9 Transporting the Printer 5. Remove the standard paper tray. If the optional lower paper cassette is installed, remove the lower tray. 7. Unplug the power cord from the printer. 6. then disconnect the RIP interface cable from the electrical outlet;

User Manual
Page 83
Open the cover. 3. However, if you switch paper trays, you have more than one printer with or without the lower paper cassette. Lift the cover slightly backward. Remove the paper trays and then remove both covers following steps 2 through 4. 2. TO SWITCH PAPER TRAY COVERS: 1. You may find this convenient if you 'll also need to switch the tray covers, so that the manual feed guide is on the upper tray. AA-1 Switching Paper Trays Appendix A: Switching Paper Trays You can switch the positions of the standard paper tray and optional lower tray.
Open the cover. 3. However, if you switch paper trays, you have more than one printer with or without the lower paper cassette. Lift the cover slightly backward. Remove the paper trays and then remove both covers following steps 2 through 4. 2. TO SWITCH PAPER TRAY COVERS: 1. You may find this convenient if you 'll also need to switch the tray covers, so that the manual feed guide is on the upper tray. AA-1 Switching Paper Trays Appendix A: Switching Paper Trays You can switch the positions of the standard paper tray and optional lower tray.

User Manual
Page 91
....2 inches (640 mm) Depth: 17.3 inches (439 mm) maximum Height: 8.8 inches (224 mm) • Printing (A3 size paper) Width: 25.2 inches (640 mm) Depth: 27.7 inches (704 mm) maximum Height: 8.8 inches (224 mm) • Printing (letter size paper, lower paper cassette installed) Width: 25.2 inches (640 mm) Depth: 21.4 inches (544 mm) maximum Height: 12.5 inches...
....2 inches (640 mm) Depth: 17.3 inches (439 mm) maximum Height: 8.8 inches (224 mm) • Printing (A3 size paper) Width: 25.2 inches (640 mm) Depth: 27.7 inches (704 mm) maximum Height: 8.8 inches (224 mm) • Printing (letter size paper, lower paper cassette installed) Width: 25.2 inches (640 mm) Depth: 21.4 inches (544 mm) maximum Height: 12.5 inches...

User Manual
Page 96
..., 1-13, 2-2 to 2-5 Lights, control panel, 3-1 to 3-2, 5-4 to 5-5 Lower paper cassette installing, 1-3 to 1-4 loading paper, 2-6 M Manual feed slot feeding paper, 2-12 front, 2-7 to 2-8 rear, 2-8 to 2-10 Mechanical specifications, B-6 Media type lever and cards, 1-13, 2-2 to 2-5 N Nozzle check pattern, 1-14 to 1-15, 4-2 to 4-3 P Panoramic paper, 2-2 Paper EPSON, 2-10 to 2-12 glossy, 2-10 to 2-12 jams, 3-2 to 3-5, 5-4 to 5-5 lights, 3-2, 5-4 to...
..., 1-13, 2-2 to 2-5 Lights, control panel, 3-1 to 3-2, 5-4 to 5-5 Lower paper cassette installing, 1-3 to 1-4 loading paper, 2-6 M Manual feed slot feeding paper, 2-12 front, 2-7 to 2-8 rear, 2-8 to 2-10 Mechanical specifications, B-6 Media type lever and cards, 1-13, 2-2 to 2-5 N Nozzle check pattern, 1-14 to 1-15, 4-2 to 4-3 P Panoramic paper, 2-2 Paper EPSON, 2-10 to 2-12 glossy, 2-10 to 2-12 jams, 3-2 to 3-5, 5-4 to 5-5 lights, 3-2, 5-4 to...

