Quick Reference Guide
Page 2
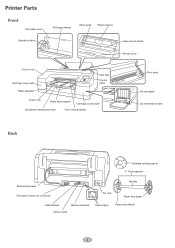
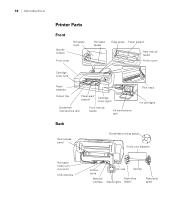
Printer Parts Front Roll paper cover Spindle holders Roll paper feeder Edge guide Paper support Rear manual feeder Printer cover Front cover Cartridge cover (left) Paper cassette Alert light Control panel Output tray Paper eject support Cartridge cover (right) Borderfree maintenance tank Front manual feeder Print head Ink cartridges Ink maintenance tank Back Bordless printing spacer 3" Core adapters Rear access panel Roll paper holder unit connector AC inlet Spindle Paper stop (gray) USB interface Network interface Airflow vents Status lights Paper stop (black) 1
Printer Parts Front Roll paper cover Spindle holders Roll paper feeder Edge guide Paper support Rear manual feeder Printer cover Front cover Cartridge cover (left) Paper cassette Alert light Control panel Output tray Paper eject support Cartridge cover (right) Borderfree maintenance tank Front manual feeder Print head Ink cartridges Ink maintenance tank Back Bordless printing spacer 3" Core adapters Rear access panel Roll paper holder unit connector AC inlet Spindle Paper stop (gray) USB interface Network interface Airflow vents Status lights Paper stop (black) 1
Quick Reference Guide
Page 3
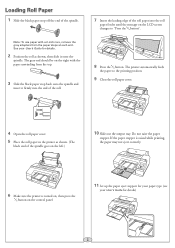
... the gray adapters from the top. 3 Slide the black paper stop off the end of the spindle. The printer automatically feeds the paper to the printing position. 9 Close the roll paper cover. 4 Open the roll paper cover. 5 Place the roll paper in the printer as shown, then slide it firmly into the.... The gray end should be on the control panel. 11 Set up the paper eject support for your paper type (see your User's Guide for details) . 2 Note: To use paper with the paper unwinding from the paper stops at each end. See your User's Guide for details. 2 Position the roll as shown. ...
... the gray adapters from the top. 3 Slide the black paper stop off the end of the spindle. The printer automatically feeds the paper to the printing position. 9 Close the roll paper cover. 4 Open the roll paper cover. 5 Place the roll paper in the printer as shown, then slide it firmly into the.... The gray end should be on the control panel. 11 Set up the paper eject support for your paper type (see your User's Guide for details) . 2 Note: To use paper with the paper unwinding from the paper stops at each end. See your User's Guide for details. 2 Position the roll as shown. ...

Quick Reference Guide
Page 4
...2 Press the button. Note: Make sure the roll paper is A3 or larger, extend the paper cassette to even the pages. 3 Loading Paper in the Paper Cassette Make sure the printer is on. 1 Lift the edge of the output tray to remove it. 3 If your paper size is rewound before removing the spindle. 3 Hold both... ends of paper, then gently tap it on a flat surface to match the size of the paper. 2 Slide open the paper cassette, lift it slightly and then pull it out. 4 Slide the...
...2 Press the button. Note: Make sure the roll paper is A3 or larger, extend the paper cassette to even the pages. 3 Loading Paper in the Paper Cassette Make sure the printer is on. 1 Lift the edge of the output tray to remove it. 3 If your paper size is rewound before removing the spindle. 3 Hold both... ends of paper, then gently tap it on a flat surface to match the size of the paper. 2 Slide open the paper cassette, lift it slightly and then pull it out. 4 Slide the...
Quick Reference Guide
Page 5
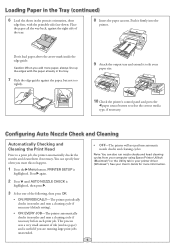
.... 10 Check the printer's control panel and press the paper source button to select the correct media type, if necessary. You can also run nozzle checks and head cleaning cycles from your computer using Epson Printer Utility4 (Macintosh®) or the Utility tab in the tray. 7 Slide the edge ...guides against the right side of the tray. 8 Insert the paper cassette. Note: You can specify how often you want this to a...
.... 10 Check the printer's control panel and press the paper source button to select the correct media type, if necessary. You can also run nozzle checks and head cleaning cycles from your computer using Epson Printer Utility4 (Macintosh®) or the Utility tab in the tray. 7 Slide the edge ...guides against the right side of the tray. 8 Insert the paper cassette. Note: You can specify how often you want this to a...
Quick Reference Guide
Page 6
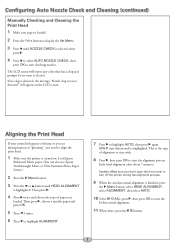
... BI-D ALL, press , then press OK to start the bi-directional alignment. 11 When done, press the button. 5 Load Epson Enhanced Matte paper. (You can also use Epson Doubleweight Matte or Ultra Premium Photo Paper Luster.) 2 Press the Menu button. 3 Press the or button until NOZZLE CHECK is highlighted. Configuring Auto Nozzle Check and...
... BI-D ALL, press , then press OK to start the bi-directional alignment. 11 When done, press the button. 5 Load Epson Enhanced Matte paper. (You can also use Epson Doubleweight Matte or Ultra Premium Photo Paper Luster.) 2 Press the Menu button. 3 Press the or button until NOZZLE CHECK is highlighted. Configuring Auto Nozzle Check and...
Quick Reference Guide
Page 8
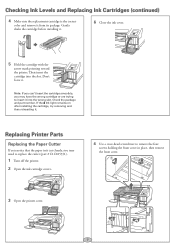
... four screws holding the front cover in place, then remove the front cover. 3 Open the printer cover. 7 Replacing Printer Parts Replacing the Paper Cutter If you notice that the paper isn't cut cleanly, you may need to replace the cutter (part # C1C815351). 1 Turn off the printer. 2 Open the ink cartridge covers. 4 Use...
... four screws holding the front cover in place, then remove the front cover. 3 Open the printer cover. 7 Replacing Printer Parts Replacing the Paper Cutter If you notice that the paper isn't cut cleanly, you may need to replace the cutter (part # C1C815351). 1 Turn off the printer. 2 Open the ink cartridge covers. 4 Use...
Quick Reference Guide
Page 10
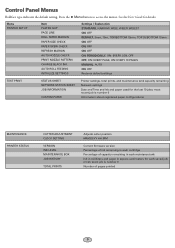
...each saved job; See theUser's Guide for the last 10 jobs; most recent job is number 0 Information about registered paper configurations MAINTENANCE PRINTER STATUS CUTTER ADJUSTMENT CLOCK SETTING VERSION INK LEVEL MAINTENANCE BOX JOB HISTORY TOTAL PRINTS Adjusts cutter position MM/DD... of pages printed 9 Press the Menu button to access the menus. Menu PRINTER SETUP Item PLATEN GAP PAGE LINE ROLL PAPER MARGIN PAPER SIZE CHECK PAPER SKEW CHECK REFRESH MARGIN AUTO NOZZLE CHECK PRINT NOZZLE PATTERN CHANGE BLACK INK AUTO ROLL FEEDING INITIALIZE SETTINGS Settings / Explanation STANDARD...
...each saved job; See theUser's Guide for the last 10 jobs; most recent job is number 0 Information about registered paper configurations MAINTENANCE PRINTER STATUS CUTTER ADJUSTMENT CLOCK SETTING VERSION INK LEVEL MAINTENANCE BOX JOB HISTORY TOTAL PRINTS Adjusts cutter position MM/DD... of pages printed 9 Press the Menu button to access the menus. Menu PRINTER SETUP Item PLATEN GAP PAGE LINE ROLL PAPER MARGIN PAPER SIZE CHECK PAPER SKEW CHECK REFRESH MARGIN AUTO NOZZLE CHECK PRINT NOZZLE PATTERN CHANGE BLACK INK AUTO ROLL FEEDING INITIALIZE SETTINGS Settings / Explanation STANDARD...

Quick Reference Guide
Page 11
...PAPER SETUP HEAD ALIGNMENT ROLL PAPER REMAINING REMAINING PPR SETUP ROLL PAPER LENGTH ROLL LENGTH ALERT PAPER TYPE CUSTOM PAPER PAPER TYPE PLATEN GAP THICKNESS PATTERN PAPER FEED ADJUST A PAPER FEED ADJUST B DRYING TIME PAPER SUCTION SET ROLL PAPER TENSION REMOVE SKEW PAPER THICKNESS PAPER TYPE PAPER THICKNESS ALIGNMENT AUTO MANUAL Setting appears only when no paper...% 0.0 sec. STANDARD, -1, -2, -3, -4 NORMAL, HIGH, EXTRA HIGH ON, OFF Media type loaded in the printer Paper No 1 to 10 Photo, Proofing, Fine Art, Matte, Plain, Others STANDARD, NARROW, WIDE, WIDER PRINT -0.70% to 0.70% -0.70...
...PAPER SETUP HEAD ALIGNMENT ROLL PAPER REMAINING REMAINING PPR SETUP ROLL PAPER LENGTH ROLL LENGTH ALERT PAPER TYPE CUSTOM PAPER PAPER TYPE PLATEN GAP THICKNESS PATTERN PAPER FEED ADJUST A PAPER FEED ADJUST B DRYING TIME PAPER SUCTION SET ROLL PAPER TENSION REMOVE SKEW PAPER THICKNESS PAPER TYPE PAPER THICKNESS ALIGNMENT AUTO MANUAL Setting appears only when no paper...% 0.0 sec. STANDARD, -1, -2, -3, -4 NORMAL, HIGH, EXTRA HIGH ON, OFF Media type loaded in the printer Paper No 1 to 10 Photo, Proofing, Fine Art, Matte, Plain, Others STANDARD, NARROW, WIDE, WIDER PRINT -0.70% to 0.70% -0.70...

Quick Reference Guide
Page 13
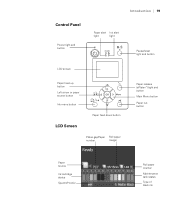
Control Panel Lights and Buttons Paper alert light Ink alert light Power light and button Pause/reset light and button LCD screen Paper feed up button Left arrow or paper source button Ink Menu button Paper release (ePlaten®) button Main Menu button Paper cut button Paper feed down button Printed in USA CPD-28116
Control Panel Lights and Buttons Paper alert light Ink alert light Power light and button Pause/reset light and button LCD screen Paper feed up button Left arrow or paper source button Ink Menu button Paper release (ePlaten®) button Main Menu button Paper cut button Paper feed down button Printed in USA CPD-28116
User's Guide
Page 5
... Software 30 Adding the Network Port 33 Updating Your Printer Firmware 35 Checking the Current Firmware Version 35 Downloading and Updating the Firmware 36 2 Handling Paper and Other Media Selecting Media for Your Printer 37 Guidelines for Using...
... Software 30 Adding the Network Port 33 Updating Your Printer Firmware 35 Checking the Current Firmware Version 35 Downloading and Updating the Firmware 36 2 Handling Paper and Other Media Selecting Media for Your Printer 37 Guidelines for Using...
User's Guide
Page 6
... Built-in Cutter 56 Adjusting the Platen Gap for Thick or Thin Paper 57 Optimizing the Settings for Your Paper 58 Creating Custom Paper Configurations 58 Selecting Custom Paper Configurations 60 3 Printing With Epson Drivers for Windows Sizing Images for Borderless Printing on Roll Paper 62 Choosing Basic Print Options 63 Selecting the Correct Media Type...
... Built-in Cutter 56 Adjusting the Platen Gap for Thick or Thin Paper 57 Optimizing the Settings for Your Paper 58 Creating Custom Paper Configurations 58 Selecting Custom Paper Configurations 60 3 Printing With Epson Drivers for Windows Sizing Images for Borderless Printing on Roll Paper 62 Choosing Basic Print Options 63 Selecting the Correct Media Type...
User's Guide
Page 7
Contents | 7 4 Printing With Epson Drivers for Macintosh Sizing Images for Borderless Printing on Roll Paper 90 Choosing Page Setup and Basic Print Options 91 Choosing Advanced Media Control Options 97 Choosing Roll Paper Settings 98 Controlling Borderless Image Expansion 100 Creating a Custom Preset and Printing 101 Choosing Advanced Black and White Photo Settings 102...
Contents | 7 4 Printing With Epson Drivers for Macintosh Sizing Images for Borderless Printing on Roll Paper 90 Choosing Page Setup and Basic Print Options 91 Choosing Advanced Media Control Options 97 Choosing Roll Paper Settings 98 Controlling Borderless Image Expansion 100 Creating a Custom Preset and Printing 101 Choosing Advanced Black and White Photo Settings 102...
User's Guide
Page 8
... Problems Diagnosing Problems 143 Checking Error Messages and Lights 144 Improving Print Quality 152 Solving Operational Problems 156 Solving Miscellaneous Printing Problems 157 Solving Paper Problems 159 Clearing Paper Jams 160 Uninstalling and Reinstalling the Printer Driver 163 Macintosh OS X 163 Windows 163 A Specifications Clearing Stored Print Information 165 Environmental 165 Electrical...
... Problems Diagnosing Problems 143 Checking Error Messages and Lights 144 Improving Print Quality 152 Solving Operational Problems 156 Solving Miscellaneous Printing Problems 157 Solving Paper Problems 159 Clearing Paper Jams 160 Uninstalling and Reinstalling the Printer Driver 163 Macintosh OS X 163 Windows 163 A Specifications Clearing Stored Print Information 165 Environmental 165 Electrical...

User's Guide
Page 9
... equipment. Tips contain additional hints on how to get the most out of procedures for setting up and using your printer, loading paper, using the Epson printer drivers, and replacing ink cartridges. Warnings, Cautions, Notes, and Tips Please follow these guidelines as you have a problem. ... summary of your printer. 11 Attach it working at its best, and provides troubleshooting tips in case you use and printer maintenance-loading paper, replacing ink cartridges and other components, cleaning and aligning the print head, and using the printer's menu system. 11 Introduction This User...
... equipment. Tips contain additional hints on how to get the most out of procedures for setting up and using your printer, loading paper, using the Epson printer drivers, and replacing ink cartridges. Warnings, Cautions, Notes, and Tips Please follow these guidelines as you have a problem. ... summary of your printer. 11 Attach it working at its best, and provides troubleshooting tips in case you use and printer maintenance-loading paper, replacing ink cartridges and other components, cleaning and aligning the print head, and using the printer's menu system. 11 Introduction This User...
User's Guide
Page 10
com for a complete list. Options and Accessories Your Epson Stylus Pro 4900® offers these user-replaceable items: Consumables and user-replaceable parts Part Replacement ink maintenance tank (see page 137) Replacement borderfree maintenance tank (see page ... One-year extended service plan Two-year extended service plan Part number SPECTRO17 SPECTRO17UV EPP49B1 EPP49B2 In addition, you can purchase optional equipment and genuine Epson ink and paper from an Epson Professional Imaging Authorized Reseller. sales), www.epson.ca (Canadian sales), or call 800-GO...
com for a complete list. Options and Accessories Your Epson Stylus Pro 4900® offers these user-replaceable items: Consumables and user-replaceable parts Part Replacement ink maintenance tank (see page 137) Replacement borderfree maintenance tank (see page ... One-year extended service plan Two-year extended service plan Part number SPECTRO17 SPECTRO17UV EPP49B1 EPP49B2 In addition, you can purchase optional equipment and genuine Epson ink and paper from an Epson Professional Imaging Authorized Reseller. sales), www.epson.ca (Canadian sales), or call 800-GO...

User's Guide
Page 13
... lift the printer. • When setting up the printer, make sure you use the equipment safely and effectively. • The Epson Stylus Pro 4900 weighs about 115 lb (52 kg) without the ink or paper. The printer will not operate properly if it , as loudspeakers or the base units of cordless telephones. • Place the...
... lift the printer. • When setting up the printer, make sure you use the equipment safely and effectively. • The Epson Stylus Pro 4900 weighs about 115 lb (52 kg) without the ink or paper. The printer will not operate properly if it , as loudspeakers or the base units of cordless telephones. • Place the...
User's Guide
Page 16
18 | Introduction Printer Parts Front Spindle holders Roll paper cover Front cover Roll paper feeder Edge guide Paper support Rear manual feeder Printer cover Cartridge cover (left) Paper cassette Output tray Paper eject support Cartridge cover (right) Borderfree maintenance tank Front manual feeder Ink maintenance tank Print head Ink cartridges Back Rear access panel Borderless printing spacer 3-inch core adapters Roll paper holder unit connector USB interface Airflow vents Network interface AC inlet Spindle Paper stop Status lights (black) Paper stop (gray) 18
18 | Introduction Printer Parts Front Spindle holders Roll paper cover Front cover Roll paper feeder Edge guide Paper support Rear manual feeder Printer cover Cartridge cover (left) Paper cassette Output tray Paper eject support Cartridge cover (right) Borderfree maintenance tank Front manual feeder Ink maintenance tank Print head Ink cartridges Back Rear access panel Borderless printing spacer 3-inch core adapters Roll paper holder unit connector USB interface Airflow vents Network interface AC inlet Spindle Paper stop Status lights (black) Paper stop (gray) 18
User's Guide
Page 17
Control Panel Power light and button Introduction | 19 Paper alert Ink alert light light Pause/reset light and button LCD screen Paper feed up button Left arrow or paper source button Ink menu button Paper feed down button LCD Screen Platen gap/Paper Roll paper number margin Paper release (ePlaten™) light and button Main Menu button Paper cut button Paper source Ink cartridge status SpectroProofer 19 Roll paper counter Maintenance tank status Type of black ink
Control Panel Power light and button Introduction | 19 Paper alert Ink alert light light Pause/reset light and button LCD screen Paper feed up button Left arrow or paper source button Ink menu button Paper feed down button LCD Screen Platen gap/Paper Roll paper number margin Paper release (ePlaten™) light and button Main Menu button Paper cut button Paper source Ink cartridge status SpectroProofer 19 Roll paper counter Maintenance tank status Type of black ink

User's Guide
Page 19
... from the front of the output tray to remove it. 21 Lift the edge of the paper tray. 2. 21 Chapter 1: Setting Up the Printer This chapter includes the following information: • Unpacking and connecting the Epson Stylus Pro 4900 • Installing ink • Connecting to your computer or network • Configuring the printer for a network...
... from the front of the output tray to remove it. 21 Lift the edge of the paper tray. 2. 21 Chapter 1: Setting Up the Printer This chapter includes the following information: • Unpacking and connecting the Epson Stylus Pro 4900 • Installing ink • Connecting to your computer or network • Configuring the printer for a network...

User's Guide
Page 20
Check carefully for all packing materials and tape from the output tray. 4. Remove all packing materials and tape from inside and outside the printer, then close the top cover. 22 | Setting Up the Printer 3. Open the paper tray and top cover and remove all the tape inside the printer. Replace the paper tray and output tray. 22 Save the box and packaging in case you need to ship the printer. 5.
Check carefully for all packing materials and tape from the output tray. 4. Remove all packing materials and tape from inside and outside the printer, then close the top cover. 22 | Setting Up the Printer 3. Open the paper tray and top cover and remove all the tape inside the printer. Replace the paper tray and output tray. 22 Save the box and packaging in case you need to ship the printer. 5.


