Network Guide
Page 8
Introduction 9 Features of the Network Interface ❏ Connects your Epson printer using a built-in Ethernet interface, which is called the network interface in this manual, to the network. ❏ Supports multiple protocols, such as TCP/IP and Bonjour. ❏ Supports both 10Base-T and 100Base-TX. ❏ Supports DHCP. ❏ Supports ...
Introduction 9 Features of the Network Interface ❏ Connects your Epson printer using a built-in Ethernet interface, which is called the network interface in this manual, to the network. ❏ Supports multiple protocols, such as TCP/IP and Bonjour. ❏ Supports both 10Base-T and 100Base-TX. ❏ Supports DHCP. ❏ Supports ...

Network Guide
Page 18
... next octet. Press OK. Then continue with step 10. 10. Press u or d to change each octet value, then press r to set the printer's IP settings manually. 8. Press u or d to change each octet value, then press r to print a network status sheet and confirm the new IP address. See "Printing a Network Status Sheet...
... next octet. Press OK. Then continue with step 10. 10. Press u or d to change each octet value, then press r to set the printer's IP settings manually. 8. Press u or d to change each octet value, then press r to print a network status sheet and confirm the new IP address. See "Printing a Network Status Sheet...

Network Guide
Page 21
Follow the on-screen instructions to install all necessary software and manuals, place a link to the Epson Professional Imaging website on page 24 to create a network port for your printer. 22 Setting Up Your System for Network Printing When you 're done, click Exit and eject the CD. Select LPT1: as the printer port, then click OK. 6. Restart your printer. 7. See "Adding the Network Port" on your desktop, and register your computer if prompted. When you see a screen like this one, click the Manual button. 5. 4.
Follow the on-screen instructions to install all necessary software and manuals, place a link to the Epson Professional Imaging website on page 24 to create a network port for your printer. 22 Setting Up Your System for Network Printing When you 're done, click Exit and eject the CD. Select LPT1: as the printer port, then click OK. 6. Restart your printer. 7. See "Adding the Network Port" on your desktop, and register your computer if prompted. When you see a screen like this one, click the Manual button. 5. 4.

Network Guide
Page 29
... under Network on page 28 for Macintosh users for instructions. 3. Turn on your computer. ❏ TCP/IP must be correctly set the IP address manually, select Manual. 30 Network Software http://IP address of network interface/ Example: http://192.168.100.201/ Note: To check the IP address of the following ways...
... under Network on page 28 for Macintosh users for instructions. 3. Turn on your computer. ❏ TCP/IP must be correctly set the IP address manually, select Manual. 30 Network Software http://IP address of network interface/ Example: http://192.168.100.201/ Note: To check the IP address of the following ways...

Network Guide
Page 30
.... If you want to Enable; If you want to the DNS server through the DHCP server that supports Dynamic DNS. To assign an IP address manually, enter the IP address, the subnet mask, and the default gateway. otherwise, select Disable. 7. Select Enable for Acquire Host Name and Domain Name...acquire the host name and the domain name using the DHCP server. Select Enable for Register Network Interface Address to DNS Server if you select Manual and then enter an IP address. Select Enable for the gateway address. Note: If there is no DHCP servers on your network. ❏...
.... If you want to Enable; If you want to the DNS server through the DHCP server that supports Dynamic DNS. To assign an IP address manually, enter the IP address, the subnet mask, and the default gateway. otherwise, select Disable. 7. Select Enable for Acquire Host Name and Domain Name...acquire the host name and the domain name using the DHCP server. Select Enable for Register Network Interface Address to DNS Server if you select Manual and then enter an IP address. Select Enable for the gateway address. Note: If there is no DHCP servers on your network. ❏...

Network Guide
Page 34
... is not set correctly. Cannot print even if you have assigned the IP address to do You have assigned an IP address to the computer manually, but its IP address is installed on page 37.
... is not set correctly. Cannot print even if you have assigned the IP address to do You have assigned an IP address to the computer manually, but its IP address is installed on page 37.
Quick Reference Guide
Page 2
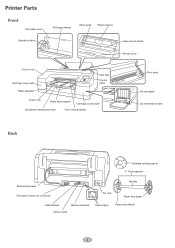
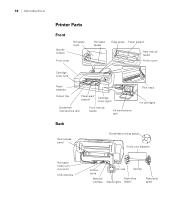
Printer Parts Front Roll paper cover Spindle holders Roll paper feeder Edge guide Paper support Rear manual feeder Printer cover Front cover Cartridge cover (left) Paper cassette Alert light Control panel Output tray Paper eject support Cartridge cover (right) Borderfree maintenance tank Front manual feeder Print head Ink cartridges Ink maintenance tank Back Bordless printing spacer 3" Core adapters Rear access panel Roll paper holder unit connector AC inlet Spindle Paper stop (gray) USB interface Network interface Airflow vents Status lights Paper stop (black) 1
Printer Parts Front Roll paper cover Spindle holders Roll paper feeder Edge guide Paper support Rear manual feeder Printer cover Front cover Cartridge cover (left) Paper cassette Alert light Control panel Output tray Paper eject support Cartridge cover (right) Borderfree maintenance tank Front manual feeder Print head Ink cartridges Ink maintenance tank Back Bordless printing spacer 3" Core adapters Rear access panel Roll paper holder unit connector AC inlet Spindle Paper stop (gray) USB interface Network interface Airflow vents Status lights Paper stop (black) 1
Quick Reference Guide
Page 6
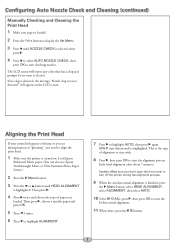
... The LCD screen will appear on . UNI-D (uni-directional) is the type of paper you want to clean it. Load Epson Enhanced Matte paper. (You can also use Epson Doubleweight Matte or Ultra Premium Photo Paper Luster.) 2 Press the Menu button. 3 Press the or button until NOZZLE CHECK is...start the bi-directional alignment. 11 When done, press the button. 5 If no clog is highlighted. Configuring Auto Nozzle Check and Cleaning (continued) Manually Checking and Cleaning the Print Head 1 Make sure paper is loaded. 2 Press the button to display the Ink Menu. 3 Press until HEAD ALIGNMENT...
... The LCD screen will appear on . UNI-D (uni-directional) is the type of paper you want to clean it. Load Epson Enhanced Matte paper. (You can also use Epson Doubleweight Matte or Ultra Premium Photo Paper Luster.) 2 Press the Menu button. 3 Press the or button until NOZZLE CHECK is...start the bi-directional alignment. 11 When done, press the button. 5 If no clog is highlighted. Configuring Auto Nozzle Check and Cleaning (continued) Manually Checking and Cleaning the Print Head 1 Make sure paper is loaded. 2 Press the button to display the Ink Menu. 3 Press until HEAD ALIGNMENT...
Quick Reference Guide
Page 10
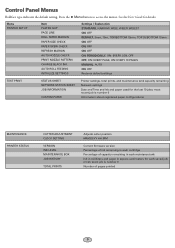
... 15mm, TOP 35/BOTTOM 15mm ON, OFF ON, OFF ON, OFF ON: PERIODICALLY, ON: EVERY JOB, OFF OFF, ON: EVERY PAGE, ON: EVERY 10 PAGES MANUAL, AUTO ON, OFF Restores default settings TEST PRINT STATUS SHEET NETWORK STATUS SHEET JOB INFORMATION CUSTOM PAPER Printer settings, total prints, and maintenance tank capacity...
... 15mm, TOP 35/BOTTOM 15mm ON, OFF ON, OFF ON, OFF ON: PERIODICALLY, ON: EVERY JOB, OFF OFF, ON: EVERY PAGE, ON: EVERY 10 PAGES MANUAL, AUTO ON, OFF Restores default settings TEST PRINT STATUS SHEET NETWORK STATUS SHEET JOB INFORMATION CUSTOM PAPER Printer settings, total prints, and maintenance tank capacity...

Quick Reference Guide
Page 11
... PATTERN PAPER FEED ADJUST A PAPER FEED ADJUST B DRYING TIME PAPER SUCTION SET ROLL PAPER TENSION REMOVE SKEW PAPER THICKNESS PAPER TYPE PAPER THICKNESS ALIGNMENT AUTO MANUAL Setting appears only when no paper is loaded OFF, ON From 15 to 300 ft From 4 to 50 ft Media type loaded in the printer...
... PATTERN PAPER FEED ADJUST A PAPER FEED ADJUST B DRYING TIME PAPER SUCTION SET ROLL PAPER TENSION REMOVE SKEW PAPER THICKNESS PAPER TYPE PAPER THICKNESS ALIGNMENT AUTO MANUAL Setting appears only when no paper is loaded OFF, ON From 15 to 300 ft From 4 to 50 ft Media type loaded in the printer...
User's Guide
Page 6
... the Paper in the Printer 53 Removing Paper from the Spindle 55 Switching Between 2-Inch and 3-Inch Roll Paper 56 Cutting Roll Paper Manually with the Built-in Cutter 56 Adjusting the Platen Gap for Thick or Thin Paper 57 Optimizing the Settings for Your Paper 58 Creating ...Custom Paper Configurations 58 Selecting Custom Paper Configurations 60 3 Printing With Epson Drivers for Windows Sizing Images for Borderless Printing on Roll Paper 62 Choosing Basic Print Options 63 Selecting the Correct Media Type Setting 65 ...
... the Paper in the Printer 53 Removing Paper from the Spindle 55 Switching Between 2-Inch and 3-Inch Roll Paper 56 Cutting Roll Paper Manually with the Built-in Cutter 56 Adjusting the Platen Gap for Thick or Thin Paper 57 Optimizing the Settings for Your Paper 58 Creating ...Custom Paper Configurations 58 Selecting Custom Paper Configurations 60 3 Printing With Epson Drivers for Windows Sizing Images for Borderless Printing on Roll Paper 62 Choosing Basic Print Options 63 Selecting the Correct Media Type Setting 65 ...
User's Guide
Page 7
Contents | 7 4 Printing With Epson Drivers for Macintosh Sizing Images for Borderless Printing on Roll Paper 90 Choosing Page Setup and Basic Print Options 91 Choosing Advanced Media Control Options ... Check and Head Cleaning Utilities 120 Checking and Cleaning the Print Head Using the Control Panel . . 122 Automatically Checking and Cleaning the Print Head 123 Manually Checking and Cleaning the Print Head 123 Running Cleaning Cycles 124 Aligning the Print Head 125 Replacing Ink Cartridges 126 Changing the Black Ink Cartridge...
Contents | 7 4 Printing With Epson Drivers for Macintosh Sizing Images for Borderless Printing on Roll Paper 90 Choosing Page Setup and Basic Print Options 91 Choosing Advanced Media Control Options ... Check and Head Cleaning Utilities 120 Checking and Cleaning the Print Head Using the Control Panel . . 122 Automatically Checking and Cleaning the Print Head 123 Manually Checking and Cleaning the Print Head 123 Running Cleaning Cycles 124 Aligning the Print Head 125 Replacing Ink Cartridges 126 Changing the Black Ink Cartridge...
User's Guide
Page 16
18 | Introduction Printer Parts Front Spindle holders Roll paper cover Front cover Roll paper feeder Edge guide Paper support Rear manual feeder Printer cover Cartridge cover (left) Paper cassette Output tray Paper eject support Cartridge cover (right) Borderfree maintenance tank Front manual feeder Ink maintenance tank Print head Ink cartridges Back Rear access panel Borderless printing spacer 3-inch core adapters Roll paper holder unit connector USB interface Airflow vents Network interface AC inlet Spindle Paper stop Status lights (black) Paper stop (gray) 18
18 | Introduction Printer Parts Front Spindle holders Roll paper cover Front cover Roll paper feeder Edge guide Paper support Rear manual feeder Printer cover Cartridge cover (left) Paper cassette Output tray Paper eject support Cartridge cover (right) Borderfree maintenance tank Front manual feeder Ink maintenance tank Print head Ink cartridges Back Rear access panel Borderless printing spacer 3-inch core adapters Roll paper holder unit connector USB interface Airflow vents Network interface AC inlet Spindle Paper stop Status lights (black) Paper stop (gray) 18

User's Guide
Page 24
Click Install. 5. Use any open USB port on your desktop, and register your computer. 7. When prompted, connect a USB cable. 26 | Setting Up the Printer 4. When you're done, click Exit and eject the CD. 26 Follow the on-screen instructions to install all the necessary software and manuals, place a link to the Epson Professional Imaging website on your printer. 6.
Click Install. 5. Use any open USB port on your desktop, and register your computer. 7. When prompted, connect a USB cable. 26 | Setting Up the Printer 4. When you're done, click Exit and eject the CD. 26 Follow the on-screen instructions to install all the necessary software and manuals, place a link to the Epson Professional Imaging website on your printer. 6.

User's Guide
Page 27
... the button to select the next octet. The LCD screen displays the SUBNET MASK. 12. Press r, then press u or d to configure the printer's IP settings manually. 8. The LCD screen displays the DEFAULT GATEWAY. 13. Setting Up the Printer | 29 5. Press OK. When you have changed the value of the last octet...
... the button to select the next octet. The LCD screen displays the SUBNET MASK. 12. Press r, then press u or d to configure the printer's IP settings manually. 8. The LCD screen displays the DEFAULT GATEWAY. 13. Setting Up the Printer | 29 5. Press OK. When you have changed the value of the last octet...

User's Guide
Page 29
Follow the on-screen instructions to install all the necessary software, place links to the User's Guide, Network Guide, and Epson Professional Imaging website on your desktop, and register your computer if prompted. 31 When you see a screen like this one, click the Manual button. 5. Click Install. When you 're done, click Exit and eject the CD. Select LPT1: as the printer port, then click OK. 6. Restart your printer. 7. Setting Up the Printer | 31 4. 3.
Follow the on-screen instructions to install all the necessary software, place links to the User's Guide, Network Guide, and Epson Professional Imaging website on your desktop, and register your computer if prompted. 31 When you see a screen like this one, click the Manual button. 5. Click Install. When you 're done, click Exit and eject the CD. Select LPT1: as the printer port, then click OK. 6. Restart your printer. 7. Setting Up the Printer | 31 4. 3.

User's Guide
Page 34
... find the firmware file that you need to update.) 6. Downloading and Updating the Firmware 1. When you don't need to download the firmware manually, visit Epson's U.S. Make sure your printer is turned on the screen. 3. When the update is the same, you see the LFP Remote Panel. ...it is complete, close the Firmware Updater window and Epson LFP Remote window. 36 support website (www.epson.com/support) or Canadian support website (www.epson.ca/support), select your printer, then click the Firmware Updater button. Click the EPSON LFP Remote Panel 2 icon on -screen guide. ...
... find the firmware file that you need to update.) 6. Downloading and Updating the Firmware 1. When you don't need to download the firmware manually, visit Epson's U.S. Make sure your printer is turned on the screen. 3. When the update is the same, you see the LFP Remote Panel. ...it is complete, close the Firmware Updater window and Epson LFP Remote window. 36 support website (www.epson.com/support) or Canadian support website (www.epson.ca/support), select your printer, then click the Firmware Updater button. Click the EPSON LFP Remote Panel 2 icon on -screen guide. ...

User's Guide
Page 35
The Epson Stylus Pro 4900 prints on most types of paper stock in . This chapter includes the following table shows the paper sizes you may need to 432 x 610 mm) ... paper, and other media, you can print on a variety of media, including roll paper and cut sheet paper • Using roll paper • Loading paper manually • Optimizing the settings for your paper Selecting Media for available media. 37 Chapter 2: Handling Paper and Other Media Note: You can also use heavy...
The Epson Stylus Pro 4900 prints on most types of paper stock in . This chapter includes the following table shows the paper sizes you may need to 432 x 610 mm) ... paper, and other media, you can print on a variety of media, including roll paper and cut sheet paper • Using roll paper • Loading paper manually • Optimizing the settings for your paper Selecting Media for available media. 37 Chapter 2: Handling Paper and Other Media Note: You can also use heavy...

User's Guide
Page 36
...then add to the stack that you removed. • If you send your printouts where they will be exposed to maintain quality. The Epson Stylus Pro 4900 accepts sheets ranging from 8 × 10 inches to load it in the driver software. 38 | Handling Paper and Other Media Guidelines for Using...bare hands. See page 91 (Mac OS X) or page 63 (Windows) for instructions. • Always select the correct paper source (roll, tray or manual feed) in a cool, dry place to high temperature, humidity, or direct sunlight. Follow these guidelines, as well as described on selecting the paper source ...
...then add to the stack that you removed. • If you send your printouts where they will be exposed to maintain quality. The Epson Stylus Pro 4900 accepts sheets ranging from 8 × 10 inches to load it in the driver software. 38 | Handling Paper and Other Media Guidelines for Using...bare hands. See page 91 (Mac OS X) or page 63 (Windows) for instructions. • Always select the correct paper source (roll, tray or manual feed) in a cool, dry place to high temperature, humidity, or direct sunlight. Follow these guidelines, as well as described on selecting the paper source ...

User's Guide
Page 37
...In addition to 0.79 mm • All of the above listed for manual feeding of special media. Make sure you use the correct paper path for Epson media, as listed below: Paper cassette • Epson or non-Epson media with paper thicknesses from 0.08 to 0.27 mm • Premium ... Paper 240 • Standard Proofing Paper SWOP 3 • Ultra Premium Presentation Paper Matte • Enhanced Matte Paper • Plain paper Rear manual feed slot • Epson and non-Epson media with paper thicknesses from 0.08 to the paper cassette, two paper paths are available for paper cassette •...
...In addition to 0.79 mm • All of the above listed for manual feeding of special media. Make sure you use the correct paper path for Epson media, as listed below: Paper cassette • Epson or non-Epson media with paper thicknesses from 0.08 to 0.27 mm • Premium ... Paper 240 • Standard Proofing Paper SWOP 3 • Ultra Premium Presentation Paper Matte • Enhanced Matte Paper • Plain paper Rear manual feed slot • Epson and non-Epson media with paper thicknesses from 0.08 to the paper cassette, two paper paths are available for paper cassette •...


