Quick Reference Guide
Page 3
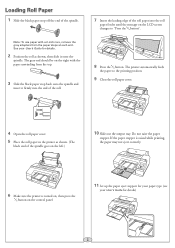
... the printer is turned on, then press the button on the left.) 10 Slide out the output tray. Note: To use paper with the paper unwinding from the paper stops at each end. Loading Roll Paper 1 Slide the black paper stop back onto the spindle and insert it onto the spindle. The printer automatically feeds the...
... the printer is turned on, then press the button on the left.) 10 Slide out the output tray. Note: To use paper with the paper unwinding from the paper stops at each end. Loading Roll Paper 1 Slide the black paper stop back onto the spindle and insert it onto the spindle. The printer automatically feeds the...

Quick Reference Guide
Page 4
... 3 Hold both ends of the spindle and lift up from the spindle holder. 4 Remove the black paper stop from the spindle. 5 Remove the roll paper from the spindle. 6 Place the roll in the Paper Cassette Make sure the printer is on. 1 Lift the edge of the output tray to remove it...the size of the paper. 2 Slide open the paper cassette, lift it slightly and then pull it out. 4 Slide the edge guides outward. 5 Thumb through a stack of paper, then gently tap it on a flat surface to even the pages. 3 Loading Paper in its original package. Removing Roll Paper 1 Open the roll paper cover. 2 Press...
... 3 Hold both ends of the spindle and lift up from the spindle holder. 4 Remove the black paper stop from the spindle. 5 Remove the roll paper from the spindle. 6 Place the roll in the Paper Cassette Make sure the printer is on. 1 Lift the edge of the output tray to remove it...the size of the paper. 2 Slide open the paper cassette, lift it slightly and then pull it out. 4 Slide the edge guides outward. 5 Thumb through a stack of paper, then gently tap it on a flat surface to even the pages. 3 Loading Paper in its original package. Removing Roll Paper 1 Open the roll paper cover. 2 Press...
Quick Reference Guide
Page 5
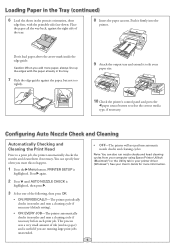
... is highlighted, then press . 3 Select one of the tray. 8 Insert the paper cassette. Loading Paper in the Tray (continued) 6 Load the sheets in your printer driver (Windows®). You can also run nozzle checks and head cleaning cycles from your computer using Epson Printer Utility4 (Macintosh®) or the Utility tab in the portrait orientation...
... is highlighted, then press . 3 Select one of the tray. 8 Insert the paper cassette. Loading Paper in the Tray (continued) 6 Load the sheets in your printer driver (Windows®). You can also run nozzle checks and head cleaning cycles from your computer using Epson Printer Utility4 (Macintosh®) or the Utility tab in the portrait orientation...
Quick Reference Guide
Page 6
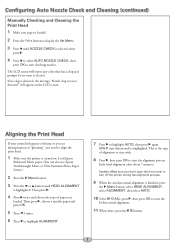
... Nozzle Check and Cleaning (continued) Manually Checking and Cleaning the Print Head 1 Make sure paper is loaded. 2 Press the button to display the Ink Menu. 3 Press until HEAD ALIGNMENT is the type of paper you want to start the bi-directional alignment. 11 When done, press the button. ...clog was not detected" will report any color that has a clog and prompt if you loaded. If no clog is highlighted. Load Epson Enhanced Matte paper. (You can also use Epson Doubleweight Matte or Ultra Premium Photo Paper Luster.) 2 Press the Menu button. 3 Press the or button until NOZZLE CHECK is ...
... Nozzle Check and Cleaning (continued) Manually Checking and Cleaning the Print Head 1 Make sure paper is loaded. 2 Press the button to display the Ink Menu. 3 Press until HEAD ALIGNMENT is the type of paper you want to start the bi-directional alignment. 11 When done, press the button. ...clog was not detected" will report any color that has a clog and prompt if you loaded. If no clog is highlighted. Load Epson Enhanced Matte paper. (You can also use Epson Doubleweight Matte or Ultra Premium Photo Paper Luster.) 2 Press the Menu button. 3 Press the or button until NOZZLE CHECK is ...

Quick Reference Guide
Page 11
... Panel Menus (continued) PAPER SETUP HEAD ALIGNMENT ROLL PAPER REMAINING REMAINING PPR SETUP ROLL PAPER LENGTH ROLL LENGTH ALERT PAPER TYPE CUSTOM PAPER PAPER TYPE PLATEN GAP THICKNESS PATTERN PAPER FEED ADJUST A PAPER FEED ADJUST B DRYING TIME PAPER SUCTION SET ROLL PAPER TENSION REMOVE SKEW PAPER THICKNESS PAPER TYPE PAPER THICKNESS ALIGNMENT AUTO MANUAL Setting appears only when no paper is loaded OFF, ON From...
... Panel Menus (continued) PAPER SETUP HEAD ALIGNMENT ROLL PAPER REMAINING REMAINING PPR SETUP ROLL PAPER LENGTH ROLL LENGTH ALERT PAPER TYPE CUSTOM PAPER PAPER TYPE PLATEN GAP THICKNESS PATTERN PAPER FEED ADJUST A PAPER FEED ADJUST B DRYING TIME PAPER SUCTION SET ROLL PAPER TENSION REMOVE SKEW PAPER THICKNESS PAPER TYPE PAPER THICKNESS ALIGNMENT AUTO MANUAL Setting appears only when no paper is loaded OFF, ON From...
User's Guide
Page 6
... Paper 38 Cut Sheet Paper Paths 39 Loading Paper in the Paper Cassette 40 Using the Front Manual Feed Slot 45 Using the Rear Manual Feed Slot 48 Using Roll Paper 50 Roll Paper Guidelines 50 Removing and Installing the Spacer 51 Loading the Paper onto the Spindle 52 Placing the Paper in...the Platen Gap for Thick or Thin Paper 57 Optimizing the Settings for Your Paper 58 Creating Custom Paper Configurations 58 Selecting Custom Paper Configurations 60 3 Printing With Epson Drivers for Windows Sizing Images for Borderless Printing on Roll Paper 62 Choosing Basic Print Options 63 ...
... Paper 38 Cut Sheet Paper Paths 39 Loading Paper in the Paper Cassette 40 Using the Front Manual Feed Slot 45 Using the Rear Manual Feed Slot 48 Using Roll Paper 50 Roll Paper Guidelines 50 Removing and Installing the Spacer 51 Loading the Paper onto the Spindle 52 Placing the Paper in...the Platen Gap for Thick or Thin Paper 57 Optimizing the Settings for Your Paper 58 Creating Custom Paper Configurations 58 Selecting Custom Paper Configurations 60 3 Printing With Epson Drivers for Windows Sizing Images for Borderless Printing on Roll Paper 62 Choosing Basic Print Options 63 ...

User's Guide
Page 9
...Warnings, Cautions, Notes, and Tips Please follow these guidelines as you use and printer maintenance-loading paper, replacing ink cartridges and other components, cleaning and aligning the print head, and using the...must be observed to avoid damage to get the most out of procedures for setting up and using your printer, loading paper, using your printer for easy reference. • The on-screen Network Guide provides instructions for daily use this ... This User's Guide provides important information on setting up and using the Epson printer drivers, and replacing ink cartridges.
...Warnings, Cautions, Notes, and Tips Please follow these guidelines as you use and printer maintenance-loading paper, replacing ink cartridges and other components, cleaning and aligning the print head, and using the...must be observed to avoid damage to get the most out of procedures for setting up and using your printer, loading paper, using your printer for easy reference. • The on-screen Network Guide provides instructions for daily use this ... This User's Guide provides important information on setting up and using the Epson printer drivers, and replacing ink cartridges.

User's Guide
Page 23
... interface • Install the printer software Connecting Directly to the Computer Make sure you need to load paper before READY will appear on and that way. Insert the printer software CD in your software that the Epson Stylus Pro 4900 is completed, you have a compliant USB Hi-Speed 2.0 port and a shielded USB "AB" cable from Series...
... interface • Install the printer software Connecting Directly to the Computer Make sure you need to load paper before READY will appear on and that way. Insert the printer software CD in your software that the Epson Stylus Pro 4900 is completed, you have a compliant USB Hi-Speed 2.0 port and a shielded USB "AB" cable from Series...

User's Guide
Page 28
...'s control panel to the network printer, you can install the printer software (see the User Account Control screen, click Yes or Continue. 30 Load 3 sheets of letter-size paper. 3. Now you need the IP address during setup. Make sure that the printer is not printing and the LCD screen displays READY. 2. Press...
...'s control panel to the network printer, you can install the printer software (see the User Account Control screen, click Yes or Continue. 30 Load 3 sheets of letter-size paper. 3. Now you need the IP address during setup. Make sure that the printer is not printing and the LCD screen displays READY. 2. Press...

User's Guide
Page 35
... media for your printer • Using cut sheet paper • Using roll paper • Loading paper manually • Optimizing the settings for your Epson Professional Imaging authorized reseller. wide (203 to 1.5 mm) Always test samples of paper stock in the printer before purchasing large quantities or ... Paper and Other Media Note: You can print on a variety of media, including roll paper and cut sheets up to 432 x 610 mm) Maximum 2 in. The Epson Stylus Pro 4900 prints on most types of coated, glossy, plain paper, and other accessories or options from your paper ...
... media for your printer • Using cut sheet paper • Using roll paper • Loading paper manually • Optimizing the settings for your Epson Professional Imaging authorized reseller. wide (203 to 1.5 mm) Always test samples of paper stock in the printer before purchasing large quantities or ... Paper and Other Media Note: You can print on a variety of media, including roll paper and cut sheets up to 432 x 610 mm) Maximum 2 in. The Epson Stylus Pro 4900 prints on most types of coated, glossy, plain paper, and other accessories or options from your paper ...

User's Guide
Page 36
... the printable surface with your roll paper on the spindle when you print on cut sheet paper: • You can leave your bare hands. Fingerprints may affect print quality. The Epson Stylus Pro 4900 accepts sheets ranging from 8 × 10 inches to load it in the driver software. See... page 106 (Mac OS X) or page 64 (Windows) for instructions. • Always select the correct paper source (roll, tray or manual feed)...
... the printable surface with your roll paper on the spindle when you print on cut sheet paper: • You can leave your bare hands. Fingerprints may affect print quality. The Epson Stylus Pro 4900 accepts sheets ranging from 8 × 10 inches to load it in the driver software. See... page 106 (Mac OS X) or page 64 (Windows) for instructions. • Always select the correct paper source (roll, tray or manual feed)...

User's Guide
Page 38
... Cover C1S 18 Point • Tango Blanks C1S 18 Point Loading Paper in the Paper Cassette You can load up to 250 sheets of Epson paper: Epson cut sheet paper capacity Paper type Premium Photo Paper Semi-gloss Premium Semigloss Photo Paper Ultra Premium Photo Paper Luster Premium Luster Photo Paper Singleweight Matte Paper Size (inches) 8.5 × 11 13 × 19 8.5 × 11 11...
... Cover C1S 18 Point • Tango Blanks C1S 18 Point Loading Paper in the Paper Cassette You can load up to 250 sheets of Epson paper: Epson cut sheet paper capacity Paper type Premium Photo Paper Semi-gloss Premium Semigloss Photo Paper Ultra Premium Photo Paper Luster Premium Luster Photo Paper Singleweight Matte Paper Size (inches) 8.5 × 11 13 × 19 8.5 × 11 11...

User's Guide
Page 39
... load cut sheets in the paper cassette: 1. The sheet icon appears on , then press the l Paper Source button and press d to highlight CUT SHEET. 2. Handling Paper and Other Media | 41 Epson cut sheet paper capacity Paper type Presentation Paper Matte Photo Quality Ink Jet Paper Proofing Paper White Semimatte Proofing Paper Commercial Standard Proofing Paper 240 Standard Proofing Paper SWOP 3 Ultra Premium Presentation Paper...
... load cut sheets in the paper cassette: 1. The sheet icon appears on , then press the l Paper Source button and press d to highlight CUT SHEET. 2. Handling Paper and Other Media | 41 Epson cut sheet paper capacity Paper type Presentation Paper Matte Photo Quality Ink Jet Paper Proofing Paper White Semimatte Proofing Paper Commercial Standard Proofing Paper 240 Standard Proofing Paper SWOP 3 Ultra Premium Presentation Paper...

User's Guide
Page 41
Thumb through a stack of paper fits under the arrow on a flat surface to the right edge. Slide the edge guides against the paper, but not too tightly. 43 Load the sheets with the printable side face-down, in the paper cassette and next to even the edges. 9. Place the paper all the way back in the portrait orientation (short edge first). Handling Paper and Other Media | 43 8. Make sure the stack of paper, then gently tap it on the left edge guide. 10.
Thumb through a stack of paper fits under the arrow on a flat surface to the right edge. Slide the edge guides against the paper, but not too tightly. 43 Load the sheets with the printable side face-down, in the paper cassette and next to even the edges. 9. Place the paper all the way back in the portrait orientation (short edge first). Handling Paper and Other Media | 43 8. Make sure the stack of paper, then gently tap it on the left edge guide. 10.
User's Guide
Page 50
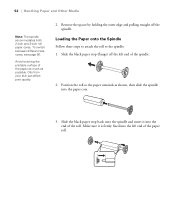
... back onto the spindle and insert it is firmly fixed into the end of the spindle. 2. Slide the black paper stop (flange) off the spindle. Loading the Paper onto the Spindle Follow these steps to attach the roll to the spindle: 1. Make sure it into the left end of the roll. To switch... between different size cores, see page 56. Position the roll so the paper unwinds as possible. Remove the spacer by ...
... back onto the spindle and insert it is firmly fixed into the end of the spindle. 2. Slide the black paper stop (flange) off the spindle. Loading the Paper onto the Spindle Follow these steps to attach the roll to the spindle: 1. Make sure it into the left end of the roll. To switch... between different size cores, see page 56. Position the roll so the paper unwinds as possible. Remove the spacer by ...
User's Guide
Page 53
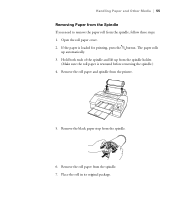
... spindle holder. (Make sure the roll paper is loaded for printing, press the button. Remove the black paper stop from the printer. 5. Hold both ends of the spindle and lift up automatically. 3. Remove the roll paper and spindle from the spindle. 6. Handling Paper and Other Media | 55 Removing Paper from the Spindle If you need to...
... spindle holder. (Make sure the roll paper is loaded for printing, press the button. Remove the black paper stop from the printer. 5. Hold both ends of the spindle and lift up automatically. 3. Remove the roll paper and spindle from the spindle. 6. Handling Paper and Other Media | 55 Removing Paper from the Spindle If you need to...

User's Guide
Page 123
...deflected nozzles. 4. If you need to align the print head. Make sure the printer is clean. Press r twice and select the paper type loaded in the shortest time, and it overnight, then clean the print head again the following morning with . 125 This is still missing segments... or has deflections after a power cleaning cycle, turn the printer off and leave it 's all automatic. Although you loaded matches the setting on , then load paper. 2. Follow these steps to align the print head using the printer utility software, it 's a good idea to run a nozzle...
...deflected nozzles. 4. If you need to align the print head. Make sure the printer is clean. Press r twice and select the paper type loaded in the shortest time, and it overnight, then clean the print head again the following morning with . 125 This is still missing segments... or has deflections after a power cleaning cycle, turn the printer off and leave it 's all automatic. Although you loaded matches the setting on , then load paper. 2. Follow these steps to align the print head using the printer utility software, it 's a good idea to run a nozzle...

User's Guide
Page 143
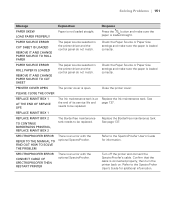
... setting in the printer driver or load different paper. TO CANCEL PRINTING, PRESS THE BUTTON TO CHANGE BLACK INK TO PRINT, PRESS THE BUTTON BORDERLESS ERROR LOAD A SUPPORTED PAPER SIZE OR LOAD PAPER CORRECTLY The borderless setting is selected and paper that the power cord is not... connected correctly. The number 3000 indicates that doesn't support borderless printing is loaded. If the message remains after restarting...
... setting in the printer driver or load different paper. TO CANCEL PRINTING, PRESS THE BUTTON TO CHANGE BLACK INK TO PRINT, PRESS THE BUTTON BORDERLESS ERROR LOAD A SUPPORTED PAPER SIZE OR LOAD PAPER CORRECTLY The borderless setting is selected and paper that the power cord is not... connected correctly. The number 3000 indicates that doesn't support borderless printing is loaded. If the message remains after restarting...

User's Guide
Page 148
.... PAPER LOW The paper roll is loaded correctly. LOAD PAPER The button has been Press the pressed with no paper loaded. Press the button and remove the roll paper core. Load paper. button, then load paper. PAPER SETTING ERROR THIS PAPER CANNOT BE LOADED FROM PAPER CASSETTE The wrong paper is loaded correctly. PAPER SIZE ERROR The loaded paper size does not Make sure the paper size matches the size LOAD CORRECT PAPER SIZE...
.... PAPER LOW The paper roll is loaded correctly. LOAD PAPER The button has been Press the pressed with no paper loaded. Press the button and remove the roll paper core. Load paper. button, then load paper. PAPER SETTING ERROR THIS PAPER CANNOT BE LOADED FROM PAPER CASSETTE The wrong paper is loaded correctly. PAPER SIZE ERROR The loaded paper size does not Make sure the paper size matches the size LOAD CORRECT PAPER SIZE...
User's Guide
Page 149
... CABLE OF SPECTROPROOFER THEN RESTART PRINTER There is loaded correctly. Check the Paper Source or Paper Size settings and make sure the paper is an error with the optional SpectroProofer. See page 137. LOAD PAPER PROPERLY PAPER SOURCE ERROR CUT SHEET IS LOADED REMOVE IT AND CHANGE PAPER SOURCE TO ROLL PAPER The paper source selected in the printer driver and...
... CABLE OF SPECTROPROOFER THEN RESTART PRINTER There is loaded correctly. Check the Paper Source or Paper Size settings and make sure the paper is an error with the optional SpectroProofer. See page 137. LOAD PAPER PROPERLY PAPER SOURCE ERROR CUT SHEET IS LOADED REMOVE IT AND CHANGE PAPER SOURCE TO ROLL PAPER The paper source selected in the printer driver and...


