Quick Reference Guide
Page 2
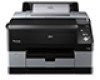
Printer Parts Front Roll paper cover Spindle holders Roll paper feeder Edge guide Paper support Rear manual feeder Printer cover Front cover Cartridge cover (left) Paper cassette Alert light Control panel Output tray Paper eject support Cartridge cover (right) Borderfree maintenance tank Front manual feeder Print head Ink cartridges Ink maintenance tank Back Bordless printing spacer 3" Core adapters Rear access panel Roll paper holder unit connector AC inlet Spindle Paper stop (gray) USB interface Network interface Airflow vents Status lights Paper stop (black) 1
Printer Parts Front Roll paper cover Spindle holders Roll paper feeder Edge guide Paper support Rear manual feeder Printer cover Front cover Cartridge cover (left) Paper cassette Alert light Control panel Output tray Paper eject support Cartridge cover (right) Borderfree maintenance tank Front manual feeder Print head Ink cartridges Ink maintenance tank Back Bordless printing spacer 3" Core adapters Rear access panel Roll paper holder unit connector AC inlet Spindle Paper stop (gray) USB interface Network interface Airflow vents Status lights Paper stop (black) 1
Quick Reference Guide
Page 5
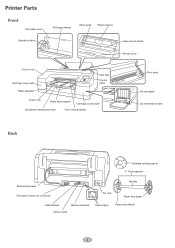
... printer automatically checks the nozzles and cleans them if necessary. Press again. 2 Press until AUTO NOZZLE CHECK is highlighted, then press . 3 Select one of ink (and no paper) and is highlighted. PRINTER SETUP is useful if you want this to happen. 1 Press the Menu button. See your computer using... Epson Printer Utility4 (Macintosh®) or the Utility tab in the tray. 7 Slide the edge guides against the right side of the tray. 8 Insert ...
... printer automatically checks the nozzles and cleans them if necessary. Press again. 2 Press until AUTO NOZZLE CHECK is highlighted, then press . 3 Select one of ink (and no paper) and is highlighted. PRINTER SETUP is useful if you want this to happen. 1 Press the Menu button. See your computer using... Epson Printer Utility4 (Macintosh®) or the Utility tab in the tray. 7 Slide the edge guides against the right side of the tray. 8 Insert ...
Quick Reference Guide
Page 6
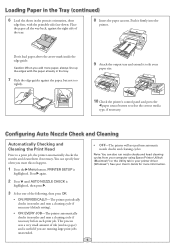
...) Manually Checking and Cleaning the Print Head 1 Make sure paper is loaded. 2 Press the button to display the Ink Menu. 3 Press until HEAD ALIGNMENT is highlighted. Load Epson Enhanced Matte paper. (You can also use Epson Doubleweight Matte or Ultra Premium Photo Paper Luster.) 2 Press the Menu button. 3 Press the or button until...
...) Manually Checking and Cleaning the Print Head 1 Make sure paper is loaded. 2 Press the button to display the Ink Menu. 3 Press until HEAD ALIGNMENT is highlighted. Load Epson Enhanced Matte paper. (You can also use Epson Doubleweight Matte or Ultra Premium Photo Paper Luster.) 2 Press the Menu button. 3 Press the or button until...

Quick Reference Guide
Page 7
... icons correspond to see which cartridge is from the printer. Epson UltraChrome® HDR ink cartridges Ink Bay Left Right Slot no. 1 2 3 4 5 6 7 8 9 10 11 Cartridge Green (GR) Light Light Black (LLK) Yellow (Y) Light Cyan (LC) Vivid Light Magenta (VLM) Orange (OR... is displayed, the cartridge is low, you start. Check the LCD screen to the 11 cartridge slots in the printer. If ink gets on . 1 Press the ink compartment cover to open it. T653B00 T653900 T653400 T653500 T653600 T653A00 T653800 T653300 T653700 T653200 T653100 2 Push in your cartridges is expended. ...
... icons correspond to see which cartridge is from the printer. Epson UltraChrome® HDR ink cartridges Ink Bay Left Right Slot no. 1 2 3 4 5 6 7 8 9 10 11 Cartridge Green (GR) Light Light Black (LLK) Yellow (Y) Light Cyan (LC) Vivid Light Magenta (VLM) Orange (OR... is displayed, the cartridge is low, you start. Check the LCD screen to the 11 cartridge slots in the printer. If ink gets on . 1 Press the ink compartment cover to open it. T653B00 T653900 T653400 T653500 T653600 T653A00 T653800 T653300 T653700 T653200 T653100 2 Push in your cartridges is expended. ...
Quick Reference Guide
Page 8
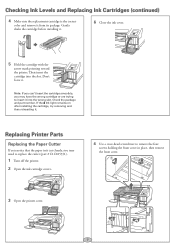
... notice that the paper isn't cut cleanly, you may need to replace the cutter (part # C1C815351). 1 Turn off the printer. 2 Open the ink cartridge covers. 4 Use a cross-head screwdriver to insert it into the slot. Check the package and part number. Checking... Ink Levels and Replacing Ink Cartridges (continued) 4 Make sure the replacement cartridge is the correct color and remove it . If the Ink light remains on after installing the cartridge, try removing and then reinserting it . 6 Close...
... notice that the paper isn't cut cleanly, you may need to replace the cutter (part # C1C815351). 1 Turn off the printer. 2 Open the ink cartridge covers. 4 Use a cross-head screwdriver to insert it into the slot. Check the package and part number. Checking... Ink Levels and Replacing Ink Cartridges (continued) 4 Make sure the replacement cartridge is the correct color and remove it . If the Ink light remains on after installing the cartridge, try removing and then reinserting it . 6 Close...

Quick Reference Guide
Page 9
... blade is unlocked. Be careful when removing it . 2 Release the tank lock. Replacing the Ink Maintenance Tank 1 Open the right ink cartridge cover. 2 Pull out the maintenance tank as shown. Replacing the Maintenance Tanks The Epson Stylus Pro 4900 has two maintenance tanks: Ink (part# T619000) and Borderfree (part# T619100). Push it in until it snaps into...
... blade is unlocked. Be careful when removing it . 2 Release the tank lock. Replacing the Ink Maintenance Tank 1 Open the right ink cartridge cover. 2 Pull out the maintenance tank as shown. Replacing the Maintenance Tanks The Epson Stylus Pro 4900 has two maintenance tanks: Ink (part# T619000) and Borderfree (part# T619100). Push it in until it snaps into...
Quick Reference Guide
Page 10
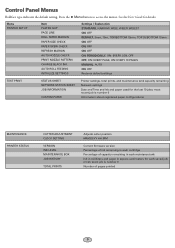
... Item PLATEN GAP PAGE LINE ROLL PAPER MARGIN PAPER SIZE CHECK PAPER SKEW CHECK REFRESH MARGIN AUTO NOZZLE CHECK PRINT NOZZLE PATTERN CHANGE BLACK INK AUTO ROLL FEEDING INITIALIZE SETTINGS Settings / Explanation STANDARD, NARROW, WIDE, WIDER, WIDEST ON, OFF DEFAULT, 3mm, 15m, TOP/BOTTOM ...SHEET JOB INFORMATION CUSTOM PAPER Printer settings, total prints, and maintenance tank capacity remaining Network settings Date and Time and Ink and paper used for details. most recent job is number 0 Information about registered paper configurations MAINTENANCE PRINTER STATUS CUTTER ADJUSTMENT CLOCK ...
... Item PLATEN GAP PAGE LINE ROLL PAPER MARGIN PAPER SIZE CHECK PAPER SKEW CHECK REFRESH MARGIN AUTO NOZZLE CHECK PRINT NOZZLE PATTERN CHANGE BLACK INK AUTO ROLL FEEDING INITIALIZE SETTINGS Settings / Explanation STANDARD, NARROW, WIDE, WIDER, WIDEST ON, OFF DEFAULT, 3mm, 15m, TOP/BOTTOM ...SHEET JOB INFORMATION CUSTOM PAPER Printer settings, total prints, and maintenance tank capacity remaining Network settings Date and Time and Ink and paper used for details. most recent job is number 0 Information about registered paper configurations MAINTENANCE PRINTER STATUS CUTTER ADJUSTMENT CLOCK ...

Quick Reference Guide
Page 13
Control Panel Lights and Buttons Paper alert light Ink alert light Power light and button Pause/reset light and button LCD screen Paper feed up button Left arrow or paper source button Ink Menu button Paper release (ePlaten®) button Main Menu button Paper cut button Paper feed down button Printed in USA CPD-28116
Control Panel Lights and Buttons Paper alert light Ink alert light Power light and button Pause/reset light and button LCD screen Paper feed up button Left arrow or paper source button Ink Menu button Paper release (ePlaten®) button Main Menu button Paper cut button Paper feed down button Printed in USA CPD-28116
User's Guide
Page 5
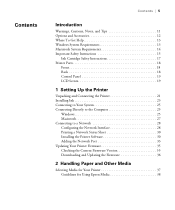
...and Accessories 12 Where To Get Help 13 Windows System Requirements 13 Macintosh System Requirements 14 Important Safety Instructions 15 Ink Cartridge Safety Instructions 17 Printer Parts 18 Front 18 Back 18 Control Panel 19 LCD Screen 19 1 Setting Up... the Printer Unpacking and Connecting the Printer 21 Installing Ink 23 Connecting to Your System 25 Connecting Directly to the Computer 25 Windows 25 Macintosh 27 Connecting to a ... Paper and Other Media Selecting Media for Your Printer 37 Guidelines for Using Epson Media 38 5
...and Accessories 12 Where To Get Help 13 Windows System Requirements 13 Macintosh System Requirements 14 Important Safety Instructions 15 Ink Cartridge Safety Instructions 17 Printer Parts 18 Front 18 Back 18 Control Panel 19 LCD Screen 19 1 Setting Up... the Printer Unpacking and Connecting the Printer 21 Installing Ink 23 Connecting to Your System 25 Connecting Directly to the Computer 25 Windows 25 Macintosh 27 Connecting to a ... Paper and Other Media Selecting Media for Your Printer 37 Guidelines for Using Epson Media 38 5
User's Guide
Page 7
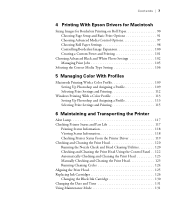
Contents | 7 4 Printing With Epson Drivers for Macintosh Sizing Images for Borderless Printing on Roll Paper 90 Choosing Page Setup and Basic Print Options 91 Choosing Advanced Media Control Options ... Checking and Cleaning the Print Head 123 Manually Checking and Cleaning the Print Head 123 Running Cleaning Cycles 124 Aligning the Print Head 125 Replacing Ink Cartridges 126 Changing the Black Ink Cartridge 130 Changing the Date and Time 131 Using Maintenance Mode 131 7
Contents | 7 4 Printing With Epson Drivers for Macintosh Sizing Images for Borderless Printing on Roll Paper 90 Choosing Page Setup and Basic Print Options 91 Choosing Advanced Media Control Options ... Checking and Cleaning the Print Head 123 Manually Checking and Cleaning the Print Head 123 Running Cleaning Cycles 124 Aligning the Print Head 125 Replacing Ink Cartridges 126 Changing the Black Ink Cartridge 130 Changing the Date and Time 131 Using Maintenance Mode 131 7
User's Guide
Page 8
8 | Contents Replacing the Paper Cutter 133 Removing the Old Cutter 133 Installing the New Cutter 135 Replacing the Maintenance Tanks 137 Replacing the Ink Maintenance Tank 138 Replacing the Borderfree Maintenance Tank 139 Cleaning the Printer 141 Transporting or Storing the Printer 141 Preparing the Printer for Shipment 142 ... Environmental 165 Electrical 165 Dimensions and Weight 166 Printer Interfaces 166 Safety Approvals 166 Media 166 Roll Paper 166 Cut Sheets 167 Printable Area 167 Ink Cartridges 168 Index 8
8 | Contents Replacing the Paper Cutter 133 Removing the Old Cutter 133 Installing the New Cutter 135 Replacing the Maintenance Tanks 137 Replacing the Ink Maintenance Tank 138 Replacing the Borderfree Maintenance Tank 139 Cleaning the Printer 141 Transporting or Storing the Printer 141 Preparing the Printer for Shipment 142 ... Environmental 165 Electrical 165 Dimensions and Weight 166 Printer Interfaces 166 Safety Approvals 166 Media 166 Roll Paper 166 Cut Sheets 167 Printable Area 167 Ink Cartridges 168 Index 8

User's Guide
Page 9
..., using the printer's menu system. Attach it working at its best, and provides troubleshooting tips in case you use and printer maintenance-loading paper, replacing ink cartridges and other components, cleaning and aligning the print head, and using the...
..., using the printer's menu system. Attach it working at its best, and provides troubleshooting tips in case you use and printer maintenance-loading paper, replacing ink cartridges and other components, cleaning and aligning the print head, and using the...
User's Guide
Page 10
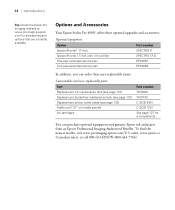
... cutter blade (see page 133) Additional 2"/3" roll media spindle Ink cartridges Part number T619000 T619100 C12C815351 C12C811251 See page 127 for accessories and options that are currently available. 12 | Introduction Tip: Check the Epson Pro Imaging website at www.proimaging.epson. Options and Accessories Your Epson Stylus Pro 4900® offers these optional upgrades and accessories: Optional equipment...
... cutter blade (see page 133) Additional 2"/3" roll media spindle Ink cartridges Part number T619000 T619100 C12C815351 C12C811251 See page 127 for accessories and options that are currently available. 12 | Introduction Tip: Check the Epson Pro Imaging website at www.proimaging.epson. Options and Accessories Your Epson Stylus Pro 4900® offers these optional upgrades and accessories: Optional equipment...

User's Guide
Page 13
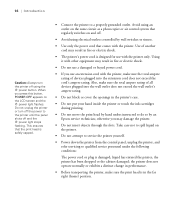
... temperature and humidity. Also keep this product. You may need more space behind the printer if you use the equipment safely and effectively. • The Epson Stylus Pro 4900 weighs about 115 lb (52 kg) without the ink or paper.
... temperature and humidity. Also keep this product. You may need more space behind the printer if you use the equipment safely and effectively. • The Epson Stylus Pro 4900 weighs about 115 lb (52 kg) without the ink or paper.
User's Guide
Page 14
... rating. • Do not block or cover the openings in the printer's case. • Do not put your hand inside the printer or touch the ink cartridges during printing. • Do not move the print head by hand unless instructed to do so by wall switches or timers. • Use only... panel shuts off and the P power light stops flashing. Do not unplug the printer or turn the printer off using electrical outlets controlled by an Epson service technician;
... rating. • Do not block or cover the openings in the printer's case. • Do not put your hand inside the printer or touch the ink cartridges during printing. • Do not move the print head by hand unless instructed to do so by wall switches or timers. • Use only... panel shuts off and the P power light stops flashing. Do not unplug the printer or turn the printer off using electrical outlets controlled by an Epson service technician;
User's Guide
Page 15
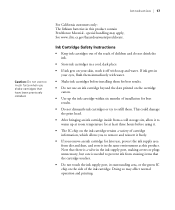
... customers only: The lithium batteries in your skin, wash it off with water. • Shake ink cartridges before installing them . If ink gets in this product. Introduction | 17 Caution: Do not use an ink cartridge beyond the date printed on the cartridge carton. • Use up at room temperature for ... allows you to remove and reinsert it freely. • If you remove an ink cartridge for later use, protect the ink supply area from staining items that the cartridge touches. • Do not touch the ink supply port, its surrounding area, or the green IC chip on your eyes, flush...
... customers only: The lithium batteries in your skin, wash it off with water. • Shake ink cartridges before installing them . If ink gets in this product. Introduction | 17 Caution: Do not use an ink cartridge beyond the date printed on the cartridge carton. • Use up at room temperature for ... allows you to remove and reinsert it freely. • If you remove an ink cartridge for later use, protect the ink supply area from staining items that the cartridge touches. • Do not touch the ink supply port, its surrounding area, or the green IC chip on your eyes, flush...
User's Guide
Page 16
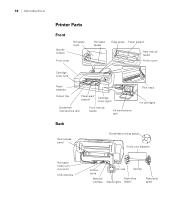
18 | Introduction Printer Parts Front Spindle holders Roll paper cover Front cover Roll paper feeder Edge guide Paper support Rear manual feeder Printer cover Cartridge cover (left) Paper cassette Output tray Paper eject support Cartridge cover (right) Borderfree maintenance tank Front manual feeder Ink maintenance tank Print head Ink cartridges Back Rear access panel Borderless printing spacer 3-inch core adapters Roll paper holder unit connector USB interface Airflow vents Network interface AC inlet Spindle Paper stop Status lights (black) Paper stop (gray) 18
18 | Introduction Printer Parts Front Spindle holders Roll paper cover Front cover Roll paper feeder Edge guide Paper support Rear manual feeder Printer cover Cartridge cover (left) Paper cassette Output tray Paper eject support Cartridge cover (right) Borderfree maintenance tank Front manual feeder Ink maintenance tank Print head Ink cartridges Back Rear access panel Borderless printing spacer 3-inch core adapters Roll paper holder unit connector USB interface Airflow vents Network interface AC inlet Spindle Paper stop Status lights (black) Paper stop (gray) 18
User's Guide
Page 17
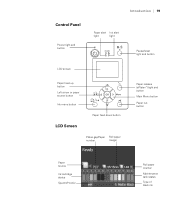
Control Panel Power light and button Introduction | 19 Paper alert Ink alert light light Pause/reset light and button LCD screen Paper feed up button Left arrow or paper source button Ink menu button Paper feed down button LCD Screen Platen gap/Paper Roll paper number margin Paper release (ePlaten™) light and button Main Menu button Paper cut button Paper source Ink cartridge status SpectroProofer 19 Roll paper counter Maintenance tank status Type of black ink
Control Panel Power light and button Introduction | 19 Paper alert Ink alert light light Pause/reset light and button LCD screen Paper feed up button Left arrow or paper source button Ink menu button Paper feed down button LCD Screen Platen gap/Paper Roll paper number margin Paper release (ePlaten™) light and button Main Menu button Paper cut button Paper source Ink cartridge status SpectroProofer 19 Roll paper counter Maintenance tank status Type of black ink

User's Guide
Page 19
... to set up and use the printer. 1. 21 Chapter 1: Setting Up the Printer This chapter includes the following information: • Unpacking and connecting the Epson Stylus Pro 4900 • Installing ink • Connecting to your computer or network • Configuring the printer for a network • Installing the printer software for Windows or Macintosh • Updating...
... to set up and use the printer. 1. 21 Chapter 1: Setting Up the Printer This chapter includes the following information: • Unpacking and connecting the Epson Stylus Pro 4900 • Installing ink • Connecting to your computer or network • Configuring the printer for a network • Installing the printer software for Windows or Macintosh • Updating...
User's Guide
Page 21
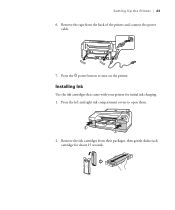
Remove the ink cartridges from the back of the printer and connect the power cable. 7. Press the left and right ink compartment covers to turn on the printer. Remove the tape from their packages, then gently shake each cartridge for initial ink charging. 1. Installing Ink Use the ink cartridges that came with your printer for about 15 seconds. 23 Press the P power button to open them. 2. Setting Up the Printer | 23 6.
Remove the ink cartridges from the back of the printer and connect the power cable. 7. Press the left and right ink compartment covers to turn on the printer. Remove the tape from their packages, then gently shake each cartridge for initial ink charging. 1. Installing Ink Use the ink cartridges that came with your printer for about 15 seconds. 23 Press the P power button to open them. 2. Setting Up the Printer | 23 6.


