

Technical Brief (Ink Jet Printers)
Page 3
... ink cartridge to produce their best output quality when used , the best possibly print quality is a professional photographer staking his reputation on the same page. Epson papers are designed in those marks. Additionally, unlike competitive printers tht require special or optional inks, with Epson printers there are specifically designed to primarily print photos with Epson printers and genuine Epson inks...
... ink cartridge to produce their best output quality when used , the best possibly print quality is a professional photographer staking his reputation on the same page. Epson papers are designed in those marks. Additionally, unlike competitive printers tht require special or optional inks, with Epson printers there are specifically designed to primarily print photos with Epson printers and genuine Epson inks...

Product Information Guide
Page 2
... date on the package has expired. Do not refill the ink cartridge. Don't use genuine Epson cartridges. Epson Stylus Photo RX600 Paper name Epson Premium Semigloss Photo Paper Epson Premium Luster Photo Paper Epson Photo Quality Self Adhesive Sheets Epson Ink Jet Transparencies Epson Iron-On Transfer Paper Epson Glossy Photo Greeting Card Kit Epson Semigloss Scrapbook Photo Paper PremierArt Matte Scrapbook Photo Paper Size Letter (8.5 × 11 inches) Letter (8.5 × 11...
... date on the package has expired. Do not refill the ink cartridge. Don't use genuine Epson cartridges. Epson Stylus Photo RX600 Paper name Epson Premium Semigloss Photo Paper Epson Premium Luster Photo Paper Epson Photo Quality Self Adhesive Sheets Epson Ink Jet Transparencies Epson Iron-On Transfer Paper Epson Glossy Photo Greeting Card Kit Epson Semigloss Scrapbook Photo Paper PremierArt Matte Scrapbook Photo Paper Size Letter (8.5 × 11 inches) Letter (8.5 × 11...

Product Information Guide
Page 14
...image area, but not printing, and the ! Click Cancel to return to clean the print head. Use the u and d buttons to replace an ink cartridge; Make sure letter-size paper is long), place it in the dot pattern, press OK. Now you are missing, you 're done. This ...a nozzle check. 7. Epson Stylus Photo RX600 2/04 Position the film holder so that the 35 mm slide section faces the center of the RX600 Note: If your printouts are unexpectedly light, or dots or lines are ready copy, print, or scan. Note: You can also clean the print head using the printer software.
...image area, but not printing, and the ! Click Cancel to return to clean the print head. Use the u and d buttons to replace an ink cartridge; Make sure letter-size paper is long), place it in the dot pattern, press OK. Now you are missing, you 're done. This ...a nozzle check. 7. Epson Stylus Photo RX600 2/04 Position the film holder so that the 35 mm slide section faces the center of the RX600 Note: If your printouts are unexpectedly light, or dots or lines are ready copy, print, or scan. Note: You can also clean the print head using the printer software.
Product Information Guide
Page 15
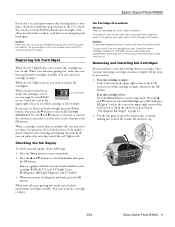
.... When you begin. Epson Stylus Photo RX600 If you don't see any dried ink to select LCD Contrast Adjustment. Press the u and d buttons to enter setup mode. When your RX600 screen. You can 't print if a cartridge is empty, then press the OK button. When your ink supply, do the following: 1. Caution: To avoid damaging the printer, never move the...
.... When you begin. Epson Stylus Photo RX600 If you don't see any dried ink to select LCD Contrast Adjustment. Press the u and d buttons to enter setup mode. When your RX600 screen. You can 't print if a cartridge is empty, then press the OK button. When your ink supply, do the following: 1. Caution: To avoid damaging the printer, never move the...

Product Information Guide
Page 16
... above shows the black cartridge being removed. error light is off the RX600 while Ink Charging appears on the LCD screen. Dispose of ink. This may need to force the cover closed. Aligning the Print Head If your printouts look grainy or vertical lines appear jagged, you . Epson Stylus Photo RX600 2/04 Open the ink cartridge cover holder by pulling...
... above shows the black cartridge being removed. error light is off the RX600 while Ink Charging appears on the LCD screen. Dispose of ink. This may need to force the cover closed. Aligning the Print Head If your printouts look grainy or vertical lines appear jagged, you . Epson Stylus Photo RX600 2/04 Open the ink cartridge cover holder by pulling...

Product Information Guide
Page 17
... print head lock, tape the print head to the case. Epson Stylus Photo RX600 5. Open the scanner lid and slide the transportation lock to the Setup Menu. Caution: To avoid damage, always leave the ink cartridges installed when transporting the RX600. Then turn on the LCD screen. Then disconnect the USB .... Never transport or store the RX600 on top of each row with the two vertical lines most precisely printed on its side or in its original box or one of the remaining alignment patterns. 7. Remove any paper from moving during transport. Lift up the scanner unit. 9. Press...
... print head lock, tape the print head to the case. Epson Stylus Photo RX600 5. Open the scanner lid and slide the transportation lock to the Setup Menu. Caution: To avoid damage, always leave the ink cartridges installed when transporting the RX600. Then turn on the LCD screen. Then disconnect the USB .... Never transport or store the RX600 on top of each row with the two vertical lines most precisely printed on its side or in its original box or one of the remaining alignment patterns. 7. Remove any paper from moving during transport. Lift up the scanner unit. 9. Press...

Start Here Card
Page 2
1 Unpack 1 Make sure you have all the tape, foam, and protective plastic from the top of this sheet. 4043426-00 Printed in XXX Epson Stylus Photo RX600 Ink cartridges (6 total) User's Guide Paper support Film holder Software CD-ROM How to Copy and Print 2 Remove all the parts shown here. If any parts are missing, contact Epson® as described on the back of the RX600. !
1 Unpack 1 Make sure you have all the tape, foam, and protective plastic from the top of this sheet. 4043426-00 Printed in XXX Epson Stylus Photo RX600 Ink cartridges (6 total) User's Guide Paper support Film holder Software CD-ROM How to Copy and Print 2 Remove all the parts shown here. If any parts are missing, contact Epson® as described on the back of the RX600. !

Start Here Card
Page 4
... connector on the back of the RX600. Do not connect the USB cable yet. 2 Press and hold the On button until the Mode and Setup lights flash. 6 Install Ink Cartridges 1 Press the Color button on ...the side. 2 Remove the clear plastic sheet inside. 3 Remove the orange plastic print head lock and store it in . 5 Plug In and Turn On 1 Plug the RX600 ...into loading position. 2 Lift up the entire scanner unit using the handles on the front of the RX600. The print head moves into a grounded electrical ...
... connector on the back of the RX600. Do not connect the USB cable yet. 2 Press and hold the On button until the Mode and Setup lights flash. 6 Install Ink Cartridges 1 Press the Color button on ...the side. 2 Remove the clear plastic sheet inside. 3 Remove the orange plastic print head lock and store it in . 5 Plug In and Turn On 1 Plug the RX600 ...into loading position. 2 Lift up the entire scanner unit using the handles on the front of the RX600. The print head moves into a grounded electrical ...
Start Here Card
Page 5
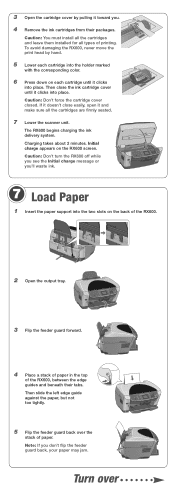
... with the corresponding color. 6 Press down on each cartridge until it clicks into the two slots on the RX600 screen. If it doesn't close the ink cartridge cover until it clicks into place. The RX600 begins charging the ink delivery system. Initial charge appears on the back of the RX600. 2 Open the output tray. 3 Flip the feeder...
... with the corresponding color. 6 Press down on each cartridge until it clicks into the two slots on the RX600 screen. If it doesn't close the ink cartridge cover until it clicks into place. The RX600 begins charging the ink delivery system. Initial charge appears on the back of the RX600. 2 Open the output tray. 3 Flip the feeder...

Start Here Card
Page 8
... port icon and turn on and securely connected to add a printer, click Add. 2 On the Printer List screen, click the Add button. 3 On the next screen, select EPSON USB from the Apple menu. 2 Select the SP RX600 Series icon, then click your problem is listed below, try ...ink cartridges are pushed down menu. 4 Click Stylus Photo RX600. Selecting the RX600 in section 8. Then remove the CD-ROM. See "Any Questions?" A New Hardware Wizard Click Cancel and follow the steps in Mac OS X 1 Open the OS X Applications folder, then open the Utilities folder and start Print Center or the Printer...
... port icon and turn on and securely connected to add a printer, click Add. 2 On the Printer List screen, click the Add button. 3 On the next screen, select EPSON USB from the Apple menu. 2 Select the SP RX600 Series icon, then click your problem is listed below, try ...ink cartridges are pushed down menu. 4 Click Stylus Photo RX600. Selecting the RX600 in section 8. Then remove the CD-ROM. See "Any Questions?" A New Hardware Wizard Click Cancel and follow the steps in Mac OS X 1 Open the OS X Applications folder, then open the Utilities folder and start Print Center or the Printer...
User Manual
Page 6
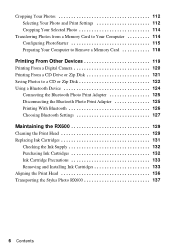
... the Bluetooth Photo Print Adapter 125 Disconnecting the Bluetooth Photo Print Adapter 125 Printing With Bluetooth 126 Choosing Bluetooth Settings 127 Maintaining the RX600 129 Cleaning the Print Head 129 Replacing Ink Cartridges 131 Checking the Ink Supply 132 Purchasing Ink Cartridges 132 Ink Cartridge Precautions 133 Removing and Installing Ink Cartridges 133 Aligning the Print Head 136 Transporting the Stylus Photo RX600 137 6 Contents
... the Bluetooth Photo Print Adapter 125 Disconnecting the Bluetooth Photo Print Adapter 125 Printing With Bluetooth 126 Choosing Bluetooth Settings 127 Maintaining the RX600 129 Cleaning the Print Head 129 Replacing Ink Cartridges 131 Checking the Ink Supply 132 Purchasing Ink Cartridges 132 Ink Cartridge Precautions 133 Removing and Installing Ink Cartridges 133 Aligning the Print Head 136 Transporting the Stylus Photo RX600 137 6 Contents
User Manual
Page 7
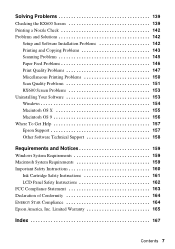
...RX600 Screen Problems 153 Uninstalling Your Software 153 Windows 154 Macintosh OS X 155 Macintosh OS 9 156 Where To Get Help 157 Epson Support 157 Other Software Technical Support 158 Requirements and Notices 159 Windows System Requirements 159 Macintosh System Requirements 159 Important Safety Instructions 160 Ink Cartridge... Safety Instructions 161 LCD Panel Safety Instructions 162 FCC Compliance Statement 163 Declaration of Conformity 164 ENERGY STAR Compliance 164 Epson America, Inc. Limited Warranty 165 ...
...RX600 Screen Problems 153 Uninstalling Your Software 153 Windows 154 Macintosh OS X 155 Macintosh OS 9 156 Where To Get Help 157 Epson Support 157 Other Software Technical Support 158 Requirements and Notices 159 Windows System Requirements 159 Macintosh System Requirements 159 Important Safety Instructions 160 Ink Cartridge... Safety Instructions 161 LCD Panel Safety Instructions 162 FCC Compliance Statement 163 Declaration of Conformity 164 ENERGY STAR Compliance 164 Epson America, Inc. Limited Warranty 165 ...

User Manual
Page 129
... page 131 ■ "Aligning the Print Head" on page 136 ■ "Transporting the Stylus Photo RX600" on your printer settings window for details.) 2. Note: You can deliver ink properly. error light is turned on checking ink levels and replacing ink cartridges, aligning the print head, and transporting your printouts are unexpectedly light, or dots or lines are missing...
... page 131 ■ "Aligning the Print Head" on page 136 ■ "Transporting the Stylus Photo RX600" on your printer settings window for details.) 2. Note: You can deliver ink properly. error light is turned on checking ink levels and replacing ink cartridges, aligning the print head, and transporting your printouts are unexpectedly light, or dots or lines are missing...

User Manual
Page 131
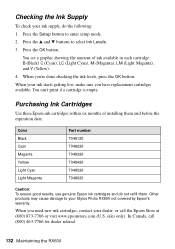
... select LCD Contrast Adjustment. light flashes, one or more than six months old, you 'll see the icon clearly, then press the OK button. Caution: When you need to see a message on ink. Replacing Ink Cartridges When the red ! You can't print if a cartridge is more ink cartridges are low on your Stylus Photo RX600 for a long time, the print...
... select LCD Contrast Adjustment. light flashes, one or more than six months old, you 'll see the icon clearly, then press the OK button. Caution: When you need to see a message on ink. Replacing Ink Cartridges When the red ! You can't print if a cartridge is more ink cartridges are low on your Stylus Photo RX600 for a long time, the print...
User Manual
Page 132
Checking the Ink Supply To check your Stylus Photo RX600 not covered by Epson's warranty. Press the OK button. You can't print if a cartridge is empty. sales only). You see a graphic showing the amount of installing them and before the expiration date: Color Black Cyan Magenta Yellow Light Cyan ...
Checking the Ink Supply To check your Stylus Photo RX600 not covered by Epson's warranty. Press the OK button. You can't print if a cartridge is empty. sales only). You see a graphic showing the amount of installing them and before the expiration date: Color Black Cyan Magenta Yellow Light Cyan ...
User Manual
Page 133
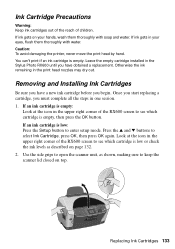
...printer, never move the print head by hand. Look at the icon in the upper right corner of the RX600 screen to see which cartridge is empty, then press the OK button. Use the side grips to open the scanner unit, as described on page 132. 2. If ink gets in one session. 1. Leave the empty cartridge... installed in the Stylus Photo RX600 until you must complete all the steps in your hands, wash them thoroughly with soap and water. If an ink cartridge is low or check the ink levels as shown, making sure ...
...printer, never move the print head by hand. Look at the icon in the upper right corner of the RX600 screen to see which cartridge is empty, then press the OK button. Use the side grips to open the scanner unit, as described on page 132. 2. If ink gets in one session. 1. Leave the empty cartridge... installed in the Stylus Photo RX600 until you must complete all the steps in your hands, wash them thoroughly with soap and water. If an ink cartridge is low or check the ink levels as shown, making sure ...

User Manual
Page 134
...cartridge. 134 Maintaining the RX600 Caution: Never attempt to the replacement position. Wait until the cartridges have moved to open the cartridge holder's cover while the print head is moving. Press in the tab at the back of it , then lift the cartridge straight out. Dispose of the cartridge... to release it carefully. Note: The illustration above shows the black cartridge being removed. Identify the cartridge you need to replace. Open the cover from the back 4. 3. Open the ink cartridge cover holder by pulling...
...cartridge. 134 Maintaining the RX600 Caution: Never attempt to the replacement position. Wait until the cartridges have moved to open the cartridge holder's cover while the print head is moving. Press in the tab at the back of it , then lift the cartridge straight out. Dispose of the cartridge... to release it carefully. Note: The illustration above shows the black cartridge being removed. Identify the cartridge you need to replace. Open the cover from the back 4. 3. Open the ink cartridge cover holder by pulling...

User Manual
Page 135
...Stylus Photo RX600 begins charging the ink delivery system and the Ink Charging message appears on the RX600 screen, unless the Stylus Photo RX600 hasn't moved or made noise for more than 5 minutes. This may cause incomplete charging of ink. Press down on each newly installed cartridge until it clicks into place. Replacing Ink Cartridges 135 Close the cartridge..., make sure all the cartridges are firmly seated. When you need to force the cover closed. 6. Caution: Never turn off the Stylus Photo RX600 while Ink Charging appears on the RX600 screen. Press down firmly until...
...Stylus Photo RX600 begins charging the ink delivery system and the Ink Charging message appears on the RX600 screen, unless the Stylus Photo RX600 hasn't moved or made noise for more than 5 minutes. This may cause incomplete charging of ink. Press down on each newly installed cartridge until it clicks into place. Replacing Ink Cartridges 135 Close the cartridge..., make sure all the cartridges are firmly seated. When you need to force the cover closed. 6. Caution: Never turn off the Stylus Photo RX600 while Ink Charging appears on the RX600 screen. Press down firmly until...

User Manual
Page 137
...in its original box or one of the remaining alignment patterns. 9. Wait until the scanner carriage moves to the Setup Menu. Open the scanner lid and slide the transportation lock to the unlocked position after installing the Stylus Photo RX600 in the far right ...new location. 3. Then turn on the Stylus Photo RX600. Transporting the Stylus Photo RX600 137 Caution: To avoid damage, always leave the ink cartridges installed when transporting the Stylus Photo RX600. Close the scanner lid. When you're finished you need to turn the Stylus Photo RX600 off. 2. Press the P On button...
...in its original box or one of the remaining alignment patterns. 9. Wait until the scanner carriage moves to the Setup Menu. Open the scanner lid and slide the transportation lock to the unlocked position after installing the Stylus Photo RX600 in the far right ...new location. 3. Then turn on the Stylus Photo RX600. Transporting the Stylus Photo RX600 137 Caution: To avoid damage, always leave the ink cartridges installed when transporting the Stylus Photo RX600. Close the scanner lid. When you're finished you need to turn the Stylus Photo RX600 off. 2. Press the P On button...
User Manual
Page 142
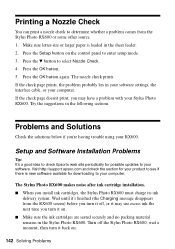
... it may have a problem with your computer. Problems and Solutions Check the solutions below if you install ink cartridges, the Stylus Photo RX600 must charge its ink delivery system. Setup and Software Installation Problems Tip: It's a good idea to check Epson's web site periodically for downloading to your computer. Try the suggestions in your software settings, the...
... it may have a problem with your computer. Problems and Solutions Check the solutions below if you install ink cartridges, the Stylus Photo RX600 must charge its ink delivery system. Setup and Software Installation Problems Tip: It's a good idea to check Epson's web site periodically for downloading to your computer. Try the suggestions in your software settings, the...


