

Technical Brief (Ink Jet Printers)
Page 3
... are no added costs for applying ink droplets to primarily print photos with Epson printers and genuine Epson inks so when all rights in those marks. Epson Papers: In general, Epson printers will deliver their best output quality when used , the best possibly print quality is most efficient pattern for optional cartridges, and you see continuous tone color...
... are no added costs for applying ink droplets to primarily print photos with Epson printers and genuine Epson inks so when all rights in those marks. Epson Papers: In general, Epson printers will deliver their best output quality when used , the best possibly print quality is most efficient pattern for optional cartridges, and you see continuous tone color...

Product Information Guide
Page 2
... is usable after ink replacement. An IC chip on the cartridge calculates the amount of paper may cause damage to your printer not covered by the manufacturer at 77 °F (25 °C). Always test samples of paper. Do not refill the ink cartridge. Adding ink does not increase the... paper or air mail paper 0.006 to 0.02 inch (0.16 to 0.52 mm) 12 to 20 lb (45 to 90 g/m2) for use genuine Epson cartridges. Epson Stylus Photo RX600 2/04 Single sheets Size Paper type Thickness Weight Letter (8.5 × 11 inches) A4 (8.3 × 11.7 inches) Half-letter (5.5 × 8.5 inches...
... is usable after ink replacement. An IC chip on the cartridge calculates the amount of paper may cause damage to your printer not covered by the manufacturer at 77 °F (25 °C). Always test samples of paper. Do not refill the ink cartridge. Adding ink does not increase the... paper or air mail paper 0.006 to 0.02 inch (0.16 to 0.52 mm) 12 to 20 lb (45 to 90 g/m2) for use genuine Epson cartridges. Epson Stylus Photo RX600 2/04 Single sheets Size Paper type Thickness Weight Letter (8.5 × 11 inches) A4 (8.3 × 11.7 inches) Half-letter (5.5 × 8.5 inches...

Product Information Guide
Page 14
...also print a nozzle check using the printer software. or Help button on your printer settings window for instructions on printing a nozzle check. 7. error light is off the RX600 while the message Head Cleaning appears on , you may need to replace an ink cartridge; Press the u and d buttons ... Help button on your printer settings window for instructions. ❏ If your printouts are unexpectedly light, or dots or lines are missing, you are wide). See the User's Guide for instructions on running the print head cleaning utility. 1. Epson Stylus Photo RX600 Placing 35 mm Slides on...
...also print a nozzle check using the printer software. or Help button on your printer settings window for instructions on printing a nozzle check. 7. error light is off the RX600 while the message Head Cleaning appears on , you may need to replace an ink cartridge; Press the u and d buttons ... Help button on your printer settings window for instructions. ❏ If your printouts are unexpectedly light, or dots or lines are missing, you are wide). See the User's Guide for instructions on running the print head cleaning utility. 1. Epson Stylus Photo RX600 Placing 35 mm Slides on...
Product Information Guide
Page 15
...if printouts don't look their best. light flashes, one session. 1. Press the Setup button to maintain good print quality. When your hands, wash them thoroughly with soap and water. If an ink cartridge is off and wait overnight-this allows any improvement ...ink supply, do the following: 1. Epson Stylus Photo RX600 If you don't see any dried ink to replace it on page 15. 2. You can 't print if a cartridge is low: Press the Setup button to select Ink Cartridge, press OK, then press OK again. You can 't print if a cartridge is empty. Caution: To avoid damaging the printer...
...if printouts don't look their best. light flashes, one session. 1. Press the Setup button to maintain good print quality. When your hands, wash them thoroughly with soap and water. If an ink cartridge is off and wait overnight-this allows any improvement ...ink supply, do the following: 1. Epson Stylus Photo RX600 If you don't see any dried ink to replace it on page 15. 2. You can 't print if a cartridge is low: Press the Setup button to select Ink Cartridge, press OK, then press OK again. You can 't print if a cartridge is empty. Caution: To avoid damaging the printer...

Product Information Guide
Page 16
... letter-size paper. 3. Aligning the Print Head If your printouts look grainy or vertical lines appear jagged, you need to replace other ink cartridges, repeat steps 4 through 6 before continuing with step 7. 16 - Epson Stylus Photo RX600 2/04 Close the cartridge cover, then lower the scanner unit. 4. Caution: If you hear it carefully. Press down firmly until the...
... letter-size paper. 3. Aligning the Print Head If your printouts look grainy or vertical lines appear jagged, you need to replace other ink cartridges, repeat steps 4 through 6 before continuing with step 7. 16 - Epson Stylus Photo RX600 2/04 Close the cartridge cover, then lower the scanner unit. 4. Caution: If you hear it carefully. Press down firmly until the...

Product Information Guide
Page 17
... printed on its new location. 2/04 Epson Stylus Photo RX600 - 17 You may need to turn the RX600 off. Press the P On button to... avoid damage, always leave the ink cartridges installed when transporting the RX600. Unplug the power cord from your RX600 some distance, you move the ...transportation lock back to use a magnifying glass or loupe. . 2. Then disconnect the USB cable from the electrical outlet. Lift up the scanner unit. 9. Remove the orange print head lock from its original box or one...
... printed on its new location. 2/04 Epson Stylus Photo RX600 - 17 You may need to turn the RX600 off. Press the P On button to... avoid damage, always leave the ink cartridges installed when transporting the RX600. Unplug the power cord from your RX600 some distance, you move the ...transportation lock back to use a magnifying glass or loupe. . 2. Then disconnect the USB cable from the electrical outlet. Lift up the scanner unit. 9. Remove the orange print head lock from its original box or one...

Start Here Card
Page 2
If any parts are missing, contact Epson® as described on the back of this sheet. 4043426-00 Printed in XXX Epson Stylus Photo RX600 Ink cartridges (6 total) User's Guide Paper support Film holder Software CD-ROM How to Copy and Print 2 Remove all the parts shown here. 1 Unpack 1 Make sure you have all the tape, foam, and protective plastic from the top of the RX600. !
If any parts are missing, contact Epson® as described on the back of this sheet. 4043426-00 Printed in XXX Epson Stylus Photo RX600 Ink cartridges (6 total) User's Guide Paper support Film holder Software CD-ROM How to Copy and Print 2 Remove all the parts shown here. 1 Unpack 1 Make sure you have all the tape, foam, and protective plastic from the top of the RX600. !

Start Here Card
Page 4
... button until the Mode and Setup lights flash. 6 Install Ink Cartridges 1 Press the Color button on the back of the RX600. Caution: You must remove the orange print head lock or the RX600 won't work. 4 Close the scanner unit. 5 Connect the... from the scanner lid to the round TPU connector on the front of the RX600. Don't force it in. 5 Plug In and Turn On 1 Plug the RX600 into loading position. 2 Lift up the entire scanner unit using the handles on... . The print head moves into a grounded electrical outlet. continue 4 Unlock the Printer 1 Lift up the entire scanner unit.
... button until the Mode and Setup lights flash. 6 Install Ink Cartridges 1 Press the Color button on the back of the RX600. Caution: You must remove the orange print head lock or the RX600 won't work. 4 Close the scanner unit. 5 Connect the... from the scanner lid to the round TPU connector on the front of the RX600. Don't force it in. 5 Plug In and Turn On 1 Plug the RX600 into loading position. 2 Lift up the entire scanner unit using the handles on... . The print head moves into a grounded electrical outlet. continue 4 Unlock the Printer 1 Lift up the entire scanner unit.
Start Here Card
Page 5
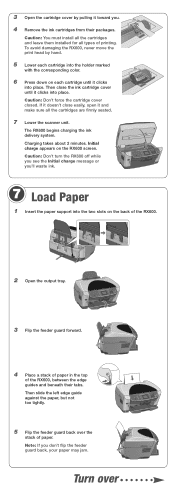
...of paper. Caution: Don't turn the RX600 off while you see the Initial charge message or you . 4 Remove the ink cartridges from their tabs. Charging takes about 2 minutes. Caution: You must install all the cartridges and leave them installed for all the cartridges are firmly seated. 7 Lower the scanner ...unit. If it doesn't close the ink cartridge cover until it toward you 'll waste ink. 7 Load Paper 1 Insert the paper support into the two slots on the RX600 screen. Caution: Don't force the cartridge cover closed. Then slide the left edge guide against the paper,...
...of paper. Caution: Don't turn the RX600 off while you see the Initial charge message or you . 4 Remove the ink cartridges from their tabs. Charging takes about 2 minutes. Caution: You must install all the cartridges and leave them installed for all the cartridges are firmly seated. 7 Lower the scanner ...unit. If it doesn't close the ink cartridge cover until it toward you 'll waste ink. 7 Load Paper 1 Insert the paper support into the two slots on the RX600 screen. Caution: Don't force the cartridge cover closed. Then slide the left edge guide against the paper,...

Start Here Card
Page 8
...'s Guide. Make sure all the ink cartridges are pushed down menu. 4 Click Stylus Photo RX600. Then remove the CD-ROM. They give you 'd like to add a printer, click Add. 2 On the Printer List screen, click the Add button. 3 On the next screen, select EPSON USB from the Apple menu. 2 Select the SP RX600 Series icon, then click your when...
...'s Guide. Make sure all the ink cartridges are pushed down menu. 4 Click Stylus Photo RX600. Then remove the CD-ROM. They give you 'd like to add a printer, click Add. 2 On the Printer List screen, click the Add button. 3 On the next screen, select EPSON USB from the Apple menu. 2 Select the SP RX600 Series icon, then click your when...
User Manual
Page 6
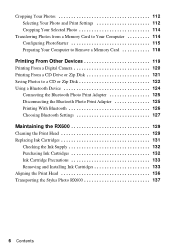
... the Bluetooth Photo Print Adapter 125 Disconnecting the Bluetooth Photo Print Adapter 125 Printing With Bluetooth 126 Choosing Bluetooth Settings 127 Maintaining the RX600 129 Cleaning the Print Head 129 Replacing Ink Cartridges 131 Checking the Ink Supply 132 Purchasing Ink Cartridges 132 Ink Cartridge Precautions 133 Removing and Installing Ink Cartridges 133 Aligning the Print Head 136 Transporting the Stylus Photo RX600 137 6 Contents
... the Bluetooth Photo Print Adapter 125 Disconnecting the Bluetooth Photo Print Adapter 125 Printing With Bluetooth 126 Choosing Bluetooth Settings 127 Maintaining the RX600 129 Cleaning the Print Head 129 Replacing Ink Cartridges 131 Checking the Ink Supply 132 Purchasing Ink Cartridges 132 Ink Cartridge Precautions 133 Removing and Installing Ink Cartridges 133 Aligning the Print Head 136 Transporting the Stylus Photo RX600 137 6 Contents
User Manual
Page 7
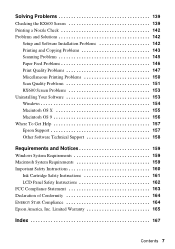
...RX600 Screen Problems 153 Uninstalling Your Software 153 Windows 154 Macintosh OS X 155 Macintosh OS 9 156 Where To Get Help 157 Epson Support 157 Other Software Technical Support 158 Requirements and Notices 159 Windows System Requirements 159 Macintosh System Requirements 159 Important Safety Instructions 160 Ink Cartridge... Safety Instructions 161 LCD Panel Safety Instructions 162 FCC Compliance Statement 163 Declaration of Conformity 164 ENERGY STAR Compliance 164 Epson America, Inc. Limited Warranty 165 ...
...RX600 Screen Problems 153 Uninstalling Your Software 153 Windows 154 Macintosh OS X 155 Macintosh OS 9 156 Where To Get Help 157 Epson Support 157 Other Software Technical Support 158 Requirements and Notices 159 Windows System Requirements 159 Macintosh System Requirements 159 Important Safety Instructions 160 Ink Cartridge... Safety Instructions 161 LCD Panel Safety Instructions 162 FCC Compliance Statement 163 Declaration of Conformity 164 ENERGY STAR Compliance 164 Epson America, Inc. Limited Warranty 165 ...

User Manual
Page 129
... Print Head" below ■ "Replacing Ink Cartridges" on page 131 ■ "Aligning the Print Head" on page 136 ■ "Transporting the Stylus Photo RX600" on page 137 Cleaning the Print Head If your printer settings window for details.) 2. Make sure the Stylus Photo RX600 is off. (If the ! Press ... button on running the print head cleaning utility. 1. error light is flashing or on checking ink levels and replacing ink cartridges, aligning the print head, and transporting your Stylus Photo RX600. You'll also find instructions on , you notice a decline in print quality, follow the...
... Print Head" below ■ "Replacing Ink Cartridges" on page 131 ■ "Aligning the Print Head" on page 136 ■ "Transporting the Stylus Photo RX600" on page 137 Cleaning the Print Head If your printer settings window for details.) 2. Make sure the Stylus Photo RX600 is off. (If the ! Press ... button on running the print head cleaning utility. 1. error light is flashing or on checking ink levels and replacing ink cartridges, aligning the print head, and transporting your Stylus Photo RX600. You'll also find instructions on , you notice a decline in print quality, follow the...

User Manual
Page 131
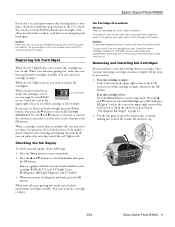
... the cartridge even if the red ! Replacing Ink Cartridges 131 light flashes, one or more than six months old, you may need to replace the cartridge(s). ! light When you print with low or empty ink cartridges, you'll see a message on page 139. Caution: When you don't turn the Stylus Photo RX600 off ...'t improve after cleaning three or four times, check the solutions beginning on your Stylus Photo RX600 for a long time, the print quality can also turn on , you need to replace it on ink. Replacing Ink Cartridges When the red ! light is empty. You can decline. If you don...
... the cartridge even if the red ! Replacing Ink Cartridges 131 light flashes, one or more than six months old, you may need to replace the cartridge(s). ! light When you print with low or empty ink cartridges, you'll see a message on page 139. Caution: When you don't turn the Stylus Photo RX600 off ...'t improve after cleaning three or four times, check the solutions beginning on your Stylus Photo RX600 for a long time, the print quality can also turn on , you need to replace it on ink. Replacing Ink Cartridges When the red ! light is empty. You can decline. If you don...
User Manual
Page 132
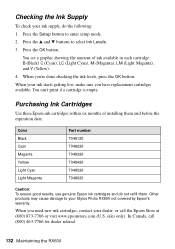
... Part number T048120 T048220 T048320 T048420 T048520 T048620 Caution: To ensure good results, use genuine Epson ink cartridges and do the following: 1. Press the u and d buttons to your Stylus Photo RX600 not covered by Epson's warranty. Other products may cause damage to select Ink Levels. 3. Press the OK button. You see a graphic showing the amount of installing them...
... Part number T048120 T048220 T048320 T048420 T048520 T048620 Caution: To ensure good results, use genuine Epson ink cartridges and do the following: 1. Press the u and d buttons to your Stylus Photo RX600 not covered by Epson's warranty. Other products may cause damage to select Ink Levels. 3. Press the OK button. You see a graphic showing the amount of installing them...
User Manual
Page 133
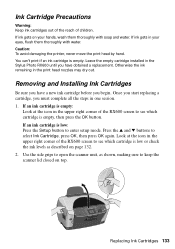
... hands, wash them thoroughly with soap and water. If ink gets in the upper right corner of the RX600 screen to select Ink Cartridge, press OK, then press OK again. Otherwise the ink remaining in one session. 1. If an ink cartridge is low: Press the Setup button to keep the scanner... and d buttons to see which cartridge is empty. Look at the icon in the Stylus Photo RX600 until you have a new ink cartridge before you must complete all the steps in the print head nozzles may dry out. Replacing Ink Cartridges 133 Caution: To avoid damaging the printer, never move the print head by ...
... hands, wash them thoroughly with soap and water. If ink gets in the upper right corner of the RX600 screen to select Ink Cartridge, press OK, then press OK again. Otherwise the ink remaining in one session. 1. If an ink cartridge is low: Press the Setup button to keep the scanner... and d buttons to see which cartridge is empty. Look at the icon in the Stylus Photo RX600 until you have a new ink cartridge before you must complete all the steps in the print head nozzles may dry out. Replacing Ink Cartridges 133 Caution: To avoid damaging the printer, never move the print head by ...

User Manual
Page 134
... replacement position. Press in the tab at the back of it , then lift the cartridge straight out. Only remove the cartridge(s) you need to replace. 3. Dispose of the cartridge to replace. 5. Unwrap the new cartridge. 134 Maintaining the RX600 Open the ink cartridge cover holder by pulling the back up and toward you need to release it...
... replacement position. Press in the tab at the back of it , then lift the cartridge straight out. Only remove the cartridge(s) you need to replace. 3. Dispose of the cartridge to replace. 5. Unwrap the new cartridge. 134 Maintaining the RX600 Open the ink cartridge cover holder by pulling the back up and toward you need to release it...

User Manual
Page 135
... force the cover closed. Caution: Never turn off the Stylus Photo RX600 while Ink Charging appears on the RX600 screen. 6. Close the cartridge cover, then lower the scanner unit. Press down firmly until you see the Ink cartridge replacement completed message, click OK. Replacing Ink Cartridges 135 Insert the new cartridge into place. When you hear it click into place. If...
... force the cover closed. Caution: Never turn off the Stylus Photo RX600 while Ink Charging appears on the RX600 screen. 6. Close the cartridge cover, then lower the scanner unit. Press down firmly until you see the Ink cartridge replacement completed message, click OK. Replacing Ink Cartridges 135 Insert the new cartridge into place. When you hear it click into place. If...

User Manual
Page 137
...Stylus Photo RX600 some distance, you see a Head alignment completed message on the Stylus Photo RX600. Transporting the Stylus Photo RX600 137 Caution: To avoid damage, always leave the ink cartridges installed when transporting the Stylus Photo RX600. Press the P On button to the unlocked position after installing the Stylus Photo RX600... the print head locks in its original box or one of the remaining alignment patterns. 9. Transporting the Stylus Photo RX600 If you move the transportation lock back to turn the Stylus Photo RX600 off. 2. Wait until the scanner carriage moves to...
...Stylus Photo RX600 some distance, you see a Head alignment completed message on the Stylus Photo RX600. Transporting the Stylus Photo RX600 137 Caution: To avoid damage, always leave the ink cartridges installed when transporting the Stylus Photo RX600. Press the P On button to the unlocked position after installing the Stylus Photo RX600... the print head locks in its original box or one of the remaining alignment patterns. 9. Transporting the Stylus Photo RX600 If you move the transportation lock back to turn the Stylus Photo RX600 off. 2. Wait until the scanner carriage moves to...
User Manual
Page 142
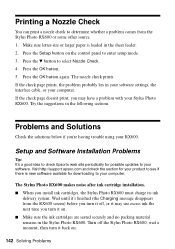
...the OK button again. Try the suggestions in the sheet feeder. 2. The Stylus Photo RX600 makes noise after ink cartridge installation. ■ When you turn it on. ■ Make sure the ink cartridges are seated securely and no packing material remains in your software settings, the ...re having trouble using your Stylus Photo RX600. Problems and Solutions Check the solutions below if you may use excess ink the next time you install ink cartridges, the Stylus Photo RX600 must charge its ink delivery system. Press the OK button. 5. Visit http://support.epson.com and check the section...
...the OK button again. Try the suggestions in the sheet feeder. 2. The Stylus Photo RX600 makes noise after ink cartridge installation. ■ When you turn it on. ■ Make sure the ink cartridges are seated securely and no packing material remains in your software settings, the ...re having trouble using your Stylus Photo RX600. Problems and Solutions Check the solutions below if you may use excess ink the next time you install ink cartridges, the Stylus Photo RX600 must charge its ink delivery system. Press the OK button. 5. Visit http://support.epson.com and check the section...


