

Technical Brief (Ink Jet Printers)
Page 1
... together to the needs of specific users instead of offering a one printers. This technical brief provides detailed information on the following pages. This combination of these core printing technologies is equally important in Epson ink jet printers work together to produce brilliant Photo Quality color, sharp text, and incredible print speeds Small Ink Droplet...
... together to the needs of specific users instead of offering a one printers. This technical brief provides detailed information on the following pages. This combination of these core printing technologies is equally important in Epson ink jet printers work together to produce brilliant Photo Quality color, sharp text, and incredible print speeds Small Ink Droplet...

Technical Brief (Ink Jet Printers)
Page 2
... representations • The smallest ink droplets can be combined to improve color ranges and accuracy because Epson printers can produce a number of printed "dots" • Large ink droplets are unique in photos and laser sharp text. Also, Epson's variable ink droplet sizes and high resolutions combine to achieve more tone representations for smoother gradations...
... representations • The smallest ink droplets can be combined to improve color ranges and accuracy because Epson printers can produce a number of printed "dots" • Large ink droplets are unique in photos and laser sharp text. Also, Epson's variable ink droplet sizes and high resolutions combine to achieve more tone representations for smoother gradations...

Technical Brief (Ink Jet Printers)
Page 3
... diffusion technology to determine the most interested in the everyday printing of documents and the occasional photo, is an amateur photographer looking to primarily print photos with Epson printers and genuine Epson inks so when all rights in the Ink Solutions document. 5. The Epson printer drivers use a halftoning module that places ink droplets to change. ©2006...
... diffusion technology to determine the most interested in the everyday printing of documents and the occasional photo, is an amateur photographer looking to primarily print photos with Epson printers and genuine Epson inks so when all rights in the Ink Solutions document. 5. The Epson printer drivers use a halftoning module that places ink droplets to change. ©2006...
User Manual (P.I.M Plug-in)
Page 1
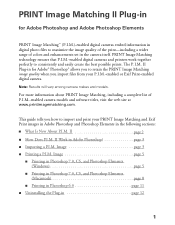
... page 8 ■ Printing in Photoshop 6.0 page 11 ■ Uninstalling the Plug-in the camera itself. PRINT Image Matching technology ensures that P.I.M.-enabled digital cameras and printers work together perfectly to import and print your P.I .M. The P.I .M. II page 2 ■ How Does P.I .M. Image page 3 ■ Printing a P.I .M.-enabled camera... Plug-in for Adobe Photoshop and Adobe Photoshop Elements PRINT Image Matching™ (P.I.M.)-enabled digital cameras embed information in digital photo files to maximize the image quality of the print-including a wider range of P.I .M.
... page 8 ■ Printing in Photoshop 6.0 page 11 ■ Uninstalling the Plug-in the camera itself. PRINT Image Matching technology ensures that P.I.M.-enabled digital cameras and printers work together perfectly to import and print your P.I .M. The P.I .M. II page 2 ■ How Does P.I .M. Image page 3 ■ Printing a P.I .M.-enabled camera... Plug-in for Adobe Photoshop and Adobe Photoshop Elements PRINT Image Matching™ (P.I.M.)-enabled digital cameras embed information in digital photo files to maximize the image quality of the print-including a wider range of P.I .M.

User Manual (P.I.M Plug-in)
Page 2
... Epson Stylus® Photo R200 ■ Epson Stylus Photo R300/R300M ■ Epson Stylus Photo R320 ■ Epson Stylus Photo R800 ■ Epson Stylus Photo RX500 ■ Epson Stylus Photo RX600 ■ Epson Stylus Photo 780 ■ Epson Stylus Photo 785EPX ■ Epson Stylus Photo 820 ■ Epson Stylus Photo 825 ■ Epson Stylus Photo 890 ■ Epson Stylus Photo 900 ■ Epson Stylus Photo 925 ■ Epson Stylus Photo 960 ■ Epson Stylus Photo 1280 ■ Epson Stylus Photo 2000P* ■ Epson Stylus Photo 2200 ■ PictureMate™ by Epson * This printer...
... Epson Stylus® Photo R200 ■ Epson Stylus Photo R300/R300M ■ Epson Stylus Photo R320 ■ Epson Stylus Photo R800 ■ Epson Stylus Photo RX500 ■ Epson Stylus Photo RX600 ■ Epson Stylus Photo 780 ■ Epson Stylus Photo 785EPX ■ Epson Stylus Photo 820 ■ Epson Stylus Photo 825 ■ Epson Stylus Photo 890 ■ Epson Stylus Photo 900 ■ Epson Stylus Photo 925 ■ Epson Stylus Photo 960 ■ Epson Stylus Photo 1280 ■ Epson Stylus Photo 2000P* ■ Epson Stylus Photo 2200 ■ PictureMate™ by Epson * This printer...
User Manual (P.I.M Plug-in)
Page 5
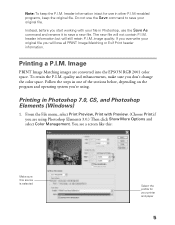
... the original file. Image PRINT Image Matching images are using . Follow the steps in one of the sections below, depending on the program and operating system you are converted into the EPSON RGB 2001 color space. From the File menu, select Print Preview, Print with your ... file. The new file will lose all PRINT Image Matching or Exif Print header information. quality and enhancements, make sure you overwrite your printer and paper 5 header information intact for your original file you start working with Preview. (Choose Print if you 're using Photoshop Elements...
... the original file. Image PRINT Image Matching images are using . Follow the steps in one of the sections below, depending on the program and operating system you are converted into the EPSON RGB 2001 color space. From the File menu, select Print Preview, Print with your ... file. The new file will lose all PRINT Image Matching or Exif Print header information. quality and enhancements, make sure you overwrite your printer and paper 5 header information intact for your original file you start working with Preview. (Choose Print if you 're using Photoshop Elements...

User Manual (P.I.M Plug-in)
Page 6
... for the Intent. 4. Click Print. 5. Click the Advanced button. (If you 're using. In the Source Space box, make sure EPSON RGB 2001 is selected. 3. You see an Advanced button, click Custom, then click Advanced.) 6 Click Setup, then select your paper Click ...Advanced Click Custom, then Advanced 6. Select Perceptual for your printer and the paper you don't see your printer Properties or Preferences window: . Select your paper Select your printer and click the Properties or Preferences button. 2. Under Media Type (or Type), select...
... for the Intent. 4. Click Print. 5. Click the Advanced button. (If you 're using. In the Source Space box, make sure EPSON RGB 2001 is selected. 3. You see an Advanced button, click Custom, then click Advanced.) 6 Click Setup, then select your paper Click ...Advanced Click Custom, then Advanced 6. Select Perceptual for your printer and the paper you don't see your printer Properties or Preferences window: . Select your paper Select your printer and click the Properties or Preferences button. 2. Under Media Type (or Type), select...
User Manual (P.I.M Plug-in)
Page 8
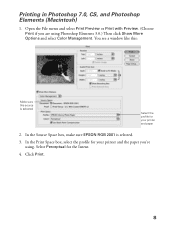
Printing in Photoshop 7.0, CS, and Photoshop Elements (Macintosh) 1. Select Perceptual for your printer and paper 2. In the Print Space box, select the profile for the Intent. 4. In the Source Space box, make sure EPSON RGB 2001 is selected Select the profile for your printer and the paper you are using . Open the File menu and select Print Preview or Print with Preview. (Choose Print if you 're using Photoshop Elements 3.0.) Then click Show More Options and select Color Management. You see a window like this: Make sure this source is selected. 3. Click Print. 8
Printing in Photoshop 7.0, CS, and Photoshop Elements (Macintosh) 1. Select Perceptual for your printer and paper 2. In the Print Space box, select the profile for the Intent. 4. In the Source Space box, make sure EPSON RGB 2001 is selected Select the profile for your printer and the paper you are using . Open the File menu and select Print Preview or Print with Preview. (Choose Print if you 're using Photoshop Elements 3.0.) Then click Show More Options and select Color Management. You see a window like this: Make sure this source is selected. 3. Click Print. 8
User Manual (P.I.M Plug-in)
Page 11
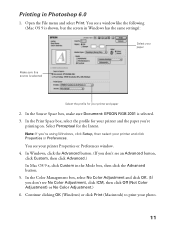
...Document: EPSON RGB 2001 is selected Select the profile for your paper Make sure this source is selected. 3. In the Color Management box, select No Color Adjustment and click OK. (If you 're printing on. Open the File menu and select Print. Select Perceptual for your printer and ...see a window like the following (Mac OS 9 is shown, but the screen in Windows has the same settings): Select your printer and paper 2. Note: If you don't see your photo. 11 You see an Advanced button, click Custom, then click Advanced.) In Mac OS 9.x, click Custom in Photoshop 6.0 1. ...
...Document: EPSON RGB 2001 is selected Select the profile for your paper Make sure this source is selected. 3. In the Color Management box, select No Color Adjustment and click OK. (If you 're printing on. Open the File menu and select Print. Select Perceptual for your printer and ...see a window like the following (Mac OS 9 is shown, but the screen in Windows has the same settings): Select your printer and paper 2. Note: If you don't see your photo. 11 You see an Advanced button, click Custom, then click Advanced.) In Mac OS 9.x, click Custom in Photoshop 6.0 1. ...
Product Brochure - Bluetooth Photo Print Adapter
Page 1
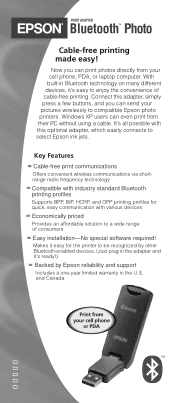
...press a few buttons, and you can print photos directly from their PC without using a cable. Now you can even print from your cell phone or PDA ™ Connect this optional adapter, which easily connects to compatible Epson photo printers. With built-in Bluetooth technology on many ...different devices, it 's ready!) Backed by Epson reliability and support Includes a one-year limited warranty in the adapter and it 's easy to a wide ...
...press a few buttons, and you can print photos directly from their PC without using a cable. Now you can even print from your cell phone or PDA ™ Connect this optional adapter, which easily connects to compatible Epson photo printers. With built-in Bluetooth technology on many ...different devices, it 's ready!) Backed by Epson reliability and support Includes a one-year limited warranty in the adapter and it 's easy to a wide ...

Product Brochure - Bluetooth Photo Print Adapter
Page 2
... System Requirements Devices that support the standard Bluetooth printing profiles Printers Supported Epson Stylus® Photo R300 Regulatory Requirements UL, CSA, CE, FCC Class B Certification Bluetooth V1.1 qualified Part Number C12C824142 Warranty One year limited in these marks. © Copyright 2003 Epson America, Inc. and Canada Epson America, Inc. 3840 Kilroy Airport Way, Long Beach, CA 90806...
... System Requirements Devices that support the standard Bluetooth printing profiles Printers Supported Epson Stylus® Photo R300 Regulatory Requirements UL, CSA, CE, FCC Class B Certification Bluetooth V1.1 qualified Part Number C12C824142 Warranty One year limited in these marks. © Copyright 2003 Epson America, Inc. and Canada Epson America, Inc. 3840 Kilroy Airport Way, Long Beach, CA 90806...

User Manual - Bluetooth Photo Print Adapter
Page 2
... equipment. ❏ Keep this product at least 22 cm away from this product. operating system; Bluetooth Settings Printer / all-in-one Refer to the printer's or all-in injury, electric shock, or fire. magnetic fields; reception sensitivity; and antenna performance. Radio ...10063; For customer support information, please refer to connect and disconnect the adapter. Connecting and Disconnecting the Bluetooth Photo Print Adapter Refer to the printer's or all devices enabled with the Bluetooth Specification, it is a wireless communication module that employs Bluetooth wireless ...
... equipment. ❏ Keep this product at least 22 cm away from this product. operating system; Bluetooth Settings Printer / all-in-one Refer to the printer's or all-in injury, electric shock, or fire. magnetic fields; reception sensitivity; and antenna performance. Radio ...10063; For customer support information, please refer to connect and disconnect the adapter. Connecting and Disconnecting the Bluetooth Photo Print Adapter Refer to the printer's or all devices enabled with the Bluetooth Specification, it is a wireless communication module that employs Bluetooth wireless ...

Product Information Guide
Page 2
...air mail paper 0.006 to 0.02 inch (0.16 to 0.52 mm) 12 to 20 lb (45 to your printer not covered by Epson's warranty. Do not load curled, folded, or wrinkled paper. Do not refill the ink cartridge. Paper Since ...the manufacturer at any non-Epson brand of paper. Epson Stylus Photo RX600 Paper name Epson Premium Semigloss Photo Paper Epson Premium Luster Photo Paper Epson Photo Quality Self Adhesive Sheets Epson Ink Jet Transparencies Epson Iron-On Transfer Paper Epson Glossy Photo Greeting Card Kit Epson Semigloss Scrapbook Photo Paper PremierArt Matte Scrapbook Photo Paper Size Letter (8.5 ...
...air mail paper 0.006 to 0.02 inch (0.16 to 0.52 mm) 12 to 20 lb (45 to your printer not covered by Epson's warranty. Do not load curled, folded, or wrinkled paper. Do not refill the ink cartridge. Paper Since ...the manufacturer at any non-Epson brand of paper. Epson Stylus Photo RX600 Paper name Epson Premium Semigloss Photo Paper Epson Premium Luster Photo Paper Epson Photo Quality Self Adhesive Sheets Epson Ink Jet Transparencies Epson Iron-On Transfer Paper Epson Glossy Photo Greeting Card Kit Epson Semigloss Scrapbook Photo Paper PremierArt Matte Scrapbook Photo Paper Size Letter (8.5 ...
Product Information Guide
Page 10
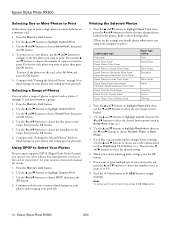
... l and r buttons to choose the last photo in the printer. Press the u and d buttons to highlight Paper Size, then use the l and r buttons to select the size of photos to print (such as photos 1 through 5) and print them as Brightness, Fit to Frame, etc.). Epson Stylus Photo RX600 2/04 Epson Stylus Photo RX600 Selecting One or More Photos to Print Follow these steps to...
... l and r buttons to choose the last photo in the printer. Press the u and d buttons to highlight Paper Size, then use the l and r buttons to select the size of photos to print (such as photos 1 through 5) and print them as Brightness, Fit to Frame, etc.). Epson Stylus Photo RX600 2/04 Epson Stylus Photo RX600 Selecting One or More Photos to Print Follow these steps to...

Product Information Guide
Page 14
...fit in two small holes near the scanner lid, as shown below) in portrait orientation (longer than they can also print a nozzle check using the printer software. This unclogs the nozzles so they are ready copy, print, or scan. Press the u and d buttons to enter setup mode. 3. ...2. or Help button on your slide image is long), place it only if quality declines. Then follow the instructions on the LCD screen. Epson Stylus Photo RX600 Placing 35 mm Slides on but your printouts are unexpectedly light, or dots or lines are missing, you may need to clean the print head...
...fit in two small holes near the scanner lid, as shown below) in portrait orientation (longer than they can also print a nozzle check using the printer software. This unclogs the nozzles so they are ready copy, print, or scan. Press the u and d buttons to enter setup mode. 3. ...2. or Help button on your slide image is long), place it only if quality declines. Then follow the instructions on the LCD screen. Epson Stylus Photo RX600 Placing 35 mm Slides on but your printouts are unexpectedly light, or dots or lines are missing, you may need to clean the print head...
Product Information Guide
Page 15
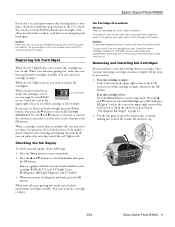
...or four times, check the troubleshooting solutions in the User's Guide. Caution: To avoid damaging the printer, never move the print head by hand. You can 't print if a cartridge is more ink...the d button to turn on ink. It's a good idea to select LCD Contrast Adjustment. Epson Stylus Photo RX600 If you 're done checking the ink levels, press the OK button. When you print with ...amount of ink available in the upper right corner of children. Check the icon in one or more than six months old, you have replacement cartridges available. Ink Cartridge Precautions Warning...
...or four times, check the troubleshooting solutions in the User's Guide. Caution: To avoid damaging the printer, never move the print head by hand. You can 't print if a cartridge is more ink...the d button to turn on ink. It's a good idea to select LCD Contrast Adjustment. Epson Stylus Photo RX600 If you 're done checking the ink levels, press the OK button. When you print with ...amount of ink available in the upper right corner of children. Check the icon in one or more than six months old, you have replacement cartridges available. Ink Cartridge Precautions Warning...
Product Support Bulletin
Page 1
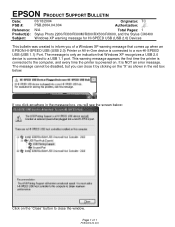
...EPSON PRODUCT SUPPORT BULLETIN Date: PSB #: Reference: Product(s): Subject: 03/18/2004 PSB.2004.04.004 Originator: TC Authorization: N/A Total Pages: 1 Stylus Photo 2200/R300/R300M/R800/RX500/RX600, and the Stylus... CX6400 Windows XP warning message for HI-SPEED USB (USB 2.0) Devices This bulletin was created to inform you of 1 PSB.2004.04.004 This warning message appears the first time the printer...message is only an indication that comes up when an EPSON HI-SPEED USB (USB 2.0) Printer or All-in the red box below : Click on ...
...EPSON PRODUCT SUPPORT BULLETIN Date: PSB #: Reference: Product(s): Subject: 03/18/2004 PSB.2004.04.004 Originator: TC Authorization: N/A Total Pages: 1 Stylus Photo 2200/R300/R300M/R800/RX500/RX600, and the Stylus... CX6400 Windows XP warning message for HI-SPEED USB (USB 2.0) Devices This bulletin was created to inform you of 1 PSB.2004.04.004 This warning message appears the first time the printer...message is only an indication that comes up when an EPSON HI-SPEED USB (USB 2.0) Printer or All-in the red box below : Click on ...

Start Here Card
Page 4
...'t work. 4 Close the scanner unit. 5 Connect the short cable leading from the scanner lid to the round TPU connector on the back of the RX600. Position the connector as shown here before pushing it in the storage area. continue Do not connect the USB cable yet. 2 Press and hold the ... side. 2 Remove the clear plastic sheet inside. 3 Remove the orange plastic print head lock and store it in . 5 Plug In and Turn On 1 Plug the RX600 into loading position. 2 Lift up the entire scanner unit using the handles on the front of the...
...'t work. 4 Close the scanner unit. 5 Connect the short cable leading from the scanner lid to the round TPU connector on the back of the RX600. Position the connector as shown here before pushing it in the storage area. continue Do not connect the USB cable yet. 2 Press and hold the ... side. 2 Remove the clear plastic sheet inside. 3 Remove the orange plastic print head lock and store it in . 5 Plug In and Turn On 1 Plug the RX600 into loading position. 2 Lift up the entire scanner unit using the handles on the front of the...
Start Here Card
Page 7
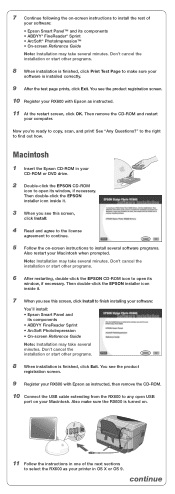
...the restart screen, click OK. Then remove the CD-ROM and restart your RX600 with Epson as instructed, then remove the CD-ROM. 10 Connect the USB cable extending from the RX600 to any open USB port on your printer in OS X or OS 9. You see the product registration screen. 10 ...; ArcSoft PhotoImpression • On-screen Reference Guide Note: Installation may take several minutes. Macintosh 1 Insert the Epson CD-ROM in one of your CD-ROM or DVD drive. 2 Double-click the EPSON CD-ROM icon to open its window, if necessary. 7 Continue following the on-screen instructions to install the...
...the restart screen, click OK. Then remove the CD-ROM and restart your RX600 with Epson as instructed, then remove the CD-ROM. 10 Connect the USB cable extending from the RX600 to any open USB port on your printer in OS X or OS 9. You see the product registration screen. 10 ...; ArcSoft PhotoImpression • On-screen Reference Guide Note: Installation may take several minutes. Macintosh 1 Insert the Epson CD-ROM in one of your CD-ROM or DVD drive. 2 Double-click the EPSON CD-ROM icon to open its window, if necessary. 7 Continue following the on-screen instructions to install the...

Start Here Card
Page 8
... securely connected to install the necessary software for your printer. 7 Close Print Center or the Printer Setup Utility. 8 If you see your Macintosh in Mac OS 9 1 Open the Chooser from the pull-down menu. 4 Click Stylus Photo RX600. The Printer List now includes two entries for them. For more... solutions, see a screen asking if you 're ready to add a printer, click Add. 2 On the Printer List screen, click the Add button. 3 On the next screen, select EPSON USB from the Apple menu...
... securely connected to install the necessary software for your printer. 7 Close Print Center or the Printer Setup Utility. 8 If you see your Macintosh in Mac OS 9 1 Open the Chooser from the pull-down menu. 4 Click Stylus Photo RX600. The Printer List now includes two entries for them. For more... solutions, see a screen asking if you 're ready to add a printer, click Add. 2 On the Printer List screen, click the Add button. 3 On the next screen, select EPSON USB from the Apple menu...


