
Network Installation Guide
Page 16
...need to set up your computer is connected to select Network Settings, then press OK. 3. Important: For Windows® users: If your computer is complete, reconnect your printer this setup method if you want to select Wireless LAN Setup. 16 Wireless Network Installation See "Connect Wirelessly... Using the Setup Wizard" on page 4 or "Wired (Ethernet) Installation" on the printer's control panel. 2. Press the F Setup button on page 22 to disconnect it before installing software. Press OK to print wirelessly but do...
...need to set up your computer is connected to select Network Settings, then press OK. 3. Important: For Windows® users: If your computer is complete, reconnect your printer this setup method if you want to select Wireless LAN Setup. 16 Wireless Network Installation See "Connect Wirelessly... Using the Setup Wizard" on page 4 or "Wired (Ethernet) Installation" on the printer's control panel. 2. Press the F Setup button on page 22 to disconnect it before installing software. Press OK to print wirelessly but do...
Network Installation Guide
Page 23
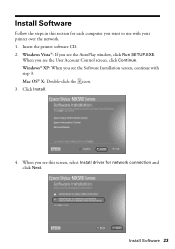
When you see the Software Installation screen, continue with your printer over the network. 1. When you see the AutoPlay window, click Run SETUP.EXE. Mac OS® X: Double-click the icon. 3. Click Install. 4. Install Software 23 Windows Vista®: If you want to use with step 3. Install Software Follow the steps in this screen, select Install driver for each computer you see the User Account Control screen, click Continue. Insert the printer software CD. 2. Windows® XP: When you see this section for network connection and click Next.
When you see the Software Installation screen, continue with your printer over the network. 1. When you see the AutoPlay window, click Run SETUP.EXE. Mac OS® X: Double-click the icon. 3. Click Install. 4. Install Software 23 Windows Vista®: If you want to use with step 3. Install Software Follow the steps in this screen, select Install driver for each computer you see the User Account Control screen, click Continue. Insert the printer software CD. 2. Windows® XP: When you see this section for network connection and click Next.
Network Installation Guide
Page 28
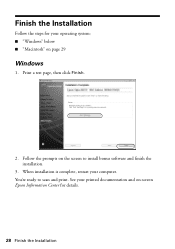
Follow the prompts on page 29 Windows 1. When installation is complete, restart your operating system: ■ "Windows" below ■ "Macintosh" on the screen to scan and print. Finish the Installation Follow the steps for details. 28 Finish the Installation Print a test page, then click Finish. 2. See your printed documentation and on-screen Epson Information Center for your computer. You're ready to install bonus software and finish the installation. 3.
Follow the prompts on page 29 Windows 1. When installation is complete, restart your operating system: ■ "Windows" below ■ "Macintosh" on the screen to scan and print. Finish the Installation Follow the steps for details. 28 Finish the Installation Print a test page, then click Finish. 2. See your printed documentation and on-screen Epson Information Center for your computer. You're ready to install bonus software and finish the installation. 3.
Network Installation Guide
Page 32
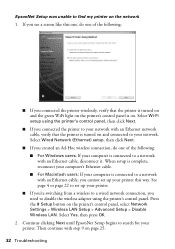
... Yes, then press OK. 2. See page 4 or page 22 to set up your printer. ■ If you're switching from a wireless to a wired network connection, you created an Ad-Hoc wireless connection, do one of the following : ■ For Windows users: If your computer is connected to a network with an Ethernet cable, disconnect...
... Yes, then press OK. 2. See page 4 or page 22 to set up your printer. ■ If you're switching from a wireless to a wired network connection, you created an Ad-Hoc wireless connection, do one of the following : ■ For Windows users: If your computer is connected to a network with an Ethernet cable, disconnect...
Network Installation Guide
Page 33
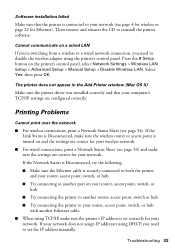
..., try the following: ■ Make sure the Ethernet cable is connected to your network (see page 34). Cannot communicate on the printer's control panel, select Network Settings > Wireless LAN Setup > Advanced Setup > Manual Setup > Disable Wireless LAN. If your network does... not assign IP addresses using the printer's control panel. Troubleshooting 33 The printer does not appear in the Add Printer window (Mac OS X) Make sure the printer driver was installed correctly and that the printer is securely connected to both the printer and your router, access point, switch,...
..., try the following: ■ Make sure the Ethernet cable is connected to your network (see page 34). Cannot communicate on the printer's control panel, select Network Settings > Wireless LAN Setup > Advanced Setup > Manual Setup > Disable Wireless LAN. If your network does... not assign IP addresses using the printer's control panel. Troubleshooting 33 The printer does not appear in the Add Printer window (Mac OS X) Make sure the printer driver was installed correctly and that the printer is securely connected to both the printer and your router, access point, switch,...
Quick Guide
Page 2
... Selecting All Photos for Printing 17 Printing Photos From an Index Sheet 18 Memory Card Print Settings 20 Printing From Your Computer 21 Printing in Windows 21 Printing With a Macintosh 23 Selecting the Correct Paper Type 28 Scanning a Document or Photo 29 Basic Scanning 29 Restoring and Correcting Photos 30 Maintaining...
... Selecting All Photos for Printing 17 Printing Photos From an Index Sheet 18 Memory Card Print Settings 20 Printing From Your Computer 21 Printing in Windows 21 Printing With a Macintosh 23 Selecting the Correct Paper Type 28 Scanning a Document or Photo 29 Basic Scanning 29 Restoring and Correcting Photos 30 Maintaining...
Quick Guide
Page 16
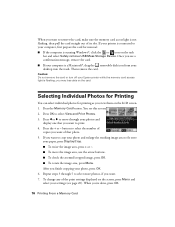
Caution: Do not remove the card or turn off your photos and display one that photo. 5. Press the Memory Card button. Press OK to select more photos, if you ...your photo, press OK. 6. Selecting Individual Photos for Printing You can select individual photos for removal: ■ If the computer is running Windows®, click the or icon on the LCD screen. 1. Press l or r to move the image area, use the arrow buttons...., press OK. ■ To rotate the image area, press Menu. Press the + or - Repeat steps 3 through your Epson printer while the memory card access light is flashing;
Caution: Do not remove the card or turn off your photos and display one that photo. 5. Press the Memory Card button. Press OK to select more photos, if you ...your photo, press OK. 6. Selecting Individual Photos for Printing You can select individual photos for removal: ■ If the computer is running Windows®, click the or icon on the LCD screen. 1. Press l or r to move the image area, use the arrow buttons...., press OK. ■ To rotate the image area, press Menu. Press the + or - Repeat steps 3 through your Epson printer while the memory card access light is flashing;
Quick Guide
Page 21
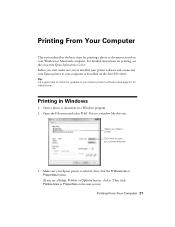
Tip: It's a good idea to check for updates to your Epson printer's software (see a window like this one: Select your Epson printer Click here to your Epson printer is selected, then click the Preferences or Properties button. (If you 've installed your printer software and connected your Epson printer to open your Windows or Macintosh computer. Open the File menu and select Print...
Tip: It's a good idea to check for updates to your Epson printer's software (see a window like this one: Select your Epson printer Click here to your Epson printer is selected, then click the Preferences or Properties button. (If you 've installed your printer software and connected your Epson printer to open your Windows or Macintosh computer. Open the File menu and select Print...
Quick Guide
Page 23
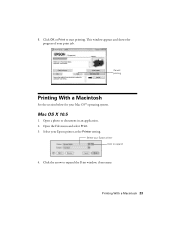
Open a photo or document in an application. 2. This window appears and shows the progress of your Epson printer as the Printer setting. Select your Mac OS® operating system. Click OK or Print to expand 4. Open the File menu and select Print. 3. 8. Select your print job. Mac OS X 10.5 1. Cancel printing Printing With a Macintosh See the section below for your Epson printer Click to start printing. Printing With a Macintosh 23 Click the arrow to expand the Print window, if necessary.
Open a photo or document in an application. 2. This window appears and shows the progress of your Epson printer as the Printer setting. Select your Mac OS® operating system. Click OK or Print to expand 4. Open the File menu and select Print. 3. 8. Select your print job. Mac OS X 10.5 1. Cancel printing Printing With a Macintosh See the section below for your Epson printer Click to start printing. Printing With a Macintosh 23 Click the arrow to expand the Print window, if necessary.
Quick Guide
Page 24
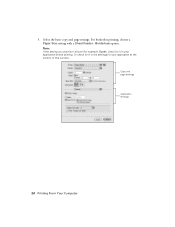
Copy and page settings Application settings 24 Printing From Your Computer Select the basic copy and page settings. Borderless option. Or check for it in the settings for it in your application at the bottom of this window. Note: If the setting you want isn't shown (for example, Scale), check for your application before printing. For borderless printing, choose a Paper Size setting with a Sheet Feeder - 5.
Copy and page settings Application settings 24 Printing From Your Computer Select the basic copy and page settings. Borderless option. Or check for it in the settings for it in your application at the bottom of this window. Note: If the setting you want isn't shown (for example, Scale), check for your application before printing. For borderless printing, choose a Paper Size setting with a Sheet Feeder - 5.

Quick Guide
Page 26
Open a photo or document in the dock. Select the following settings: Select your Epson printer Select your Paper Size Select your print job, click the printer icon in an application. 2. Click OK to 10.4 1. Cancel printing Pause or resume printing Select the print job Mac OS X 10.3 to close the Page Setup window. 26 Printing From Your Computer Borderless option. 3. Open the File menu and select Page Setup. 10. To monitor your document or image orientation For borderless printing, choose a Paper Size setting with a Sheet Feeder -
Open a photo or document in the dock. Select the following settings: Select your Epson printer Select your Paper Size Select your print job, click the printer icon in an application. 2. Click OK to 10.4 1. Cancel printing Pause or resume printing Select the print job Mac OS X 10.3 to close the Page Setup window. 26 Printing From Your Computer Borderless option. 3. Open the File menu and select Page Setup. 10. To monitor your document or image orientation For borderless printing, choose a Paper Size setting with a Sheet Feeder -
Quick Guide
Page 29
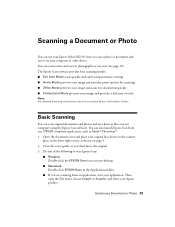
...9632; Full Auto Mode scans quickly and easily using the Epson Scan software. Scanning a Document or Photo You can use your Epson Stylus NX510 Series to start your computer or other device. Basic ... shown on page 9. 2. Note: For detailed scanning instructions, see page 30). Do one of tools. Then open the File menu, choose Import or Acquire, and select your... a Document or Photo 29 You can also launch Epson Scan from an application, start Epson Scan: ■ Windows: Double-click the EPSON Scan icon on -screen Epson Information Center. Open the document cover and place your...
...9632; Full Auto Mode scans quickly and easily using the Epson Scan software. Scanning a Document or Photo You can use your Epson Stylus NX510 Series to start your computer or other device. Basic ... shown on page 9. 2. Note: For detailed scanning instructions, see page 30). Do one of tools. Then open the File menu, choose Import or Acquire, and select your... a Document or Photo 29 You can also launch Epson Scan from an application, start Epson Scan: ■ Windows: Double-click the EPSON Scan icon on -screen Epson Information Center. Open the document cover and place your...

Quick Guide
Page 30
... a Document or Photo Then follow the instructions in Epson Scan's Full Auto Mode. Full Auto Mode Click the Customize button, click Dust Removal and/or Color Restoration, click OK, and click Scan. You see a different Epson Scan window.) 5. You can automatically transform a faded, dusty,... or badly exposed color photo into one with too much background light. Note: For more information, see its icon in a photo ...
... a Document or Photo Then follow the instructions in Epson Scan's Full Auto Mode. Full Auto Mode Click the Customize button, click Dust Removal and/or Color Restoration, click OK, and click Scan. You see a different Epson Scan window.) 5. You can automatically transform a faded, dusty,... or badly exposed color photo into one with too much background light. Note: For more information, see its icon in a photo ...
Quick Guide
Page 33
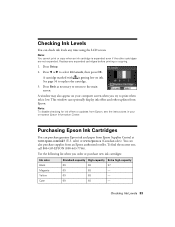
...to the main screen. A window may also appear on your on ink. sales) or www.epson.ca (Canadian sales). Press Back as necessary to return to select Ink Levels, then press OK. Purchasing Epson Ink Cartridges You can purchase genuine Epson ink and paper from an Epson authorized reseller. Note: You cannot... try to replace the cartridge. 3. Press Setup. 2. See page 34 to print when ink is low. To find the nearest one, call 800-GO-EPSON (800-463-7766). Checking Ink Levels You can check ink levels any expended cartridges before printing or copying. 1. Replace any time ...
...to the main screen. A window may also appear on your on ink. sales) or www.epson.ca (Canadian sales). Press Back as necessary to return to select Ink Levels, then press OK. Purchasing Epson Ink Cartridges You can purchase genuine Epson ink and paper from an Epson authorized reseller. Note: You cannot... try to replace the cartridge. 3. Press Setup. 2. See page 34 to print when ink is low. To find the nearest one, call 800-GO-EPSON (800-463-7766). Checking Ink Levels You can check ink levels any expended cartridges before printing or copying. 1. Replace any time ...
Quick Guide
Page 37
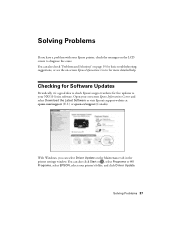
...Solving Problems If you can select Driver Update on the Maintenance tab in the printer settings window. Open your Epson printer, check the messages on -screen Epson Information Center for free updates to your printer's folder, and click Driver Update. Solving Problems 37 You can also check "... troubleshooting suggestions, or see the on the LCD screen to check Epson's support website for more detailed help. You can also click Start or , select Programs or All Programs, select EPSON, select your NX510 Series software. Checking for Software Updates Periodically, it's a good idea...
...Solving Problems If you can select Driver Update on the Maintenance tab in the printer settings window. Open your Epson printer, check the messages on -screen Epson Information Center for free updates to your printer's folder, and click Driver Update. Solving Problems 37 You can also check "... troubleshooting suggestions, or see the on the LCD screen to check Epson's support website for more detailed help. You can also click Start or , select Programs or All Programs, select EPSON, select your NX510 Series software. Checking for Software Updates Periodically, it's a good idea...
Start Here
Page 5
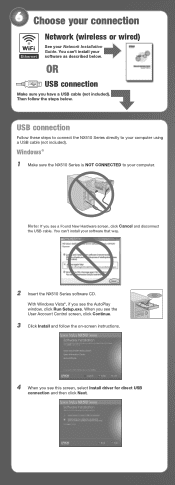
... 't install your software that way. 2 Insert the NX510 Series software CD. USB connection Follow these steps to connect the NX510 Series directly to your computer using a USB cable (not included). With Windows Vista®, if you see the AutoPlay window, click Run Setup.exe. OR USB connection Make sure... you see a Found New Hardware screen, click Cancel and disconnect the USB cable. Windows® 1 Make sure the NX510 Series is NOT CONNECTED to your computer. Note: If you have a USB cable (not included). You can 't install your Network...
... 't install your software that way. 2 Insert the NX510 Series software CD. USB connection Follow these steps to connect the NX510 Series directly to your computer using a USB cable (not included). With Windows Vista®, if you see the AutoPlay window, click Run Setup.exe. OR USB connection Make sure... you see a Found New Hardware screen, click Cancel and disconnect the USB cable. Windows® 1 Make sure the NX510 Series is NOT CONNECTED to your computer. Note: If you have a USB cable (not included). You can 't install your Network...
Product Brochure
Page 2
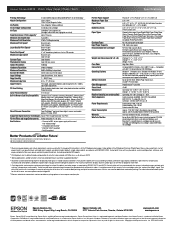
...or registered trademarks of ink remains in -one, instruction booklet, CD-ROM containing printer drivers and software (Windows and Macintosh®), one 69 Black ink cartridge, one 69 Cyan ink cartridge, one 69 Magenta ink cartridge, and one , see www.epson.com/cartridgeinfo 5 See our website for priming...-M+, xD-Picture Card Type-H Direct Camera Connection Front PictBridge™ port (print from start of prints. and Canada Epson Stylus NX510 all -in-one 69 Yellow ink cartridge For more information about yields for both printing and print head maintenance. Actual print times will ...
...or registered trademarks of ink remains in -one, instruction booklet, CD-ROM containing printer drivers and software (Windows and Macintosh®), one 69 Black ink cartridge, one 69 Cyan ink cartridge, one 69 Magenta ink cartridge, and one , see www.epson.com/cartridgeinfo 5 See our website for priming...-M+, xD-Picture Card Type-H Direct Camera Connection Front PictBridge™ port (print from start of prints. and Canada Epson Stylus NX510 all -in-one 69 Yellow ink cartridge For more information about yields for both printing and print head maintenance. Actual print times will ...


