Quick Guide
Page 18
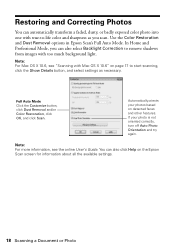
...Scanning with too much background light. Use the Color Restoration and Dust Removal options in Epson Scan's Full Auto Mode. Restoring and Correcting Photos You can also click Help on the Epson Scan screen for information about all the available settings. 18 Scanning a Document or ...Photo Automatically orients your photo is not oriented correctly, turn off Auto Photo Orientation and try again. In Home and Professional...
...Scanning with too much background light. Use the Color Restoration and Dust Removal options in Epson Scan's Full Auto Mode. Restoring and Correcting Photos You can also click Help on the Epson Scan screen for information about all the available settings. 18 Scanning a Document or ...Photo Automatically orients your photo is not oriented correctly, turn off Auto Photo Orientation and try again. In Home and Professional...

Quick Guide
Page 19
... . Checking the Print Head Nozzles If your online User's Guide. To align the print head, if necessary, see page 3). 2. Turn off the printer. 3. Hold down the y Stop button as you need to turn the printer back on top of the cover or use only a soft, non-abrasive microfiber-type cloth. Maintaining Your...
... . Checking the Print Head Nozzles If your online User's Guide. To align the print head, if necessary, see page 3). 2. Turn off the printer. 3. Hold down the y Stop button as you need to turn the printer back on top of the cover or use only a soft, non-abrasive microfiber-type cloth. Maintaining Your...
Quick Guide
Page 21
... and click OK, then select EPSON StatusMonitor. Then try cleaning the print head again. Note: If you may need to be able to verify that the print head is low or expended. Caution: Never turn off the printer and wait at least once a month to maintain good print quality. If quality... does not improve, one minute. The P Power light flashes throughout the cleaning cycle and stays on . If that doesn't help, contact Epson as described on page 19) to ...
... and click OK, then select EPSON StatusMonitor. Then try cleaning the print head again. Note: If you may need to be able to verify that the print head is low or expended. Caution: Never turn off the printer and wait at least once a month to maintain good print quality. If quality... does not improve, one minute. The P Power light flashes throughout the cleaning cycle and stays on . If that doesn't help, contact Epson as described on page 19) to ...
Quick Guide
Page 23
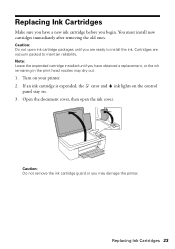
...: Do not open the ink cover. If an ink cartridge is expended, the error and ink lights on the control panel stay on your printer. 2. Turn on . 3. Replacing Ink Cartridges Make sure you have obtained a replacement, or the ink remaining in the print head nozzles may damage the printer.
...: Do not open the ink cover. If an ink cartridge is expended, the error and ink lights on the control panel stay on your printer. 2. Turn on . 3. Replacing Ink Cartridges Make sure you have obtained a replacement, or the ink remaining in the print head nozzles may damage the printer.
Quick Guide
Page 26
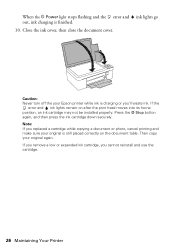
... ink lights remain on the document table. Then copy your original is charging or you'll waste ink. ink lights go Caution: Never turn off the your Epson printer while ink is still placed correctly on after the print head moves into its home position, an ink cartridge may not be installed...
... ink lights remain on the document table. Then copy your original is charging or you'll waste ink. ink lights go Caution: Never turn off the your Epson printer while ink is still placed correctly on after the print head moves into its home position, an ink cartridge may not be installed...

Quick Guide
Page 28
... the y stop button to continue (see page 3). An ink cartridge is expended or not installed correctly, or is turned on the control panel. Ink in the sheet feeder and press the y stop flashing before turning off . Light status P power on P power flashing (slow) P power flashing (fast) error on or flashing ink flashing..., or is busy. Open the document cover and remove any paper jammed inside. Error Indicators You can continue printing, or check which cartridge is being turned off the printer.
... the y stop button to continue (see page 3). An ink cartridge is expended or not installed correctly, or is turned on the control panel. Ink in the sheet feeder and press the y stop flashing before turning off . Light status P power on P power flashing (slow) P power flashing (fast) error on or flashing ink flashing..., or is busy. Open the document cover and remove any paper jammed inside. Error Indicators You can continue printing, or check which cartridge is being turned off the printer.
Quick Guide
Page 29
...are cropped, move your original away from the edges slightly. ■ Make sure your paper is loaded short edge first and is still lit, turn off your Epson printer. You can load up to separate the sheets a little. If the edges are correct for the paper you 're having trouble using ... solutions below if you loaded. Then reload the paper against the right side, and slide the left edge guide against its left side. See your Epson printer. Problems and Solutions 29 Don't load paper above the arrow mark inside , press either of Premium Photo Paper Glossy (4 × 6 inch only). If...
...are cropped, move your original away from the edges slightly. ■ Make sure your paper is loaded short edge first and is still lit, turn off your Epson printer. You can load up to separate the sheets a little. If the edges are correct for the paper you 're having trouble using ... solutions below if you loaded. Then reload the paper against the right side, and slide the left edge guide against its left side. See your Epson printer. Problems and Solutions 29 Don't load paper above the arrow mark inside , press either of Premium Photo Paper Glossy (4 × 6 inch only). If...
Quick Guide
Page 30
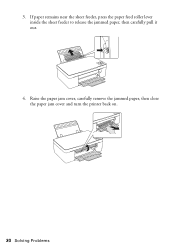
Raise the paper jam cover, carefully remove the jammed paper, then close the paper jam cover and turn the printer back on. 30 Solving Problems 3. If paper remains near the sheet feeder, press the paper feed roller lever inside the sheet feeder to release the jammed paper, then carefully pull it out. 4.
Raise the paper jam cover, carefully remove the jammed paper, then close the paper jam cover and turn the printer back on. 30 Solving Problems 3. If paper remains near the sheet feeder, press the paper feed roller lever inside the sheet feeder to release the jammed paper, then carefully pull it out. 4.
Quick Guide
Page 33
..., read and follow these safety instructions: ■ Be sure to follow all warnings and instructions marked on your Epson printer. ■ Use only the type of power source indicated on a flat, stable surface that extends beyond its base in all devices plugged into the .... ■ Do not open the scanner section while the NX125/127 Series is at least 4 inches (10 cm) away from the electrical outlet. ■ Always turn off the printer using the printer for sufficient ventilation. Do not block or cover openings in direct sunlight. ■ Place the printer on the printer...
..., read and follow these safety instructions: ■ Be sure to follow all warnings and instructions marked on your Epson printer. ■ Use only the type of power source indicated on a flat, stable surface that extends beyond its base in all devices plugged into the .... ■ Do not open the scanner section while the NX125/127 Series is at least 4 inches (10 cm) away from the electrical outlet. ■ Always turn off the printer using the printer for sufficient ventilation. Do not block or cover openings in direct sunlight. ■ Place the printer on the printer...
Quick Guide
Page 34
... the ink from staining items that the cartridge touches. otherwise ink may be ink remaining around the printer. If ink gets on its side, or turn it gets in your hand inside or around the ink supply port. this can dry out the print head and may cause fire. If it...
... the ink from staining items that the cartridge touches. otherwise ink may be ink remaining around the printer. If ink gets on its side, or turn it gets in your hand inside or around the ink supply port. this can dry out the print head and may cause fire. If it...

Quick Guide
Page 35
... this equipment will not occur in a residential installation. If this equipment does cause interference to radio and television reception, which exceed the limits established by turning the equipment off and on, the user is the responsibility of the following measures: ■ Reorient or relocate the receiving antenna. ■ Increase the separation...
... this equipment will not occur in a residential installation. If this equipment does cause interference to radio and television reception, which exceed the limits established by turning the equipment off and on, the user is the responsibility of the following measures: ■ Reorient or relocate the receiving antenna. ■ Increase the separation...
Start Here
Page 1
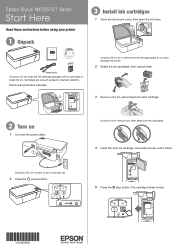
...cartridge guard or you are vacuum packed to maintain reliability. Caution: Don't remove any other seals from each cartridge. 2 Turn on 1 Connect the power cable. Epson Stylus® NX125/127 Series Start Here Read these instructions before using your computer yet. 2 Press the power button. 5... Press the stop button. Cartridges are ready to your printer. 1 Unpack Epson Stylus® NX125/127 Series Quick Guide Basic Copying, Printing, and Scanning Maintenance Solving Problems Power cord Caution: Do not open the ink ...
...cartridge guard or you are vacuum packed to maintain reliability. Caution: Don't remove any other seals from each cartridge. 2 Turn on 1 Connect the power cable. Epson Stylus® NX125/127 Series Start Here Read these instructions before using your computer yet. 2 Press the power button. 5... Press the stop button. Cartridges are ready to your printer. 1 Unpack Epson Stylus® NX125/127 Series Quick Guide Basic Copying, Printing, and Scanning Maintenance Solving Problems Power cord Caution: Do not open the ink ...
Start Here
Page 2
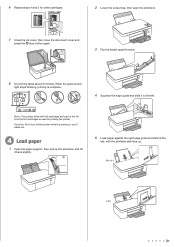
Caution: Don't turn off the printer while it is complete. 4 Squeeze the edge guide and slide it back slightly. 5 Load paper against the right edge guide and behind ...
Caution: Don't turn off the printer while it is complete. 4 Squeeze the edge guide and slide it back slightly. 5 Load paper against the right edge guide and behind ...

Start Here
Page 3
...and disconnect the USB cable. Windows®: If you see this screen, click Add Printer. always load it short edge first. 2 Insert the Epson Stylus NX125/127 Series software CD. 6 Slide the edge guide over, against the left edge of the screen to continue, if necessary. Macintosh®...;: Double-click the Epson icon, if necessary. 3 Click Install and follow the on . 5 Install software 1 Make sure the printer is turned on -screen instructions. 7 Flip the feeder guard back. 4 When prompted, connect the USB ...
...and disconnect the USB cable. Windows®: If you see this screen, click Add Printer. always load it short edge first. 2 Insert the Epson Stylus NX125/127 Series software CD. 6 Slide the edge guide over, against the left edge of the screen to continue, if necessary. Macintosh®...;: Double-click the Epson icon, if necessary. 3 Click Install and follow the on . 5 Install software 1 Make sure the printer is turned on -screen instructions. 7 Flip the feeder guard back. 4 When prompted, connect the USB ...

