
Product Brochure
Page 1
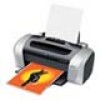
...! INK JET PRINTER STYLUS® C66 Everyday Printing Made Easy. Brilliance that last, even on plain paper Includes water, smudge, and light-resistant DURABrite Inks for brilliant, long-lasting photos Print stacks of borderless 4" x 6" photos in a snap Enjoy the DURABrite Photo Series advantage Includes a photo paper pack (20 sheets), Photo Series software, and easy access to Epson's exclusive...
...! INK JET PRINTER STYLUS® C66 Everyday Printing Made Easy. Brilliance that last, even on plain paper Includes water, smudge, and light-resistant DURABrite Inks for brilliant, long-lasting photos Print stacks of borderless 4" x 6" photos in a snap Enjoy the DURABrite Photo Series advantage Includes a photo paper pack (20 sheets), Photo Series software, and easy access to Epson's exclusive...

Product Brochure
Page 2
...and some ink from the first cartridges is used for initialization. Cartridge yields will vary based on system configuration, software application and page complexity. ** For more information about supplies for this printer and cartridge yields, go to www.epson.com.... 2004 Epson America, Inc. as fast as 2 min. 55 sec. Epson, Epson Stylus and Micro Piezo are trademarks and/or registered trademarks of Epson America, Inc. borderless photo sizes - 4" x 6") Paper Types Plain paper; Color photo is a trademark of their respective companies. INK JET PRINTER STYLUS® C66 SPECIFICATIONS ...
...and some ink from the first cartridges is used for initialization. Cartridge yields will vary based on system configuration, software application and page complexity. ** For more information about supplies for this printer and cartridge yields, go to www.epson.com.... 2004 Epson America, Inc. as fast as 2 min. 55 sec. Epson, Epson Stylus and Micro Piezo are trademarks and/or registered trademarks of Epson America, Inc. borderless photo sizes - 4" x 6") Paper Types Plain paper; Color photo is a trademark of their respective companies. INK JET PRINTER STYLUS® C66 SPECIFICATIONS ...

Product Information Guide
Page 5
... Quick Guide or on reinstalling the printer software. ❏ If the check page doesn't print, you may not be installed correctly. Then reconnect the cable and turn off the printer while the green P power light is...Epson DURABrite Ink Glossy Photo Paper DURABrite Ink Glossy Photo Paper Epson Glossy Photo Paper Glossy Photo Paper Epson All Purpose Glossy Photo Paper Epson Photo Paper Epson Premium Semigloss Photo Paper Epson Ink Jet Transparencies Ink Jet Transparencies 3/04 EPSON Stylus C66 - 5 Press the H ink button and close the printer cover. Then gently push each ink...
... Quick Guide or on reinstalling the printer software. ❏ If the check page doesn't print, you may not be installed correctly. Then reconnect the cable and turn off the printer while the green P power light is...Epson DURABrite Ink Glossy Photo Paper DURABrite Ink Glossy Photo Paper Epson Glossy Photo Paper Glossy Photo Paper Epson All Purpose Glossy Photo Paper Epson Photo Paper Epson Premium Semigloss Photo Paper Epson Ink Jet Transparencies Ink Jet Transparencies 3/04 EPSON Stylus C66 - 5 Press the H ink button and close the printer cover. Then gently push each ink...

Quick Reference Guide
Page 5
...its software is set up . Loading Paper 1. Press the locking tab and slide the left edge guide. ■ Load the printable side face-up and its Tab extension. 2. Printing Before you print, make sure your paper against the paper (but not too tightly). Insert your printer ...other side. ■ Always load the short edge first, even when printing in landscape mode. ■ Load letterhead or preprinted paper into the printer top edge first. ■ Check the paper package for additional loading and printing instructions. 5 Follow these guidelines when loading paper: ■ Don...
...its software is set up . Loading Paper 1. Press the locking tab and slide the left edge guide. ■ Load the printable side face-up and its Tab extension. 2. Printing Before you print, make sure your paper against the paper (but not too tightly). Insert your printer ...other side. ■ Always load the short edge first, even when printing in landscape mode. ■ Load letterhead or preprinted paper into the printer top edge first. ■ Check the paper package for additional loading and printing instructions. 5 Follow these guidelines when loading paper: ■ Don...
Quick Reference Guide
Page 6
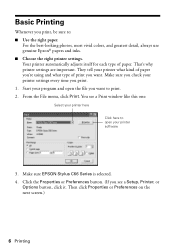
...Make sure you check your printer what type of paper. Start your printer software 3. You see a Setup, Printer, or Options button, click it. Then click Properties or Preferences on the next screen.) 6 Printing From the File menu, click Print. That's why printer settings are important. Click...genuine Epson® papers and inks. ■ Choose the right printer settings. Your printer automatically adjusts itself for each type of print you print, be sure to open your program and open the file you 're using and what kind of paper you want . Make sure EPSON Stylus C66 ...
...Make sure you check your printer what type of paper. Start your printer software 3. You see a Setup, Printer, or Options button, click it. Then click Properties or Preferences on the next screen.) 6 Printing From the File menu, click Print. That's why printer settings are important. Click...genuine Epson® papers and inks. ■ Choose the right printer settings. Your printer automatically adjusts itself for each type of print you print, be sure to open your program and open the file you 're using and what kind of paper you want . Make sure EPSON Stylus C66 ...

Quick Reference Guide
Page 9
Click the Properties or Preferences button. (If you see a Print window like this one: Select your printer here Click here to open your printer software 6. Select the following in the printer settings window: Photo or Best Photo Borderless Photo paper type 4 x 6 in is automatically selected Orientation 8. Printing 4 × 6 Borderless Photos 9 5. You see a Setup, Printer, or Options button, click it. Select Photo or Best Photo as the Quality Option setting. From the File menu, click Print. Then click Properties or Preferences on the next screen.) 7.
Click the Properties or Preferences button. (If you see a Print window like this one: Select your printer here Click here to open your printer software 6. Select the following in the printer settings window: Photo or Best Photo Borderless Photo paper type 4 x 6 in is automatically selected Orientation 8. Printing 4 × 6 Borderless Photos 9 5. You see a Setup, Printer, or Options button, click it. Select Photo or Best Photo as the Quality Option setting. From the File menu, click Print. Then click Properties or Preferences on the next screen.) 7.

Quick Reference Guide
Page 14
Your paper doesn't feed correctly or jams in the printer. ■ If paper doesn't feed, remove it from the sheet feeder, reload it , but not too tightly). ■ If multiple pages feed at once, remove ... doesn't eject fully or is wrinkled. ■ If the paper doesn't eject fully, you may have torn off. The printer prints blank pages. ■ Make sure your printer is selected in your printer software or program is not set the wrong paper size. see page 6. ■ The print head nozzles may need cleaning; If...
Your paper doesn't feed correctly or jams in the printer. ■ If paper doesn't feed, remove it from the sheet feeder, reload it , but not too tightly). ■ If multiple pages feed at once, remove ... doesn't eject fully or is wrinkled. ■ If the paper doesn't eject fully, you may have torn off. The printer prints blank pages. ■ Make sure your printer is selected in your printer software or program is not set the wrong paper size. see page 6. ■ The print head nozzles may need cleaning; If...

Quick Reference Guide
Page 15
...sheet feeder. Problems and Solutions 15 Slide the left edge guide against the paper. ■ See your software documentation for your paper size. Then try printing again. ■ Make sure your printer is positioned all the way to the right of your screen (taskbar) in Windows.® Try restarting ... paper Size setting matches the paper you loaded. ■ Make sure the paper is selected in your software. ■ If you're using a switch box or USB hub with your printer, connect the printer directly to your computer. You don't see the icon, follow these steps: 1. Image size or position...
...sheet feeder. Problems and Solutions 15 Slide the left edge guide against the paper. ■ See your software documentation for your paper size. Then try printing again. ■ Make sure your printer is positioned all the way to the right of your screen (taskbar) in Windows.® Try restarting ... paper Size setting matches the paper you loaded. ■ Make sure the paper is selected in your software. ■ If you're using a switch box or USB hub with your printer, connect the printer directly to your computer. You don't see the icon, follow these steps: 1. Image size or position...

Quick Reference Guide
Page 17
Notices System Requirements To use your printer and its software, your system should have: ■ A Microsoft® Windows compatible PC with a Pentium® 233 MHz or faster recommended ■ Microsoft Windows 98, Windows Me, Windows 2000, or Windows XP ■ At least 64MB RAM (128MB recommended) ■ 100MB free hard disk space (200MB or more recommended) ■ VGA or better display adapter and monitor ■ A Windows-compliant USB port ■ A shielded USB "AB" cable up to 6.5 feet (2 meters) long. 17
Notices System Requirements To use your printer and its software, your system should have: ■ A Microsoft® Windows compatible PC with a Pentium® 233 MHz or faster recommended ■ Microsoft Windows 98, Windows Me, Windows 2000, or Windows XP ■ At least 64MB RAM (128MB recommended) ■ 100MB free hard disk space (200MB or more recommended) ■ VGA or better display adapter and monitor ■ A Windows-compliant USB port ■ A shielded USB "AB" cable up to 6.5 feet (2 meters) long. 17

Quick Reference Guide
Page 23
...both warranties and conditions. This warranty gives you specific legal rights and you . EXCEPT AS PROVIDED IN THIS WRITTEN WARRANTY, NEITHER EPSON AMERICA, INC. NOR ITS AFFILIATES SHALL BE LIABLE FOR ANY LOSS, INCONVENIENCE, OR DAMAGE, INCLUDING DIRECT, SPECIAL, INCIDENTAL OR CONSEQUENTIAL...improper shipping, damage caused by disasters such as fire, flood, and lightning, improper electrical current, software problems, interaction with non-Epson products, or service other than by an Epson Authorized Servicer. SOME LAWS DO NOT ALLOW THE EXCLUSION OF IMPLIED WARRANTIES. UNLESS STATED HEREIN, ...
...both warranties and conditions. This warranty gives you specific legal rights and you . EXCEPT AS PROVIDED IN THIS WRITTEN WARRANTY, NEITHER EPSON AMERICA, INC. NOR ITS AFFILIATES SHALL BE LIABLE FOR ANY LOSS, INCONVENIENCE, OR DAMAGE, INCLUDING DIRECT, SPECIAL, INCIDENTAL OR CONSEQUENTIAL...improper shipping, damage caused by disasters such as fire, flood, and lightning, improper electrical current, software problems, interaction with non-Epson products, or service other than by an Epson Authorized Servicer. SOME LAWS DO NOT ALLOW THE EXCLUSION OF IMPLIED WARRANTIES. UNLESS STATED HEREIN, ...

Start Here Card
Page 1
4050351-00 XXX Start Here Epson Stylus® C66 1 Unpack 1 Make sure you have all the parts shown here. Do not touch or remove the white cable Remove tape and insert 4 Slide the paper ... tape and packing material inside and around the printer. The tape may be in slightly different places on the back of the sheet feeder. Printer Software CD-ROM Quick Guide Paper support Power cord Ink cartridges 2 Remove any parts are missing, contact Epson as described on your printer, so check carefully. 3 Remove the tape and insert...
4050351-00 XXX Start Here Epson Stylus® C66 1 Unpack 1 Make sure you have all the parts shown here. Do not touch or remove the white cable Remove tape and insert 4 Slide the paper ... tape and packing material inside and around the printer. The tape may be in slightly different places on the back of the sheet feeder. Printer Software CD-ROM Quick Guide Paper support Power cord Ink cartridges 2 Remove any parts are missing, contact Epson as described on your printer, so check carefully. 3 Remove the tape and insert...

Start Here Card
Page 3
... into the USB port on your printer. Keep it is turned off. The green power light flashes as your computer is firmly seated. continued 4 Lower each ink cartridge down until it turned off until section 6, "Install Software." 2 Plug the flat end of the cable into any available USB port ...on your computer. 3 Plug the square end of the cartridge label should match the marker on the holder. 5 Close the cartridge cover. 6 Close the printer cover and press the ink button. Caution: Don...
... into the USB port on your printer. Keep it is turned off. The green power light flashes as your computer is firmly seated. continued 4 Lower each ink cartridge down until it turned off until section 6, "Install Software." 2 Plug the flat end of the cable into any available USB port ...on your computer. 3 Plug the square end of the cartridge label should match the marker on the holder. 5 Close the cartridge cover. 6 Close the printer cover and press the ink button. Caution: Don...

Start Here Card
Page 4
...the edge guides. 2 Press in your computer and turned on the back of this sheet to complete the software installation. Then turn on your computer. 2 Wait for Windows to detect your printer and display a screen like this : DON'T CLICK ANY BUTTONS ON THIS SCREEN. You see the license ... turned on the screen. 4 When installation halts, click Finish. 5 You see the Options Menu. Your printer software installs automatically and various messages appear on and connected. 3 Put the Epson CD in the side of paper and place them against the paper, but not too tightly. Windows XP 1 Make sure...
...the edge guides. 2 Press in your computer and turned on the back of this sheet to complete the software installation. Then turn on your computer. 2 Wait for Windows to detect your printer and display a screen like this : DON'T CLICK ANY BUTTONS ON THIS SCREEN. You see the license ... turned on the screen. 4 When installation halts, click Finish. 5 You see the Options Menu. Your printer software installs automatically and various messages appear on and connected. 3 Put the Epson CD in the side of paper and place them against the paper, but not too tightly. Windows XP 1 Make sure...

Start Here Card
Page 5
Windows 98 1 Make sure your printer is connected to complete the software installation. Click Next on each of the four screens that follow. 10 When the Add Printer Wizard screen appears, click Finish. 11 When installation halts, click Finish. 12 You see the Options Menu. Installation proceeds automatically....Wizard screen. 5 Click the Search for the CD to detect your computer and turned on and connected. 3 Put the Epson CD in "Finishing Software Installation" to your printer and display a screen like this : DON'T CLICK ANY BUTTONS ON THIS SCREEN. Note: If a screen like this doesn...
Windows 98 1 Make sure your printer is connected to complete the software installation. Click Next on each of the four screens that follow. 10 When the Add Printer Wizard screen appears, click Finish. 11 When installation halts, click Finish. 12 You see the Options Menu. Installation proceeds automatically....Wizard screen. 5 Click the Search for the CD to detect your computer and turned on and connected. 3 Put the Epson CD in "Finishing Software Installation" to your printer and display a screen like this : DON'T CLICK ANY BUTTONS ON THIS SCREEN. Note: If a screen like this doesn...

Start Here Card
Page 6
...halts, click Finish. 9 You see the Options Menu. Note: If a screen like this doesn't appear, make sure your printer is turned on and connected. 3 Put the Epson CD in your CD-ROM or DVD drive and wait a few seconds for option, then click Next. Read the agreement and ... computer and turned on. Note: If a screen like this doesn't appear, make sure your printer is turned on and connected. 3 Put the Epson CD in your printer again. Continue with the instructions in "Finishing Software Installation" in the next column to continue. 5 When installation halts, click Finish. 6 Your ...
...halts, click Finish. 9 You see the Options Menu. Note: If a screen like this doesn't appear, make sure your printer is turned on and connected. 3 Put the Epson CD in your CD-ROM or DVD drive and wait a few seconds for option, then click Next. Read the agreement and ... computer and turned on. Note: If a screen like this doesn't appear, make sure your printer is turned on and connected. 3 Put the Epson CD in your printer again. Continue with the instructions in "Finishing Software Installation" in the next column to continue. 5 When installation halts, click Finish. 6 Your ...

Start Here Card
Page 7
... see the Options Menu. Read the agreement and click Agree. Continue with the instructions in the printer. Note: You need a registration number. 3 Click Install Epson Printer Information Center to install it . You're ready to complete the software installation. If paper is on , and press the paper button. If paper is listed here, try...
... see the Options Menu. Read the agreement and click Agree. Continue with the instructions in the printer. Note: You need a registration number. 3 Click Install Epson Printer Information Center to install it . You're ready to complete the software installation. If paper is on , and press the paper button. If paper is listed here, try...

Start Here Card
Page 8
... files, look for reprints, snapshots, and enlargements. Your Epson SoundAdviceSM Express Code is perfect for answers: Epson Stylus C66 Quick Guide Check this code to quickly select the Epson Stylus C66 in SoundAdvice. How To Get Paper and Ink Use genuine Epson inks and paper to view Print Show Animations and your Epson printer! It's perfect for these services, you can reach...
... files, look for reprints, snapshots, and enlargements. Your Epson SoundAdviceSM Express Code is perfect for answers: Epson Stylus C66 Quick Guide Check this code to quickly select the Epson Stylus C66 in SoundAdvice. How To Get Paper and Ink Use genuine Epson inks and paper to view Print Show Animations and your Epson printer! It's perfect for these services, you can reach...


