Product Information Guide
Page 4
... described below, or run a printer check (see page 5). you have a replacement cartridge. EPSON Stylus C66 3/04 Reinstall it with the printer or incorrectly installed. Load more paper, then press the is off the printer, wait a few seconds, and turn on the front of the cartridges is receiving a print job, replacing an ink light flashes cartridge, charging ink, or cleaning the print...
... described below, or run a printer check (see page 5). you have a replacement cartridge. EPSON Stylus C66 3/04 Reinstall it with the printer or incorrectly installed. Load more paper, then press the is off the printer, wait a few seconds, and turn on the front of the cartridges is receiving a print job, replacing an ink light flashes cartridge, charging ink, or cleaning the print...

Product Information Guide
Page 7
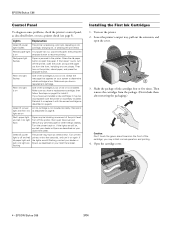
... head by holding down gently until the cartridge is flashing, unless the printer hasn't moved or made noise for a long time, print quality can decline, so turn off . EPSON Stylus C66 10. Close the cartridge cover. 6. The green P power light flashes and the printer makes noise. you may inhibit normal operation...stays on the front of the printer. 11. Print head cleaning uses ink, so clean it four or five times. 8. Caution: When you remove the new cartridge from its package, shake it only if quality declines. Push down the H ink button on the printer for three seconds. (This only...
... head by holding down gently until the cartridge is flashing, unless the printer hasn't moved or made noise for a long time, print quality can decline, so turn off . EPSON Stylus C66 10. Close the cartridge cover. 6. The green P power light flashes and the printer makes noise. you may inhibit normal operation...stays on the front of the printer. 11. Print head cleaning uses ink, so clean it four or five times. 8. Caution: When you remove the new cartridge from its package, shake it only if quality declines. Push down the H ink button on the printer for three seconds. (This only...

Product Information Guide
Page 9
... the rectangles. Caution: To avoid damage, remove the ink cartridges when transporting the printer. 1. Press the H ink button. Then disconnect the printer cable from the electrical outlet. Open the printer cover and secure the ink cartridge holder to print a black horizontal alignment sheet...Printer To keep your hands, wash them thoroughly with water. 7. The print head moves to the ink cartridge replacement position, and the P power light begins to close the output tray. 3/04 EPSON Stylus C66 - 9 Open the cartridge cover. 6. Close the cartridge cover and press the ink...
... the rectangles. Caution: To avoid damage, remove the ink cartridges when transporting the printer. 1. Press the H ink button. Then disconnect the printer cable from the electrical outlet. Open the printer cover and secure the ink cartridge holder to print a black horizontal alignment sheet...Printer To keep your hands, wash them thoroughly with water. 7. The print head moves to the ink cartridge replacement position, and the P power light begins to close the output tray. 3/04 EPSON Stylus C66 - 9 Open the cartridge cover. 6. Close the cartridge cover and press the ink...

Product Information Guide
Page 10
... the printer level as you notice a decline in print quality, clean the print head (see page 8). Plug in the original box using the protective materials that came with Print Show movies and HTML User's Guide 10 - Repack the printer and its attachments in and power on your printer, install your ink cartridges, and test your printer. EPSON Stylus C66...
... the printer level as you notice a decline in print quality, clean the print head (see page 8). Plug in the original box using the protective materials that came with Print Show movies and HTML User's Guide 10 - Repack the printer and its attachments in and power on your printer, install your ink cartridges, and test your printer. EPSON Stylus C66...
Quick Reference Guide
Page 12
...printer, then open the cover and remove any jammed paper or other side. ■ The ink cartridges may have an internal error. The printer may need cleaning; see page 16. ■ Select a higher Quality Option setting; see your Start Here sheet. Turn off and red paper light and red ink...are still on, contact your dealer or Epson as described on your on replacing ink cartridges. ■ Run the Print Head Alignment utility; see banding (light lines). ■ The print head nozzles may be blocking movement of the paper is off the printer, wait a few seconds, and turn it...
...printer, then open the cover and remove any jammed paper or other side. ■ The ink cartridges may have an internal error. The printer may need cleaning; see page 16. ■ Select a higher Quality Option setting; see your Start Here sheet. Turn off and red paper light and red ink...are still on, contact your dealer or Epson as described on your on replacing ink cartridges. ■ Run the Print Head Alignment utility; see banding (light lines). ■ The print head nozzles may be blocking movement of the paper is off the printer, wait a few seconds, and turn it...
Quick Reference Guide
Page 13
... printer as described in your on-screen User's Guide. ■ Make sure your on-screen User's Guide for instructions. ■ The ink cartridges may need cleaning; If it's damp or curled, reload a new stack of the paper is face-up . You may need to ensure proper saturation and absorption of genuine Epson inks.... ■ Use Epson papers to use an included support sheet or load your paper one side of the paper will contain a lighter image or text, print that smudges or marks appear on the front of the paper is face-up . see page 10 for instructions. ■ Remove each sheet from the...
... printer as described in your on-screen User's Guide. ■ Make sure your on-screen User's Guide for instructions. ■ The ink cartridges may need cleaning; If it's damp or curled, reload a new stack of the paper is face-up . You may need to ensure proper saturation and absorption of genuine Epson inks.... ■ Use Epson papers to use an included support sheet or load your paper one side of the paper will contain a lighter image or text, print that smudges or marks appear on the front of the paper is face-up . see page 10 for instructions. ■ Remove each sheet from the...
Quick Reference Guide
Page 19
... the ink cartridges within six months of the cartridge. You may damage the printer. ■ Install the ink cartridge immediately after removing it from its package. Do not touch the ink cartridge ink supply port or surrounding area. ■ Before transporting the printer, make sure it . ■ Do not shake an ink cartridge after you handle used ink cartridges; if liquid has entered the printer; Ink Cartridge Safety...
... the ink cartridges within six months of the cartridge. You may damage the printer. ■ Install the ink cartridge immediately after removing it from its package. Do not touch the ink cartridge ink supply port or surrounding area. ■ Before transporting the printer, make sure it . ■ Do not shake an ink cartridge after you handle used ink cartridges; if liquid has entered the printer; Ink Cartridge Safety...

Start Here Card
Page 1
... paper support into the slot on your printer, so check carefully. 3 Remove the tape and insert securing the ink cartridge holder. The paper support should fit securely. The tape may be in slightly different places on the back of this sheet. 4050351-00 XXX Start Here Epson Stylus® C66 1 Unpack 1 Make sure you have all the...
... paper support into the slot on your printer, so check carefully. 3 Remove the tape and insert securing the ink cartridge holder. The paper support should fit securely. The tape may be in slightly different places on the back of this sheet. 4050351-00 XXX Start Here Epson Stylus® C66 1 Unpack 1 Make sure you have all the...

Start Here Card
Page 2
... turn the printer on . Then remove the cartridges from the package. (Don't shake them after removing the packaging.) 3 Open the cartridge cover. Caution: Use only the printer's power button to the printer, then plug it into a grounded electrical outlet. 2 Press the printer's power button until the green power light comes on and off. 23 Install Ink Cartridges 1 Lower the printer's output...
... turn the printer on . Then remove the cartridges from the package. (Don't shake them after removing the packaging.) 3 Open the cartridge cover. Caution: Use only the printer's power button to the printer, then plug it into a grounded electrical outlet. 2 Press the printer's power button until the green power light comes on and off. 23 Install Ink Cartridges 1 Lower the printer's output...


