

User Manual
Page 5
Chapter 2 Using Other Printer Functions Loading Paper Manually 2-2 Paper sizes 2-2 Printing on single sheets 2-2 Printing on envelopes 2-4 Tips for Maintaining the ...character-table setting 2-16 Chapter 3 Maintenance and Troubleshooting Replacing the Ink Cartridge Cleaning the Print Head Cleaning the Printer 3-4 Transporting the Printer 3-5 Troubleshooting 3-5 Error indicators 3-6 Power supply 3-7 Printing 3-7 Paper handling 3-12 Appendix Technical Specifications A-2 Printer specifications A-2 Command Summary A-12 Sending printer commands A-12 Using the command summary A-12 ...
Chapter 2 Using Other Printer Functions Loading Paper Manually 2-2 Paper sizes 2-2 Printing on single sheets 2-2 Printing on envelopes 2-4 Tips for Maintaining the ...character-table setting 2-16 Chapter 3 Maintenance and Troubleshooting Replacing the Ink Cartridge Cleaning the Print Head Cleaning the Printer 3-4 Transporting the Printer 3-5 Troubleshooting 3-5 Error indicators 3-6 Power supply 3-7 Printing 3-7 Paper handling 3-12 Appendix Technical Specifications A-2 Printer specifications A-2 Command Summary A-12 Sending printer commands A-12 Using the command summary A-12 ...

User Manual
Page 7
...test. cl Chapter 2 contains information that you 'll find in this chapter. cl The Appendix includes the printer specifications, commands, and character tables. 0 A glossary of printer terms and an index are at the end. How to Use This Manual Here's what you will need...It explains how to unpack and set up the printer. If the printer does not operate properly or you have difficulties, see this book: 0 Chapter 1 describes how to load paper manually and change printer settings from the control panel. 0 Chapter 3 contains maintenance and troubleshooting information. Introduction 1
...test. cl Chapter 2 contains information that you 'll find in this chapter. cl The Appendix includes the printer specifications, commands, and character tables. 0 A glossary of printer terms and an index are at the end. How to Use This Manual Here's what you will need...It explains how to unpack and set up the printer. If the printer does not operate properly or you have difficulties, see this book: 0 Chapter 1 describes how to load paper manually and change printer settings from the control panel. 0 Chapter 3 contains maintenance and troubleshooting information. Introduction 1

User Manual
Page 38
... what you select the most often. For instructions, see "Troubleshooting" in Chapter 2. 1-22 Setting Up Your Printer When the printer receives data from the following: LQ, EX, FX, LX, RX, MX, EPSON printer, Standard printer, and Draft printer. Tips for Using the Paper Feeder Following the tips below ...will give you the best performance when printing with the fonts and formats that you use most appropriate printer as described above, you may want to ...
... what you select the most often. For instructions, see "Troubleshooting" in Chapter 2. 1-22 Setting Up Your Printer When the printer receives data from the following: LQ, EX, FX, LX, RX, MX, EPSON printer, Standard printer, and Draft printer. Tips for Using the Paper Feeder Following the tips below ...will give you the best performance when printing with the fonts and formats that you use most appropriate printer as described above, you may want to ...

User Manual
Page 57
Chapter 3 Maintenance and Troubleshooting Replacing the Ink Cartridge 3-2 Cleaning the Print Head 3-3 Cleaning the Printer 3-4 Transporting the Printer 3-5 Troubleshooting 3-5 Error indicators 3-6 Power supply 3-7 Printing 3-7 Paper handling 3-12 Maintenance and Troubleshooting 3-1
Chapter 3 Maintenance and Troubleshooting Replacing the Ink Cartridge 3-2 Cleaning the Print Head 3-3 Cleaning the Printer 3-4 Transporting the Printer 3-5 Troubleshooting 3-5 Error indicators 3-6 Power supply 3-7 Printing 3-7 Paper handling 3-12 Maintenance and Troubleshooting 3-1
User Manual
Page 58
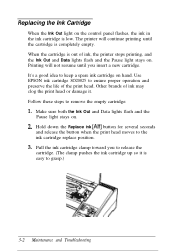
... and Data lights flash and the Pause light stays on the control panel flashes, the ink in the ink cartridge is out of ink, the printer stops printing, and the Ink Out and Data lights flash and the Pause light stays on hand. Printing will continue printing until you to ... the life of ink may clog the print head or damage it is completely empty. Follow these steps to the ink cartridge replace position. 3. Other brands of the print head. The printer will not resume until the cartridge is easy to grasp.) 3-2 Maintenance and Troubleshooting Use EPSON ink cartridge SO20025 to ...
... and Data lights flash and the Pause light stays on the control panel flashes, the ink in the ink cartridge is out of ink, the printer stops printing, and the Ink Out and Data lights flash and the Pause light stays on hand. Printing will continue printing until you to ... the life of ink may clog the print head or damage it is completely empty. Follow these steps to the ink cartridge replace position. 3. Other brands of the print head. The printer will not resume until the cartridge is easy to grasp.) 3-2 Maintenance and Troubleshooting Use EPSON ink cartridge SO20025 to ...

User Manual
Page 59
...immediately with soap and water. Cleaning the Print Head If print quality diminishes, use button to ensure that the nozzles are delivering ink properly. Make sure the printer is turned on . The Pause light flashes throughout the cycle and then stays on when the cleaning cycle is on and the... Pause light is finished. 3. Press the Pa use the printer's built-in print-head cleaning cycle to resume printing. Maintenance and Troubleshooting 3-3 Do not take up to 40 seconds to refill it properly. This can take the the used cartridge ...
...immediately with soap and water. Cleaning the Print Head If print quality diminishes, use button to ensure that the nozzles are delivering ink properly. Make sure the printer is turned on . The Pause light flashes throughout the cycle and then stays on when the cleaning cycle is on and the... Pause light is finished. 3. Press the Pa use the printer's built-in print-head cleaning cycle to resume printing. Maintenance and Troubleshooting 3-3 Do not take up to 40 seconds to refill it properly. This can take the the used cartridge ...
User Manual
Page 60
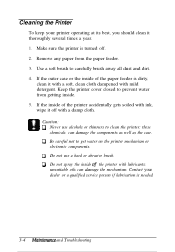
... not spray the inside of the printer accidentally gets soiled with ink, wipe it off . 2. Contact your printer operating at its best, you should clean it with a soft, clean cloth dampened with lubricants; these chemicals can damage the mechanism. Make sure the printer is needed. 3-4 h4aintenance and Troubleshooting Keep the printer cover closed to carefully brush...
... not spray the inside of the printer accidentally gets soiled with ink, wipe it off . 2. Contact your printer operating at its best, you should clean it with a soft, clean cloth dampened with lubricants; these chemicals can damage the mechanism. Make sure the printer is needed. 3-4 h4aintenance and Troubleshooting Keep the printer cover closed to carefully brush...

User Manual
Page 61
... the ink cartridge when you transport the pin ter. If the print quality is not capped, turn off the printer. Unplug the power cord from the printer. 3. Repack the printer and power cord and place them in this section and follow the recommended steps. Troubleshooting Most ...problems you may become unusable otherwise. 2. Maintenance and Troubleshooting 3-5 Remove the paper from the ...
... the ink cartridge when you transport the pin ter. If the print quality is not capped, turn off the printer. Unplug the power cord from the printer. 3. Repack the printer and power cord and place them in this section and follow the recommended steps. Troubleshooting Most ...problems you may become unusable otherwise. 2. Maintenance and Troubleshooting 3-5 Remove the paper from the ...

User Manual
Page 62
... or replace the one you have installed with a pattern of error indicators, as listed in the printer. Turn off . Fatal ink system error Contact your dealer. 3-6 Maintenance and Troubleshooting Follow the steps on or off - A carriage error occurred. Error indicators Some problems are identified with a new one. I .I,0 I , 0 - I 0 0.I, 0 .0I, All panel lights flashing Error...
... or replace the one you have installed with a pattern of error indicators, as listed in the printer. Turn off . Fatal ink system error Contact your dealer. 3-6 Maintenance and Troubleshooting Follow the steps on or off - A carriage error occurred. Error indicators Some problems are identified with a new one. I .I,0 I , 0 - I 0 0.I, 0 .0I, All panel lights flashing Error...

User Manual
Page 63
... cord is working. Prin fing All lights flash but then go off and stay off. Turn off . The lights come on the printer. Do not reconnect the power cord to determine whether it back on page 3-13. Plug another electrical device into the electrical outlet.... lights are off the printer. Check that the printer's voltage rating matches the voltage of the power switch with the vertical bar ( I) is pressed down to turn it is properly plugged into the outlet to an electrical outlet. A carriage error has occurred. Maintenance and Troubleshooting 3-7 Contact your dealer....
... cord is working. Prin fing All lights flash but then go off and stay off. Turn off . The lights come on the printer. Do not reconnect the power cord to determine whether it back on page 3-13. Plug another electrical device into the electrical outlet.... lights are off the printer. Check that the printer's voltage rating matches the voltage of the power switch with the vertical bar ( I) is pressed down to turn it is properly plugged into the outlet to an electrical outlet. A carriage error has occurred. Maintenance and Troubleshooting 3-7 Contact your dealer....
User Manual
Page 65
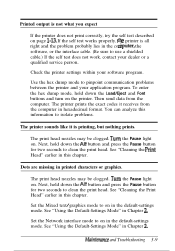
...down the AH button and press the Pause button for two seconds to on . Turn the Pause light on page 1-13. h4aintenance and Troubleshooting 3-9 The printer prints the exact codes it is printing, but nothing prints. Next, hold down the AH button and press the Pause button for two ...seconds to isolate problems. The printer sounds like it receives from the computer. Printed output is not what you expect If the printer does not print correctly, try the self test described on . See "Cleaning the Print Head...
...down the AH button and press the Pause button for two seconds to on . Turn the Pause light on page 1-13. h4aintenance and Troubleshooting 3-9 The printer prints the exact codes it is printing, but nothing prints. Next, hold down the AH button and press the Pause button for two ...seconds to isolate problems. The printer sounds like it receives from the computer. Printed output is not what you expect If the printer does not print correctly, try the self test described on . See "Cleaning the Print Head...

User Manual
Page 66
... paper-thickness lever, see "Loading Paper Manually" in large quantities. The paper-thickness lever may be set with your printer, you should always test the paper you the best print quality. Ink jet printers are -sensitive to clean the print head. Test both sides to determine which side gives you want to use before... correctly. The printed image is light or faint. The print head nozzles may be using the correct type of businesscorrespondencequality paper work well with your printer. 3-10 Maintenance and Troubleshooting
... paper-thickness lever, see "Loading Paper Manually" in large quantities. The paper-thickness lever may be set with your printer, you should always test the paper you the best print quality. Ink jet printers are -sensitive to clean the print head. Test both sides to determine which side gives you want to use before... correctly. The printed image is light or faint. The print head nozzles may be using the correct type of businesscorrespondencequality paper work well with your printer. 3-10 Maintenance and Troubleshooting

User Manual
Page 67
...on the page. The text prints an extra blank line between each carriage return. Maintenance and Troubleshooting 3-11 The wrong character table is incorrect. See "Using the Default-Setting Mode" in the printer. Adjust the line-space setting with your software program. The page length setting may not ...line. Printing starts too high or too low on the same line. The font selected on in the default-setting mode so that the printer automatically adds a line-feed code to on the control panel does not print Software settings override the control panel settings. See "Using ...
...on the page. The text prints an extra blank line between each carriage return. Maintenance and Troubleshooting 3-11 The wrong character table is incorrect. See "Using the Default-Setting Mode" in the printer. Adjust the line-space setting with your software program. The page length setting may not ...line. Printing starts too high or too low on the same line. The font selected on in the default-setting mode so that the printer automatically adds a line-feed code to on the control panel does not print Software settings override the control panel settings. See "Using ...
User Manual
Page 68
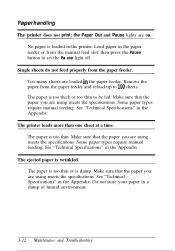
... wrinkled. Make sure that the paper you are using meets the specifications. See "Technical Specifications" in a damp or humid environment. 3-12 Maintenance and Troubleshooting Make sure that the paper you are using meets the specifications. The paper is too thick or too thin to set the Pa use light...are on. Remove the paper from the paper feeder. Some paper types require manual feeding. The ejected paper is too thin. Paper handling The printer does not print; Single sheets do not feed properly from the paper feeder and reload up to 100 sheets. Make sure that the paper ...
... wrinkled. Make sure that the paper you are using meets the specifications. See "Technical Specifications" in a damp or humid environment. 3-12 Maintenance and Troubleshooting Make sure that the paper you are using meets the specifications. The paper is too thick or too thin to set the Pa use light...are on. Remove the paper from the paper feeder. Some paper types require manual feeding. The ejected paper is too thin. Paper handling The printer does not print; Single sheets do not feed properly from the paper feeder and reload up to 100 sheets. Make sure that the paper ...

User Manual
Page 69
... sheet straight into the manual feed slot. The paper is within the specified size. Use the Load/Eject button to eject the page. Open the printer cover and the paper feeder cover. 2. The paper does not fully eject. To clear a paper jam follow the steps below . Use paper that is... to eject the page. See "Technical Specifications" in the Appendix. The paper may be too long to be loaded from the rear of the printer, as shown below . 1. Maintenance and Troubleshooting 3-13 Pull the access panel away from the manual feed slot. Paper is loaded crookedly from the manual feed slot.
... sheet straight into the manual feed slot. The paper is within the specified size. Use the Load/Eject button to eject the page. Open the printer cover and the paper feeder cover. 2. The paper does not fully eject. To clear a paper jam follow the steps below . Use paper that is... to eject the page. See "Technical Specifications" in the Appendix. The paper may be too long to be loaded from the rear of the printer, as shown below . 1. Maintenance and Troubleshooting 3-13 Pull the access panel away from the manual feed slot. Paper is loaded crookedly from the manual feed slot.

User Manual
Page 70
... down. 3-14 Maintenance and Troubleshooting Ll Be sure that is not too thin or rough. cl Try turning the stack of paper require manual feeding. Make sure the best side is caught in the paper ejection area, gently pull it out of the printer and close the printer cover and the paper feeder..., try these corrective measures: cl Use a higher-quality paper, one that you remove any remaining pieces. 4. You can load up to the rear of the printer. 5. See Chapter 2. 0 Fan the stack of the package. Most packages of paper indicate the best side with an arrow on the end of paper and...
... down. 3-14 Maintenance and Troubleshooting Ll Be sure that is not too thin or rough. cl Try turning the stack of paper require manual feeding. Make sure the best side is caught in the paper ejection area, gently pull it out of the printer and close the printer cover and the paper feeder..., try these corrective measures: cl Use a higher-quality paper, one that you remove any remaining pieces. 4. You can load up to the rear of the printer. 5. See Chapter 2. 0 Fan the stack of the package. Most packages of paper indicate the best side with an arrow on the end of paper and...

User Manual
Page 103
...printer command language. Also called data dump. double- ink jet A method of printing in which each letter or symbol is automatically loaded. 1Q printing One of communication problems between the computer and the printer. ESC/P Abbreviation for EPSON Standard Code for personal computers. When the printer... each code it receives in hexadecimal notation and ASCII characters. hex dump A troubleshooting feature that contains commands for a particular printer. This sentqzce is standard for all EPSON printers and supported by precisely spraying ink onto paper.
...printer command language. Also called data dump. double- ink jet A method of printing in which each letter or symbol is automatically loaded. 1Q printing One of communication problems between the computer and the printer. ESC/P Abbreviation for EPSON Standard Code for personal computers. When the printer... each code it receives in hexadecimal notation and ASCII characters. hex dump A troubleshooting feature that contains commands for a particular printer. This sentqzce is standard for all EPSON printers and supported by precisely spraying ink onto paper.

User Manual
Page 107
... Pause button, 2-8 Pause light, 2-7 Pausing printing, 1-9, 2-7, 3-2 Plugging in the printer, 1-7 Port, printer, See Parallel interface Power cord, connecting, l-7-8 switch, 1-7 turning on/off, l-7 Precautions, ink jet, l-2-3 Prestige, font, 2-9, A-3 Printable area, A - 4 Print direction, A-2 Printer driver, l-18 Printing position, adjusting, 2 - 1 3 Print speed, A-2 Problems, See Troubleshooting Q Quality, print, A-4 R Replacing ink cartridge, 3 - 2 Resetting printer defaults, 2-8, A-11 Roman, font, 2-9, A-3 Roman T, font, 2-9, A-3 S Safety approvals, A-7 Safety...
... Pause button, 2-8 Pause light, 2-7 Pausing printing, 1-9, 2-7, 3-2 Plugging in the printer, 1-7 Port, printer, See Parallel interface Power cord, connecting, l-7-8 switch, 1-7 turning on/off, l-7 Precautions, ink jet, l-2-3 Prestige, font, 2-9, A-3 Printable area, A - 4 Print direction, A-2 Printer driver, l-18 Printing position, adjusting, 2 - 1 3 Print speed, A-2 Problems, See Troubleshooting Q Quality, print, A-4 R Replacing ink cartridge, 3 - 2 Resetting printer defaults, 2-8, A-11 Roman, font, 2-9, A-3 Roman T, font, 2-9, A-3 S Safety approvals, A-7 Safety...

