
Basics Guide
Page 4
... Document 63 Scanning to Your Computer 63 Scanning to a Memory Card 66 Backing Up Your Photos 67 Maintaining Your RX580 69 Checking the Print Head Nozzles 69 Cleaning the Print Head 70 Replacing Ink Cartridges 71 Aligning the Print Head 77 Solving Problems 78 Error Messages 78 Problems and Solutions 79 Where To Get Help 82 Notices 83 Index...
... Document 63 Scanning to Your Computer 63 Scanning to a Memory Card 66 Backing Up Your Photos 67 Maintaining Your RX580 69 Checking the Print Head Nozzles 69 Cleaning the Print Head 70 Replacing Ink Cartridges 71 Aligning the Print Head 77 Solving Problems 78 Error Messages 78 Problems and Solutions 79 Where To Get Help 82 Notices 83 Index...
Basics Guide
Page 69
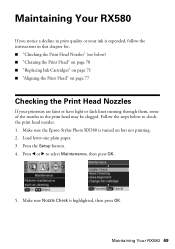
... the Print Head" on but not printing. 2. Press the Setup button. 4. Maintaining Your RX580 69 Make sure Nozzle Check is turned on page 77 Checking the Print Head Nozzles If your ink is expended, follow the instructions in this chapter for: ■ "Checking the Print Head Nozzles" (see below to select Maintenance, then press OK. 5. Make sure the Epson Stylus Photo RX580...
... the Print Head" on but not printing. 2. Press the Setup button. 4. Maintaining Your RX580 69 Make sure Nozzle Check is turned on page 77 Checking the Print Head Nozzles If your ink is expended, follow the instructions in this chapter for: ■ "Checking the Print Head Nozzles" (see below to select Maintenance, then press OK. 5. Make sure the Epson Stylus Photo RX580...
Basics Guide
Page 70
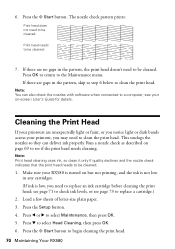
... faint, or you notice light or dark bands across your printouts are gaps in any cartridges. (If ink is low, you may need to begin cleaning the print head. 70 Maintaining Your RX580 Press l or r to clean the print head. Press the Setup button. 4. Run a nozzle check as described on -screen User's Guide for details.
... faint, or you notice light or dark bands across your printouts are gaps in any cartridges. (If ink is low, you may need to begin cleaning the print head. 70 Maintaining Your RX580 Press l or r to clean the print head. Press the Setup button. 4. Run a nozzle check as described on -screen User's Guide for details.
Basics Guide
Page 71
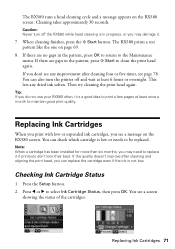
... gaps in the pattern, press OK to return to select Ink Cartridge Status, then press OK. Checking Ink Cartridge Status 1. The RX580 runs a head cleaning cycle and a message appears on the RX580 screen. Then try cleaning the print head again. Press l or r to the Maintenance menu. If there are no gaps in the pattern, press x Start to...
... gaps in the pattern, press OK to return to select Ink Cartridge Status, then press OK. Checking Ink Cartridge Status 1. The RX580 runs a head cleaning cycle and a message appears on the RX580 screen. Then try cleaning the print head again. Press l or r to the Maintenance menu. If there are no gaps in the pattern, press x Start to...
Basics Guide
Page 76
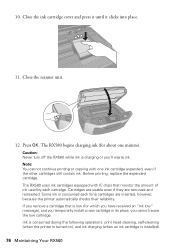
... message), and you temporarily install a new cartridge in its place, you cannot reuse the low cartridge. Caution: Never turn off the RX580 while ink is low (for about one ink cartridge expended, even if the other cartridges still contain ink. Close the ink cartridge cover...inserted, however, because the printer automatically checks their reliability. If you 'll waste ink. Ink is consumed during the following operations: print head cleaning, self-cleaning (when the printer is turned on), and ink charging (when an ink cartridge is consumed each cartridge. Some ink is installed). 76...
... message), and you temporarily install a new cartridge in its place, you cannot reuse the low cartridge. Caution: Never turn off the RX580 while ink is low (for about one ink cartridge expended, even if the other cartridges still contain ink. Close the ink cartridge cover...inserted, however, because the printer automatically checks their reliability. If you 'll waste ink. Ink is consumed during the following operations: print head cleaning, self-cleaning (when the printer is turned on), and ink charging (when an ink cartridge is consumed each cartridge. Some ink is installed). 76...
Basics Guide
Page 79
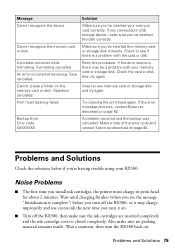
...note of the error code and contact Epson as described on page 82. Noise Problems ■ The first time you 've inserted the disk correctly. Cannot recognize the memory card or disk. Retry the procedure. Try cleaning the print head again. Wait until charging finishes (...formatting. Save cancelled. Print head cleaning failed. Message Cannot recognize the device. Formatting cancelled. If you connected a USB storage device, make sure you install ink cartridges, the printer must charge its print head for about 2 minutes. Make sure you 're having trouble using your RX580. If the error ...
...note of the error code and contact Epson as described on page 82. Noise Problems ■ The first time you 've inserted the disk correctly. Cannot recognize the memory card or disk. Retry the procedure. Try cleaning the print head again. Wait until charging finishes (...formatting. Save cancelled. Print head cleaning failed. Message Cannot recognize the device. Formatting cancelled. If you connected a USB storage device, make sure you install ink cartridges, the printer must charge its print head for about 2 minutes. Make sure you 're having trouble using your RX580. If the error ...

Basics Guide
Page 81
...flat against the document table glass and the RX580 is cut off, try turning off the Fit Frame setting. Don't spray glass cleaner directly on the glass. ■ Make sure your paper size and layout settings are printed. ■ For the best print quality, use a small amount of glass ...; If you notice jagged vertical lines, you are not recommended), or use Epson special paper (see page 62) and genuine Epson ink cartridges (see page 71 for instructions. ■ The ink cartridges may need to clean the print head. see page 72). ■ Set the tray lever to the paper position...
...flat against the document table glass and the RX580 is cut off, try turning off the Fit Frame setting. Don't spray glass cleaner directly on the glass. ■ Make sure your paper size and layout settings are printed. ■ For the best print quality, use a small amount of glass ...; If you notice jagged vertical lines, you are not recommended), or use Epson special paper (see page 62) and genuine Epson ink cartridges (see page 71 for instructions. ■ The ink cartridges may need to clean the print head. see page 72). ■ Set the tray lever to the paper position...
Basics Guide
Page 84
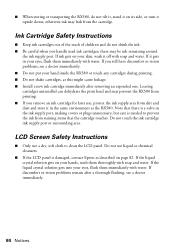
... dehydrate the print head and may prevent the RX580 from printing. ■ If you remove an ink cartridge for later use, protect the ink supply area from staining items that the cartridge touches. Note that there is a valve in the ink supply port, making covers or plugs unnecessary, but care is damaged, contact Epson as... remain after removing an expended one. LCD Screen Safety Instructions ■ Only use liquid or chemical cleansers. ■ If the LCD panel is needed to clean the LCD panel.
... dehydrate the print head and may prevent the RX580 from printing. ■ If you remove an ink cartridge for later use, protect the ink supply area from staining items that the cartridge touches. Note that there is a valve in the ink supply port, making covers or plugs unnecessary, but care is damaged, contact Epson as... remain after removing an expended one. LCD Screen Safety Instructions ■ Only use liquid or chemical cleansers. ■ If the LCD panel is needed to clean the LCD panel.
Basics Guide
Page 89
...drive, backing up photos, 67 to 68 CDs adjusting print density, 35 adjusting print position, 50 to 51 copying, 51 to 53 inserting, 46 to 48 jewel case insert, 55 measuring, 45 to 46 printing on, 45 to 51 Cleaning print head, 70 to 71 Color management, turning off, 58, 60 Color restoration, 18 to ...19, 63 ColorSync, 60 Contrast, 35 Control panel, 6 Copy button, 6 Copying documents, 14 layout settings, 16 on CDs/DVDs, 51 to 53 photos, 15 to 17 placing ...
...drive, backing up photos, 67 to 68 CDs adjusting print density, 35 adjusting print position, 50 to 51 copying, 51 to 53 inserting, 46 to 48 jewel case insert, 55 measuring, 45 to 46 printing on, 45 to 51 Cleaning print head, 70 to 71 Color management, turning off, 58, 60 Color restoration, 18 to ...19, 63 ColorSync, 60 Contrast, 35 Control panel, 6 Copy button, 6 Copying documents, 14 layout settings, 16 on CDs/DVDs, 51 to 53 photos, 15 to 17 placing ...

Basics Guide
Page 91
... Card button, 6, 24 Messages, error, 78 to 79 Mobile phone, printing from, 41 to 44 Mode button, 6 Modes, scanning, 63 N Noise problems, 79 Nozzle check, 69 to 70 O Originals, placing on glass, 12 to 13, 52 P Paper Epson, 10, 28 feeding problems, 80 loading, 7 to 9 special types,...printing all, 26 printing by date, 27 restoring color, 18 to 19 scanning, 63 to 66 sizing, 17, 36 to 37 storing, 11 viewing, 24 viewing and printing, 25 PictBridge, 41 Premium photo papers, 10 Print head aligning, 77 cleaning, 70 to 71 Print quality problems, 81 Print settings, 28 to 30, 34 to 35 Printing all photos...
... Card button, 6, 24 Messages, error, 78 to 79 Mobile phone, printing from, 41 to 44 Mode button, 6 Modes, scanning, 63 N Noise problems, 79 Nozzle check, 69 to 70 O Originals, placing on glass, 12 to 13, 52 P Paper Epson, 10, 28 feeding problems, 80 loading, 7 to 9 special types,...printing all, 26 printing by date, 27 restoring color, 18 to 19 scanning, 63 to 66 sizing, 17, 36 to 37 storing, 11 viewing, 24 viewing and printing, 25 PictBridge, 41 Premium photo papers, 10 Print head aligning, 77 cleaning, 70 to 71 Print quality problems, 81 Print settings, 28 to 30, 34 to 35 Printing all photos...
Product Information Guide
Page 11
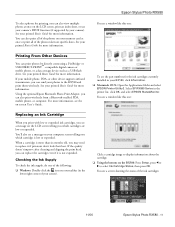
... cartridges: 11/06 Epson Stylus Photo RX580 - 11 See your camera). You can also print wirelessly from a Bluetooth-enabled PDA, mobile phone, or computer. Select SP RX580 Series in the printer list, click OK, and select EPSON StatusMonitor. If the quality doesn't improve after cleaning and aligning the print head, you can also print all of the photos on your memory card...
... cartridges: 11/06 Epson Stylus Photo RX580 - 11 See your camera). You can also print wirelessly from a Bluetooth-enabled PDA, mobile phone, or computer. Select SP RX580 Series in the printer list, click OK, and select EPSON StatusMonitor. If the quality doesn't improve after cleaning and aligning the print head, you can also print all of the photos on your memory card...
Product Information Guide
Page 12
... IC chip can damage the ink cartridge. the label identifying the color should be on your eyes, flush them . Before printing, replace the expended cartridge. If it . 12 - Then press...ink cartridge or its surrounding area. This RX580 uses ink cartridges equipped with one of the following operations: print head cleaning, self-cleaning (performed when the RX580 is turned on), and ink charging (... not open the cartridge cover while the print head is closed, then lift up to your RX580 not covered by hand. 5. Epson Stylus Photo RX580 When you remove an ink cartridge temporarily,...
... IC chip can damage the ink cartridge. the label identifying the color should be on your eyes, flush them . Before printing, replace the expended cartridge. If it . 12 - Then press...ink cartridge or its surrounding area. This RX580 uses ink cartridges equipped with one of the following operations: print head cleaning, self-cleaning (performed when the RX580 is turned on), and ink charging (... not open the cartridge cover while the print head is closed, then lift up to your RX580 not covered by hand. 5. Epson Stylus Photo RX580 When you remove an ink cartridge temporarily,...

Product Information Guide
Page 14
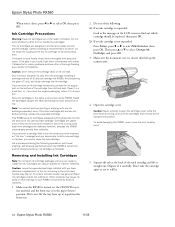
... colors are faint, follow the steps in the paper (lower) position. Press the Setup button. 3. Please wait" appears on the LCD screen. Please wait" appears on the LCD screen. Epson Stylus Photo RX580 12. After about one minute, the message "Ink cartridge replacement is turned on the right. Note: Print head cleaning uses ink, so clean the print head only when print...
... colors are faint, follow the steps in the paper (lower) position. Press the Setup button. 3. Please wait" appears on the LCD screen. Please wait" appears on the LCD screen. Epson Stylus Photo RX580 12. After about one minute, the message "Ink cartridge replacement is turned on the right. Note: Print head cleaning uses ink, so clean the print head only when print...

Product Information Guide
Page 15
... gaps or lines (as shown below ), press OK to return to clean the print head again. Otherwise, ink may also see any improvement after cleaning four times, turn it is in the RX580, then press the x Start button. If you need to clean the print head. Epson Stylus Photo RX580 6. This allows any memory cards installed in your printouts if your selections...
... gaps or lines (as shown below ), press OK to return to clean the print head again. Otherwise, ink may also see any improvement after cleaning four times, turn it is in the RX580, then press the x Start button. If you need to clean the print head. Epson Stylus Photo RX580 6. This allows any memory cards installed in your printouts if your selections...
Product Information Guide
Page 16
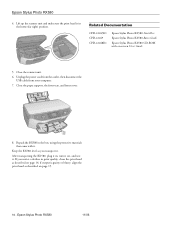
... your computer. 7. Epson Stylus Photo RX580 11/06 Repack the RX580 in print quality, clean the print head as described on -screen User's Guide 5. After transporting the RX580, plug it in the home (far right) position. Close the paper support, the front tray, and front cover. 8. Related Documentation CPD-22267R1 CPD-22269 CPD-22268R1 Epson Stylus Photo RX580 Start Here Epson Stylus Photo RX580 Basics Guide Epson Stylus Photo RX580 CD-ROM...
... your computer. 7. Epson Stylus Photo RX580 11/06 Repack the RX580 in print quality, clean the print head as described on -screen User's Guide 5. After transporting the RX580, plug it in the home (far right) position. Close the paper support, the front tray, and front cover. 8. Related Documentation CPD-22267R1 CPD-22269 CPD-22268R1 Epson Stylus Photo RX580 Start Here Epson Stylus Photo RX580 Basics Guide Epson Stylus Photo RX580 CD-ROM...


