

Installation Guide - ELPMBUNI Universal Mount Assembly
Page 3
... so may result in damage to the projector and/or damage to the projector and could increase the risk of fire. Do not install near heater, fireplace, direct sunlight, air conditioning or any questions - (800) 368-9700. Installation Manual THE INSTALLATION INSTRUCTIONS MUST BE READ TO PREVENT... studs, use suitable hardware (which is to installation. When mounting to a ceiling that is to vibration, movement or chance of the projector. Do not install on a structure that contains wooden studs, dead center of direct heat energy. At least two qualified people should perform...
... so may result in damage to the projector and/or damage to the projector and could increase the risk of fire. Do not install near heater, fireplace, direct sunlight, air conditioning or any questions - (800) 368-9700. Installation Manual THE INSTALLATION INSTRUCTIONS MUST BE READ TO PREVENT... studs, use suitable hardware (which is to installation. When mounting to a ceiling that is to vibration, movement or chance of the projector. Do not install on a structure that contains wooden studs, dead center of direct heat energy. At least two qualified people should perform...

Installation Guide - ELPMBUNI Universal Mount Assembly
Page 4
... Level (Supplied) Stud Finder (Commercially Available) M5 Allen Wrench NOTE: Mounting screws will vary by projector. Please see the following hardware is included in the hardware pack but is shipped with the M3 x 16 Phillips screws. Installation Manual Page - 5 - Upper Assembly (Qty 1) Mounting Bracket (Qty 1) Plastic Barrel Caps (Qty 4) M3 Flat Washers...
... Level (Supplied) Stud Finder (Commercially Available) M5 Allen Wrench NOTE: Mounting screws will vary by projector. Please see the following hardware is included in the hardware pack but is shipped with the M3 x 16 Phillips screws. Installation Manual Page - 5 - Upper Assembly (Qty 1) Mounting Bracket (Qty 1) Plastic Barrel Caps (Qty 4) M3 Flat Washers...

Installation Guide - ELPMBUNI Universal Mount Assembly
Page 5
ELPMBUNI A NOTE: The four (2-piece) leg assemblies can be used as single leg or any combination C of your projector for filter and lamp access. K M J L J L Installation Manual ELPMBUNI Universal Mount Assembly A Single Wooden Stud Mounting Points B Solid Structure Mounting Points C Ceiling Plate D Allen Wrench E Height Adjustment Screws F Tension Knobs G Safety Knob H Security ...
ELPMBUNI A NOTE: The four (2-piece) leg assemblies can be used as single leg or any combination C of your projector for filter and lamp access. K M J L J L Installation Manual ELPMBUNI Universal Mount Assembly A Single Wooden Stud Mounting Points B Solid Structure Mounting Points C Ceiling Plate D Allen Wrench E Height Adjustment Screws F Tension Knobs G Safety Knob H Security ...

Installation Guide - ELPMBUNI Universal Mount Assembly
Page 6
... to these recommendations during your final image on a smooth flat surface. 2. Mounting Points Inverted Projector Blanket, soft cloth etc Figure 1 Flat surface Installation Manual Page - 7 - Failure to do so could result in thread size (Figure 1). CAUTION: THE PROJECTOR IS FRAGILE; Here you will enhance the quality of mounting points and screw thread (pitch...
... to these recommendations during your final image on a smooth flat surface. 2. Mounting Points Inverted Projector Blanket, soft cloth etc Figure 1 Flat surface Installation Manual Page - 7 - Failure to do so could result in thread size (Figure 1). CAUTION: THE PROJECTOR IS FRAGILE; Here you will enhance the quality of mounting points and screw thread (pitch...

Installation Guide - ELPMBUNI Universal Mount Assembly
Page 7
Installation Manual Figure 2 Tri-Lock Opening Rotate 180° To Unlock Tension Knobs Upper Assembly Safety Knob Figure 3 Figure 4 Page - 8 - ELPMBUNI 4. Separate the upper assembly from the projector mounting bracket by slightly loosening the two tension knurl knobs to be rotated 180° apart and separate. Next loosen the safety screw knurl knob far enough to allow the two parts to create free play between the bracket tri-lock assembly and the upper section tri-lock assembly points. 5.
Installation Manual Figure 2 Tri-Lock Opening Rotate 180° To Unlock Tension Knobs Upper Assembly Safety Knob Figure 3 Figure 4 Page - 8 - ELPMBUNI 4. Separate the upper assembly from the projector mounting bracket by slightly loosening the two tension knurl knobs to be rotated 180° apart and separate. Next loosen the safety screw knurl knob far enough to allow the two parts to create free play between the bracket tri-lock assembly and the upper section tri-lock assembly points. 5.

Installation Guide - ELPMBUNI Universal Mount Assembly
Page 8
... with the M3 flat washers (supplied). FIGURE 6 Two-Piece Leg FIGURE 7 One-Piece Leg Allen Wrench Mounting Hardware Inverted Projector Leveling Barrels FIGURE A Installation Manual Figure 5 Line up the leveling barrels to the projector. 1. You may also reduce the two-piece leg to a one-piece leg as shown. Use the M3 x 16 Phillips...
... with the M3 flat washers (supplied). FIGURE 6 Two-Piece Leg FIGURE 7 One-Piece Leg Allen Wrench Mounting Hardware Inverted Projector Leveling Barrels FIGURE A Installation Manual Figure 5 Line up the leveling barrels to the projector. 1. You may also reduce the two-piece leg to a one-piece leg as shown. Use the M3 x 16 Phillips...

Installation Guide - ELPMBUNI Universal Mount Assembly
Page 9
PowerLite 830p, 835p Hardware: M4 x 12mm (Qty 4) Installation Manual PowerLite S3, S4, 62C, 76C, 82C, Hardware: M4 x 12mm (Qty 3) Page - 10 - ELPMBUNI NOTE: If your projector model is not shown, when arranging the leg combination, simply ensure access to filters and lamp housings when aligning brackets. This mount works with all sub-25 pound projectors.
PowerLite 830p, 835p Hardware: M4 x 12mm (Qty 4) Installation Manual PowerLite S3, S4, 62C, 76C, 82C, Hardware: M4 x 12mm (Qty 3) Page - 10 - ELPMBUNI NOTE: If your projector model is not shown, when arranging the leg combination, simply ensure access to filters and lamp housings when aligning brackets. This mount works with all sub-25 pound projectors.

Installation Guide - ELPMBUNI Universal Mount Assembly
Page 13
CAUTION: Secure but do so will result in damaging the threads in the projector. Failure to do not over-tighten the mounting hardware. Allen Wrench Level Inverted Projector DOWN UP Adjusting the Mount Figure 8 Leveling Barrels Page - 14 - Installation Manual When the position desired is achieved tighten the mounting hardware to level the mounting...
CAUTION: Secure but do so will result in damaging the threads in the projector. Failure to do not over-tighten the mounting hardware. Allen Wrench Level Inverted Projector DOWN UP Adjusting the Mount Figure 8 Leveling Barrels Page - 14 - Installation Manual When the position desired is achieved tighten the mounting hardware to level the mounting...

Installation Guide - ELPMBUNI Universal Mount Assembly
Page 14
...recommended from the center of the mounting bracket to the front edge of the lens to a point centered horizontally on your screen and projector, make sure the mounting location will safely support the weight of the screen for best picture ratio. 2. Secure the ceiling assembly ... the lens as well. 4. Before you mount your installation environment (Figure 9). Ceiling Structure Ceiling Wood Stud Wood Screws Upper Assembly Installation Manual Knurl Knobs (3ea) Figure 9 Secure the ceiling mount to parallel with other (commercially available) hardware depending on the screen and no...
...recommended from the center of the mounting bracket to the front edge of the lens to a point centered horizontally on your screen and projector, make sure the mounting location will safely support the weight of the screen for best picture ratio. 2. Secure the ceiling assembly ... the lens as well. 4. Before you mount your installation environment (Figure 9). Ceiling Structure Ceiling Wood Stud Wood Screws Upper Assembly Installation Manual Knurl Knobs (3ea) Figure 9 Secure the ceiling mount to parallel with other (commercially available) hardware depending on the screen and no...

Installation Guide - ELPMBUNI Universal Mount Assembly
Page 17
...° Universal Mount Page - 18 - Safety Knurl Knob Tension Knurl Knobs Figure 13 Tri-Lock Opening Alignment Slot Projector Mount Installation Manual ELPMBUNI Securing the Projector to the upper assembly. Make sure the three-knurl knobs are loosened to fully expose to prevent further rotation of the bracket in the upper ...
...° Universal Mount Page - 18 - Safety Knurl Knob Tension Knurl Knobs Figure 13 Tri-Lock Opening Alignment Slot Projector Mount Installation Manual ELPMBUNI Securing the Projector to the upper assembly. Make sure the three-knurl knobs are loosened to fully expose to prevent further rotation of the bracket in the upper ...

Installation Guide - ELPMBUNI Universal Mount Assembly
Page 18
... height, tilt, and roll and yaw to optimize the projected image. 2. If roll adjustment is achieved tighten the two screws. 4. With the projector secured in the mount and power on the screen, slightly loosen the front and rear M8 screws and adjust to the screen and firmly tighten... roll adjustment screws (Figure 16). ELPMBUNI Final Adjustments 1. Wood Stud Ceiling Allen Wrench Height Adjustable Screws (Roll) Adjusting Screws Allen Wrench Installation Manual Figure 14 Figure 15 Wood Stud Ceiling Tilt Adjusting Screws Allen Wrench Wood Stud Ceiling Figure 16 Page - 19 -
... height, tilt, and roll and yaw to optimize the projected image. 2. If roll adjustment is achieved tighten the two screws. 4. With the projector secured in the mount and power on the screen, slightly loosen the front and rear M8 screws and adjust to the screen and firmly tighten... roll adjustment screws (Figure 16). ELPMBUNI Final Adjustments 1. Wood Stud Ceiling Allen Wrench Height Adjustable Screws (Roll) Adjusting Screws Allen Wrench Installation Manual Figure 14 Figure 15 Wood Stud Ceiling Tilt Adjusting Screws Allen Wrench Wood Stud Ceiling Figure 16 Page - 19 -
Product Information Guide
Page 5
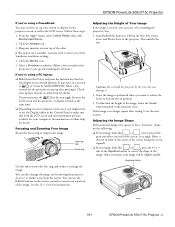
..., you toggle between the LCD screen and the projector, or display on top of the Simulscan resolution settings: 1. Move it by extending the projector's feet. 1. After correction, your image looks like or , press the + or - EPSON PowerLite 505c/715c Projector If you're using a PC laptop: ❏... these steps: 1. You can raise it directly in position. 3. Stand behind the projector. Allow a few seconds for details. See your laptop's manual or online help for the projector to the projector's feet. side of the Keystone button to set up after pressing it. On most...
..., you toggle between the LCD screen and the projector, or display on top of the Simulscan resolution settings: 1. Move it by extending the projector's feet. 1. After correction, your image looks like or , press the + or - EPSON PowerLite 505c/715c Projector If you're using a PC laptop: ❏... these steps: 1. You can raise it directly in position. 3. Stand behind the projector. Allow a few seconds for details. See your laptop's manual or online help for the projector to the projector's feet. side of the Keystone button to set up after pressing it. On most...
Product Information Guide
Page 11
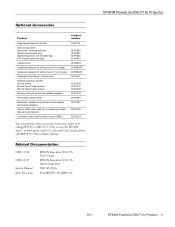
...Replacement lamp and air filter Soft carrying cases: Samsonite® wheeled soft case Slimline soft shoulder bag Notebook/projector soft shoulder bag ATA molded hard shell case Ceiling mount Suspension adapter for ceiling mount (1-inch pipe) ...cable (for dealer referral. Related Documentation CPD-11736 CPD-11737 Service Manual Parts Price Lists EPSON PowerLite 505c/715c User's Guide EPSON PowerLite 505c/715c Quick Setup sheet TM-505c/715c PL-EMP505c, PL-EMP715c EPSON PowerLite 505c/715c Projector 1/01 EPSON PowerLite 505c/715c Projector - 11 sales only). In Canada, please call (800) 873...
...Replacement lamp and air filter Soft carrying cases: Samsonite® wheeled soft case Slimline soft shoulder bag Notebook/projector soft shoulder bag ATA molded hard shell case Ceiling mount Suspension adapter for ceiling mount (1-inch pipe) ...cable (for dealer referral. Related Documentation CPD-11736 CPD-11737 Service Manual Parts Price Lists EPSON PowerLite 505c/715c User's Guide EPSON PowerLite 505c/715c Quick Setup sheet TM-505c/715c PL-EMP505c, PL-EMP715c EPSON PowerLite 505c/715c Projector 1/01 EPSON PowerLite 505c/715c Projector - 11 sales only). In Canada, please call (800) 873...

User Manual
Page 5
CContents 1 2 Welcome 1 Getting the Most from Your Projector 2 Using Your Documentation 3 Reading This Manual Online 3 Getting More Information 4 Registration and Warranty 5 Unpacking the Projector 6 Additional Components 7 Optional Accessories 8 Setting Up the Projector 9 Positioning the Projector 10 Connecting to a Laptop Computer 12 Connecting the Computer Cable 12 Connecting ... AV Cable 16 Connecting S-Video 17 Connecting Component Video Cables 18 Using the Projector 19 Turning On Your Equipment 20 Turning On the Projector 20 What To Do If You See a Blank Screen 22 iii
CContents 1 2 Welcome 1 Getting the Most from Your Projector 2 Using Your Documentation 3 Reading This Manual Online 3 Getting More Information 4 Registration and Warranty 5 Unpacking the Projector 6 Additional Components 7 Optional Accessories 8 Setting Up the Projector 9 Positioning the Projector 10 Connecting to a Laptop Computer 12 Connecting the Computer Cable 12 Connecting ... AV Cable 16 Connecting S-Video 17 Connecting Component Video Cables 18 Using the Projector 19 Turning On Your Equipment 20 Turning On the Projector 20 What To Do If You See a Blank Screen 22 iii
User Manual
Page 7
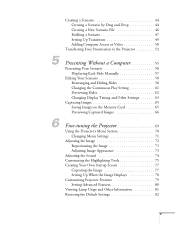
... 46 Building a Scenario 47 Setting Up Transitions 49 Adding Computer Access or Video 50 Transferring Your Presentation to the Projector 52 Presenting Without a Computer 55 Presenting Your Scenario 56 Displaying Each Slide Manually 57 Editing Your Scenario 58 Rearranging and Hiding Slides 58 Changing the Continuous Play Setting 61 Previewing Slides 62...
... 46 Building a Scenario 47 Setting Up Transitions 49 Adding Computer Access or Video 50 Transferring Your Presentation to the Projector 52 Presenting Without a Computer 55 Presenting Your Scenario 56 Displaying Each Slide Manually 57 Editing Your Scenario 58 Rearranging and Hiding Slides 58 Changing the Continuous Play Setting 61 Previewing Slides 62...
User Manual
Page 12
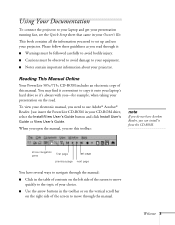
.... s Notes contain important information about your choice. Reading This Manual Online Your PowerLite 505c/715c CD-ROM includes an electronic copy of this toolbar: note If you need to use your projector. Just insert the PowerLite CD-ROM in your Owner's Kit. To view your electronic manual, you do not have several ways to navigate through...
.... s Notes contain important information about your choice. Reading This Manual Online Your PowerLite 505c/715c CD-ROM includes an electronic copy of this toolbar: note If you need to use your projector. Just insert the PowerLite CD-ROM in your Owner's Kit. To view your electronic manual, you do not have several ways to navigate through...

User Manual
Page 21
...Tighten the screws on page 111 (available from EPSON; Connect the other computer systems, see page 8). 3. See your computer manual for connecting to the projector's Computer port. note To connect to desktops and other end of the computer cable to your projector. 2. If you're using a PowerBook and...the computer cable to a video device on page 16. If you can connect the PowerLite projector to use the Macintosh desktop adapter as shown on the connectors. 12 Setting Up the Projector note Laptop configurations vary. Connecting the Computer Cable Before you may need to any ...
...Tighten the screws on page 111 (available from EPSON; Connect the other computer systems, see page 8). 3. See your computer manual for connecting to the projector's Computer port. note To connect to desktops and other end of the computer cable to your projector. 2. If you're using a PowerBook and...the computer cable to a video device on page 16. If you can connect the PowerLite projector to use the Macintosh desktop adapter as shown on the connectors. 12 Setting Up the Projector note Laptop configurations vary. Connecting the Computer Cable Before you may need to any ...
User Manual
Page 23
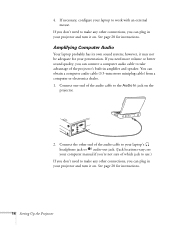
... the other connections, you can plug in your projector and turn it may not be adequate for your projector and turn it on . You can connect a computer audio cable to make any other connections, you can plug in amplifier and speaker. see your computer manual if you're not sure of which jack.... If you can obtain a computer audio cable (3.5-mm stereo miniplug cable) from a computer or electronics dealer. 1. See page 20 for instructions. 14 Setting Up the Projector Connect one end of the audio cable to your laptop to the Audio In jack on the...
... the other connections, you can plug in your projector and turn it may not be adequate for your projector and turn it on . You can connect a computer audio cable to make any other connections, you can plug in amplifier and speaker. see your computer manual if you're not sure of which jack.... If you can obtain a computer audio cable (3.5-mm stereo miniplug cable) from a computer or electronics dealer. 1. See page 20 for instructions. 14 Setting Up the Projector Connect one end of the audio cable to your laptop to the Audio In jack on the...
User Manual
Page 33
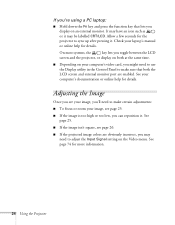
... it may need to use the Display utility in the Control Panel to make sure that lets you toggle between the LCD screen and the projector, or display on both the LCD screen and external monitor port are enabled. On most systems, the key lets you display on an external ... your image, you may be labelled CRT/LCD. See your laptop's manual or online help for details. Adjusting the Image Once you see page 26. Allow a few seconds for more information. 24 Using the Projector See page 74 for the projector to adjust the Input Signal setting on your image, see page 25...
... it may need to use the Display utility in the Control Panel to make sure that lets you toggle between the LCD screen and the projector, or display on both the LCD screen and external monitor port are enabled. On most systems, the key lets you display on an external ... your image, you may be labelled CRT/LCD. See your laptop's manual or online help for details. Adjusting the Image Once you see page 26. Allow a few seconds for more information. 24 Using the Projector See page 74 for the projector to adjust the Input Signal setting on your image, see page 25...

User Manual
Page 58
...Select All from a wide variety of time. The Cell Settings box appears: Click to change slides manually Click to change slides automatically Click to advance manually or automatically after a specified period of transition effects between slides or cells. 1. If you need ...to rearrange cells, you click. When you have finished adding slides and images to your slides to add transition effects Creating Presentations for instructions. See the next sections for Your Projector...
...Select All from a wide variety of time. The Cell Settings box appears: Click to change slides manually Click to change slides automatically Click to advance manually or automatically after a specified period of transition effects between slides or cells. 1. If you need ...to rearrange cells, you click. When you have finished adding slides and images to your slides to add transition effects Creating Presentations for instructions. See the next sections for Your Projector...


