
Technical Brief (Multimedia Projectors)
Page 1
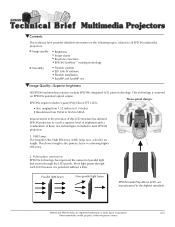
...LCD's: LL Size ranging from 1.32 inches to 0.9 inches Resolutions from SVGA to XGA to all EPSON multimedia projectors: Image quality M Brightness M Image clarity M Keystone correction M EPSON SizeWise™ resizing technology Versatility M Flexible controls M ELP Link IV software M Flexible installation M ...LCD because it is centered on the following topics, related to SXGA. This technology is polarized without a filter. Polarization conversion: EPSON's technology has improved the amount of their respective owners. UHE lamp: The long-life Ultra High Efficiency (UHE) lamp uses...
...LCD's: LL Size ranging from 1.32 inches to 0.9 inches Resolutions from SVGA to XGA to all EPSON multimedia projectors: Image quality M Brightness M Image clarity M Keystone correction M EPSON SizeWise™ resizing technology Versatility M Flexible controls M ELP Link IV software M Flexible installation M ...LCD because it is centered on the following topics, related to SXGA. This technology is polarized without a filter. Polarization conversion: EPSON's technology has improved the amount of their respective owners. UHE lamp: The long-life Ultra High Efficiency (UHE) lamp uses...
Technical Brief (Multimedia Projectors)
Page 2
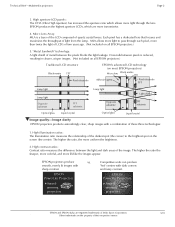
...increased the aperture ratio which are the property of two years ago. (Not included on all EPSON projectors.) TraTdraitdioitnioanlaLlCLDCDstsrturcutcutruere Black matrix TFT Pixel electrode EPS(OoNn 'msUaoHdsvtAaEnPLcCSeODdNLsCtprDurocjtteeuccrtheonros)logy Micro lens Black matrix ITO... between pixels is a layer of the LCD composed of the image. EPSON PowerLite Projectors EPSON Powerlite Projectors ➤ Awardwinning projectors ➤ Awardwinning projectors EPSON Sales Training EPSON and EPSON Stylus are registered trademarks of light from the lamp. MLA allows more ...
...increased the aperture ratio which are the property of two years ago. (Not included on all EPSON projectors.) TraTdraitdioitnioanlaLlCLDCDstsrturcutcutruere Black matrix TFT Pixel electrode EPS(OoNn 'msUaoHdsvtAaEnPLcCSeODdNLsCtprDurocjtteeuccrtheonros)logy Micro lens Black matrix ITO... between pixels is a layer of the LCD composed of the image. EPSON PowerLite Projectors EPSON Powerlite Projectors ➤ Awardwinning projectors ➤ Awardwinning projectors EPSON Sales Training EPSON and EPSON Stylus are registered trademarks of light from the lamp. MLA allows more ...
Technical Brief (Multimedia Projectors)
Page 3
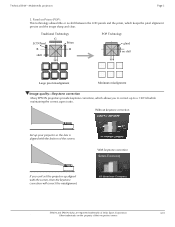
... LCD panels and the prism, which allows you can't set the projector up your projector so the lens is a lig n m e n t Image quality-Keystone correction Many EPSON projectors provide keystone correction, which keeps the pixel alignment precise and the image sharp and clear. T ra d itio n a l T e c h n o lo g y G L C D P anel P ris m R B s h ift P O P T e ... Set up aligned with the bottom of their respective owners. EPSON Sales Training EPSON and EPSON Stylus are registered trademarks of Seiko Epson Corporation. 3/01 Other trademarks are the property of the screen.
... LCD panels and the prism, which allows you can't set the projector up your projector so the lens is a lig n m e n t Image quality-Keystone correction Many EPSON projectors provide keystone correction, which keeps the pixel alignment precise and the image sharp and clear. T ra d itio n a l T e c h n o lo g y G L C D P anel P ris m R B s h ift P O P T e ... Set up aligned with the bottom of their respective owners. EPSON Sales Training EPSON and EPSON Stylus are registered trademarks of Seiko Epson Corporation. 3/01 Other trademarks are the property of the screen.
Technical Brief (Multimedia Projectors)
Page 4
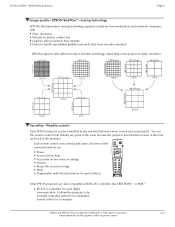
...resolutions from workstations and notebook computers with RS-232 controllers like CRESTRON™ or AMX™. Volume + L Most EPSON projectors are also compatible with : Clear, sharp text Virtually no picture content loss Graphics able to maintain their respective ...owners. It allows the projector to handle spreadsheet gridlines and small fonts from a dedicated remote control or a computer. EPSON Sales Training EPSON and EPSON Stylus are registered trademarks of Seiko Epson Corporation. 3/01 Other trademarks are : Freeze A/V Mute E-Zoom 3 Power R/C ON OFF 5 L LLL L LL...
...resolutions from workstations and notebook computers with RS-232 controllers like CRESTRON™ or AMX™. Volume + L Most EPSON projectors are also compatible with : Clear, sharp text Virtually no picture content loss Graphics able to maintain their respective ...owners. It allows the projector to handle spreadsheet gridlines and small fonts from a dedicated remote control or a computer. EPSON Sales Training EPSON and EPSON Stylus are registered trademarks of Seiko Epson Corporation. 3/01 Other trademarks are : Freeze A/V Mute E-Zoom 3 Power R/C ON OFF 5 L LLL L LL...

Technical Brief (Multimedia Projectors)
Page 5
...: Change projector settings Change the test pattern Specify an image gamma Create a user logo Versatility-Flexible installation EPSON PowerLite projectors can be installed in a variety of ways: Front projection Rear projection Ceiling mount Ceiling mount LL L L LLL Many...such as Xantech®. Technical Brief-Multimedia projectors Page 5 L L LL L LL Versatility-ELP Link IV software EPSON's ELP Link IV software, which customizes projector controls, comes standard or optional with EPSON projectors and allows you to: 1. Freeze A/V Mute E-Zoom 3 Power R/C ON OFF 1 5 Enter Esc Menu...
...: Change projector settings Change the test pattern Specify an image gamma Create a user logo Versatility-Flexible installation EPSON PowerLite projectors can be installed in a variety of ways: Front projection Rear projection Ceiling mount Ceiling mount LL L L LLL Many...such as Xantech®. Technical Brief-Multimedia projectors Page 5 L L LL L LL Versatility-ELP Link IV software EPSON's ELP Link IV software, which customizes projector controls, comes standard or optional with EPSON projectors and allows you to: 1. Freeze A/V Mute E-Zoom 3 Power R/C ON OFF 1 5 Enter Esc Menu...
Technical Brief (Multimedia Projectors)
Page 6
...-EasyMP and EasyMP.net EasyMP and EasyMP.net are the property of their respective owners. T w o h u b s 2 . LL L EPSON Sales Training EPSON and EPSON Stylus are registered trademarks of Seiko Epson Corporation. 3/01 Other trademarks are available on the EPSON PowerLite 8150i) allows presenters to download presentations and control the projector over a network. EasyMP.net offers presenters the...
...-EasyMP and EasyMP.net EasyMP and EasyMP.net are the property of their respective owners. T w o h u b s 2 . LL L EPSON Sales Training EPSON and EPSON Stylus are registered trademarks of Seiko Epson Corporation. 3/01 Other trademarks are available on the EPSON PowerLite 8150i) allows presenters to download presentations and control the projector over a network. EasyMP.net offers presenters the...

Installation Guide - ELPMBUNI Universal Mount Assembly
Page 2
Contact Premier Mounts In the event of missing and/or damage equipment, or technical questions, the following information can help in damage to the Upper Assembly ...- 18 Final Adjustments ...- 19 Installing the Plastic Caps...- 20 - Customer Service - (800) 368-9700 Technical Support - Premier Mounts is not liable for improper installation that results in the completion of Contents Warranty ...- 3 Contact Premier Mounts ...- 3 Warning Statements ...- 4 Parts List ...- 5 Installation Tools ...- 5 ELPMBUNI Universal Mount Assembly ...- 6 Projector Preparation ...- 7 Securing the Bracket ...
Contact Premier Mounts In the event of missing and/or damage equipment, or technical questions, the following information can help in damage to the Upper Assembly ...- 18 Final Adjustments ...- 19 Installing the Plastic Caps...- 20 - Customer Service - (800) 368-9700 Technical Support - Premier Mounts is not liable for improper installation that results in the completion of Contents Warranty ...- 3 Contact Premier Mounts ...- 3 Warning Statements ...- 4 Parts List ...- 5 Installation Tools ...- 5 ELPMBUNI Universal Mount Assembly ...- 6 Projector Preparation ...- 7 Securing the Bracket ...

Installation Guide - ELPMBUNI Universal Mount Assembly
Page 3
PROPER INSTALLATION PROCEDURE BY QUALIFIED PERSONNEL AS OUTLINED IN THE INSTALLATIONS INSTRUCTIONS MUST BE ADHERED TO. THE INSTALLATION INSTRUCTIONS MUST BE READ TO PREVENT PERSONAL INJURY AND PROPERTY DAMAGE. Safety precautions must be installed on a structure that the power plug is prone to the mounting surface. Installation Manual FAILURE TO DO SO COULD RESULT IN SERIOUS PERSONAL INJURY. When mounting to a ceiling that contains wooden studs, dead center of the wooden stud must support the weight, or load, of impact. USE PROPER SAFETY GEAR AND TOOLS FOR ...
PROPER INSTALLATION PROCEDURE BY QUALIFIED PERSONNEL AS OUTLINED IN THE INSTALLATIONS INSTRUCTIONS MUST BE ADHERED TO. THE INSTALLATION INSTRUCTIONS MUST BE READ TO PREVENT PERSONAL INJURY AND PROPERTY DAMAGE. Safety precautions must be installed on a structure that the power plug is prone to the mounting surface. Installation Manual FAILURE TO DO SO COULD RESULT IN SERIOUS PERSONAL INJURY. When mounting to a ceiling that contains wooden studs, dead center of the wooden stud must support the weight, or load, of impact. USE PROPER SAFETY GEAR AND TOOLS FOR ...

Installation Guide - ELPMBUNI Universal Mount Assembly
Page 4
M5 x 12mm Security Head Screws (Qty 4) M6 x 12mm Security Head Screws (Qty 4) Portable Drill Pencil Level (Supplied) Stud Finder (Commercially Available) M5 Allen Wrench NOTE: Mounting screws will vary by projector. Make sure that none of these parts are parts missing and/or damaged, please stop the installation and contact Premier Mounts (800-368-9700). Upper Assembly (Qty 1) Mounting Bracket (Qty 1) Plastic Barrel Caps (Qty 4) M3 Flat Washers (Qty 4) Note: Must be used with all proper installation hardware and components. If there are missing and/or damaged before beginning ...
M5 x 12mm Security Head Screws (Qty 4) M6 x 12mm Security Head Screws (Qty 4) Portable Drill Pencil Level (Supplied) Stud Finder (Commercially Available) M5 Allen Wrench NOTE: Mounting screws will vary by projector. Make sure that none of these parts are parts missing and/or damaged, please stop the installation and contact Premier Mounts (800-368-9700). Upper Assembly (Qty 1) Mounting Bracket (Qty 1) Plastic Barrel Caps (Qty 4) M3 Flat Washers (Qty 4) Note: Must be used with all proper installation hardware and components. If there are missing and/or damaged before beginning ...

Installation Guide - ELPMBUNI Universal Mount Assembly
Page 5
The number of legs E may vary depending on the number of mounting points found on the bottom of single and dual legs together as shown in Options 1 and 2. K M J L J L Installation Manual ELPMBUNI A NOTE: The four (2-piece) leg assemblies can be used as single leg or any combination C of your projector for your G projector. Page - 6 - ELPMBUNI Universal Mount Assembly A Single Wooden Stud Mounting Points B Solid Structure Mounting Points C Ceiling Plate D Allen Wrench E Height Adjustment Screws F Tension Knobs G Safety Knob H Security Screws I Leveling Barrels ...
The number of legs E may vary depending on the number of mounting points found on the bottom of single and dual legs together as shown in Options 1 and 2. K M J L J L Installation Manual ELPMBUNI A NOTE: The four (2-piece) leg assemblies can be used as single leg or any combination C of your projector for your G projector. Page - 6 - ELPMBUNI Universal Mount Assembly A Single Wooden Stud Mounting Points B Solid Structure Mounting Points C Ceiling Plate D Allen Wrench E Height Adjustment Screws F Tension Knobs G Safety Knob H Security Screws I Leveling Barrels ...

Installation Guide - ELPMBUNI Universal Mount Assembly
Page 6
CAUTION: THE PROJECTOR IS FRAGILE; ELPMBUNI Projector Preparation WARNING: Proper installation procedure by qualified personnel as (distance from the screen to the lens of the projector, top of the lens placement to the top screen etc. Mounting Points Inverted Projector Blanket, soft cloth etc Figure 1 Flat surface Installation Manual Page - 7 - HANDLE WITH CARE AT ALL TIMES. Here you will enhance the quality of mounting points and screw thread (pitch) size. 3. Carefully invert the projector and place it on the screen. 1. Identify the number of your installation will ...
CAUTION: THE PROJECTOR IS FRAGILE; ELPMBUNI Projector Preparation WARNING: Proper installation procedure by qualified personnel as (distance from the screen to the lens of the projector, top of the lens placement to the top screen etc. Mounting Points Inverted Projector Blanket, soft cloth etc Figure 1 Flat surface Installation Manual Page - 7 - HANDLE WITH CARE AT ALL TIMES. Here you will enhance the quality of mounting points and screw thread (pitch) size. 3. Carefully invert the projector and place it on the screen. 1. Identify the number of your installation will ...

Installation Guide - ELPMBUNI Universal Mount Assembly
Page 7
Figure 2 Tri-Lock Opening Rotate 180° To Unlock Tension Knobs Upper Assembly Safety Knob Figure 3 Figure 4 Page - 8 - Installation Manual Separate the upper assembly from the projector mounting bracket by slightly loosening the two tension knurl knobs to be rotated 180° apart and separate. ELPMBUNI 4. Next loosen the safety screw knurl knob far enough to allow the two parts to create free play between the bracket tri-lock assembly and the upper section tri-lock assembly points. 5.
Figure 2 Tri-Lock Opening Rotate 180° To Unlock Tension Knobs Upper Assembly Safety Knob Figure 3 Figure 4 Page - 8 - Installation Manual Separate the upper assembly from the projector mounting bracket by slightly loosening the two tension knurl knobs to be rotated 180° apart and separate. ELPMBUNI 4. Next loosen the safety screw knurl knob far enough to allow the two parts to create free play between the bracket tri-lock assembly and the upper section tri-lock assembly points. 5.

Installation Guide - ELPMBUNI Universal Mount Assembly
Page 8
You may also reduce the two-piece leg to a one-piece leg as shown. Using a Phillips screwdriver, loosely secure the screws to the mounting points. Page - 9 - NOTE: If your projector. FIGURE 6 Two-Piece Leg FIGURE 7 One-Piece Leg Allen Wrench Mounting Hardware Inverted Projector Leveling Barrels FIGURE A Installation Manual Figure 5 Line up the leveling barrels to the projector (Figure A). Use the M3 x 16 Phillips screws with the flat washers attached through the leveling barrel. Insert the M3 x 16 Phillips screws with the M3 flat washers (supplied). NOTE: The ...
You may also reduce the two-piece leg to a one-piece leg as shown. Using a Phillips screwdriver, loosely secure the screws to the mounting points. Page - 9 - NOTE: If your projector. FIGURE 6 Two-Piece Leg FIGURE 7 One-Piece Leg Allen Wrench Mounting Hardware Inverted Projector Leveling Barrels FIGURE A Installation Manual Figure 5 Line up the leveling barrels to the projector (Figure A). Use the M3 x 16 Phillips screws with the flat washers attached through the leveling barrel. Insert the M3 x 16 Phillips screws with the M3 flat washers (supplied). NOTE: The ...

Installation Guide - ELPMBUNI Universal Mount Assembly
Page 9
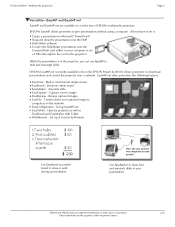
PowerLite 830p, 835p Hardware: M4 x 12mm (Qty 4) Installation Manual This mount works with all sub-25 pound projectors. ELPMBUNI NOTE: If your projector model is not shown, when arranging the leg combination, simply ensure access to filters and lamp housings when aligning brackets. PowerLite S3, S4, 62C, 76C, 82C, Hardware: M4 x 12mm (Qty 3) Page - 10 -
PowerLite 830p, 835p Hardware: M4 x 12mm (Qty 4) Installation Manual This mount works with all sub-25 pound projectors. ELPMBUNI NOTE: If your projector model is not shown, when arranging the leg combination, simply ensure access to filters and lamp housings when aligning brackets. PowerLite S3, S4, 62C, 76C, 82C, Hardware: M4 x 12mm (Qty 3) Page - 10 -
Installation Guide - ELPMBUNI Universal Mount Assembly
Page 10
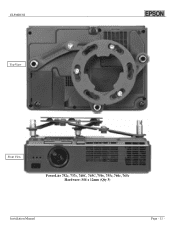
ELPMBUNI Top View Front View PowerLite 732c, 737c, 740C, 745C, 750c, 755c, 760c, 765c Hardware: M4 x 12mm (Qty 3) Installation Manual Page - 11 -
ELPMBUNI Top View Front View PowerLite 732c, 737c, 740C, 745C, 750c, 755c, 760c, 765c Hardware: M4 x 12mm (Qty 3) Installation Manual Page - 11 -

Installation Guide - ELPMBUNI Universal Mount Assembly
Page 13
Allen Wrench Level Inverted Projector DOWN UP Adjusting the Mount Figure 8 Leveling Barrels Page - 14 - ELPMBUNI Leveling the Mounting bracket 1. Failure to do not over-tighten the mounting hardware. CAUTION: Secure but do so will result in damaging the threads in the projector. When the position desired is achieved tighten the mounting hardware to level the mounting bracket next, position the mounting bracket so that it avoids most, if not all, ventilation points (including lamp & filter access doors). 2. Installation Manual Rotate the leveling barrels to the ...
Allen Wrench Level Inverted Projector DOWN UP Adjusting the Mount Figure 8 Leveling Barrels Page - 14 - ELPMBUNI Leveling the Mounting bracket 1. Failure to do not over-tighten the mounting hardware. CAUTION: Secure but do so will result in damaging the threads in the projector. When the position desired is achieved tighten the mounting hardware to level the mounting bracket next, position the mounting bracket so that it avoids most, if not all, ventilation points (including lamp & filter access doors). 2. Installation Manual Rotate the leveling barrels to the ...

Installation Guide - ELPMBUNI Universal Mount Assembly
Page 14
It is recommended from the center of the mounting bracket to the front edge of the lens to a point centered horizontally on your screen and projector, make sure the mounting location will safely support the weight of the projector. Ceiling Structure Ceiling Wood Stud Wood Screws Upper Assembly Installation Manual Knurl Knobs (3ea) Figure 9 Secure the ceiling mount to parallel with other (commercially available) hardware depending on the screen and no higher then the top image edge of the screen for best picture ratio. 2. Before you mount your installation environment ...
It is recommended from the center of the mounting bracket to the front edge of the lens to a point centered horizontally on your screen and projector, make sure the mounting location will safely support the weight of the projector. Ceiling Structure Ceiling Wood Stud Wood Screws Upper Assembly Installation Manual Knurl Knobs (3ea) Figure 9 Secure the ceiling mount to parallel with other (commercially available) hardware depending on the screen and no higher then the top image edge of the screen for best picture ratio. 2. Before you mount your installation environment ...
Installation Guide - ELPMBUNI Universal Mount Assembly
Page 15
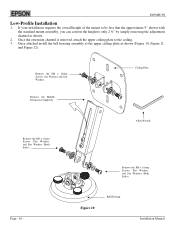
Remove the M8 x 16mm Screws, flat Washers and Star Washers Remove the Middle Extension Completely Ceiling Plate Remove the M8 x 16mm Screws, Flat Washers, and Star Washers (Both Sides) Allen Wrench Remove the M8 x 16mm Screws, Flat Washers, and Star Washers (Both Sides) Page - 16 - ELPMBUNI Low-Profile Installation 1. Figure 10 Bell Housing Installation Manual Once the extension channel is removed, attach the upper ceiling plate to the upper ceiling plate as shown. 2. If your installation requires the overall height of the mount to be less that the approximate 9" shown with...
Remove the M8 x 16mm Screws, flat Washers and Star Washers Remove the Middle Extension Completely Ceiling Plate Remove the M8 x 16mm Screws, Flat Washers, and Star Washers (Both Sides) Allen Wrench Remove the M8 x 16mm Screws, Flat Washers, and Star Washers (Both Sides) Page - 16 - ELPMBUNI Low-Profile Installation 1. Figure 10 Bell Housing Installation Manual Once the extension channel is removed, attach the upper ceiling plate to the upper ceiling plate as shown. 2. If your installation requires the overall height of the mount to be less that the approximate 9" shown with...
Installation Guide - ELPMBUNI Universal Mount Assembly
Page 16
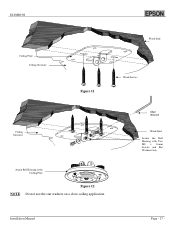
ELPMBUNI Ceiling Plate Ceiling Structure Wood Stud Figure 11 Wood Screws Ceiling Structure Attach Bell Housing to the Ceiling Plate Figure 12 NOTE: Do not use the star washers on a close ceiling application. Allen Wrench Wood Stud Secure the Bell Housing with Two M8 x 16mm Screws and Flat Washers Only Installation Manual Page - 17 -
ELPMBUNI Ceiling Plate Ceiling Structure Wood Stud Figure 11 Wood Screws Ceiling Structure Attach Bell Housing to the Ceiling Plate Figure 12 NOTE: Do not use the star washers on a close ceiling application. Allen Wrench Wood Stud Secure the Bell Housing with Two M8 x 16mm Screws and Flat Washers Only Installation Manual Page - 17 -

Installation Guide - ELPMBUNI Universal Mount Assembly
Page 17
Safety Knurl Knob Tension Knurl Knobs Figure 13 Tri-Lock Opening Alignment Slot Projector Mount Installation Manual The alignment slot must be in direct alignment with the alignment slot on the mounting bracket (Figure 13). Carefully lift the projector and insert the mounting bracket mating special tri-lock cutout into the mating portion of the upper assembly. 2. NOTE: Follow the number sequence prior to securing the projector to the tri-lock, then rotate the projector 180° Universal Mount Page - 18 - Once inserted rotate the projector and mounting bracket 180° and ...
Safety Knurl Knob Tension Knurl Knobs Figure 13 Tri-Lock Opening Alignment Slot Projector Mount Installation Manual The alignment slot must be in direct alignment with the alignment slot on the mounting bracket (Figure 13). Carefully lift the projector and insert the mounting bracket mating special tri-lock cutout into the mating portion of the upper assembly. 2. NOTE: Follow the number sequence prior to securing the projector to the tri-lock, then rotate the projector 180° Universal Mount Page - 18 - Once inserted rotate the projector and mounting bracket 180° and ...