Product Brochure
Page 1
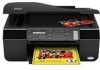
... Automatic Document Feeder • Fax in -One Epson Stylus® NX300 Print | Copy | Scan | Fax Great features at a great value. reduce and enlarge copies 25 to 400 percent • Replace only the color that last - Features and Benefits • Copy, scan or fax stacks of documents with high quality scanning - One-touch copying; Plain paper prints resist...
... Automatic Document Feeder • Fax in -One Epson Stylus® NX300 Print | Copy | Scan | Fax Great features at a great value. reduce and enlarge copies 25 to 400 percent • Replace only the color that last - Features and Benefits • Copy, scan or fax stacks of documents with high quality scanning - One-touch copying; Plain paper prints resist...
Product Brochure
Page 2
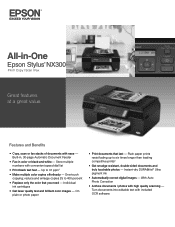
... jet all-in-one, Instruction booklet, CD-ROM containing all -in indoor display conditions. Epson Stylus NX300 Print | Copy | Scan | Fax Printing Technology 4-color (CMYK) drop-on-demand MicroPiezo® ink jet technology Nozzle Configuration 90 Black, 29 Cyan, Magenta and Yellow Ink ..., paper type, frequency of use of ink remains in these marks. Cartridge yields vary considerably based on black and color text patterns in the U.S. Epson, Epson Stylus and MicroPiezo are subject to media, printed image, display conditions, light intensity, humidity and atmospheric conditions...
... jet all-in-one, Instruction booklet, CD-ROM containing all -in indoor display conditions. Epson Stylus NX300 Print | Copy | Scan | Fax Printing Technology 4-color (CMYK) drop-on-demand MicroPiezo® ink jet technology Nozzle Configuration 90 Black, 29 Cyan, Magenta and Yellow Ink ..., paper type, frequency of use of ink remains in these marks. Cartridge yields vary considerably based on black and color text patterns in the U.S. Epson, Epson Stylus and MicroPiezo are subject to media, printed image, display conditions, light intensity, humidity and atmospheric conditions...

Quick Guide
Page 1
Epson Stylus® NX300 Series Quick Guide Basic Printing, Copying, Scanning, and Faxing Maintaining Your All-in-One Solving Problems
Epson Stylus® NX300 Series Quick Guide Basic Printing, Copying, Scanning, and Faxing Maintaining Your All-in-One Solving Problems
Quick Guide
Page 2
Contents Introduction 4 Loading Paper 5 Using Special Papers 6 Placing Originals for Copying, Scanning, or Faxing 8 Using the Scanner Glass 8 Using the Automatic Document Feeder 9 Copying a Document or Photo 11 Copying a Document 11 Copying a Photo 12 ...20 Receiving Faxes 22 Printing From Your Computer 24 Printing in Windows 24 Printing With a Macintosh 26 Selecting the Correct Paper Type 30 Scanning a Document or Photo 31 Basic Scanning 31 Scanning Multiple Pages 32 Maintaining Your NX300 Series 34 Checking the Print Head Nozzles 34 Cleaning the Print Head 35 2 Contents
Contents Introduction 4 Loading Paper 5 Using Special Papers 6 Placing Originals for Copying, Scanning, or Faxing 8 Using the Scanner Glass 8 Using the Automatic Document Feeder 9 Copying a Document or Photo 11 Copying a Document 11 Copying a Photo 12 ...20 Receiving Faxes 22 Printing From Your Computer 24 Printing in Windows 24 Printing With a Macintosh 26 Selecting the Correct Paper Type 30 Scanning a Document or Photo 31 Basic Scanning 31 Scanning Multiple Pages 32 Maintaining Your NX300 Series 34 Checking the Print Head Nozzles 34 Cleaning the Print Head 35 2 Contents
Quick Guide
Page 4
...your desktop. Tip: Tips contain hints for printing from your computer ■ Scan multiple pages ■ Perform routine maintenance ■ Solve simple problems This book tells you read your NX300 Series instructions: Warning: Warnings must be followed carefully to your Windows® ...contain important information about your equipment. For additional instructions, see the on-screen Epson Information Center by double-clicking its icon on your computer! Introduction After you have set up your Epson Stylus® NX300 Series as described on the Start Here sheet, turn here to: ■...
...your desktop. Tip: Tips contain hints for printing from your computer ■ Scan multiple pages ■ Perform routine maintenance ■ Solve simple problems This book tells you read your NX300 Series instructions: Warning: Warnings must be followed carefully to your Windows® ...contain important information about your equipment. For additional instructions, see the on-screen Epson Information Center by double-clicking its icon on your computer! Introduction After you have set up your Epson Stylus® NX300 Series as described on the Start Here sheet, turn here to: ■...
Quick Guide
Page 8
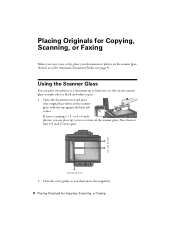
Close the cover gently so you can place two photos or a document up to make color or black-and-white copies. 1. Open the document cover and place your documents or photos on the scanner glass to two at least 1/4 inch (5 mm) ...apart. 1/4 inch (5 mm) 2. or 4 × 6-inch photos, you don't move the original(s). 8 Placing Originals for Copying, Scanning, or Faxing Before you 're scanning 3 × 5- Using the Scanner Glass You can place up to letter-size (or A4) on the scanner glass (below) or in the Automatic...
Close the cover gently so you can place two photos or a document up to make color or black-and-white copies. 1. Open the document cover and place your documents or photos on the scanner glass to two at least 1/4 inch (5 mm) ...apart. 1/4 inch (5 mm) 2. or 4 × 6-inch photos, you don't move the original(s). 8 Placing Originals for Copying, Scanning, or Faxing Before you 're scanning 3 × 5- Using the Scanner Glass You can place up to letter-size (or A4) on the scanner glass (below) or in the Automatic...

Quick Guide
Page 10
Note: When you use the Copy function, letter-size paper is loaded, you copy a legal-size document, the image will be cropped to fit lettersize paper. 10 Placing Originals for your printed copies. Once the original document is automatically selected for Copying, Scanning, or Faxing Slide the edge guide against the originals. If you can copy, scan, or fax. 5.
Note: When you use the Copy function, letter-size paper is loaded, you copy a legal-size document, the image will be cropped to fit lettersize paper. 10 Placing Originals for your printed copies. Once the original document is automatically selected for Copying, Scanning, or Faxing Slide the edge guide against the originals. If you can copy, scan, or fax. 5.
Quick Guide
Page 18
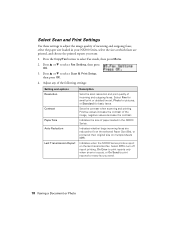
... incoming and outgoing faxes, select the paper size loaded in the NX300 Series. Adjust any of the following settings: Setting and options Resolution Contrast Paper Size Auto Reduction Last Transmission Report Description Sets the scan resolution and print quality of the image, negative values decrease the ... want. 1. Press the Copy/Fax button to select Fax Setting, then press OK. 3. Sets the contrast when scanning and printing. Indicates the size of paper loaded in your NX300 Series, select the size at their original size on multiple sheets (Off). Press u or d to select Fax mode...
... incoming and outgoing faxes, select the paper size loaded in the NX300 Series. Adjust any of the following settings: Setting and options Resolution Contrast Paper Size Auto Reduction Last Transmission Report Description Sets the scan resolution and print quality of the image, negative values decrease the ... want. 1. Press the Copy/Fax button to select Fax Setting, then press OK. 3. Sets the contrast when scanning and printing. Indicates the size of paper loaded in your NX300 Series, select the size at their original size on multiple sheets (Off). Press u or d to select Fax mode...
Quick Guide
Page 21
... press 2 to continue with the selection made . ■ If you've connected a telephone to the NX300 Series, dial the number from another number, press 2 to continue with the selection made . ■ ...button to select one of the following fax settings, press Menu: ■ Resolution to increase the scanning resolution of a faxed document. ■ Contrast to change the contrast of the following to dial... to which you have dialed (such as a fax information service). Press the x B&W or x Color button to receive a fax from the phone. To cancel faxing, press y Stop/Clear Settings at right...
... press 2 to continue with the selection made . ■ If you've connected a telephone to the NX300 Series, dial the number from another number, press 2 to continue with the selection made . ■ ...button to select one of the following fax settings, press Menu: ■ Resolution to increase the scanning resolution of a faxed document. ■ Contrast to change the contrast of the following to dial... to which you have dialed (such as a fax information service). Press the x B&W or x Color button to receive a fax from the phone. To cancel faxing, press y Stop/Clear Settings at right...
Quick Guide
Page 22
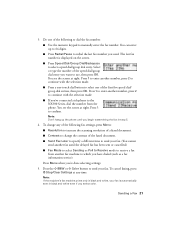
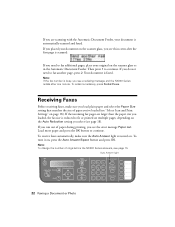
...paper and select the Paper Size setting that matches the size of rings before the NX300 Series answers, see this screen after one minute. Auto Answer light Stop/ Clear Settings Auto Answer/ Space Copy/Fax B&W Color Speed Dial Group Dial/ Backspace Redial/Pause 22 Faxing a Document or Photo Note...: If the fax number is busy, you see a redialing message and the NX300 Series redials after the first page is scanned: If you need to fit or printed on...
...paper and select the Paper Size setting that matches the size of rings before the NX300 Series answers, see this screen after one minute. Auto Answer light Stop/ Clear Settings Auto Answer/ Space Copy/Fax B&W Color Speed Dial Group Dial/ Backspace Redial/Pause 22 Faxing a Document or Photo Note...: If the fax number is busy, you see a redialing message and the NX300 Series redials after the first page is scanned: If you need to fit or printed on...
Quick Guide
Page 31
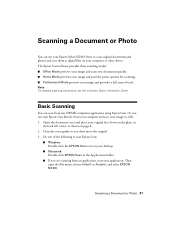
... image and provides preset options for scanning. ■ Professional Mode previews your image and provides a full array of the following to a file. 1. Scanning a Document or Photo You can use your Epson Stylus NX300 Series to scan original documents and photos and save your image to start Epson Scan: ■ Windows: Double-click the EPSON Scan icon on your computer or...
... image and provides preset options for scanning. ■ Professional Mode previews your image and provides a full array of the following to a file. 1. Scanning a Document or Photo You can use your Epson Stylus NX300 Series to scan original documents and photos and save your image to start Epson Scan: ■ Windows: Double-click the EPSON Scan icon on your computer or...
Quick Guide
Page 32
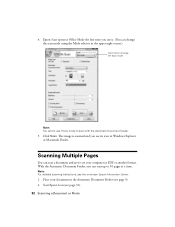
... Automatic Document Feeder, you use it on -screen Epson Information Center. 1. Click Scan. Scanning Multiple Pages You can scan up to scan with the Automatic Document Feeder. 5. Note: For detailed scanning instructions, see page 31). 32 Scanning a Document or Photo Epson Scan opens in Office Mode the first time you can scan a document and save it . (You can change the...
... Automatic Document Feeder, you use it on -screen Epson Information Center. 1. Click Scan. Scanning Multiple Pages You can scan up to scan with the Automatic Document Feeder. 5. Note: For detailed scanning instructions, see page 31). 32 Scanning a Document or Photo Epson Scan opens in Office Mode the first time you can scan a document and save it . (You can change the...
Quick Guide
Page 33
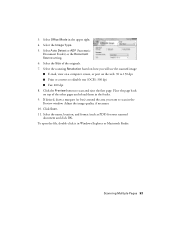
...window. Select Auto Detect or ADF (Automatic Document Feeder) as PDF) for your scanned document and click OK. Click the Preview button to scan in the feeder. 9. Adjust the image quality, if necessary. 10. Scanning Multiple Pages 33 Click Scan. 11. To open the file, double-click it in the upper right. 4.... If desired, draw a marquee (or box) around the area you will use the scanned image: ■ E-mail, view on a computer screen, or post on top of the originals. 7. Place the page back on the web: 96 to 150...
...window. Select Auto Detect or ADF (Automatic Document Feeder) as PDF) for your scanned document and click OK. Click the Preview button to scan in the feeder. 9. Adjust the image quality, if necessary. 10. Scanning Multiple Pages 33 Click Scan. 11. To open the file, double-click it in the upper right. 4.... If desired, draw a marquee (or box) around the area you will use the scanned image: ■ E-mail, view on a computer screen, or post on top of the originals. 7. Place the page back on the web: 96 to 150...

Quick Guide
Page 42
■ Use the Automatic Document Feeder to fax or scan legal-size documents, but not to separate the sheets. Load up . or 10 sheets ...30 sheets of the scanner glass. Letter-size paper is stuck inside, press the P On button to turn the NX300 Series back on. If the edges are not bent, folded, or curled up to remove the paper without opening ... a time. Then lift the scanner, remove the jammed paper and torn pieces, close the scanner, and turn off the NX300 Series. If documents have jammed: 1. If paper is automatically selected for copying. Caution: Do not try to 20 sheets...
■ Use the Automatic Document Feeder to fax or scan legal-size documents, but not to separate the sheets. Load up . or 10 sheets ...30 sheets of the scanner glass. Letter-size paper is stuck inside, press the P On button to turn the NX300 Series back on. If the edges are not bent, folded, or curled up to remove the paper without opening ... a time. Then lift the scanner, remove the jammed paper and torn pieces, close the scanner, and turn off the NX300 Series. If documents have jammed: 1. If paper is automatically selected for copying. Caution: Do not try to 20 sheets...

Start Here
Page 6
...on . 6 Mac OS X 10.5 users: skip to print, copy, scan, and fax! You're ready to step 10. Other users: continue with step 7. 7 When you 're done, eject the CD. See your computer. Make sure the NX300 Series is NOT CONNECTED to install the rest of the software and...continue after a moment, make sure you securely connected and turned on the NX300 Series. 6 Follow the on-screen instructions to your computer. 2 Insert the NX300 Series software CD. 3 Double-click the Epson icon. 4 Click Install and follow the on your NX300 Series. 7 When you see this screen, click Open the Printer List....
...on . 6 Mac OS X 10.5 users: skip to print, copy, scan, and fax! You're ready to step 10. Other users: continue with step 7. 7 When you 're done, eject the CD. See your computer. Make sure the NX300 Series is NOT CONNECTED to install the rest of the software and...continue after a moment, make sure you securely connected and turned on the NX300 Series. 6 Follow the on-screen instructions to your computer. 2 Insert the NX300 Series software CD. 3 Double-click the Epson icon. 4 Click Install and follow the on your NX300 Series. 7 When you see this screen, click Open the Printer List....

Start Here
Page 7
... (562) 276-4382 (U.S.) or (905) 709-3839 (Canada), 6 AM to print, copy, scan, and fax! 8 Follow the steps on the right side of the screen to add the NX300 Series. 9 Click Next again, if necessary. 10 Follow the on -screen Epson Information Center for instructions. You're ready to 6 PM, Pacific Time, Monday...
... (562) 276-4382 (U.S.) or (905) 709-3839 (Canada), 6 AM to print, copy, scan, and fax! 8 Follow the steps on the right side of the screen to add the NX300 Series. 9 Click Next again, if necessary. 10 Follow the on -screen Epson Information Center for instructions. You're ready to 6 PM, Pacific Time, Monday...


