

Product Information Guide
Page 11
Epson LX-300+II Your top-of -form position; Advancing paper to the tear-off edge When the push tractor is on page 14 for about three seconds. so you finish printing. You can use the tear-off position: 1. The printer advances the paper to adjust the tear-off feature in two ways: ❏ Manually... Micro Adjust mode. 4. You may need to the tear-off mode and select the appropriate page length for instructions.) 7/06 Epson LX-300+II - 11 The printer beeps and the Pause light begins to the tear-off edge on the Auto tear off position If your software. Press the LF/FF...
Epson LX-300+II Your top-of -form position; Advancing paper to the tear-off edge When the push tractor is on page 14 for about three seconds. so you finish printing. You can use the tear-off position: 1. The printer advances the paper to adjust the tear-off feature in two ways: ❏ Manually... Micro Adjust mode. 4. You may need to the tear-off mode and select the appropriate page length for instructions.) 7/06 Epson LX-300+II - 11 The printer beeps and the Pause light begins to the tear-off edge on the Auto tear off position If your software. Press the LF/FF...

Product Information Guide
Page 14
... settings (in bold) and options you may need to print a list of paper each time the printer ejects a printed page. 1. The table below to step 6. 6. Epson LX-300+II Default Settings While you can often set the default settings through the options for the selected setting until ...you see the Reference Guide.) ) Settings Page length for Italic table Manual feed wait time Buzzer Auto CR (IBM 2380 Plus...
... settings (in bold) and options you may need to print a list of paper each time the printer ejects a printed page. 1. The table below to step 6. 6. Epson LX-300+II Default Settings While you can often set the default settings through the options for the selected setting until ...you see the Reference Guide.) ) Settings Page length for Italic table Manual feed wait time Buzzer Auto CR (IBM 2380 Plus...

Product Information Guide
Page 16
... hot; Make sure the tractor that comes with mild detergent dissolved in place and flat on the printer mechanism or electronic components. If an additional pull tractor is still dirty, clean it . Related Documentation( Manual Epson LX-300+II User's Guide CD-ROM containing the on-screen Reference Guide Part number 4105348-00/CPD-21412 3101470...
... hot; Make sure the tractor that comes with mild detergent dissolved in place and flat on the printer mechanism or electronic components. If an additional pull tractor is still dirty, clean it . Related Documentation( Manual Epson LX-300+II User's Guide CD-ROM containing the on-screen Reference Guide Part number 4105348-00/CPD-21412 3101470...
Reference Guide
Page 3
Contents Introduction About This Manual 6 Warnings, Cautions, and Notes 7 Safety Instructions 7 Hot parts caution symbol 7 When setting up the printer 8 When operating the printer 9 When handling paper 9 When maintaining the printer 10 Chapter 1 Paper Handling Printing on Continuous Paper 11 Printing with the push tractor 12 Printing with the ...on Special Paper 29 Adjusting the paper thickness lever 29 Multipart forms 30 Labels 31 Envelopes 32 Chapter 2 Using the Printer Software Accessing the Printer Driver 34 From Windows applications 34 From the Start menu 36 Changing the...
Contents Introduction About This Manual 6 Warnings, Cautions, and Notes 7 Safety Instructions 7 Hot parts caution symbol 7 When setting up the printer 8 When operating the printer 9 When handling paper 9 When maintaining the printer 10 Chapter 1 Paper Handling Printing on Continuous Paper 11 Printing with the push tractor 12 Printing with the ...on Special Paper 29 Adjusting the paper thickness lever 29 Multipart forms 30 Labels 31 Envelopes 32 Chapter 2 Using the Printer Software Accessing the Printer Driver 34 From Windows applications 34 From the Start menu 36 Changing the...
Reference Guide
Page 6
Introduction Your Epson® LX-300+II printer provides high-quality printing and superior performance in a compact design. About This Manual This manual provides detailed information about the control panel functions, including how to change the printer's default settings. ❏ Chapter 4, "Maintenance and Troubleshooting," includes basic maintenance procedures and solutions to possible problems. 6 Introduction The CD-ROM that came...
Introduction Your Epson® LX-300+II printer provides high-quality printing and superior performance in a compact design. About This Manual This manual provides detailed information about the control panel functions, including how to change the printer's default settings. ❏ Chapter 4, "Maintenance and Troubleshooting," includes basic maintenance procedures and solutions to possible problems. 6 Introduction The CD-ROM that came...
Reference Guide
Page 10
... not operate normally or exhibits a distinct change in this product. iv. ii. If the printer has been dropped or the cabinet damaged. Doing so may cause fire. ❏ Adjust only those controls that are covered by the operating instructions. ... only. ❏ Do not spill liquid onto the printer. ❏ Except as specifically explained in performance. ❏ Do not use aerosol blowers which contain flammable gas inside or around this manual, do not attempt to service the printer yourself. ❏ Unplug the printer and refer servicing to qualified service personnel under the following...
... not operate normally or exhibits a distinct change in this product. iv. ii. If the printer has been dropped or the cabinet damaged. Doing so may cause fire. ❏ Adjust only those controls that are covered by the operating instructions. ... only. ❏ Do not spill liquid onto the printer. ❏ Except as specifically explained in performance. ❏ Do not use aerosol blowers which contain flammable gas inside or around this manual, do not attempt to service the printer yourself. ❏ Unplug the printer and refer servicing to qualified service personnel under the following...
Reference Guide
Page 24
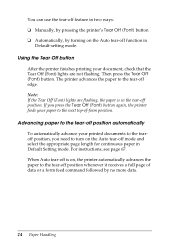
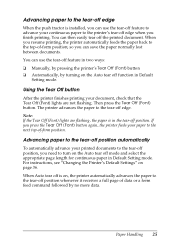
... the paper to the tear-off function in Default-setting mode. You can use the tear-off feature in two ways: ❏ Manually, by pressing the printer's Tear Off (Font) button ❏ Automatically, by no more data. 24 Paper Handling Note: If the Tear Off (Font) lights are not flashing. When Auto... paper in the tear-off position. Then press the Tear Off (Font) button. For instructions, see page 67. Using the Tear Off button After the printer finishes printing your paper to turn on the Auto tear-off edge. If you need to the next top-of data or a form feed command...
... the paper to the tear-off function in Default-setting mode. You can use the tear-off feature in two ways: ❏ Manually, by pressing the printer's Tear Off (Font) button ❏ Automatically, by no more data. 24 Paper Handling Note: If the Tear Off (Font) lights are not flashing. When Auto... paper in the tear-off position. Then press the Tear Off (Font) button. For instructions, see page 67. Using the Tear Off button After the printer finishes printing your paper to turn on the Auto tear-off edge. If you need to the next top-of data or a form feed command...
Reference Guide
Page 68
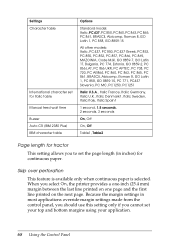
... the page length (in most applications override margin settings made from the control panel, you should use this setting only if you select On, the printer provides a one-inch (25.4 mm) margin between the last line printed on one page and the first line printed on the next page. When you... cannot set your top and bottom margins using your application. 68 Using the Control Panel Settings Character table International character set for Italic table Manual feed wait time Buzzer Auto CR (IBM 2380 Plus) IBM character table Options Standard model: Italic, PC 437, PC 850, PC 860, PC 863, PC...
... the page length (in most applications override margin settings made from the control panel, you should use this setting only if you select On, the printer provides a one-inch (25.4 mm) margin between the last line printed on one page and the first line printed on the next page. When you... cannot set your top and bottom margins using your application. 68 Using the Control Panel Settings Character table International character set for Italic table Manual feed wait time Buzzer Auto CR (IBM 2380 Plus) IBM character table Options Standard model: Italic, PC 437, PC 850, PC 860, PC 863, PC...

Reference Guide
Page 70
When you choose Off, the printer prints up to 300 cps (characters per second) at 10 cpi. If your printer is set to Auto. You can specify 10 seconds or 30 seconds for the interface mode, depending on which one computer, choose Parallel, Serial, or ... whether a print job is measured in bits per second (bps). See your computer manual and software documentation for the proper setting. I /F (interface) mode is connected to two computers using different interfaces, select Auto (automatic) to allow the printer to only one is disabled. Baud rate Use this option is set the data...
When you choose Off, the printer prints up to 300 cps (characters per second) at 10 cpi. If your printer is set to Auto. You can specify 10 seconds or 30 seconds for the interface mode, depending on which one computer, choose Parallel, Serial, or ... whether a print job is measured in bits per second (bps). See your computer manual and software documentation for the proper setting. I /F (interface) mode is connected to two computers using different interfaces, select Auto (automatic) to allow the printer to only one is disabled. Baud rate Use this option is set the data...
Reference Guide
Page 71
... You can customize the Italic table to print from applications based on . International character set contains eight characters that comes with the printer. If the paper feeds before you can select among several international character sets for Packet mode to suit your printing needs. Packet mode... Select Auto for the Italic character table. Turn off . Manual feed wait time This sets the amount of the serial interface to your computer manual and software documentation for Italic table You can adjust its position to 7 bit or 8 bit....
... You can customize the Italic table to print from applications based on . International character set contains eight characters that comes with the printer. If the paper feeds before you can select among several international character sets for Packet mode to suit your printing needs. Packet mode... Select Auto for the Italic character table. Turn off . Manual feed wait time This sets the amount of the serial interface to your computer manual and software documentation for Italic table You can adjust its position to 7 bit or 8 bit....
Reference Guide
Page 123
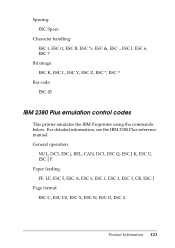
Spacing: ESC Space Character handling: ESC t, ESC (t, ESC R, ESC %, ESC &, ESC :, ESC I, ESC 6, ESC 7 Bit image: ESC K, ESC L, ESC Y, ESC Z, ESC *, ESC ^ Bar code: ESC (B IBM 2380 Plus emulation control codes This printer emulates the IBM Proprinter using the commands below. For detailed information, see the IBM 2380 Plus reference manual. General operation: NUL, DC3, ESC j, BEL, CAN, DC1, ESC Q, ESC [ K, ESC U, ESC [ F Paper feeding: FF, LF, ESC 5, ESC A, ESC 0, ESC 1, ESC 2, ESC 3, CR, ESC ] Page format: ESC C, ESC C0, ESC X, ESC N, ESC O, ESC 4 Product Information 123
Spacing: ESC Space Character handling: ESC t, ESC (t, ESC R, ESC %, ESC &, ESC :, ESC I, ESC 6, ESC 7 Bit image: ESC K, ESC L, ESC Y, ESC Z, ESC *, ESC ^ Bar code: ESC (B IBM 2380 Plus emulation control codes This printer emulates the IBM Proprinter using the commands below. For detailed information, see the IBM 2380 Plus reference manual. General operation: NUL, DC3, ESC j, BEL, CAN, DC1, ESC Q, ESC [ K, ESC U, ESC [ F Paper feeding: FF, LF, ESC 5, ESC A, ESC 0, ESC 1, ESC 2, ESC 3, CR, ESC ] Page format: ESC C, ESC C0, ESC X, ESC N, ESC O, ESC 4 Product Information 123

Reference Guide
Page 127
H Help, EPSON, 96 to 97 High speed draft, 67, 70 Hot parts caution symbol, 7 I I/F mode, 67, 70 IBM character table, 68, 72 ... forms, 29 to 31 on the pull tractor, 19 to 21 on the push tractor, 11 to 14 single sheets, 26 to 28 M Manual feed wait time, 68, 71 Micro Adjust mode, 22 to 23, 64 to 65 Multipart forms, 29 to 31, 116 N Network, 45... 67, 70, 110 Parity, 67, 70 Power cord, 110 Power supply problems, 79 to 80 Printable columns, 111 Print direction, 67, 69 Printer cleaning, 74 to 75 cover, 109 parts, 109 to 110 server, 45 to 49 sharing, 45 to 58 specifications, 111 to 124 transporting, 75...
H Help, EPSON, 96 to 97 High speed draft, 67, 70 Hot parts caution symbol, 7 I I/F mode, 67, 70 IBM character table, 68, 72 ... forms, 29 to 31 on the pull tractor, 19 to 21 on the push tractor, 11 to 14 single sheets, 26 to 28 M Manual feed wait time, 68, 71 Micro Adjust mode, 22 to 23, 64 to 65 Multipart forms, 29 to 31, 116 N Network, 45... 67, 70, 110 Parity, 67, 70 Power cord, 110 Power supply problems, 79 to 80 Printable columns, 111 Print direction, 67, 69 Printer cleaning, 74 to 75 cover, 109 parts, 109 to 110 server, 45 to 49 sharing, 45 to 58 specifications, 111 to 124 transporting, 75...

User's Guide
Page 5
... or roll paper holder, you can purchase online at www.epsonstore.com (U.S. Or you can purchase ribbon cartridges, paper, manuals, and accessories from an Epson® authorized reseller. Introduction 5 You can further expand your printer's capabilities. See "Viewing the On-screen Reference Guide" on page 14 for more information. As you install the...
... or roll paper holder, you can purchase online at www.epsonstore.com (U.S. Or you can purchase ribbon cartridges, paper, manuals, and accessories from an Epson® authorized reseller. Introduction 5 You can further expand your printer's capabilities. See "Viewing the On-screen Reference Guide" on page 14 for more information. As you install the...
User's Guide
Page 25
... the push tractor is installed, you can use the tear-off feature in two ways: ❏ Manually, by pressing the printer's Tear Off (Font) button ❏ Automatically, by no more data. If you resume printing, the printer automatically feeds the paper back to turn on the Auto tear off edge when you can...
... the push tractor is installed, you can use the tear-off feature in two ways: ❏ Manually, by pressing the printer's Tear Off (Font) button ❏ Automatically, by no more data. If you resume printing, the printer automatically feeds the paper back to turn on the Auto tear off edge when you can...

User's Guide
Page 36
...printer's settings through your Reference Guide. Setting Page length for tractor Skip over perforation Auto tear off Auto line feed Print direction Software 0 slash High speed draft mode I/F (interface) mode Auto I/F wait time Baud rate Parity Data length Parallel I/F bidirectional mode Packet mode Character table International character set for italic table Manual... ESC/P, IBM 2380 On, Off On, Off Auto, Parallel, Serial, USB 10 seconds, 30 seconds 19200, 9600, 4800, 2400, 1200, 600, 300 BPS None, Odd, Even, Ignore 8 bit, 7 bit On, Off Auto, Off Italic, PC 437, PC 850, PC 860, PC 863, PC...
...printer's settings through your Reference Guide. Setting Page length for tractor Skip over perforation Auto tear off Auto line feed Print direction Software 0 slash High speed draft mode I/F (interface) mode Auto I/F wait time Baud rate Parity Data length Parallel I/F bidirectional mode Packet mode Character table International character set for italic table Manual... ESC/P, IBM 2380 On, Off On, Off Auto, Parallel, Serial, USB 10 seconds, 30 seconds 19200, 9600, 4800, 2400, 1200, 600, 300 BPS None, Odd, Even, Ignore 8 bit, 7 bit On, Off Auto, Off Italic, PC 437, PC 850, PC 860, PC 863, PC...
User's Guide
Page 39
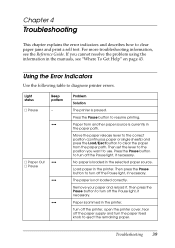
... turn the paper feed knob to clear the paper from another paper source is currently in the selected paper source. Turn off the printer, open the printer cover, tear off the paper supply and turn off the Pause light, if necessary. Paper from the paper path. If you want... to the correct position (continuous paper or single sheets) and press the Load/Eject button to eject the remaining paper. Load paper in the manuals, see the Reference Guide. The paper is loaded in the paper path. Chapter 4 Troubleshooting This chapter explains the error indicators and describes how...
... turn the paper feed knob to clear the paper from another paper source is currently in the selected paper source. Turn off the printer, open the printer cover, tear off the paper supply and turn off the Pause light, if necessary. Paper from the paper path. If you want... to the correct position (continuous paper or single sheets) and press the Load/Eject button to eject the remaining paper. Load paper in the manuals, see the Reference Guide. The paper is loaded in the paper path. Chapter 4 Troubleshooting This chapter explains the error indicators and describes how...


