Product Information Guide
Page 1
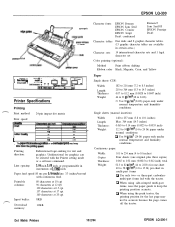
...using the push tractor, the printing position for graphics can be accurate because the page comes off the tractor. Dot Matrix Printers 10/2/94 EPSON LQ-300-1 Printing direction: Bidirectional logic-seeking for one original plus three copies) 0.065 to 0.32 mm (0.0025 to 0.012 ... Paper feed speed 80 ms per sheet in increments of l/360 inch. EPSON LQ-300 n----7 paper supports sw/ itch amsuifo 0 Couriers 0 Printer Specifications Printing Print method: Print speed: 24-pin impact dot matrix I 12 I 240 J is 300 Le4terQuatity 10 67 12 60 1 I 15 I 100 I l The ...
...using the push tractor, the printing position for graphics can be accurate because the page comes off the tractor. Dot Matrix Printers 10/2/94 EPSON LQ-300-1 Printing direction: Bidirectional logic-seeking for one original plus three copies) 0.065 to 0.32 mm (0.0025 to 0.012 ... Paper feed speed 80 ms per sheet in increments of l/360 inch. EPSON LQ-300 n----7 paper supports sw/ itch amsuifo 0 Couriers 0 Printer Specifications Printing Print method: Print speed: 24-pin impact dot matrix I 12 I 240 J is 300 Le4terQuatity 10 67 12 60 1 I 15 I 100 I l The ...
Product Information Guide
Page 3
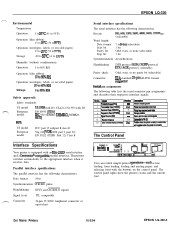
..., D-SUB, female COMector Serial pin assignments The following characteristics. Dot Matrix Printers 10/2/94 EPSON LQ-300-3 Data format: 8-bit Synchronization: STROBE pulse Handshaking: BUSY and ACKNLG signals Signal level: TTL compatible Connector: 36-pin 57-30360 Amphenol connector or equivalent EPSON LQ-300 Serial interface specifications The serial interface has the following table lists the serial connector...
..., D-SUB, female COMector Serial pin assignments The following characteristics. Dot Matrix Printers 10/2/94 EPSON LQ-300-3 Data format: 8-bit Synchronization: STROBE pulse Handshaking: BUSY and ACKNLG signals Signal level: TTL compatible Connector: 36-pin 57-30360 Amphenol connector or equivalent EPSON LQ-300 Serial interface specifications The serial interface has the following table lists the serial connector...
User Manual
Page 11
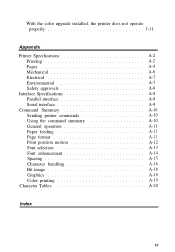
With the color upgrade installed, the printer does not operate properly 3-11 Appendix Printer Specifications Printing Paper Mechanical Electrical Environmental Safety approvals Interface Specifications Parallel interface Serial interface Command Summary Sending printer commands Using the command summary General operation Paper feeding Page format Print position motion Font selection Font enhancement Spacing Character handling Bit image Graphics...
With the color upgrade installed, the printer does not operate properly 3-11 Appendix Printer Specifications Printing Paper Mechanical Electrical Environmental Safety approvals Interface Specifications Parallel interface Serial interface Command Summary Sending printer commands Using the command summary General operation Paper feeding Page format Print position motion Font selection Font enhancement Spacing Character handling Bit image Graphics...
User Manual
Page 13
... how to get the printing results you expect or the printer does not work properly, turn here for setting up , test, and connect the printer to read this chapter first. The Appendix covers the printer's specifications and lists programming commands. Chapter 2 includes information on specific topics quickly. 2 Introduction Finding Your Way Around This manual provides...
... how to get the printing results you expect or the printer does not work properly, turn here for setting up , test, and connect the printer to read this chapter first. The Appendix covers the printer's specifications and lists programming commands. Chapter 2 includes information on specific topics quickly. 2 Introduction Finding Your Way Around This manual provides...

User Manual
Page 16
...are followed. Also, make sure that the total of fire or electric shock. Except as specifically explained in a risk of all servicing in performance, indicating a need for service Introduction 5 Unplug the printer from the wall outlet and have it does not operate normally when the operating instructions are ... points or short out parts that could expose you use an extension cord, make sure that the total of any kind into your printer because they may result in damage and will often require extensive work by a qualified service person under the following conditions: When the ...
...are followed. Also, make sure that the total of fire or electric shock. Except as specifically explained in a risk of all servicing in performance, indicating a need for service Introduction 5 Unplug the printer from the wall outlet and have it does not operate normally when the operating instructions are ... points or short out parts that could expose you use an extension cord, make sure that the total of any kind into your printer because they may result in damage and will often require extensive work by a qualified service person under the following conditions: When the ...

User Manual
Page 54
Keep these tips in the printer between jobs; Do not print labels as a pull tractor to temperature and humidity, use them only under normal operating conditions. Make sure the printing stays entirely within the printable area. (See the Appendix for specifications.) Do not leave labels loaded in mind: ...Choose labels mounted on labels. they can easily peel off the fresh supply at the rear of the printer. To remove the labels from the printer, tear off the backing and jam the printer. See page 2-13 for...
Keep these tips in the printer between jobs; Do not print labels as a pull tractor to temperature and humidity, use them only under normal operating conditions. Make sure the printing stays entirely within the printable area. (See the Appendix for specifications.) Do not leave labels loaded in mind: ...Choose labels mounted on labels. they can easily peel off the fresh supply at the rear of the printer. To remove the labels from the printer, tear off the backing and jam the printer. See page 2-13 for...

User Manual
Page 55
When you print on page 1-10. Using the Printer 2-21 To load an envelope, follow the steps used to load single sheets in "Running the Self Test" on the envelopes.... using the paper guide. Insert the wide edge of the envelope into the printer. The print head must not go past the left or right edge of the envelope or other thick paper. (See the Appendix for specifications.) It's a good idea to position 4 or 5. See page 2-18.... paper before you insert the envelope between the paper guides, push it firmly and hold it until it feeds into the printer first, printable-side down.
When you print on page 1-10. Using the Printer 2-21 To load an envelope, follow the steps used to load single sheets in "Running the Self Test" on the envelopes.... using the paper guide. Insert the wide edge of the envelope into the printer. The print head must not go past the left or right edge of the envelope or other thick paper. (See the Appendix for specifications.) It's a good idea to position 4 or 5. See page 2-18.... paper before you insert the envelope between the paper guides, push it firmly and hold it until it feeds into the printer first, printable-side down.

User Manual
Page 57
Printer setting descriptions This section describes all of continuous paper, providing a 1-inch margin between the last line printed on one page and the first line printed on the next. See the Appendix for specific characters. Because most software programs set their own top and bottom ...margins, you can easily tear off the printed pages. Skip-over the perforations of the next sheet. Auto tear off position where you should use this feature only if your program does not provide them. When the printer...
Printer setting descriptions This section describes all of continuous paper, providing a 1-inch margin between the last line printed on one page and the first line printed on the next. See the Appendix for specific characters. Because most software programs set their own top and bottom ...margins, you can easily tear off the printed pages. Skip-over the perforations of the next sheet. Auto tear off position where you should use this feature only if your program does not provide them. When the printer...
User Manual
Page 75
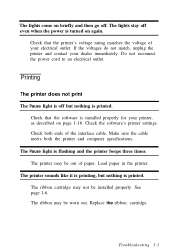
... off even when the power is flashing and the printer beeps three times. Check both the printer and computer specifications. The printer sounds like it is printing, but nothing is printed. Replace the ribbon cartridge. Check the software's printer settings. See page 1-6. Load paper in the printer. The ribbon may be out of the interface cable...
... off even when the power is flashing and the printer beeps three times. Check both the printer and computer specifications. The printer sounds like it is printing, but nothing is printed. Replace the ribbon cartridge. Check the software's printer settings. See page 1-6. Load paper in the printer. The ribbon may be out of the interface cable...
User Manual
Page 79
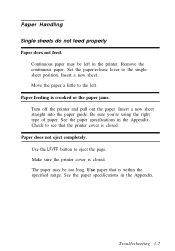
...Insert a new sheet. See the paper specifications in the Appendix. Troubleshooting 3-7 Paper Handling Single sheets do not feed properly Paper does not feed. Insert a new sheet straight into the paper guide. Check to the singlesheet position. Make sure the printer cover is within the specified range. Set .... Use the LF/FF button to the left in the printer. Use paper that the printer cover is crooked or the paper jams. Turn off the printer and pull out the paper. Paper feeding is closed . See the paper specifications in the Appendix. Move the paper a little to eject the...
...Insert a new sheet. See the paper specifications in the Appendix. Troubleshooting 3-7 Paper Handling Single sheets do not feed properly Paper does not feed. Insert a new sheet straight into the paper guide. Check to the singlesheet position. Make sure the printer cover is within the specified range. Set .... Use the LF/FF button to the left in the printer. Use paper that the printer cover is crooked or the paper jams. Turn off the printer and pull out the paper. Paper feeding is closed . See the paper specifications in the Appendix. Move the paper a little to eject the...

User Manual
Page 80
The position of the printer. Make sure your paper supply may have come off the tractor. Check that the holes on the sides of the paper are within 1 meter (3 feet) .... Reattach the paper to the correct position. Paper feeding is crooked or the paper jams. Make sure the paper guide is closed . Make sure the printer cover is in the Appendix. 3-8 Troubleshooting Continuous paper does not feed proper/y The tractor does not feed the paper. See the paper...
The position of the printer. Make sure your paper supply may have come off the tractor. Check that the holes on the sides of the paper are within 1 meter (3 feet) .... Reattach the paper to the correct position. Paper feeding is crooked or the paper jams. Make sure the paper guide is closed . Make sure the printer cover is in the Appendix. 3-8 Troubleshooting Continuous paper does not feed proper/y The tractor does not feed the paper. See the paper...

User Manual
Page 85
Appendix Printer Specifications A-2 Printing A-2 Paper A-4 Mechanical A-6 Electrical A-7 Environmental A-7 Safety approvals A-8 Interface Specifications A-8 Parallel interface A-8 Serial interface A-8 Command Summary A-10 Sending printer commands A-10 Using the command summary A-10 General operation A-11 Paper feeding A-11 Page format A-11 Print position motion A-12 Font selection A-13 Font enhancement A-14 Spacing A-15 Character handling A-16 Bit image A-18 Graphics A-19 Color printing A-19 Character Tables A-20 Appendix A-1
Appendix Printer Specifications A-2 Printing A-2 Paper A-4 Mechanical A-6 Electrical A-7 Environmental A-7 Safety approvals A-8 Interface Specifications A-8 Parallel interface A-8 Serial interface A-8 Command Summary A-10 Sending printer commands A-10 Using the command summary A-10 General operation A-11 Paper feeding A-11 Page format A-11 Print position motion A-12 Font selection A-13 Font enhancement A-14 Spacing A-15 Character handling A-16 Bit image A-18 Graphics A-19 Color printing A-19 Character Tables A-20 Appendix A-1
User Manual
Page 86
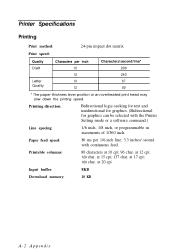
... for graphics can be selected with continuous feed. 80 characters at 10 cpi; 96 char. Printer Specifications Printing Print method: 24-pin impact dot matrix Print speed: Quality Draft Letter Quality Characters per 1/6-inch line; 3.3 inches/ second with the Printer Setting mode or a software command.) Line spacing: 1/6 inch, 1/8 inch, or programmable in increments of...
... for graphics can be selected with continuous feed. 80 characters at 10 cpi; 96 char. Printer Specifications Printing Print method: 24-pin impact dot matrix Print speed: Quality Draft Letter Quality Characters per 1/6-inch line; 3.3 inches/ second with the Printer Setting mode or a software command.) Line spacing: 1/6 inch, 1/8 inch, or programmable in increments of...

User Manual
Page 92
...55022 (CISPR Pub. 22) Class B Interface Specifications Your printer is equipped with an EIA-232D serial interface and a Centronics-compatible parallel interface. The printer switches automatically to the appropriate interface when it ...receives data. Data format: S-bit Synchronization: STROBE pulse Handshaking: BUSY and ACKNLG signals Signal level: TTL compatible Connector: 36-pin 57-30360 Amphenol connector or equivalent Serial interface The serial interface has the following characteristics. Bit rate: 300...
...55022 (CISPR Pub. 22) Class B Interface Specifications Your printer is equipped with an EIA-232D serial interface and a Centronics-compatible parallel interface. The printer switches automatically to the appropriate interface when it ...receives data. Data format: S-bit Synchronization: STROBE pulse Handshaking: BUSY and ACKNLG signals Signal level: TTL compatible Connector: 36-pin 57-30360 Amphenol connector or equivalent Serial interface The serial interface has the following characteristics. Bit rate: 300...
User Manual
Page 113
... 2-22, 2-24 tear off, 2-22-23 B Bit rate, 2-22, 2-25 Buttons, 2-2-3 C Changing printer settings, 2-25-28 Character handling, A-16 table, 2-22-23 Choosing a place for the printer, 1-3 Color Upgrade Kit, 1, 2-35-38 Command summary, A-10-19 Connecting printer to computer, 1-13-16 Continuous paper, 2-7-17 Control panel, 2-2-4 Cut-sheet feeder, 2-29-33...States users, iii I Important safety information, v-vi, 4-5 Installing options, 2-29-38 knob, 1-4 ribbon cartridge, 1-6-9 Interface, 2-22, 2-25 parallel, 1-13-14 serial, 1-13, 1-15-16 specifications, A-8-9 K Knob, 1-4 ribbon-tightening, 1-7-8 Index 1
... 2-22, 2-24 tear off, 2-22-23 B Bit rate, 2-22, 2-25 Buttons, 2-2-3 C Changing printer settings, 2-25-28 Character handling, A-16 table, 2-22-23 Choosing a place for the printer, 1-3 Color Upgrade Kit, 1, 2-35-38 Command summary, A-10-19 Connecting printer to computer, 1-13-16 Continuous paper, 2-7-17 Control panel, 2-2-4 Cut-sheet feeder, 2-29-33...States users, iii I Important safety information, v-vi, 4-5 Installing options, 2-29-38 knob, 1-4 ribbon cartridge, 1-6-9 Interface, 2-22, 2-25 parallel, 1-13-14 serial, 1-13, 1-15-16 specifications, A-8-9 K Knob, 1-4 ribbon-tightening, 1-7-8 Index 1

User Manual
Page 114
... button, 2-3 light, 2-2 Plugging in the printer, 1-9 Power supply, troubleshooting, 3-2-3 Printer assembling, 1-4-9 changing the settings, 2-25-28 choosing a place for, 1-3 commands, sending, A-10 plugging in, 1-9 settings, 2-25-28, A-9 setting descriptions, 2-23 specifications, A-2-8 Printing in pull tractor position, 2-13...Safety information, v-vi, 4-5 Selecting fonts, 2-4 Self test, 1-10-12 Sending printer commands, A-10 Serial interface, 1-15-16 Setting up the printer, 1-l-16 your software, 1-16-18 Settings, changing printer, 2-22-28 Single sheets, 2-5-6 Single-bin Cut-Sheet Feeder, 1, 2-29...
... button, 2-3 light, 2-2 Plugging in the printer, 1-9 Power supply, troubleshooting, 3-2-3 Printer assembling, 1-4-9 changing the settings, 2-25-28 choosing a place for, 1-3 commands, sending, A-10 plugging in, 1-9 settings, 2-25-28, A-9 setting descriptions, 2-23 specifications, A-2-8 Printing in pull tractor position, 2-13...Safety information, v-vi, 4-5 Selecting fonts, 2-4 Self test, 1-10-12 Sending printer commands, A-10 Serial interface, 1-15-16 Setting up the printer, 1-l-16 your software, 1-16-18 Settings, changing printer, 2-22-28 Single sheets, 2-5-6 Single-bin Cut-Sheet Feeder, 1, 2-29...

User Manual
Page 115
Spacing, character, A-15 Special paper, 2-17-21 Specifications interface, A-8-9 printer, A-2-8 State reply, 2-22, 2-25 T Tractor, 1, 2-7 pull, 2-7, 2-13-17 push, 2-7-12 unit, 2-33-34 Troubleshooting, 3-1-12 U Unpacking printer, 1-2 Upgrade kit, color, 2-35-38 Using command summary, A-10 control panel, 2-2-4 parallel interface, 1-13-14 printer, 2-1-38 serial interface, 1-13, 1-15-16 W Warnings, cautions, and notes, 3 Where to get help for United Kingdom users, iv for United States users, iii Windows, Microsoft, 1-17 Index 3
Spacing, character, A-15 Special paper, 2-17-21 Specifications interface, A-8-9 printer, A-2-8 State reply, 2-22, 2-25 T Tractor, 1, 2-7 pull, 2-7, 2-13-17 push, 2-7-12 unit, 2-33-34 Troubleshooting, 3-1-12 U Unpacking printer, 1-2 Upgrade kit, color, 2-35-38 Using command summary, A-10 control panel, 2-2-4 parallel interface, 1-13-14 printer, 2-1-38 serial interface, 1-13, 1-15-16 W Warnings, cautions, and notes, 3 Where to get help for United Kingdom users, iv for United States users, iii Windows, Microsoft, 1-17 Index 3


