
Operation Guide - EasyMP Multi PC Projection v2.00
Page 63
The selected thumbnails are • To switch the size and the number of thumbnails displayed on one page, click the or button. 3. Select up to 4 thumbnails, you click this again, the previously selected thumbnails ...
The selected thumbnails are • To switch the size and the number of thumbnails displayed on one page, click the or button. 3. Select up to 4 thumbnails, you click this again, the previously selected thumbnails ...

Operation Guide - EasyMP Multi PC Projection v2.00
Page 65
...; Speed Priority: Compresses projected image data to lock the participant's mouse operations. Parent topic: Using Additional Functions Prohibiting Participant Operations The moderator can reduce the size of data transferred to the projector to the button on the projection control screen to increase transfer speed. 65 Set options screen appears. 2. To do...
...; Speed Priority: Compresses projected image data to lock the participant's mouse operations. Parent topic: Using Additional Functions Prohibiting Participant Operations The moderator can reduce the size of data transferred to the projector to the button on the projection control screen to increase transfer speed. 65 Set options screen appears. 2. To do...

Operation Guide - EasyMP Multi PC Projection v2.00
Page 95
... connect to their default settings, except for Switch LAN on the General settings tab. Displays EasyMP Multi PC Projection version information. Select to reduce the size of Projected Panels Projecting Your Screen Controlling the Connection Bandwidth 95
... connect to their default settings, except for Switch LAN on the General settings tab. Displays EasyMP Multi PC Projection version information. Select to reduce the size of Projected Panels Projecting Your Screen Controlling the Connection Bandwidth 95

Operation Guide - EasyMP Multi PC Projection v2.00
Page 104
... Large Thumbnails 12 Clear All Projects the thumbnail you want to view. Displays next page. Switches to the page you selected. Increases the size of selected thumbnails. Displays the number of each thumbnail so you can view more than 5 thumbnails, the thumbnail selection screen appears. Deselect ...clear all the selections. When you can view more details on each thumbnail so you select more thumbnails on the screen. Reduces the size of each one. If you must click the button again. Projects the screen from your computer in full screen mode without projecting any...
... Large Thumbnails 12 Clear All Projects the thumbnail you want to view. Displays next page. Switches to the page you selected. Increases the size of selected thumbnails. Displays the number of each thumbnail so you can view more than 5 thumbnails, the thumbnail selection screen appears. Deselect ...clear all the selections. When you can view more details on each thumbnail so you select more thumbnails on the screen. Reduces the size of each one. If you must click the button again. Projects the screen from your computer in full screen mode without projecting any...

Users Guide
Page 27
... computer images) 6 Freeze button (stops video action) 7 Test Pattern button (displays a test pattern) 8 Lens Shift button (adjusts the image position) 9 Zoom button (changes the image size) 10 Menu button (accesses projector menu system) 11 Arrow buttons (move through on-screen options and move pointer) 12 Enter button (selects options and left...
... computer images) 6 Freeze button (stops video action) 7 Test Pattern button (displays a test pattern) 8 Lens Shift button (adjusts the image position) 9 Zoom button (changes the image size) 10 Menu button (accesses projector menu system) 11 Arrow buttons (move through on-screen options and move pointer) 12 Enter button (selects options and left...

Users Guide
Page 32
..., turn on the Inv Direction Button setting and adjust the OSD Rotation setting. If you place the projector from the screen determines the approximate size of the projected image. (Conversion figures may have been rounded up or down.) You can also use the projector Throw Distance Calculator at which...aspect ratio, and other settings. Use the tables here to determine approximately how far to place the projector from the screen based on the size of the image. Parent topic: Projector Placement Related references Projector Setup Settings - Extended Menu Projection Distance The distance at...
..., turn on the Inv Direction Button setting and adjust the OSD Rotation setting. If you place the projector from the screen determines the approximate size of the projected image. (Conversion figures may have been rounded up or down.) You can also use the projector Throw Distance Calculator at which...aspect ratio, and other settings. Use the tables here to determine approximately how far to place the projector from the screen based on the size of the image. Parent topic: Projector Placement Related references Projector Setup Settings - Extended Menu Projection Distance The distance at...
Users Guide
Page 33
... to the base of the image (varies depending on vertical lens shift) 3 Center of lens Pro L1100U/L1200U/L1300U/L1405U (Standard Zoom Lens) 16:10 Aspect Ratio Image or Screen Screen or image size Projection distance (1) Wide to Tele (Minimum to Maximum) 50 inches 60 to 98 inches (153 to 248 cm...
... to the base of the image (varies depending on vertical lens shift) 3 Center of lens Pro L1100U/L1200U/L1300U/L1405U (Standard Zoom Lens) 16:10 Aspect Ratio Image or Screen Screen or image size Projection distance (1) Wide to Tele (Minimum to Maximum) 50 inches 60 to 98 inches (153 to 248 cm...

Users Guide
Page 34
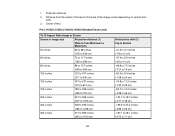
16:9 Aspect Ratio Image or Screen Screen or image size Projection distance (1) Wide to Tele (Minimum to Maximum) 49 inches 61 to 98 inches (154 to 250 cm) 50 inches 62 to 100 inches (157 ...
16:9 Aspect Ratio Image or Screen Screen or image size Projection distance (1) Wide to Tele (Minimum to Maximum) 49 inches 61 to 98 inches (154 to 250 cm) 50 inches 62 to 100 inches (157 ...

Users Guide
Page 35
4:3 Aspect Ratio Image or Screen Screen or image size Projection distance (1) Wide to Tele (Minimum to Maximum) 45 inches 61 to 99 inches (156 to 253 cm) 50 inches 68 to 111 inches (174 ...
4:3 Aspect Ratio Image or Screen Screen or image size Projection distance (1) Wide to Tele (Minimum to Maximum) 45 inches 61 to 99 inches (156 to 253 cm) 50 inches 68 to 111 inches (174 ...

Users Guide
Page 36
Pro L1500U/L1505U (Standard Zoom Lens) 16:10 Aspect Ratio Image or Screen Screen or image size Projection distance (1) Wide to Tele (Minimum to Maximum) 60 inches 78 to 128 inches (199 to 326 cm) 80 inches 105 to 172 inches (268 ... 545 inches (855 to 1385 cm) 500 inches 676 to 1093 inches (1717 to 2777 cm) 16:9 Aspect Ratio Image or Screen Screen or image size Projection distance (1) Wide to Tele (Minimum to Maximum) 59 inches 79 to 130 inches (201 to 330 cm) 36 Vertical lens shift (2) Top to bottom...
Pro L1500U/L1505U (Standard Zoom Lens) 16:10 Aspect Ratio Image or Screen Screen or image size Projection distance (1) Wide to Tele (Minimum to Maximum) 60 inches 78 to 128 inches (199 to 326 cm) 80 inches 105 to 172 inches (268 ... 545 inches (855 to 1385 cm) 500 inches 676 to 1093 inches (1717 to 2777 cm) 16:9 Aspect Ratio Image or Screen Screen or image size Projection distance (1) Wide to Tele (Minimum to Maximum) 59 inches 79 to 130 inches (201 to 330 cm) 36 Vertical lens shift (2) Top to bottom...

Users Guide
Page 37
16:9 Aspect Ratio Image or Screen Screen or image size Projection distance (1) Wide to Tele (Minimum to Maximum) 60 inches 80 to 132 inches (205 to 336 cm) 80 inches 108 to 177 inches (276 ... to 560 inches (879 to 1423 cm) 486 inches 675 to 1092 inches (1716 to 2775 cm) 4:3 Aspect Ratio Image or Screen Screen or image size Projection distance (1) Wide to Tele (Minimum to Maximum) 53 inches 78 to 128 inches (199 to 326 cm) Vertical lens shift (2) Top to bottom -34...
16:9 Aspect Ratio Image or Screen Screen or image size Projection distance (1) Wide to Tele (Minimum to Maximum) 60 inches 80 to 132 inches (205 to 336 cm) 80 inches 108 to 177 inches (276 ... to 560 inches (879 to 1423 cm) 486 inches 675 to 1092 inches (1716 to 2775 cm) 4:3 Aspect Ratio Image or Screen Screen or image size Projection distance (1) Wide to Tele (Minimum to Maximum) 53 inches 78 to 128 inches (199 to 326 cm) Vertical lens shift (2) Top to bottom -34...

Users Guide
Page 38
... High Altitude Mode to Video Sources 38 Connecting to ensure the projector's internal temperature is regulated properly. 4:3 Aspect Ratio Image or Screen Screen or image size Projection distance (1) Wide to Tele (Minimum to Maximum) 60 inches 89 to 146 inches (226 to 370 cm) 80 inches 120 to 195 inches (304...
... High Altitude Mode to Video Sources 38 Connecting to ensure the projector's internal temperature is regulated properly. 4:3 Aspect Ratio Image or Screen Screen or image size Projection distance (1) Wide to Tele (Minimum to Maximum) 60 inches 89 to 146 inches (226 to 370 cm) 80 inches 120 to 195 inches (304...

Users Guide
Page 89
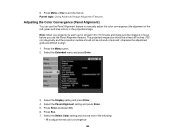
3. Turn on the projector before setting the focus, zoom, and lens shift for maximum accuracy. 1. Press Menu or Esc to use and press Enter. 6. Parent topic: Using Basic Projector Features Resizing the Image with the Zoom Button You can adjust the size of the image using the zoom buttons. Select the Extended menu and press Enter. 4. Select the language you want to exit the menus. Select the Language setting and press Enter. 5. Note: Wait 20 minutes after turning on the projector and display an image. 89
3. Turn on the projector before setting the focus, zoom, and lens shift for maximum accuracy. 1. Press Menu or Esc to use and press Enter. 6. Parent topic: Using Basic Projector Features Resizing the Image with the Zoom Button You can adjust the size of the image using the zoom buttons. Select the Extended menu and press Enter. 4. Select the language you want to exit the menus. Select the Language setting and press Enter. 5. Note: Wait 20 minutes after turning on the projector and display an image. 89

Users Guide
Page 104
..., press Esc. Settings Menu Related tasks Displaying a Test Pattern Correcting Image Shape with Quick Corner You can also display a pattern to correct the shape and size of an image that is slightly smaller. Press the Menu button. 104
..., press Esc. Settings Menu Related tasks Displaying a Test Pattern Correcting Image Shape with Quick Corner You can also display a pattern to correct the shape and size of an image that is slightly smaller. Press the Menu button. 104

Users Guide
Page 124
... the image source you always want to Wide or Normal in the Signal menu. 124 Press the Aspect button on the screen. 3. The shape and size of the displayed image changes, and the name of the image are cut-off, set the Resolution setting to use a particular aspect ratio for certain...
... the image source you always want to Wide or Normal in the Signal menu. 124 Press the Aspect button on the screen. 3. The shape and size of the displayed image changes, and the name of the image are cut-off, set the Resolution setting to use a particular aspect ratio for certain...

Users Guide
Page 125
Displays images using the full size of the image. Signal Menu Related tasks Setting the Screen Type Available Image Aspect Ratios You can select the following image aspect ratios, depending on ...
Displays images using the full size of the image. Signal Menu Related tasks Setting the Screen Type Available Image Aspect Ratios You can select the following image aspect ratios, depending on ...

Users Guide
Page 139
... to zoom into . • Press the E-Zoom + button repeatedly to disable the 4K Enhancement feature. 1. Press and hold the E-Zoom + button to the original image size, press Esc. 139 Note: This feature is enabled. button as necessary. Use the following buttons on the remote control.
... to zoom into . • Press the E-Zoom + button repeatedly to disable the 4K Enhancement feature. 1. Press and hold the E-Zoom + button to the original image size, press Esc. 139 Note: This feature is enabled. button as necessary. Use the following buttons on the remote control.

Users Guide
Page 150
... left screen. 7. Note: Input signals exceeding WUXGA are not supported. Note: Depending on the video input signals, the images may not appear at the same size even if you choose the Equal setting. 6. To switch the images, select the Swap Screens setting and press Enter. 5. You see a 4K Enhancement message, select... Yes to disable the 4K Enhancement feature. 150 To select an input source for Split Screen Projection You can also change the image sizes, select the Screen Size setting, press Enter, select a sizing option, press Enter, and press Menu to exit.
... left screen. 7. Note: Input signals exceeding WUXGA are not supported. Note: Depending on the video input signals, the images may not appear at the same size even if you choose the Equal setting. 6. To switch the images, select the Swap Screens setting and press Enter. 5. You see a 4K Enhancement message, select... Yes to disable the 4K Enhancement feature. 150 To select an input source for Split Screen Projection You can also change the image sizes, select the Screen Size setting, press Enter, select a sizing option, press Enter, and press Menu to exit.
Users Guide
Page 160
The projected image size should not be colored or textured; Select the Select Color setting and choose one of the red, green and blue colors) in focus before you ...
The projected image size should not be colored or textured; Select the Select Color setting and choose one of the red, green and blue colors) in focus before you ...

Users Guide
Page 168
... Tiling Automatically Configuring Tiling Manually Parent topic: Using Multiple Projectors Related tasks Multiple Projector Adjustment Overview Configuring Tiling Automatically If your projectors are rectangular, correctly sized, and focused. Turn on the front of the remote control for Multiple Projector Control Tiling Images into One Image You can configure tiling automatically. 1. Note...
... Tiling Automatically Configuring Tiling Manually Parent topic: Using Multiple Projectors Related tasks Multiple Projector Adjustment Overview Configuring Tiling Automatically If your projectors are rectangular, correctly sized, and focused. Turn on the front of the remote control for Multiple Projector Control Tiling Images into One Image You can configure tiling automatically. 1. Note...


