
Product Information Guide
Page 6
... button for NLQ Sans Serif font. FX-870/1170-6 10/13/92 9-Pin Printers This light is off when the button is on the printer to find the cause of basic printer operations. Press it again to select a font (draft, Epson Roman, or Epson Sans Serif). ALT The FONT button...the bin before loading paper. This button also selects the normal or condensed mode for simple control of communication problems between the printer and the computer. The printer is off for draft, on when the button is supplied. Other control-panel features Default setting mode: Self ...
... button for NLQ Sans Serif font. FX-870/1170-6 10/13/92 9-Pin Printers This light is off when the button is on the printer to find the cause of basic printer operations. Press it again to select a font (draft, Epson Roman, or Epson Sans Serif). ALT The FONT button...the bin before loading paper. This button also selects the normal or condensed mode for simple control of communication problems between the printer and the computer. The printer is off for draft, on when the button is supplied. Other control-panel features Default setting mode: Self ...

User Manual
Page 8
...Warning: This appliance must be liable against any damages or problems arising from the use in adverse environment or in conditions outside... lead of this appliance are coloured in accordance with other than those designated as Original Epson Products or Epson Approved Products by Epson (UK) Limited. Refer to rating plate for any consequential loss or damage, nor ...your plug, proceed as a result of excessive or inappropriate use, use of the product alone, and Epson (UK) Limited does not accept responsibility for voltage and check that the appliance voltage corresponds to this ...
...Warning: This appliance must be liable against any damages or problems arising from the use in adverse environment or in conditions outside... lead of this appliance are coloured in accordance with other than those designated as Original Epson Products or Epson Approved Products by Epson (UK) Limited. Refer to rating plate for any consequential loss or damage, nor ...your plug, proceed as a result of excessive or inappropriate use, use of the product alone, and Epson (UK) Limited does not accept responsibility for voltage and check that the appliance voltage corresponds to this ...
User Manual
Page 12
... Holder 4-16 Interface Cards 4-22 Front Sheet Guide 4-25 Chapter 5 Maintenance and Transportation 5-1 Cleaning the Printer 5-2 Replacing the Ribbon Cartridge 5 - 4 Transporting the Printer 5-4 Chapter 6 Troubleshooting 6-1 Problems and Solutions 6-2 Power Supply 6-3 Printing 6-4 Paper Handling 6-8 Options 6-11 Chapter 7 Technical Specifications 7-1 Printer Specifications 7-2 Interface Specifications 7-11 Option Specifications 7-15 Initialization 7-18 Chapter 8 Command Summary 8-1 Using the Command...
... Holder 4-16 Interface Cards 4-22 Front Sheet Guide 4-25 Chapter 5 Maintenance and Transportation 5-1 Cleaning the Printer 5-2 Replacing the Ribbon Cartridge 5 - 4 Transporting the Printer 5-4 Chapter 6 Troubleshooting 6-1 Problems and Solutions 6-2 Power Supply 6-3 Printing 6-4 Paper Handling 6-8 Options 6-11 Chapter 7 Technical Specifications 7-1 Printer Specifications 7-2 Interface Specifications 7-11 Option Specifications 7-15 Initialization 7-18 Chapter 8 Command Summary 8-1 Using the Command...

User Manual
Page 16
... on the operation of your l equipment. Chapter 1 contains information on installing options, general maintenance, specifications, and printer commands. If the printer does not operate properly or the printed results are not what you expect, see Chapter 6 for setting up ,... testing, and connecting the printer. There is also a glossary of printer terms and an index. Finding Your Way Around This manual provides fully illustrated, step-by-step instructions for a list of problems...
... on the operation of your l equipment. Chapter 1 contains information on installing options, general maintenance, specifications, and printer commands. If the printer does not operate properly or the printed results are not what you expect, see Chapter 6 for setting up ,... testing, and connecting the printer. There is also a glossary of printer terms and an index. Finding Your Way Around This manual provides fully illustrated, step-by-step instructions for a list of problems...

User Manual
Page 63
... enter the data dump mode. or rear-tractor position, paper moves back to find the cause of communication problems between the printer and the computer. Entering the Micro-feed mode (Hold down the PAPER FEED button while you see Data Dump Mode later in 2/216-inch ... positions. See Micro Feed later in the front- If the paper-release lever is already loaded in the printer.) Micro feed allows you can select the bin before loading paper. See Testing the Printer in Chapter 1 for details. Other control-panel features Default-setting mode: See the next section for details....
... enter the data dump mode. or rear-tractor position, paper moves back to find the cause of communication problems between the printer and the computer. Entering the Micro-feed mode (Hold down the PAPER FEED button while you see Data Dump Mode later in 2/216-inch ... positions. See Micro Feed later in the front- If the paper-release lever is already loaded in the printer.) Micro feed allows you can select the bin before loading paper. See Testing the Printer in Chapter 1 for details. Other control-panel features Default-setting mode: See the next section for details....

User Manual
Page 82
... programming language. To use data dump mode, follow these steps: 1. Next, run an application program or a program you turn on the printer. 3. ODDaCtJOa Dump Mode 1B 40 41 42 43 44 45 46 47 46 49 4A 48 4C 4D 4E 0001 4F 50 51 52...78 70 7C 7D 7E .@ABCDEFGHIJKLMN OPQRSTUVWXYZE\l- ~abcdefghijklnan opqanw: Make sure the printer is a special feature that allows experienced users to find the cause of communication problems between the printer and application programs. In data dump mode, the printer produces a printout of all the codes it receives. Load the paper. 4....
... programming language. To use data dump mode, follow these steps: 1. Next, run an application program or a program you turn on the printer. 3. ODDaCtJOa Dump Mode 1B 40 41 42 43 44 45 46 47 46 49 4A 48 4C 4D 4E 0001 4F 50 51 52...78 70 7C 7D 7E .@ABCDEFGHIJKLMN OPQRSTUVWXYZE\l- ~abcdefghijklnan opqanw: Make sure the printer is a special feature that allows experienced users to find the cause of communication problems between the printer and application programs. In data dump mode, the printer produces a printout of all the codes it receives. Load the paper. 4....

User Manual
Page 114
Chapter 6 Troubleshooting Problems and Solutions 6-2 Power Supply 6-3 Printing 6-4 Paper Handling 6-8 Options 6-11 Troubleshooting 6-1
Chapter 6 Troubleshooting Problems and Solutions 6-2 Power Supply 6-3 Printing 6-4 Paper Handling 6-8 Options 6-11 Troubleshooting 6-1
User Manual
Page 115
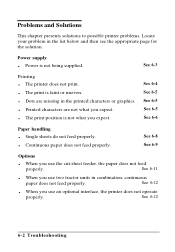
... This chapter presents solutions to possible printer problems. Locate your problem in the printed characters or graphics. l The print position is not what you expect. Power supply l Power is faint or uneven. l Dots are not what you use two tractor units in combination, continuous paper does not feed properly. See 6-4 See 6-5 See 6-5 See 6-5 See...
... This chapter presents solutions to possible printer problems. Locate your problem in the printed characters or graphics. l The print position is not what you expect. Power supply l Power is faint or uneven. l Dots are not what you use two tractor units in combination, continuous paper does not feed properly. See 6-4 See 6-5 See 6-5 See 6-5 See...

User Manual
Page 116
... rating matches the voltage of your electrical outlet. If the voltages do not match, unplug the printer and contact your Epson dealer, or a qualified service person. If problems persist, contact your dealer immediately. l The READY light does not come on briefly and then goes off even when the power is operating properly. Check...
... rating matches the voltage of your electrical outlet. If the voltages do not match, unplug the printer and contact your Epson dealer, or a qualified service person. If problems persist, contact your dealer immediately. l The READY light does not come on briefly and then goes off even when the power is operating properly. Check...

User Manual
Page 117
... does not print correctly, contact your cable is installed properly for a paper jam, ribbon jam, or other problem; l The READY light is on , the problem is out of the interface cable between the printer and the computer. If you are using the standard parallel interface, be worn out. The ribbon may not be...
... does not print correctly, contact your cable is installed properly for a paper jam, ribbon jam, or other problem; l The READY light is on , the problem is out of the interface cable between the printer and the computer. If you are using the standard parallel interface, be worn out. The ribbon may not be...

User Manual
Page 120
...the software, or the cable. Make sure the default page length setting matches your application program's menu. l Printing starts too low on . If the printer still does not print correctly, try the self test described in the default-setting mode. See page 1-15 . If the self test works properly, the... page. See page 2-19. l Skip-over -perforation may be on the page, or the bottom part of one page is all right and the problem probably lies in the center of -form position. See page 3-5. Be sure to reduce the page length. Printing l Regular gays occur in the default...
...the software, or the cable. Make sure the default page length setting matches your application program's menu. l Printing starts too low on . If the printer still does not print correctly, try the self test described in the default-setting mode. See page 1-15 . If the self test works properly, the... page. See page 2-19. l Skip-over -perforation may be on the page, or the bottom part of one page is all right and the problem probably lies in the center of -form position. See page 3-5. Be sure to reduce the page length. Printing l Regular gays occur in the default...

User Manual
Page 121
...paper may be too far to reduce or eliminate the top margin and reduce the page length. Be sure to choose the correct printer from your application software to the right. Reinsert the paper more firmly. Paper Handling The following section covers single-sheet and continuous-paper... problems. For cut-sheet feeder problems, see the section on options, starting on the page, or the bottom part of the next page. See page 1-15. Reduce...
...paper may be too far to reduce or eliminate the top margin and reduce the page length. Be sure to choose the correct printer from your application software to the right. Reinsert the paper more firmly. Paper Handling The following section covers single-sheet and continuous-paper... problems. For cut-sheet feeder problems, see the section on options, starting on the page, or the bottom part of the next page. See page 1-15. Reduce...

User Manual
Page 176
... spreadsheets onto a page. cpi See characters per inch. control code Special codes used to control printer functions (such as a carriage return or line feed) instead of communication problems between pages, and is supplied in a folded stack. dot matrix A method of printing in which the width of each character is approximately 60% of the width...
... spreadsheets onto a page. cpi See characters per inch. control code Special codes used to control printer functions (such as a carriage return or line feed) instead of communication problems between pages, and is supplied in a folded stack. dot matrix A method of printing in which the width of each character is approximately 60% of the width...
User Manual
Page 183
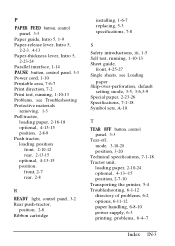
...23-24 Parallel interface, 1-14 PAUSE button, control panel, 3-3 Power cord, 1-10 Printable area, 7-6-7 Print direction, 7-2 Print test, running, 1-10-13 Problems, see Troubleshooting Protective materials removing, 1-3 Pull tractor, loading paper, 2-16-18 optional, 4-13-15 position, 2-8-9 Push tractor, loading position front, 2-10-...position, 3-20 Technical specifications, 7-1-18 Tractor unit, loading paper, 2-10-24 optional, 4-13--15 position, 2-7-10 Transporting the printer, 5-4 Troubleshooting, 6-1-12 directory of problems, 6-2 options, 6-11-12 paper handling, 6-8-10 power supply, 6-3 printing...
...23-24 Parallel interface, 1-14 PAUSE button, control panel, 3-3 Power cord, 1-10 Printable area, 7-6-7 Print direction, 7-2 Print test, running, 1-10-13 Problems, see Troubleshooting Protective materials removing, 1-3 Pull tractor, loading paper, 2-16-18 optional, 4-13-15 position, 2-8-9 Push tractor, loading position front, 2-10-...position, 3-20 Technical specifications, 7-1-18 Tractor unit, loading paper, 2-10-24 optional, 4-13--15 position, 2-7-10 Transporting the printer, 5-4 Troubleshooting, 6-1-12 directory of problems, 6-2 options, 6-11-12 paper handling, 6-8-10 power supply, 6-3 printing...

Service Manual
Page 105
Motor and Printhead Coil Resistance Coil Resistance 5.0 ohms +/- 77. 5.1 Overview REV.-A The FX-870/l 170 may exhibit different symptoms for the same problem. TSTART r 1 I 5.3 I 5-1o I 5.4 15-10 I Motor Assembly, PF Printhead Table 5-1. The following tables... difficult. The Troubleshooting Procedure The following flowchart illustrates the main steps of the head wire arrengement.) 5-1 Part Motor Assembly, CR I 5.5 5-13 ~ The problem is corrected. ] Figure 5-1. at 25 degrees C (77degrees F) CN13 on the main board 1,2,3, 4 pin@ phase A, ~, B, ~ 63 ohms +/-3...
Motor and Printhead Coil Resistance Coil Resistance 5.0 ohms +/- 77. 5.1 Overview REV.-A The FX-870/l 170 may exhibit different symptoms for the same problem. TSTART r 1 I 5.3 I 5-1o I 5.4 15-10 I Motor Assembly, PF Printhead Table 5-1. The following tables... difficult. The Troubleshooting Procedure The following flowchart illustrates the main steps of the head wire arrengement.) 5-1 Part Motor Assembly, CR I 5.5 5-13 ~ The problem is corrected. ] Figure 5-1. at 25 degrees C (77degrees F) CN13 on the main board 1,2,3, 4 pin@ phase A, ~, B, ~ 63 ohms +/-3...
Service Manual
Page 108
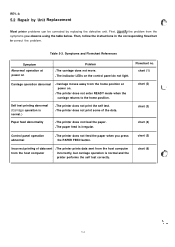
... q Carriage moves away from the home position at power on the control panel do not light. chart (5) Incorrect printing of the dots. chart (2) L." chart (3) Paper feed abnormality q The printer does not feed the paper. REV.-A 5.2 Repair by Unit Replacement (. ?,> Most printer problems can be corrected by replacing the defective unit. q The indicator LEDs on...
... q Carriage moves away from the home position at power on the control panel do not light. chart (5) Incorrect printing of the dots. chart (2) L." chart (3) Paper feed abnormality q The printer does not feed the paper. REV.-A 5.2 Repair by Unit Replacement (. ?,> Most printer problems can be corrected by replacing the defective unit. q The indicator LEDs on...

Service Manual
Page 110
at room v Replace the BOARD ASSY,, C094 MAIN. problem corrected? problem corrected? coil resistance correct (5 ohms +/- 7 '%. REV.-A Flowchart (2) carriage operation abnormal START CN3, 4, 5, 6, 7, 8, 9, and 13 connecting the BOARD ASSY., C094 MAI and the printer mechanism Yes Secure the connectors. END * END * Note: If any coils in the CR motor are shorted, also test the motor drivers on the BOARD ASSY., C094 MAIN. 5-6 v Refer to Section 5.5, Repairing the Printer Mechanism.
at room v Replace the BOARD ASSY,, C094 MAIN. problem corrected? problem corrected? coil resistance correct (5 ohms +/- 7 '%. REV.-A Flowchart (2) carriage operation abnormal START CN3, 4, 5, 6, 7, 8, 9, and 13 connecting the BOARD ASSY., C094 MAI and the printer mechanism Yes Secure the connectors. END * END * Note: If any coils in the CR motor are shorted, also test the motor drivers on the BOARD ASSY., C094 MAIN. 5-6 v Refer to Section 5.5, Repairing the Printer Mechanism.

Service Manual
Page 114
START 1 Perform the self test (Turn on Yes 1s the problem corrected? f-". -,. ' No Replace the BOARD ASSY., C094 MAIN. See Section 5.3 through 5.5. 4-, G Check the printer's default settings. See Section 1.5.1 for information on the printer while holding down the PAPER FEED button). I END END * * - ., 5-1o REV.-A Flowchart (6) incorrect printing of data sent from host computer...
START 1 Perform the self test (Turn on Yes 1s the problem corrected? f-". -,. ' No Replace the BOARD ASSY., C094 MAIN. See Section 5.3 through 5.5. 4-, G Check the printer's default settings. See Section 1.5.1 for information on the printer while holding down the PAPER FEED button). I END END * * - ., 5-1o REV.-A Flowchart (6) incorrect printing of data sent from host computer...

Service Manual
Page 115
...off only the secondary power circuit, so the primary power circuit IS Ilve as long as the printer IS connected to the FEG T (Ql) when the printer is powered. The checkpoint column provides proper waveforms, resistance values, and other information for repairing the ...BOARD ASSEMBLY, C076 PSB/PSE. It describes various problems, likely causes, checkpoints, and solutions. Table 5-4. Repairing the BOARD ASSEMBLY, C076 PSB...
...off only the secondary power circuit, so the primary power circuit IS Ilve as long as the printer IS connected to the FEG T (Ql) when the printer is powered. The checkpoint column provides proper waveforms, resistance values, and other information for repairing the ...BOARD ASSEMBLY, C076 PSB/PSE. It describes various problems, likely causes, checkpoints, and solutions. Table 5-4. Repairing the BOARD ASSEMBLY, C076 PSB...

Service Manual
Page 116
Repairing the BOARD ASSEMBLY, C076 PSB/PSE (Continued) Problem Cause Checkpoint The voltage of the +35 V line is dead. Replace Q2. Check the voltage waveforms at Q3. Solution Replace D3, Icl, Pcl, PC2 or ZD51. . , CH1=O.2V TlME=2~s Q2 is below thespecifiedvalue. I I HI CH1=2V 11 1I . . . . Table 5-4. Q3, ICI, Pcl, PC2 Check the voltage waveforms at Q2.
Repairing the BOARD ASSEMBLY, C076 PSB/PSE (Continued) Problem Cause Checkpoint The voltage of the +35 V line is dead. Replace Q2. Check the voltage waveforms at Q3. Solution Replace D3, Icl, Pcl, PC2 or ZD51. . , CH1=O.2V TlME=2~s Q2 is below thespecifiedvalue. I I HI CH1=2V 11 1I . . . . Table 5-4. Q3, ICI, Pcl, PC2 Check the voltage waveforms at Q2.


