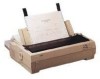
Product Information Guide
Page 3
....5 to 132 V Rated current: 1.8 A Power consumption: (during self-test printing in draft mode at 14 dots/character: 3 million characters MTBF: Standard: 4000 power-on hours Wide...: 6000 power-on hours Print head life: 100 million characters/wire Dimensions and weight: ~! The Epson...interface cards to supplement your printer. ~ Option Specifications Cut-sheet feeders Dimensions and weight: Dimensions include the printer. 9-Pin Printers 10/13/92 FX-870/1170-3 FX-870/1170 Mechanical Paper-feed methods: ...
....5 to 132 V Rated current: 1.8 A Power consumption: (during self-test printing in draft mode at 14 dots/character: 3 million characters MTBF: Standard: 4000 power-on hours Wide...: 6000 power-on hours Print head life: 100 million characters/wire Dimensions and weight: ~! The Epson...interface cards to supplement your printer. ~ Option Specifications Cut-sheet feeders Dimensions and weight: Dimensions include the printer. 9-Pin Printers 10/13/92 FX-870/1170-3 FX-870/1170 Mechanical Paper-feed methods: ...

Product Information Guide
Page 6
...while you see that your printer is selected. The self test lets you turn on for NLQ Roman, and blinks for NLQ Sans Serif font. Data dump: Hold down the PAPER FEED button while you use the optional double-bin cut -sheet feeder. FX-870/1170 Symbol set Characters defined ...in tear-off mode, out of basic printer operations. Hold it down to advance continuous paper to select a font (draft, Epson Roman, or Epson Sans Serif). FX-870/1170-6 10/13/92 9-Pin Printers PAUSE/TEAR OFF Press this button ...
...while you see that your printer is selected. The self test lets you turn on for NLQ Roman, and blinks for NLQ Sans Serif font. Data dump: Hold down the PAPER FEED button while you use the optional double-bin cut -sheet feeder. FX-870/1170 Symbol set Characters defined ...in tear-off mode, out of basic printer operations. Hold it down to advance continuous paper to select a font (draft, Epson Roman, or Epson Sans Serif). FX-870/1170-6 10/13/92 9-Pin Printers PAUSE/TEAR OFF Press this button ...
User Manual
Page 18
Chapter 1 Setting Up the Printer Unpacking the Printer 1-2 Checking the parts 1-2 Removing the protective materials 1 - 3 Choosing a Place for the Printer 1-4 Assembling the Printer 1-6 Installing the ribbon cartridge 1-6 Attaching the paper guide 1-9 Testing the Printer 1-10 Plugging in the printer 1-10 Running the self test 1-11 Connecting the Printer to Your Computer 1-14 Configuring Your Software for the Printer 1-15 Choosing from a menu 1-15 Setting Up the Printer l - l
Chapter 1 Setting Up the Printer Unpacking the Printer 1-2 Checking the parts 1-2 Removing the protective materials 1 - 3 Choosing a Place for the Printer 1-4 Assembling the Printer 1-6 Installing the ribbon cartridge 1-6 Attaching the paper guide 1-9 Testing the Printer 1-10 Plugging in the printer 1-10 Running the self test 1-11 Connecting the Printer to Your Computer 1-14 Configuring Your Software for the Printer 1-15 Choosing from a menu 1-15 Setting Up the Printer l - l

User Manual
Page 27
... sure the voltage required by the printer matches that the printer is working properly. Plug the power cord into a properly grounded electrical outlet. 1-10 Setting Up the Printer Plugging in the power cord. 3. Testing the Printer Before connecting your printer to a computer, use the built-in self test to see that of the printer to the AC inlet on...
... sure the voltage required by the printer matches that the printer is working properly. Plug the power cord into a properly grounded electrical outlet. 1-10 Setting Up the Printer Plugging in the power cord. 3. Testing the Printer Before connecting your printer to a computer, use the built-in self test to see that of the printer to the AC inlet on...

User Manual
Page 28
...and the READY light blinks. The following steps describe how to the single-sheet position. 2. Make sure that the printer is turned off. Setting Up the Printer 1-11 The printer prints the self test using a single sheet of paper, loaded from the rear, front, top, or bottom. Also, you turn ...on paper handling. Testing the Printer Running the self test You can load paper for full details on the printer. Move the paper-release lever to run the self test with continuous paper or single sheets. Hold down the PAPER FEED button while you ...
...and the READY light blinks. The following steps describe how to the single-sheet position. 2. Make sure that the printer is turned off. Setting Up the Printer 1-11 The printer prints the self test using a single sheet of paper, loaded from the rear, front, top, or bottom. Also, you turn ...on paper handling. Testing the Printer Running the self test You can load paper for full details on the printer. Move the paper-release lever to run the self test with continuous paper or single sheets. Hold down the PAPER FEED button while you ...

User Manual
Page 29
CAUTION: Use paper that is at least 210 mm (8.27 inches) wide for the standard-width carriage or 360 mm (14 4. Move the left edge guide until it locks in place next to match the width of your paper. Insert a sheet of paper between the edge guides until it meets resistance. After about two seconds, the printer loads the paper automatically and starts the self test. 1-12 Setting Up the Printer Then adjust the right edge guide to the arrow guide mark. Testing the Printer 3.
CAUTION: Use paper that is at least 210 mm (8.27 inches) wide for the standard-width carriage or 360 mm (14 4. Move the left edge guide until it locks in place next to match the width of your paper. Insert a sheet of paper between the edge guides until it meets resistance. After about two seconds, the printer loads the paper automatically and starts the self test. 1-12 Setting Up the Printer Then adjust the right edge guide to the arrow guide mark. Testing the Printer 3.
User Manual
Page 30
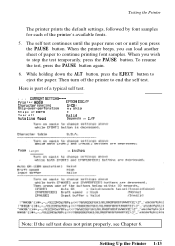
... until you wish to eject the paper. To resume the test, press the PAUSE button again. 6. Here is part of a typical self test. - - - Then turn off V&id hut line feed Depentl!5 on l/I . 0 c u i SGrip-over--perforation H o skip S h a p e o f zercl 0 Tear off the printer to end the self test. Character spacinq I - When you press the PAUSE button. CIJRRECIT SETTIl...
... until you wish to eject the paper. To resume the test, press the PAUSE button again. 6. Here is part of a typical self test. - - - Then turn off V&id hut line feed Depentl!5 on l/I . 0 c u i SGrip-over--perforation H o skip S h a p e o f zercl 0 Tear off the printer to end the self test. Character spacinq I - When you press the PAUSE button. CIJRRECIT SETTIl...
User Manual
Page 31
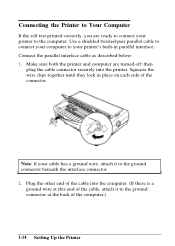
..., attach it to the ground connector beneath the interface connector. 2. Squeeze the wire clips together until they lock in parallel interface. Connecting the Printer to Your Computer If the self test printed correctly, you are turned off; then plug the cable connector securely into the computer. (If there is a ground wire at this...
..., attach it to the ground connector beneath the interface connector. 2. Squeeze the wire clips together until they lock in parallel interface. Connecting the Printer to Your Computer If the self test printed correctly, you are turned off; then plug the cable connector securely into the computer. (If there is a ground wire at this...

User Manual
Page 63
... select the bin before loading paper. This mode allows advanced users to perform the self test. For instructions, see Cut-Sheet Feeders in this chapter for details. The self test lets you turn on the printer to find the cause of the current default settings. Other control-panel features Default... See Micro Feed later in the single-sheet position, paper is operating properly and provides a printout of communication problems between the printer and the computer. Self test: Hold down ALT and press PAPER FEED.) If the paper-release lever is in this chapter. 3-4 Using the...
... select the bin before loading paper. This mode allows advanced users to perform the self test. For instructions, see Cut-Sheet Feeders in this chapter for details. The self test lets you turn on the printer to find the cause of the current default settings. Other control-panel features Default... See Micro Feed later in the single-sheet position, paper is operating properly and provides a printout of communication problems between the printer and the computer. Self test: Hold down ALT and press PAPER FEED.) If the paper-release lever is in this chapter. 3-4 Using the...

User Manual
Page 120
...the next page. Use your application software to reduce or eliminate the top margin and to choose the correct printer from your application software. If the self test does not work, contact your required paper length. If possible, specify single-sheet paper with your application program...'s menu. If the self test works properly, the printer is set the skip-over -perforation is all right and the problem probably lies in Chapter 1. Troubleshooting 6-7 See page 2-19...
...the next page. Use your application software to reduce or eliminate the top margin and to choose the correct printer from your application software. If the self test does not work, contact your required paper length. If possible, specify single-sheet paper with your application program...'s menu. If the self test works properly, the printer is set the skip-over -perforation is all right and the problem probably lies in Chapter 1. Troubleshooting 6-7 See page 2-19...
User Manual
Page 134
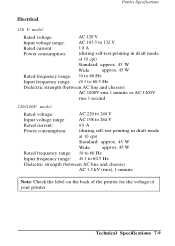
Technical Specifications 7-9 Printer Specifications Electrical 120 V model: Rated voltage: AC 120 V Input voltage range: AC 103.5 to 132 V Rated current: 1.8 A Power consumption: (during self-test printing in draft mode at 10 cpi) Standard: approx. 45 W Wide: approx. 45 W Rated frequency range: 50 ...220/240V model: Rated voltage: AC 220 to 240 V Input voltage range: AC 198 to 264 V Rated current: 0.9 A Power consumption: (during self-test printing in draft mode at 10 cpi) Standard: approx. 45 W Wide: approx. 45 W Rated frequency range: 50 to 60 Hz Input frequency ...
Technical Specifications 7-9 Printer Specifications Electrical 120 V model: Rated voltage: AC 120 V Input voltage range: AC 103.5 to 132 V Rated current: 1.8 A Power consumption: (during self-test printing in draft mode at 10 cpi) Standard: approx. 45 W Wide: approx. 45 W Rated frequency range: 50 ...220/240V model: Rated voltage: AC 220 to 240 V Input voltage range: AC 198 to 264 V Rated current: 0.9 A Power consumption: (during self-test printing in draft mode at 10 cpi) Standard: approx. 45 W Wide: approx. 45 W Rated frequency range: 50 to 60 Hz Input frequency ...

User Manual
Page 179
...automatically feeds the perforation of the printer's memory used as word processing or financial planning. All data stored in its defaults by sending a command, an INIT signal, or by turning the printer off A paper feed operation that helps you run the self test, the printer prints the characters stored in ...RAM is lost when the printer is printed at about two-thirds the normal height in the upper part ...
...automatically feeds the perforation of the printer's memory used as word processing or financial planning. All data stored in its defaults by sending a command, an INIT signal, or by turning the printer off A paper feed operation that helps you run the self test, the printer prints the characters stored in ...RAM is lost when the printer is printed at about two-thirds the normal height in the upper part ...
User Manual
Page 183
... 2-8 R READY light, control panel, 3-2 Rear push-tractor, position, 2-8 Ribbon cartridge installing, 1-6-7 replacing, 5-3 specifications, 7-8 S Safety introductions, iii, 1-5 Self test, running, 1-10-13 Sheet guide, front, 4-25-27 Single sheets, see Loading paper Skip-over-perforation, default setting mode, 3-5, 3-6,3-9 Special paper, 2-23-26...18 Tractor unit, loading paper, 2-10-24 optional, 4-13--15 position, 2-7-10 Transporting the printer, 5-4 Troubleshooting, 6-1-12 directory of problems, 6-2 options, 6-11-12 paper handling, 6-8-10 power supply, 6-3 printing problems, 6-4--7 Index IN-3
... 2-8 R READY light, control panel, 3-2 Rear push-tractor, position, 2-8 Ribbon cartridge installing, 1-6-7 replacing, 5-3 specifications, 7-8 S Safety introductions, iii, 1-5 Self test, running, 1-10-13 Sheet guide, front, 4-25-27 Single sheets, see Loading paper Skip-over-perforation, default setting mode, 3-5, 3-6,3-9 Special paper, 2-23-26...18 Tractor unit, loading paper, 2-10-24 optional, 4-13--15 position, 2-7-10 Transporting the printer, 5-4 Troubleshooting, 6-1-12 directory of problems, 6-2 options, 6-11-12 paper handling, 6-8-10 power supply, 6-3 printing problems, 6-4--7 Index IN-3
Service Manual
Page 7
... 1.4 Control Panel 1. .-.1. 7 1.4.1 Components 1. .-.17 1.4.2 Buttons 1. .-.18 1.4.3 Indicators 1. .-.19 1.5 Functions ...1. -20 1.5.1 Default Settings 1-20 1.5.2 Power On Default Settings 1. .-23 1.5.3 Buffer-full Printing 1. . -. 23 1.5.4 Hexadecimal Dump 1. . -.23 1.5.5 Self Test 1. .-24 1.5.6 Paper-out Detection 1. -. 24 1.5.7 Auto Tear-off 1. .-24 1.5.8 Thermal Protection 1. . -. 24 1.5.9 High Duty Printing 1. . -. 24 1.5.10 Sheet Loading and Sheet Ejection 1. -25 1.5.11 Adjust...
... 1.4 Control Panel 1. .-.1. 7 1.4.1 Components 1. .-.17 1.4.2 Buttons 1. .-.18 1.4.3 Indicators 1. .-.19 1.5 Functions ...1. -20 1.5.1 Default Settings 1-20 1.5.2 Power On Default Settings 1. .-23 1.5.3 Buffer-full Printing 1. . -. 23 1.5.4 Hexadecimal Dump 1. . -.23 1.5.5 Self Test 1. .-24 1.5.6 Paper-out Detection 1. -. 24 1.5.7 Auto Tear-off 1. .-24 1.5.8 Thermal Protection 1. . -. 24 1.5.9 High Duty Printing 1. . -. 24 1.5.10 Sheet Loading and Sheet Ejection 1. -25 1.5.11 Adjust...

Service Manual
Page 8
.... REV.-A 1.6 Main Components ~~ti...m m.m..-.mm 1-28 1.6.1 BOARDASSEMBLY,C094MAlN(Main ControlCircuitBoard 1-29 1.6.2 BOARDASSEMBLY,C094PNL(Control Pand~HtiWd) .....-.l-3O 1.6.3 BOARD ASSEMBLY, C076PSBFSE (Power SuPPIY circuit Board) ......1 -30 1.6.4 Printer Mechanism 1. .-.31 1.6.5 Housing Assembly 1. . -. 32 LIST OF FIGURES Figure 1-1. Self Test Printout 1. .-.24 Figure 1-10. Printer Mechanism 1. .-.31 Figure 1-16. External View of FX-870/1170 1. .-2 Figure 1-2. Iii
.... REV.-A 1.6 Main Components ~~ti...m m.m..-.mm 1-28 1.6.1 BOARDASSEMBLY,C094MAlN(Main ControlCircuitBoard 1-29 1.6.2 BOARDASSEMBLY,C094PNL(Control Pand~HtiWd) .....-.l-3O 1.6.3 BOARD ASSEMBLY, C076PSBFSE (Power SuPPIY circuit Board) ......1 -30 1.6.4 Printer Mechanism 1. .-.31 1.6.5 Housing Assembly 1. . -. 32 LIST OF FIGURES Figure 1-1. Self Test Printout 1. .-.24 Figure 1-10. Printer Mechanism 1. .-.31 Figure 1-16. External View of FX-870/1170 1. .-2 Figure 1-2. Iii

Service Manual
Page 21
...strength 220-240 VAC 198-264 VAC 50-60 Hz 49.5-60.5 Hz 0.9 A Approx. 45 W ( 80 columns) Approx. 45 W (136 columns) (Self test in draft mode, 10 cpi) 1.0 kVAC, 1 second (Between AC line and chassis) Table 1-9. F) - non-operating Resistance to 80 'Y. operating 0.50G, ...Dielectric strength 120 VAC 103.5-132 V AC 50-60 Hz 49.5-60.5 Hz 1.8 A Approx. 45 W ( 80 columns) Approx. 45 W (136 columns) (Self test in draft mode, 10 cpi) 1.5 kVAC, 1 second (Between AC line and chassis) 1.2.1.7 Environmental Conditions Table 1-10. Table 1-8. REV.-A 1.2.1.6 Electrical Specifications See ...
...strength 220-240 VAC 198-264 VAC 50-60 Hz 49.5-60.5 Hz 0.9 A Approx. 45 W ( 80 columns) Approx. 45 W (136 columns) (Self test in draft mode, 10 cpi) 1.0 kVAC, 1 second (Between AC line and chassis) Table 1-9. F) - non-operating Resistance to 80 'Y. operating 0.50G, ...Dielectric strength 120 VAC 103.5-132 V AC 50-60 Hz 49.5-60.5 Hz 1.8 A Approx. 45 W ( 80 columns) Approx. 45 W (136 columns) (Self test in draft mode, 10 cpi) 1.5 kVAC, 1 second (Between AC line and chassis) 1.2.1.7 Environmental Conditions Table 1-10. Table 1-8. REV.-A 1.2.1.6 Electrical Specifications See ...
Service Manual
Page 33
...automatically if the input data buffer is empty and the paper is too heavy for the printer's power supply. This function can be turned off the printer. (The control panel is still operational in self-test mode for paper handling and font selection. ) When pages are saved individually when a ...page length. If subsequent data is printed in the bottom line of printable lines is sent to the printer, the paper reverse feeds to put the printer in self-test mode. To stop the self test, turn off in the default setting mode. 1.5.8 Thermal Protection When the printhead temperature exceeds 82 deg...
...automatically if the input data buffer is empty and the paper is too heavy for the printer's power supply. This function can be turned off the printer. (The control panel is still operational in self-test mode for paper handling and font selection. ) When pages are saved individually when a ...page length. If subsequent data is printed in the bottom line of printable lines is sent to the printer, the paper reverse feeds to put the printer in self-test mode. To stop the self test, turn off in the default setting mode. 1.5.8 Thermal Protection When the printhead temperature exceeds 82 deg...

Service Manual
Page 36
...'t be ejected from the CSF has run out. No paper was paper in various ways, as shown below, to stop the sound. * Power-on operation (self test, hex dump, default setting, power-on selection) CSF bin-1 selected. ** CSF bin-2 selected. * The adjusted value set using micro feed is the same as the...
...'t be ejected from the CSF has run out. No paper was paper in various ways, as shown below, to stop the sound. * Power-on operation (self test, hex dump, default setting, power-on selection) CSF bin-1 selected. ** CSF bin-2 selected. * The adjusted value set using micro feed is the same as the...

Service Manual
Page 107
... buzzer functions. 5-3 All indicator LEDs blink sequentially in the CSF. Paper out error. Voltage error. Memory error. q No paper was present at the start of a self test. q Paper runs out after the PAPER FEED button has been pressed. Memory error. Paper out error. All indicators blink simultaneously. Paper release error. q Single sheet...
... buzzer functions. 5-3 All indicator LEDs blink sequentially in the CSF. Paper out error. Voltage error. Memory error. q No paper was present at the start of a self test. q Paper runs out after the PAPER FEED button has been pressed. Memory error. Paper out error. All indicators blink simultaneously. Paper release error. q Single sheet...
Service Manual
Page 108
... Problem q The carriage does not move. Self test printing abnormal (Carriage operation is irregular. First, identifi the problem from the host computer incorrectly, but carriage operation is normal and the 6 'm., ,.. ,>; chart (5) Incorrect printing of the dots. Symptoms and Flowchart References Symptom Abnormal operation at power on. q The printer does not print some of data...
... Problem q The carriage does not move. Self test printing abnormal (Carriage operation is irregular. First, identifi the problem from the host computer incorrectly, but carriage operation is normal and the 6 'm., ,.. ,>; chart (5) Incorrect printing of the dots. Symptoms and Flowchart References Symptom Abnormal operation at power on. q The printer does not print some of data...


