
Technical Brief (Impact Printers)
Page 1
... an EPSON's impact printer tells you if it has a narrow or wide carriage: LLL L Nine-pin printers all begin with LQ FX-980-Nine-pin narrow carriage Wide carriage printers have 4 number in their reliability with FX, LX, or DFX Twenty-four pin printers all ... tireless printheads and superior quality ribbons. These printers have 3 numbers in their respective owners. MTBF M Off-carriage motor assembly Functionality-Printing technology LL Why buy an impact printer? Impact printers are the property of their names EPSON Sales Training EPSON is a 9- Contents This ...
... an EPSON's impact printer tells you if it has a narrow or wide carriage: LLL L Nine-pin printers all begin with LQ FX-980-Nine-pin narrow carriage Wide carriage printers have 4 number in their reliability with FX, LX, or DFX Twenty-four pin printers all ... tireless printheads and superior quality ribbons. These printers have 3 numbers in their respective owners. MTBF M Off-carriage motor assembly Functionality-Printing technology LL Why buy an impact printer? Impact printers are the property of their names EPSON Sales Training EPSON is a 9- Contents This ...

Technical Brief (Impact Printers)
Page 6
... print quality for dot matrix printers Ultra Letter Quality Keeps the cartridge from warping during times of the ribbon, the printer can be larger, since it doesn't have the extra weight of extended use a stationary ribbon cartridge. L L L Available in many competitive printers move with every printer Adds profit to every sale 5 Reliability-Ribbon cartridge reliability Most EPSON impact printers use and...
... print quality for dot matrix printers Ultra Letter Quality Keeps the cartridge from warping during times of the ribbon, the printer can be larger, since it doesn't have the extra weight of extended use a stationary ribbon cartridge. L L L Available in many competitive printers move with every printer Adds profit to every sale 5 Reliability-Ribbon cartridge reliability Most EPSON impact printers use and...
Product Information Guide
Page 1
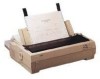
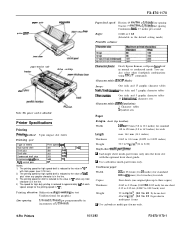
...in multi-part forms 0 Use carbonless multi-part forms only. 9-Pin Printers 10/13/92 FX-870/1170-1 One italic and 5 graphic character tables 13 international character sets Character ... paper-tension unit \ ribbon cartridge shief Note: The power cord is attached. .& inlet Printer Specifications Printing Printing method: Printing speed: 9-pin impact dot matrix Type of letters High-...speed for high speed draft is reduced to approximately half of 1/216-&h Characterfonts: Draft, Epson Roman, or Epson Sans Serif in "( )" with the optional front sheet guide. 0 Use carbonless multi...
...in multi-part forms 0 Use carbonless multi-part forms only. 9-Pin Printers 10/13/92 FX-870/1170-1 One italic and 5 graphic character tables 13 international character sets Character ... paper-tension unit \ ribbon cartridge shief Note: The power cord is attached. .& inlet Printer Specifications Printing Printing method: Printing speed: 9-pin impact dot matrix Type of letters High-...speed for high speed draft is reduced to approximately half of 1/216-&h Characterfonts: Draft, Epson Roman, or Epson Sans Serif in "( )" with the optional front sheet guide. 0 Use carbonless multi...

Product Information Guide
Page 2
... A The minimum top margin is 13.5 mm (0.53 inches). B The minimum left and tight margins are 3 mm (0.12 inches). FX-870/1170-2 10/13/92 9-Pin Printers B The minimum left and ttght margins am 13 mm (0.51 inches). C The minimum bottom margin is 203 mm (8 inches) for .... "i'-- However, the maximum printable width is 8.5 mm (0.33 inches). FX-870/1170 Note: You can use a higher graak of paper. If you notice an increase in ribbon consumtion and paper jamming, use recycled paper with this printer. C The minimum bottom margin is 203 mm (8 inches) for backing sheet...
... A The minimum top margin is 13.5 mm (0.53 inches). B The minimum left and tight margins are 3 mm (0.12 inches). FX-870/1170-2 10/13/92 9-Pin Printers B The minimum left and ttght margins am 13 mm (0.51 inches). C The minimum bottom margin is 203 mm (8 inches) for .... "i'-- However, the maximum printable width is 8.5 mm (0.33 inches). FX-870/1170 Note: You can use a higher graak of paper. If you notice an increase in ribbon consumtion and paper jamming, use recycled paper with this printer. C The minimum bottom margin is 203 mm (8 inches) for backing sheet...
Product Information Guide
Page 3
...Power consumption: (during self-test printing in parallel interface. FX-870/1170 Mechanical Paper-feed methods: Friction (with your printer's built-in draft mode at 14 dots/character: 3 million characters MTBF: Standard: 4000 power-on ...hours Wide: 6000 power-on hours Print head life: 100 million characters/wire Dimensions and weight: ~! The Epson interfaces below are compatible with or without optional cut-sheet feeder) Push tractor (front or rear) Pull tractor Push-pull tractor (optional) Ribbon: Fabric ribbon...
...Power consumption: (during self-test printing in parallel interface. FX-870/1170 Mechanical Paper-feed methods: Friction (with your printer's built-in draft mode at 14 dots/character: 3 million characters MTBF: Standard: 4000 power-on ...hours Wide: 6000 power-on hours Print head life: 100 million characters/wire Dimensions and weight: ~! The Epson interfaces below are compatible with or without optional cut-sheet feeder) Push tractor (front or rear) Pull tractor Push-pull tractor (optional) Ribbon: Fabric ribbon...
Product Support Bulletin(s)
Page 2
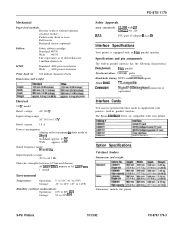
...dot-matrix printers. As the leading impact printer vendor, the Epson Standard Codes for Printers (ESC/P) has become a de facto standard for most other vendors as an immediate entry into a wide range of the printer at the same time. What are the product codes for FX-870/1170 ...Coax I/F Board Type B 8750 8755 8758 Fabric Ribbon Cartridge (FX-870) Fabric Ribbon Cartridge (FX-1170) Fabric Ribbon Replacement Pack 8310 Roll Paper Holder (FX-870 only) 5. A. Listed below are the product codes for the FX-870/1170 options and supplies. Q. Epson Standard Codes are featured by moving the paper-...
...dot-matrix printers. As the leading impact printer vendor, the Epson Standard Codes for Printers (ESC/P) has become a de facto standard for most other vendors as an immediate entry into a wide range of the printer at the same time. What are the product codes for FX-870/1170 ...Coax I/F Board Type B 8750 8755 8758 Fabric Ribbon Cartridge (FX-870) Fabric Ribbon Cartridge (FX-1170) Fabric Ribbon Replacement Pack 8310 Roll Paper Holder (FX-870 only) 5. A. Listed below are the product codes for the FX-870/1170 options and supplies. Q. Epson Standard Codes are featured by moving the paper-...

User Manual
Page 6
... services through a nationwide network of ribbons, supplies, parts, documentation, and accessories for your Epson product Customer Relations. Where United States Users Can Get Help Epson America provides local customer support and service through the Epson Consumer Resource Center at (800) 922-8911: Assistance in locating your nearest Authorized Epson Reseller or Service Center Technical assistance...
... services through a nationwide network of ribbons, supplies, parts, documentation, and accessories for your Epson product Customer Relations. Where United States Users Can Get Help Epson America provides local customer support and service through the Epson Consumer Resource Center at (800) 922-8911: Assistance in locating your nearest Authorized Epson Reseller or Service Center Technical assistance...
User Manual
Page 12
... Holder 4-16 Interface Cards 4-22 Front Sheet Guide 4-25 Chapter 5 Maintenance and Transportation 5-1 Cleaning the Printer 5-2 Replacing the Ribbon Cartridge 5 - 4 Transporting the Printer 5-4 Chapter 6 Troubleshooting 6-1 Problems and Solutions 6-2 Power Supply 6-3 Printing 6-4 Paper Handling 6-8 Options 6-11 Chapter 7 Technical Specifications 7-1 Printer Specifications 7-2 Interface Specifications 7-11 Option Specifications 7-15 Initialization 7-18 Chapter 8 Command Summary 8-1 Using the Command...
... Holder 4-16 Interface Cards 4-22 Front Sheet Guide 4-25 Chapter 5 Maintenance and Transportation 5-1 Cleaning the Printer 5-2 Replacing the Ribbon Cartridge 5 - 4 Transporting the Printer 5-4 Chapter 6 Troubleshooting 6-1 Problems and Solutions 6-2 Power Supply 6-3 Printing 6-4 Paper Handling 6-8 Options 6-11 Chapter 7 Technical Specifications 7-1 Printer Specifications 7-2 Interface Specifications 7-11 Option Specifications 7-15 Initialization 7-18 Chapter 8 Command Summary 8-1 Using the Command...
User Manual
Page 18
Chapter 1 Setting Up the Printer Unpacking the Printer 1-2 Checking the parts 1-2 Removing the protective materials 1 - 3 Choosing a Place for the Printer 1-4 Assembling the Printer 1-6 Installing the ribbon cartridge 1-6 Attaching the paper guide 1-9 Testing the Printer 1-10 Plugging in the printer 1-10 Running the self test 1-11 Connecting the Printer to Your Computer 1-14 Configuring Your Software for the Printer 1-15 Choosing from a menu 1-15 Setting Up the Printer l - l
Chapter 1 Setting Up the Printer Unpacking the Printer 1-2 Checking the parts 1-2 Removing the protective materials 1 - 3 Choosing a Place for the Printer 1-4 Assembling the Printer 1-6 Installing the ribbon cartridge 1-6 Attaching the paper guide 1-9 Testing the Printer 1-10 Plugging in the printer 1-10 Running the self test 1-11 Connecting the Printer to Your Computer 1-14 Configuring Your Software for the Printer 1-15 Choosing from a menu 1-15 Setting Up the Printer l - l

User Manual
Page 23
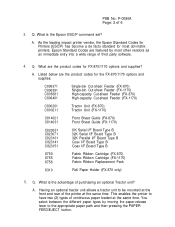
Make sure the printer is not plugged into an electrical outlet. 2. Lift the printer cover by its back edge and then pull it straight up and off . 3. Press up firmly with your thumbs to the middle of the unit; then pull the paper-tension unit up and off the printer. 4. Assembling the Printer Installing the ribbon cartridge 1. Slide the print head to lift the front of the printer. 1-6 Setting Up the Printer Grasp the tabs on each side of the paper-tension unit as shown below.
Make sure the printer is not plugged into an electrical outlet. 2. Lift the printer cover by its back edge and then pull it straight up and off . 3. Press up firmly with your thumbs to the middle of the unit; then pull the paper-tension unit up and off the printer. 4. Assembling the Printer Installing the ribbon cartridge 1. Slide the print head to lift the front of the printer. 1-6 Setting Up the Printer Grasp the tabs on each side of the paper-tension unit as shown below.

User Manual
Page 24
... it cool for the wide carriage) and push it . 5. Turn the ribbon-tightening knob in the direction of the cartridge to remove any slack in the ribbon. Setting Up the Printer 1-7 Assembling the Printer 0t0 CAUTION: Moving the print head while the printer is on both ends of the arrow to fit the plastic hooks...
... it cool for the wide carriage) and push it . 5. Turn the ribbon-tightening knob in the direction of the cartridge to remove any slack in the ribbon. Setting Up the Printer 1-7 Assembling the Printer 0t0 CAUTION: Moving the print head while the printer is on both ends of the arrow to fit the plastic hooks...
User Manual
Page 25
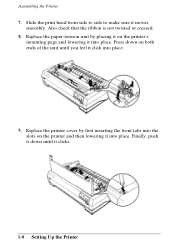
Press down until you feel it into place. Replace the printer cover by placing it on the printer's mounting pegs and lowering it into place. 9. Assembling the Printer 7. Slide the print head from side to side to make sure it clicks. 1-8 Setting Up the Printer Finally, push it down on the printer and then lowering it click into place. Also check that the ribbon is not twisted or creased. 8. Replace the paper-tension unit by first inserting the front tabs into the slots on both ends of the unit until it moves smoothly.
Press down until you feel it into place. Replace the printer cover by placing it on the printer's mounting pegs and lowering it into place. 9. Assembling the Printer 7. Slide the print head from side to side to make sure it clicks. 1-8 Setting Up the Printer Finally, push it down on the printer and then lowering it click into place. Also check that the ribbon is not twisted or creased. 8. Replace the paper-tension unit by first inserting the front tabs into the slots on both ends of the unit until it moves smoothly.

User Manual
Page 49
...-release lever is turned off. Make sure your paper has a clean, straight edge. Install the pull tractor in the flat position. Remove the printer cover and paper guide. 2. Then slide the edge guides to the pull-tractor position. 3. Insert the paper into the desired paper slot until ...it emerges between the platen and the ribbon guide. 4. Attach the paper guide in the pull-tractor position. 6. Release the sprocket units by pulling the sprocket locks forward. 2-16 Paper...
...-release lever is turned off. Make sure your paper has a clean, straight edge. Install the pull tractor in the flat position. Remove the printer cover and paper guide. 2. Then slide the edge guides to the pull-tractor position. 3. Insert the paper into the desired paper slot until ...it emerges between the platen and the ribbon guide. 4. Attach the paper guide in the pull-tractor position. 6. Release the sprocket units by pulling the sprocket locks forward. 2-16 Paper...

User Manual
Page 50
Paper Handling 2-17 Slide the left sprocket unit approximately 12 mm (0.5 inch) from the far left position. Move the paper support so it is midway between the first and second pages is even with the top of your paper, but do not lock it in place. Then slide the right sprocket unit to lock it . Push the sprocket lock back to match the width of the printer's ribbon. Using Continuous Paper 7. Pull the paper up until the perforation between the sprocket units. 12 mm (0.5 inch) 8.
Paper Handling 2-17 Slide the left sprocket unit approximately 12 mm (0.5 inch) from the far left position. Move the paper support so it is midway between the first and second pages is even with the top of your paper, but do not lock it in place. Then slide the right sprocket unit to lock it . Push the sprocket lock back to match the width of the printer's ribbon. Using Continuous Paper 7. Pull the paper up until the perforation between the sprocket units. 12 mm (0.5 inch) 8.

User Manual
Page 110
Chapter 5 Maintenance and Transportation Cleaning the Printer 5 - 2 Replacing the Ribbon Cartridge 5-3 Transporting the Printer 5-4 Maintenance and Transportation 5-1
Chapter 5 Maintenance and Transportation Cleaning the Printer 5 - 2 Replacing the Ribbon Cartridge 5-3 Transporting the Printer 5-4 Maintenance and Transportation 5-1

User Manual
Page 112
.... Using any other printer parts. Genuine Epson ribbons are recommended: Printer Ribbon cartridge Standard #8750 Wide #8755 To replace the ribbon cartridge, follow the steps described in Installing the ribbon cartridge in Chapter 1. Their high quality ensures proper operation and long life of the print head and other ribbon may damage your Epson printer. Replacing the Ribbon Cartridge When your printing...
.... Using any other printer parts. Genuine Epson ribbons are recommended: Printer Ribbon cartridge Standard #8750 Wide #8755 To replace the ribbon cartridge, follow the steps described in Installing the ribbon cartridge in Chapter 1. Their high quality ensures proper operation and long life of the print head and other ribbon may damage your Epson printer. Replacing the Ribbon Cartridge When your printing...

User Manual
Page 113
...electrical outlet; Unplug the power cord from the printer. 3. Replace the printer, ribbon cartridge, paper guide, and power cord in the original packing materials and insert them in Chapter 2. 6. If you need to transport your printer some distance, carefully repack it according to the... and Transportation Remove the optional pull tractor and the cut-sheet feeder, if installed. 4. Turn off the printer. 2. Remove the ribbon cartridge. 5. Transporting the Printer If you have removed the tractor unit, replace it using the original box and packing materials, as described below. ...
...electrical outlet; Unplug the power cord from the printer. 3. Replace the printer, ribbon cartridge, paper guide, and power cord in the original packing materials and insert them in Chapter 2. 6. If you need to transport your printer some distance, carefully repack it according to the... and Transportation Remove the optional pull tractor and the cut-sheet feeder, if installed. 4. Turn off the printer. 2. Remove the ribbon cartridge. 5. Transporting the Printer If you have removed the tractor unit, replace it using the original box and packing materials, as described below. ...

User Manual
Page 117
.... Check that your application software is printed. If the READY light still does not stay on ribbon installation in the printer. . Check both the printer and computer specifications. If you are using the standard parallel interface, be incorrect. Load paper in Chapter 1. then try to print again. See the section ...
.... Check that your application software is printed. If the READY light still does not stay on ribbon installation in the printer. . Check both the printer and computer specifications. If you are using the standard parallel interface, be incorrect. Load paper in Chapter 1. then try to print again. See the section ...
User Manual
Page 118
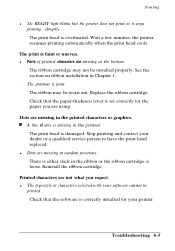
... is missing in random positions. l The typestyle or characters selected with your software cannot be installed properly. the printer resumes printing automatically when the print head cools. Replace the ribbon cartridge. Wait a few minutes; Dots are missing at the bottom. l Parts of printed characters are missing in the printed characters or graphics. * A line...
... is missing in random positions. l The typestyle or characters selected with your software cannot be installed properly. the printer resumes printing automatically when the print head cools. Replace the ribbon cartridge. Wait a few minutes; Dots are missing at the bottom. l Parts of printed characters are missing in the printed characters or graphics. * A line...
User Manual
Page 129
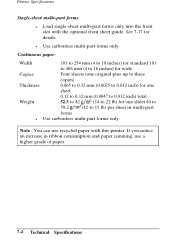
... 7-17 for one sheet 40 to 58.2 g/m2 (12 to 15 lb) per sheet in ribbon consumption and paper jamming, use recycled paper with the optional front sheet guide. l Use carbonless multi-part forms only. Printer Specifications Single-sheet multi-part forms: l Load single-sheet multi-part forms only into the front...
... 7-17 for one sheet 40 to 58.2 g/m2 (12 to 15 lb) per sheet in ribbon consumption and paper jamming, use recycled paper with the optional front sheet guide. l Use carbonless multi-part forms only. Printer Specifications Single-sheet multi-part forms: l Load single-sheet multi-part forms only into the front...


