
User Manual
Page 2
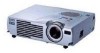
... on screen Illuminate buttons on remote control Freeze A/V Mute E-Zoom Power R/C ON OFF 3 2 5 4 Enter Esc Turn projector on/off Turn remote control on/off Mouse pointer and left mouse button Right mouse button 1 1 Display projector menu Select computer source Select S-video source Optimize computer image Display picture in picture Freeze A/V Mute E-Zoom...
... on screen Illuminate buttons on remote control Freeze A/V Mute E-Zoom Power R/C ON OFF 3 2 5 4 Enter Esc Turn projector on/off Turn remote control on/off Mouse pointer and left mouse button Right mouse button 1 1 Display projector menu Select computer source Select S-video source Optimize computer image Display picture in picture Freeze A/V Mute E-Zoom...

User Manual
Page 4
.... The information contained herein is designed only for any damages or problems arising from small children to strictly comply with your bare hands; EPSON is a service mark; WARNING: The projector and its affiliates shall be liable to the purchaser of this product, or (excluding the U.S.) failure to avoid any means, electronic, mechanical...
.... The information contained herein is designed only for any damages or problems arising from small children to strictly comply with your bare hands; EPSON is a service mark; WARNING: The projector and its affiliates shall be liable to the purchaser of this product, or (excluding the U.S.) failure to avoid any means, electronic, mechanical...

User Manual
Page 5
... Your Documentation 3 Reading This Manual Online 3 Getting More Information 4 Registration and Warranty 5 Unpacking the Projector 6 Additional Components 7 Optional Accessories 8 Setting Up the Projector 9 Positioning the Projector 10 Connecting to a Laptop Computer 12 Connecting the Computer Cable 12 Connecting the Cable for Remote Mouse Control . . . ... Sources 15 Connecting the RCA AV Cable 16 Connecting S-Video 17 Connecting Component Video Cables 18 Using the Projector 19 Turning On Your Equipment 20 Turning On the Projector 20 What To Do If You See a Blank Screen 22 iii
... Your Documentation 3 Reading This Manual Online 3 Getting More Information 4 Registration and Warranty 5 Unpacking the Projector 6 Additional Components 7 Optional Accessories 8 Setting Up the Projector 9 Positioning the Projector 10 Connecting to a Laptop Computer 12 Connecting the Computer Cable 12 Connecting the Cable for Remote Mouse Control . . . ... Sources 15 Connecting the RCA AV Cable 16 Connecting S-Video 17 Connecting Component Video Cables 18 Using the Projector 19 Turning On Your Equipment 20 Turning On the Projector 20 What To Do If You See a Blank Screen 22 iii

User Manual
Page 6
...the Image 24 Focusing and Zooming Your Image 25 Adjusting the Height of Your Image 25 Adjusting the Image Shape 26 Shutting Down the Projector 27 Using the Remote Control 29 Turning On and Using the Remote Control 30 Installing Batteries 30 Turning On the Remote Control 30 ... Using Horizontal and Vertical Highlights 37 Using the Remote Control as a Wireless Mouse 38 Creating Presentations for Your Projector. . . 39 Accessing the Memory Card 40 Moving the Memory Card from the Projector to Your Computer 40 Accessing the Memory Card Through a USB Cable . . . 42 Installing EasyMP 43...
...the Image 24 Focusing and Zooming Your Image 25 Adjusting the Height of Your Image 25 Adjusting the Image Shape 26 Shutting Down the Projector 27 Using the Remote Control 29 Turning On and Using the Remote Control 30 Installing Batteries 30 Turning On the Remote Control 30 ... Using Horizontal and Vertical Highlights 37 Using the Remote Control as a Wireless Mouse 38 Creating Presentations for Your Projector. . . 39 Accessing the Memory Card 40 Moving the Memory Card from the Projector to Your Computer 40 Accessing the Memory Card Through a USB Cable . . . 42 Installing EasyMP 43...
User Manual
Page 7
...New Scenario File 46 Building a Scenario 47 Setting Up Transitions 49 Adding Computer Access or Video 50 Transferring Your Presentation to the Projector 52 Presenting Without a Computer 55 Presenting Your Scenario 56 Displaying Each Slide Manually 57 Editing Your Scenario 58 Rearranging and Hiding Slides...Other Settings 63 Capturing Images 65 Saving Images on the Memory Card 65 Previewing Captured Images 66 Fine-tuning the Projector 69 Using the Projector's Menu System 70 Changing Menu Settings 71 Adjusting the Image 72 Repositioning the Image 73 Adjusting Image Appearance 73 ...
...New Scenario File 46 Building a Scenario 47 Setting Up Transitions 49 Adding Computer Access or Video 50 Transferring Your Presentation to the Projector 52 Presenting Without a Computer 55 Presenting Your Scenario 56 Displaying Each Slide Manually 57 Editing Your Scenario 58 Rearranging and Hiding Slides...Other Settings 63 Capturing Images 65 Saving Images on the Memory Card 65 Previewing Captured Images 66 Fine-tuning the Projector 69 Using the Projector's Menu System 70 Changing Menu Settings 71 Adjusting the Image 72 Repositioning the Image 73 Adjusting Image Appearance 73 ...

User Manual
Page 8
... 84 Cleaning and Replacing the Air Filter 85 Replacing the Lamp 86 Transporting the Projector 88 Solving Problems 89 Using On-Screen Help 90 What To Do When the Lights Flash 91 Solving Problems with the Image or Sound 94 ... Solving EasyMP Problems 101 EasyMP Error Messages 102 Where To Get Help 103 Telephone Support Services 103 Appendix A: Connecting to Additional Equipment 105 Installing the Projector 106 Connecting to an External Audio System 106 Connecting to a PC Desktop Computer 107 Connecting the Computer Cable 108 Connecting the Mouse Cable 109 Connecting...
... 84 Cleaning and Replacing the Air Filter 85 Replacing the Lamp 86 Transporting the Projector 88 Solving Problems 89 Using On-Screen Help 90 What To Do When the Lights Flash 91 Solving Problems with the Image or Sound 94 ... Solving EasyMP Problems 101 EasyMP Error Messages 102 Where To Get Help 103 Telephone Support Services 103 Appendix A: Connecting to Additional Equipment 105 Installing the Projector 106 Connecting to an External Audio System 106 Connecting to a PC Desktop Computer 107 Connecting the Computer Cable 108 Connecting the Mouse Cable 109 Connecting...
User Manual
Page 10
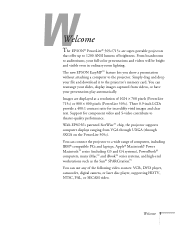
... drag and drop your full-color presentations and videos will be bright and visible even in ordinary room lighting. Three 0.9-inch LCDs provide a 400:1 contrast ratio for component video and S-video contribute to theater-quality performance. Support for incredibly vivid images and... from VGA through UXGA (through SXGA on the PowerLite 505c). Images are super-portable projectors that offer up to the projector's memory card. With EPSON's patented SizeWise™ chip, the projector supports computer displays ranging from videos, or have your presentation play automatically. WWelcome The...
... drag and drop your full-color presentations and videos will be bright and visible even in ordinary room lighting. Three 0.9-inch LCDs provide a 400:1 contrast ratio for component video and S-video contribute to theater-quality performance. Support for incredibly vivid images and... from VGA through UXGA (through SXGA on the PowerLite 505c). Images are super-portable projectors that offer up to the projector's memory card. With EPSON's patented SizeWise™ chip, the projector supports computer displays ranging from videos, or have your presentation play automatically. WWelcome The...

User Manual
Page 11
..., pointer, zoom, and many other projector features. See Chapters 4 and 5 for instructions. You can connect a DVD player, VCR, camcorder, laser disc player, digital camera, or any or all of these options: s Projecting without a computer With the EMP SlideMaker software on your presentation, you can... take advantage of any other video source to your projector. Then you can run your presentation with access to picture-in stereo speakers. s Connecting...
..., pointer, zoom, and many other projector features. See Chapters 4 and 5 for instructions. You can connect a DVD player, VCR, camcorder, laser disc player, digital camera, or any or all of these options: s Projecting without a computer With the EMP SlideMaker software on your presentation, you can... take advantage of any other video source to your projector. Then you can run your presentation with access to picture-in stereo speakers. s Connecting...
User Manual
Page 12
...previous page last page next page You have Acrobat Reader, you -for example, when taking your Owner's Kit. Welcome 3 To view your projector. Just insert the PowerLite CD-ROM in the table of contents on the left side of the screen to move through the manual: s ...drive, select the Install/View User's Guide button and click Install User's Guide or View User's Guide. Using Your Documentation To connect the projector to your laptop and get your presentation running fast, see this manual. s Notes contain important information about your equipment. Please follow these guidelines...
...previous page last page next page You have Acrobat Reader, you -for example, when taking your Owner's Kit. Welcome 3 To view your projector. Just insert the PowerLite CD-ROM in the table of contents on the left side of the screen to move through the manual: s ...drive, select the Install/View User's Guide button and click Install User's Guide or View User's Guide. Using Your Documentation To connect the projector to your laptop and get your presentation running fast, see this manual. s Notes contain important information about your equipment. Please follow these guidelines...

User Manual
Page 13
...of this book as well as Presenters Services to use your projector with your projector set up your projector? s CD-ROMs Your projector comes with two CD-ROMs. The PowerLite 505c/715c CD-ROM lets you register to EPSON support. Even more information, see your Quick Setup sheet, ... Includes your Acrobat Reader online guide. Quick steps for help system Provides assistance for details. s support.epson.com Download FAQs and e-mail your computer to use on the projector or the remote control. note You don't need to install on giving presentations? Here's where you ...
...of this book as well as Presenters Services to use your projector with your projector set up your projector? s CD-ROMs Your projector comes with two CD-ROMs. The PowerLite 505c/715c CD-ROM lets you register to EPSON support. Even more information, see your Quick Setup sheet, ... Includes your Acrobat Reader online guide. Quick steps for help system Provides assistance for details. s support.epson.com Download FAQs and e-mail your computer to use on the projector or the remote control. note You don't need to install on giving presentations? Here's where you ...

User Manual
Page 14
... their projectors, EPSON offers free Extra CareSM Road Service. In the unlikely event of EPSON's automated support services 24 hours a day. Call (800) 637-7661 and enter the PIN on new accessories, products, and services. For details, see the warranty brochures included in your projector and ...select Register Online. In addition, for more information. You can use the EPSON PrivateLine Support service to fax or mail. Registering also lets you won't have to wait ...
... their projectors, EPSON offers free Extra CareSM Road Service. In the unlikely event of EPSON's automated support services 24 hours a day. Call (800) 637-7661 and enter the PIN on new accessories, products, and services. For details, see the warranty brochures included in your projector and ...select Register Online. In addition, for more information. You can use the EPSON PrivateLine Support service to fax or mail. Registering also lets you won't have to wait ...
User Manual
Page 15
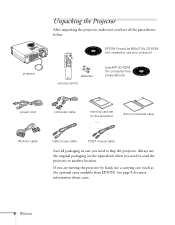
...Power R/C ON OFF 3 2 5 4 1 Enter Esc batteries remote control EPSON PowerLite 505c/715c CD-ROM (not needed to use your projector) EasyMP CD-ROM (for more information about cases. 6 Welcome If you are moving the projector by hand, use the original packaging (or the equivalent) when you need... to send the projector to ship the projector. Always use a carrying case (such as the optional cases available from EPSON). See page 8 for computer-free presentations)...
...Power R/C ON OFF 3 2 5 4 1 Enter Esc batteries remote control EPSON PowerLite 505c/715c CD-ROM (not needed to use your projector) EasyMP CD-ROM (for more information about cases. 6 Welcome If you are moving the projector by hand, use the original packaging (or the equivalent) when you need... to send the projector to ship the projector. Always use a carrying case (such as the optional cases available from EPSON). See page 8 for computer-free presentations)...
User Manual
Page 16
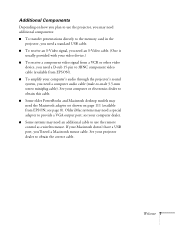
...on how you plan to use the remote control as a wireless mouse. See your computer or electronics dealer to obtain the correct cable. See your projector dealer to obtain this cable. s To amplify your video device.) s To receive a component video signal from a VCR or other video device, ...you need a D-sub 15-pin to 3BNC component video cable (available from EPSON; Additional Components Depending on page 111 (available from EPSON). s To receive an S-Video signal, you need an S-Video cable. (One is usually provided with your computer's audio ...
...on how you plan to use the remote control as a wireless mouse. See your computer or electronics dealer to obtain the correct cable. See your projector dealer to obtain this cable. s To amplify your video device.) s To receive a component video signal from a VCR or other video device, ...you need a D-sub 15-pin to 3BNC component video cable (available from EPSON; Additional Components Depending on page 111 (available from EPSON). s To receive an S-Video signal, you need an S-Video cable. (One is usually provided with your computer's audio ...
User Manual
Page 17
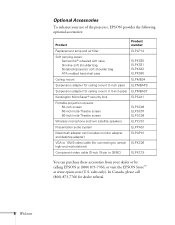
... Accessories To enhance your use of the projector, EPSON provides the following optional accessories: Product Product number Replacement lamp and air filter ELPLP14 Soft carrying cases: Samsonite® wheeled soft case Slimline soft shoulder bag Notebook/projector soft shoulder bag ATA molded hard shell case...Macintosh adapter set (includes monitor adapter and desktop adapter) ELPAP01 VGA to 13W3 video cable (for dealer referral. 8 Welcome or visit the EPSON Store™ at (800) 873-7766; In Canada, please call (800) 873-7766 for connecting to certain ELPKC06 high-end workstations...
... Accessories To enhance your use of the projector, EPSON provides the following optional accessories: Product Product number Replacement lamp and air filter ELPLP14 Soft carrying cases: Samsonite® wheeled soft case Slimline soft shoulder bag Notebook/projector soft shoulder bag ATA molded hard shell case...Macintosh adapter set (includes monitor adapter and desktop adapter) ELPAP01 VGA to 13W3 video cable (for dealer referral. 8 Welcome or visit the EPSON Store™ at (800) 873-7766; In Canada, please call (800) 873-7766 for connecting to certain ELPKC06 high-end workstations...

User Manual
Page 18
... 4 and 5 to learn how to video sources Setting Up the Projector 9 See Chapters 2 and 3 for the following in this chapter: s Positioning the projector s Connecting to a laptop computer s Connecting to use EasyMP. 1Setting Up the Projector This chapter tells you need to connect the projector to a desktop or workstation computer, see Appendix A. If you how...
... 4 and 5 to learn how to video sources Setting Up the Projector 9 See Chapters 2 and 3 for the following in this chapter: s Positioning the projector s Connecting to a laptop computer s Connecting to use EasyMP. 1Setting Up the Projector This chapter tells you need to connect the projector to a desktop or workstation computer, see Appendix A. If you how...

User Manual
Page 19
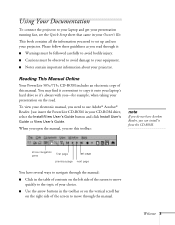
... video source, locate them within 6 feet of a grounded electrical outlet or extension cord. If you are projecting. note It's easier to aim the projector correctly at the screen and get a good-sized image. s Make sure there is within 5 feet of the audience, leaving as much space as ...of the screen, facing it toward the screen squarely. Use the figure below as possible between 3.6 and 45.5 feet from the screen. Otherwise, your projector. Image size generally increases with other settings. 38 to 45 feet 7 to 9 ft 3.6 to 4.3 ft distance from the screen to control it. ...
... video source, locate them within 6 feet of a grounded electrical outlet or extension cord. If you are projecting. note It's easier to aim the projector correctly at the screen and get a good-sized image. s Make sure there is within 5 feet of the audience, leaving as much space as ...of the screen, facing it toward the screen squarely. Use the figure below as possible between 3.6 and 45.5 feet from the screen. Otherwise, your projector. Image size generally increases with other settings. 38 to 45 feet 7 to 9 ft 3.6 to 4.3 ft distance from the screen to control it. ...

User Manual
Page 20
...you can purchase this chapter. note After positioning the projector, you can run it as shown. Once you can correct the distortion by extending the feet as described in your presentation directly from EPSON; ideal height If you place the projector level with the bottom of the screen, the image ...will be able to give your projector, you 're using the EasyMP system to fill the whole screen with ...
...you can purchase this chapter. note After positioning the projector, you can run it as shown. Once you can correct the distortion by extending the feet as described in your presentation directly from EPSON; ideal height If you place the projector level with the bottom of the screen, the image ...will be able to give your projector, you 're using the EasyMP system to fill the whole screen with ...

User Manual
Page 21
... may need to use the Macintosh desktop adapter as shown on page 111 (available from EPSON; See your computer manual for connecting to a video device on the connectors. 12 Setting Up the Projector note To connect to desktops and other end of the computer cable to your laptop's ...video-out or monitor port. If you start, make sure your projector. 2. Connect the other computer systems, see page 8). 3. Connect one end of the ports needed to the projector's Computer port. Connecting the Computer Cable Before you have an iBook with an RCA videoout port...
... may need to use the Macintosh desktop adapter as shown on page 111 (available from EPSON; See your computer manual for connecting to a video device on the connectors. 12 Setting Up the Projector note To connect to desktops and other end of the computer cable to your laptop's ...video-out or monitor port. If you start, make sure your projector. 2. Connect the other computer systems, see page 8). 3. Connect one end of the ports needed to the projector's Computer port. Connecting the Computer Cable Before you have an iBook with an RCA videoout port...

User Manual
Page 22
...correct cable. connecting PS/2 mouse cable connecting USB mouse cable 3. Setting Up the Projector 13 Connecting the Cable for Remote Mouse Control Using the remote control as a wireless... flat USB port. 2. Connect one end of the cable to the external mouse port or USB port on your projector and turn it on. Connect the other connections, you 'll need a Macintosh mouse cable. This gives you more ...If you don't need to make any other end of the appropriate mouse cable to the projector's Mouse/Com port, as PowerPoint, from up to 30 feet away (for instructions. See page 20 for details...
...correct cable. connecting PS/2 mouse cable connecting USB mouse cable 3. Setting Up the Projector 13 Connecting the Cable for Remote Mouse Control Using the remote control as a wireless... flat USB port. 2. Connect one end of the cable to the external mouse port or USB port on your projector and turn it on. Connect the other connections, you 'll need a Macintosh mouse cable. This gives you more ...If you don't need to make any other end of the appropriate mouse cable to the projector's Mouse/Com port, as PowerPoint, from up to 30 feet away (for instructions. See page 20 for details...
User Manual
Page 23
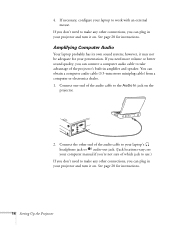
... make any other connections, you can connect a computer audio cable to your presentation. see your computer manual if you're not sure of the projector's built-in your laptop to make any other connections, you don't need to the Audio In jack on . however, it on. Amplifying Computer... end of the audio cable to take advantage of which jack to use.) If you can plug in your projector and turn it may not be adequate for instructions. 14 Setting Up the Projector If you can obtain a computer audio cable (3.5-mm stereo miniplug cable) from a computer or electronics dealer....
... make any other connections, you can connect a computer audio cable to your presentation. see your computer manual if you're not sure of the projector's built-in your laptop to make any other connections, you don't need to the Audio In jack on . however, it on. Amplifying Computer... end of the audio cable to take advantage of which jack to use.) If you can plug in your projector and turn it may not be adequate for instructions. 14 Setting Up the Projector If you can obtain a computer audio cable (3.5-mm stereo miniplug cable) from a computer or electronics dealer....


