
User Manual
Page 2
... remote control receiver foot release lever foot buttons power inlet warning lights PS/2 mouse port Kensington lock port USB port audio jacks S-video connector computer port A/V jacks Stop action Turn off picture and sound Zoom in or out Add highlighting effects on screen Illuminate buttons on remote control Freeze A/V Mute E-Zoom Power R/C ON OFF 3 2 5 4 Enter Esc Turn projector on/off Turn remote control on/off Mouse pointer and left mouse button Right mouse button 1 1 Display projector menu Select computer source Select S-video source Optimize computer image Display picture...
... remote control receiver foot release lever foot buttons power inlet warning lights PS/2 mouse port Kensington lock port USB port audio jacks S-video connector computer port A/V jacks Stop action Turn off picture and sound Zoom in or out Add highlighting effects on screen Illuminate buttons on remote control Freeze A/V Mute E-Zoom Power R/C ON OFF 3 2 5 4 Enter Esc Turn projector on/off Turn remote control on/off Mouse pointer and left mouse button Right mouse button 1 1 Display projector menu Select computer source Select S-video source Optimize computer image Display picture...

User Manual
Page 4
... form or by any cover on ; EPSON Extra Care is on. EPSON disclaims any risk of Epson America, Inc. Keep plastic bags away from the use of this product or unauthorized modifications, repairs, or alterations to handle the new lamp. EPSON is turned on the projector, except the lamp and filter covers. Important Safety Information WARNING: Never look into the projector lens when the lamp is a registered trademark of...
... form or by any cover on ; EPSON Extra Care is on. EPSON disclaims any risk of Epson America, Inc. Keep plastic bags away from the use of this product or unauthorized modifications, repairs, or alterations to handle the new lamp. EPSON is turned on the projector, except the lamp and filter covers. Important Safety Information WARNING: Never look into the projector lens when the lamp is a registered trademark of...

User Manual
Page 8
... Cleaning the Lens 84 Cleaning the Projector Case 84 Cleaning and Replacing the Air Filter 85 Replacing the Lamp 86 Transporting the Projector 88 Solving Problems 89 Using On-Screen Help 90 What To Do When the Lights Flash 91 Solving Problems with the Image or Sound 94 Solving Problems with the Remote Control 100 Solving EasyMP Problems 101 EasyMP Error Messages 102 Where To Get Help 103 Telephone Support Services 103 Appendix A: Connecting to Additional Equipment 105 Installing the Projector 106 Connecting...
... Cleaning the Lens 84 Cleaning the Projector Case 84 Cleaning and Replacing the Air Filter 85 Replacing the Lamp 86 Transporting the Projector 88 Solving Problems 89 Using On-Screen Help 90 What To Do When the Lights Flash 91 Solving Problems with the Image or Sound 94 Solving Problems with the Remote Control 100 Solving EasyMP Problems 101 EasyMP Error Messages 102 Where To Get Help 103 Telephone Support Services 103 Appendix A: Connecting to Additional Equipment 105 Installing the Projector 106 Connecting...

User Manual
Page 13
... Presenters Services to use the EasyMP features. 4 Welcome See page 90 for common problems. Available from the Help button on the projector or the remote control. s CD-ROMs Your projector comes with two CD-ROMs. The PowerLite 505c/715c CD-ROM lets you want to present without a computer. s Owner's Kit envelope Includes your questions to EPSON support. s support.epson.com Download FAQs and e-mail your Quick Setup...
... Presenters Services to use the EasyMP features. 4 Welcome See page 90 for common problems. Available from the Help button on the projector or the remote control. s CD-ROMs Your projector comes with two CD-ROMs. The PowerLite 505c/715c CD-ROM lets you want to present without a computer. s Owner's Kit envelope Includes your questions to EPSON support. s support.epson.com Download FAQs and e-mail your Quick Setup...

User Manual
Page 27
... can be purchased from EPSON (ELPKC19). Connect the large end of the component video cable into the R, G, and B ports on the projector. (Match the red and white plugs to the red and white jacks; component video cable 3. See page 74 for more information. 18 Setting Up the Projector Connecting Component Video Cables If your video source has component video connectors, you turn on the projector, use the Video menu to set the Input Signal to YCbCr or YPbPr...
... can be purchased from EPSON (ELPKC19). Connect the large end of the component video cable into the R, G, and B ports on the projector. (Match the red and white plugs to the red and white jacks; component video cable 3. See page 74 for more information. 18 Setting Up the Projector Connecting Component Video Cables If your video source has component video connectors, you turn on the projector, use the Video menu to set the Input Signal to YCbCr or YPbPr...

User Manual
Page 31
... you're using a computer, turn to change slides. Once you 're projecting a video, press the Source button on your presentation, shut down the projector correctly prevents premature lamp failure and possible damage from overheating. 6. Do one of the projector to switch to select your computer. 22 Using the Projector Use the Enter button on focusing and making other device. See Chapter 5 for instructions on the remote control to your video source, and press the...
... you're using a computer, turn to change slides. Once you 're projecting a video, press the Source button on your presentation, shut down the projector correctly prevents premature lamp failure and possible damage from overheating. 6. Do one of the projector to switch to select your computer. 22 Using the Projector Use the Enter button on focusing and making other device. See Chapter 5 for instructions on the remote control to your video source, and press the...

User Manual
Page 36
..., the orange light stays on and the exhaust fan shuts off the projector, press the red Power button on again, wait until the orange light stops flashing. Replace the lens cap, retract the lens, and unplug the power cord. 5. caution To avoid damaging the projector or lamp, never unplug the power cord when the power light is green or flashing orange. If you are done using the projector, unplug the power cord. Press the Power button again. You see a confirmation message. (If...
..., the orange light stays on and the exhaust fan shuts off the projector, press the red Power button on again, wait until the orange light stops flashing. Replace the lens cap, retract the lens, and unplug the power cord. 5. caution To avoid damaging the projector or lamp, never unplug the power cord when the power light is green or flashing orange. If you are done using the projector, unplug the power cord. Press the Power button again. You see a confirmation message. (If...
User Manual
Page 51
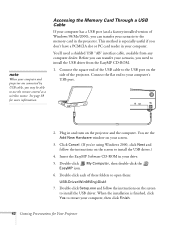
...-click the EasyMP icon. 6. You'll need to open them: USB-Driver\Win98\Eng\Disk1 7. Mouse/Com 2. Double-click each of Windows 98/Me/2000), you can transfer your computer and projector are connected by USB cable, you 're using Windows 2000, click Next and follow the instructions on the side of the USB cable to the USB port on the screen to restart your computer.
...-click the EasyMP icon. 6. You'll need to open them: USB-Driver\Win98\Eng\Disk1 7. Mouse/Com 2. Double-click each of Windows 98/Me/2000), you can transfer your computer and projector are connected by USB cable, you 're using Windows 2000, click Next and follow the instructions on the side of the USB cable to the USB port on the screen to restart your computer.
User Manual
Page 56
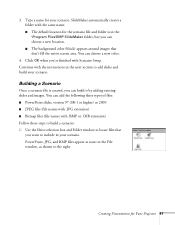
... Scenario Setup. Use the Drive selection box and Folder window to build a scenario: 1. Type a name for your scenario. You can choose a new color. 4. Click OK when you can choose a new location. Continue with the same name. SlideMaker automatically creates a folder with the instructions in the File window, as shown to add slides and build your scenario. s The default location for Your Projector...
... Scenario Setup. Use the Drive selection box and Folder window to build a scenario: 1. Type a name for your scenario. You can choose a new color. 4. Click OK when you can choose a new location. Continue with the same name. SlideMaker automatically creates a folder with the instructions in the File window, as shown to add slides and build your scenario. s The default location for Your Projector...
User Manual
Page 83
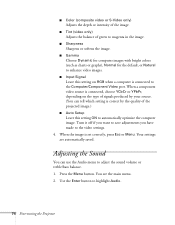
s Tint (video only) Adjusts the balance of the image. s Input Signal Leave this setting ON to automatically optimize the computer image. When the image is correct by the quality of signals produced by your source. (You can use the Audio menu to the video settings. 4. When a component video source is connected, choose YCbCr or YPbPr, depending on the type of the projected image.) s Auto Setup Leave this setting on RGB when a computer is connected to...
s Tint (video only) Adjusts the balance of the image. s Input Signal Leave this setting ON to automatically optimize the computer image. When the image is correct by the quality of signals produced by your source. (You can use the Audio menu to the video settings. 4. When a component video source is connected, choose YCbCr or YPbPr, depending on the type of the projected image.) s Auto Setup Leave this setting on RGB when a computer is connected to...

User Manual
Page 90
... about the display settings of your computer and the number of the projected image. Press the Menu button. See page 77 for the projector menus. You see the main menu. 2. 4. s Color Setting Adjusts the color temperature of hours the lamp has been used for more information. When you have captured whenever the projector starts. Viewing Lamp Usage and Other Information Use the About menu to be used . 1. Use the Enter button to adjust individual red, green, and blue values, as...
... about the display settings of your computer and the number of the projected image. Press the Menu button. See page 77 for the projector menus. You see the main menu. 2. 4. s Color Setting Adjusts the color temperature of hours the lamp has been used for more information. When you have captured whenever the projector starts. Viewing Lamp Usage and Other Information Use the About menu to be used . 1. Use the Enter button to adjust individual red, green, and blue values, as...

User Manual
Page 95
... screen when the lamp comes on (after about 1000 hours of use . If you need to replace the filter, use a small screwdriver to pry it clicks in the United States and Canada for about 900 hours of use ). To install the new filter, first insert the tab, then press down until it off. s The lamp warning light is time to replace the lamp when: s The projection image gets darker or starts...
... screen when the lamp comes on (after about 1000 hours of use . If you need to replace the filter, use a small screwdriver to pry it clicks in the United States and Canada for about 900 hours of use ). To install the new filter, first insert the tab, then press down until it off. s The lamp warning light is time to replace the lamp when: s The projection image gets darker or starts...

User Manual
Page 102
.... Remove the power cord and contact EPSON for help . This is a good time to replace it on page 86. See page 85 for instructions. The projector has overheated and turned itself off because of an internal problem. See page 85 for instructions. Solving Problems 93 flashing orange flashing red red The projector is operating normally. Power is cut off . The projector is in sleep mode. Contact EPSON for help . green The projector is cooling down. If necessary, replace the lamp...
.... Remove the power cord and contact EPSON for help . This is a good time to replace it on page 86. See page 85 for instructions. The projector has overheated and turned itself off because of an internal problem. See page 85 for instructions. Solving Problems 93 flashing orange flashing red red The projector is operating normally. Power is cut off . The projector is in sleep mode. Contact EPSON for help . green The projector is cooling down. If necessary, replace the lamp...
User Manual
Page 103
... press the Source button (on the projector) or the Comp, Video, or S-Video button (on the Video menu is off temporarily. You see a blue screen with the Image or Sound No image appears on the computer. s Make sure the cables are connected correctly, as described in sleep mode. Wait until the power light stops flashing and remains orange; Solving Problems with the message No Signal displayed. s Make sure the Brightness setting on the remote control) to sync up...
... press the Source button (on the projector) or the Comp, Video, or S-Video button (on the Video menu is off temporarily. You see a blue screen with the Image or Sound No image appears on the computer. s Make sure the cables are connected correctly, as described in sleep mode. Wait until the power light stops flashing and remains orange; Solving Problems with the message No Signal displayed. s Make sure the Brightness setting on the remote control) to sync up...

User Manual
Page 115
... you've connected a computer and video source, the projector will automatically switch the audio whenever you switch sources. (See page 32.) To connect the projector to an external sound system, you 'll have to adjust it down to position the image on-screen. To project from the rear, select Rear Proj. This causes the image to lose its square shape. If you're ceiling-mounting the projector and you...
... you've connected a computer and video source, the projector will automatically switch the audio whenever you switch sources. (See page 32.) To connect the projector to an external sound system, you 'll have to adjust it down to position the image on-screen. To project from the rear, select Rear Proj. This causes the image to lose its square shape. If you're ceiling-mounting the projector and you...

User Manual
Page 136
... Air filter, cleaning and replacing, 85 Anti-theft device, 8, 11 Aspect ratio, 121 ATA flash cards, 41 Audio adjusting tone, 74 to 75 adjusting volume, 32, 74 to 75 cables, 6 connecting desktop, 110, 113 connecting laptop, 14 connecting video device, 16 to 18 menu, 70, 74 to 75 outputting to external sound system, 106 to 107 problems, troubleshooting, 99 turning off (using A/V Mute), 33 Audio Out jack, 107 Auto button, 73 Auto Setup setting, 74 Autorun setting...
... Air filter, cleaning and replacing, 85 Anti-theft device, 8, 11 Aspect ratio, 121 ATA flash cards, 41 Audio adjusting tone, 74 to 75 adjusting volume, 32, 74 to 75 cables, 6 connecting desktop, 110, 113 connecting laptop, 14 connecting video device, 16 to 18 menu, 70, 74 to 75 outputting to external sound system, 106 to 107 problems, troubleshooting, 99 turning off (using A/V Mute), 33 Audio Out jack, 107 Auto button, 73 Auto Setup setting, 74 Autorun setting...

User Manual
Page 138
..., 79, 96 size and projection distance, 10 size range, 121 turning off (using A/V Mute), 33 zooming, 25, 33 Input signal setting, 74 Installing EasyMP, 43 USB driver, 42 Installing projector, 106 to 107 J JPEG files, 47 to 49 K Kensington anti-theft device, 8, 11 Keystone button, 26 Keystone correction, 26, 96, 121 L Lamp automatic shutoff, 27 number of hours used, 81 replacing, 86 to 88 specifications, 122 status light, 91 Language setting, 81, 90 Laptop computer connecting to, 12 to...
..., 79, 96 size and projection distance, 10 size range, 121 turning off (using A/V Mute), 33 zooming, 25, 33 Input signal setting, 74 Installing EasyMP, 43 USB driver, 42 Installing projector, 106 to 107 J JPEG files, 47 to 49 K Kensington anti-theft device, 8, 11 Keystone button, 26 Keystone correction, 26, 96, 121 L Lamp automatic shutoff, 27 number of hours used, 81 replacing, 86 to 88 specifications, 122 status light, 91 Language setting, 81, 90 Laptop computer connecting to, 12 to...
User Manual
Page 139
... 50 video access, adding, 50 to 51 Presenters Online, 4, 103 Preview icon, 62 PrivateLine Support, 5, 103 Problems color, 98 EasyMP, 101 to 102 image, 94 to 98 remote control, 100, 117 sound, 99 USB, 100 Projection lamp See Lamp Projector carrying case, 8, 88 cleaning, 84 distance from screen, 10, 121 feet, adjusting height with, 25 installing, 106 to 107 lamp specifications, 122 options, 8 positioning, 10 to 11 resolution, 1, 121 shutting off, 27 software, 4 specifications...
... 50 video access, adding, 50 to 51 Presenters Online, 4, 103 Preview icon, 62 PrivateLine Support, 5, 103 Problems color, 98 EasyMP, 101 to 102 image, 94 to 98 remote control, 100, 117 sound, 99 USB, 100 Projection lamp See Lamp Projector carrying case, 8, 88 cleaning, 84 distance from screen, 10, 121 feet, adjusting height with, 25 installing, 106 to 107 lamp specifications, 122 options, 8 positioning, 10 to 11 resolution, 1, 121 shutting off, 27 software, 4 specifications...
User Manual
Page 140
Remote control EasyMP, using for, 38 light button, 30 numbered buttons, 35 problems, 100, 117 specifications, 122 troubleshooting, 100, 117 turning on, 30 using, 29 to 38 wireless mouse, using as, 38 Replacing lamp, 86 to 88 Reset All menu, 70, 82 Resetting menu options, 71, 82 Resize button, 34 Resizing image, 34 Resolution, 1, 121 Return icon, 60, 61 S Safety instructions, 115 to 117 Scenarios adding slides, 47 to 49 background color, 47, 63 to 64...
Remote control EasyMP, using for, 38 light button, 30 numbered buttons, 35 problems, 100, 117 specifications, 122 troubleshooting, 100, 117 turning on, 30 using, 29 to 38 wireless mouse, using as, 38 Replacing lamp, 86 to 88 Reset All menu, 70, 82 Resetting menu options, 71, 82 Resize button, 34 Resizing image, 34 Resolution, 1, 121 Return icon, 60, 61 S Safety instructions, 115 to 117 Scenarios adding slides, 47 to 49 background color, 47, 63 to 64...
User Manual
Page 141
... projector, 6 to 7 USB installing driver, 42 problems, 100, 101 using cable to access memory card, 42 USB mouse cable, 6 V VCR, connecting to, 15 to 18 Video adding to scenarios, 50 to 51 button, 32 display settings, viewing, 81 to 82 formats, supported, 1, 124 to 125 menu, 70, 72 to 74 picture in picture, 79 selecting source, 32 Video port pin assignments, 126 Video sources, connecting to, 15 to 18 Volume adjusting, 32 button, 32 setting, 74 to 75 W Warning lights...
... projector, 6 to 7 USB installing driver, 42 problems, 100, 101 using cable to access memory card, 42 USB mouse cable, 6 V VCR, connecting to, 15 to 18 Video adding to scenarios, 50 to 51 button, 32 display settings, viewing, 81 to 82 formats, supported, 1, 124 to 125 menu, 70, 72 to 74 picture in picture, 79 selecting source, 32 Video port pin assignments, 126 Video sources, connecting to, 15 to 18 Volume adjusting, 32 button, 32 setting, 74 to 75 W Warning lights...


