

Owners Manual
Page 3
...change numeric settings during menu opera tions. Volume Operation Panel Tracking Button Function Power Starts or stops projection. Menu Displays or hides the menu. Left, right arrows(tracking-/ tracking+) Matches the projector's internal clock to Computer 1 , Computer 2, or Video. Resize Switches the display dot mode and resize mode (for VGA, SVGA, and SXGA input). EMP-7300/7200/5300 QUICK START operation panel speaker operation indicator speaker remoto control reciver zoom ring focus ring foot adjuster lever front foot Power Source Resize Blank Menu Sync. Use...
...change numeric settings during menu opera tions. Volume Operation Panel Tracking Button Function Power Starts or stops projection. Menu Displays or hides the menu. Left, right arrows(tracking-/ tracking+) Matches the projector's internal clock to Computer 1 , Computer 2, or Video. Resize Switches the display dot mode and resize mode (for VGA, SVGA, and SXGA input). EMP-7300/7200/5300 QUICK START operation panel speaker operation indicator speaker remoto control reciver zoom ring focus ring foot adjuster lever front foot Power Source Resize Blank Menu Sync. Use...

Owners Manual
Page 4
... functions. Power Starts or stops the projector. Source Switches to a black, a blue or user logo display. Bottom multi-pur- Freeze Keeps the current computer or video image on the screen. Resize Switches the display dot mode and resize mode (for VGA, SVGA and SXGA input). Custom Use to assign functions to a PC laptop computer a Macintosh PowerBook MAC desktop adapter Computer cable Video cable adapter Computer cable Connecting to Connecting to the Effects keys using the projector software. EMP-7300/7200/5300 QUICK START 1 Source Menu Effects...
... functions. Power Starts or stops the projector. Source Switches to a black, a blue or user logo display. Bottom multi-pur- Freeze Keeps the current computer or video image on the screen. Resize Switches the display dot mode and resize mode (for VGA, SVGA and SXGA input). Custom Use to assign functions to a PC laptop computer a Macintosh PowerBook MAC desktop adapter Computer cable Video cable adapter Computer cable Connecting to Connecting to the Effects keys using the projector software. EMP-7300/7200/5300 QUICK START 1 Source Menu Effects...

Owners Manual
Page 8
...Sleep Mode 32 Focusing and Positioning the Screen Image 33 Resize Button 35 Controlling the Projector 36 Using the Remote Control 37 Using the Control Panel 39 Projector Status Indicators 41 Operation Indicator 41 Lamp Indicator 42 Temperature Indicator 42 Using the Projector Menus 43 Accessing the Main Menu 44 Changing a Menu Setting 44 Menu Options 47 Video Menu (Image source = Computer 47 Video Menu (Image source = Video 50 Audio Menu 51 Options Menu 52 Custom Menu 54 About Menu 57 RESET ALL Menu 57 Using the Projector Software 59 Presentation support...
...Sleep Mode 32 Focusing and Positioning the Screen Image 33 Resize Button 35 Controlling the Projector 36 Using the Remote Control 37 Using the Control Panel 39 Projector Status Indicators 41 Operation Indicator 41 Lamp Indicator 42 Temperature Indicator 42 Using the Projector Menus 43 Accessing the Main Menu 44 Changing a Menu Setting 44 Menu Options 47 Video Menu (Image source = Computer 47 Video Menu (Image source = Video 50 Audio Menu 51 Options Menu 52 Custom Menu 54 About Menu 57 RESET ALL Menu 57 Using the Projector Software 59 Presentation support...

Owners Manual
Page 11
.... Images are displayed in SRS 3D sound® for image source switching and image adjustment. A totally new AVTSS™ (Automatic Video Tracking and Synchronization Sensing, patent pending) provides automatic set-up of image from the projector's 1W+1W stereo, which employ a built-in true XGA full color (16,670,000 colors) at a resolution of add-on the computer screen during presentations. The remote control can connect simultaneously to project XGA, full-color images and video onto...
.... Images are displayed in SRS 3D sound® for image source switching and image adjustment. A totally new AVTSS™ (Automatic Video Tracking and Synchronization Sensing, patent pending) provides automatic set-up of image from the projector's 1W+1W stereo, which employ a built-in true XGA full color (16,670,000 colors) at a resolution of add-on the computer screen during presentations. The remote control can connect simultaneously to project XGA, full-color images and video onto...
Owners Manual
Page 15
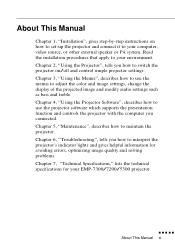
... the projector's indicator lights and gives helpful information for avoiding errors, optimizing image quality and solving problems. Chapter 7, "Technical Specifications," lists the technical specifications for your computer, video source, or other external speaker or PA system. Chapter 2, "Using the Projector", tells you connected. Chapter 5, "Maintenance", describes how to switch the projector on how to set-up the projector and connect it to adjust the color and image settings, change the display of the projected image and modify audio settings...
... the projector's indicator lights and gives helpful information for avoiding errors, optimizing image quality and solving problems. Chapter 7, "Technical Specifications," lists the technical specifications for your computer, video source, or other external speaker or PA system. Chapter 2, "Using the Projector", tells you connected. Chapter 5, "Maintenance", describes how to switch the projector on how to set-up the projector and connect it to adjust the color and image settings, change the display of the projected image and modify audio settings...

Owners Manual
Page 25
... at right angles to the screen. The light from projector to look into the lens. Screen size Horizontal distance from the lamp can damage your eyes. Connect the other end to the projector's power connector. Connect one end of the power cable to an earthed electrical socket. Turn the projector so that the projector might come on . The projector should not be in use. It is especially important that...
... at right angles to the screen. The light from projector to look into the lens. Screen size Horizontal distance from the lamp can damage your eyes. Connect the other end to the projector's power connector. Connect one end of the power cable to an earthed electrical socket. Turn the projector so that the projector might come on . The projector should not be in use. It is especially important that...

Owners Manual
Page 28
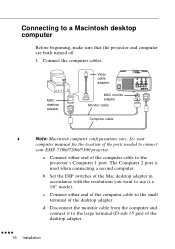
See your EMP -7300/7200/5300 projector. a. The Computer 2 port is used when connecting a second computer. Disconnect the monitor cable from the computer and connect it to connect your computer manual for the location of the ports needed to the other end of the computer cable to a PC desktop computer Before beginning, make sure that the projector and computer are both turned off. 1. s s s s 8 Installation b. Monitor cable Computer cable ♦...
See your EMP -7300/7200/5300 projector. a. The Computer 2 port is used when connecting a second computer. Disconnect the monitor cable from the computer and connect it to connect your computer manual for the location of the ports needed to the other end of the computer cable to a PC desktop computer Before beginning, make sure that the projector and computer are both turned off. 1. s s s s 8 Installation b. Monitor cable Computer cable ♦...

Owners Manual
Page 32
See your EMP-7300/ 7200/5300 projector. a. Computer cable ♦ Note: Laptop configurations vary. Connect the other end of the ports needed to connect your computer manual for the location of the computer cable to the laptop's video (monitor) port. b. c. Tighten the screws on all connectors to make sure that the projector and computer are fastened securely. The Computer 2 port is used when connecting a second computer. Connecting to a PC laptop computer Before...
See your EMP-7300/ 7200/5300 projector. a. Computer cable ♦ Note: Laptop configurations vary. Connect the other end of the ports needed to connect your computer manual for the location of the computer cable to the laptop's video (monitor) port. b. c. Tighten the screws on all connectors to make sure that the projector and computer are fastened securely. The Computer 2 port is used when connecting a second computer. Connecting to a PC laptop computer Before...
Owners Manual
Page 36
... sure that the projector and computer are both turned off. 1. The Computer 2 port is used when connecting a second computer. c. d. MAC desktop adapter Video cable adapter MAC monitor adapter Monitor cable Computer cable ♦ Note: Macintosh computer configurations vary. s s s s 16 Installation a. Connecting to connect your EMP-7300/7200/5300 projector. Disconnect the monitor cable from the computer and connect it to use (i.e. 16" mode). Set the DIP switches of the Mac desktop adapter in accordance with the resolutions you want...
... sure that the projector and computer are both turned off. 1. The Computer 2 port is used when connecting a second computer. c. d. MAC desktop adapter Video cable adapter MAC monitor adapter Monitor cable Computer cable ♦ Note: Macintosh computer configurations vary. s s s s 16 Installation a. Connecting to connect your EMP-7300/7200/5300 projector. Disconnect the monitor cable from the computer and connect it to use (i.e. 16" mode). Set the DIP switches of the Mac desktop adapter in accordance with the resolutions you want...
Owners Manual
Page 40
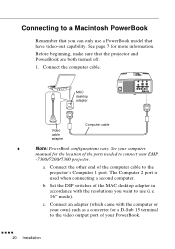
... used when connecting a second computer. Connect an adapter (which came with the resolutions you can only use (i.e. 16" mode). Connect the computer cable. b. See page 7 for a D-Sub 15 terminal to the video output port of the ports needed to use a PowerBook model that the projector and PowerBook are both turned off. 1. See your computer manual for the location of your EMP -7300/7200/5300 projector. c. Connect the other end of the MAC desktop adapter...
... used when connecting a second computer. Connect an adapter (which came with the resolutions you can only use (i.e. 16" mode). Connect the computer cable. b. See page 7 for a D-Sub 15 terminal to the video output port of the ports needed to use a PowerBook model that the projector and PowerBook are both turned off. 1. See your computer manual for the location of your EMP -7300/7200/5300 projector. c. Connect the other end of the MAC desktop adapter...

Owners Manual
Page 51
...; Warning: Never look into the lens when the lamp is projected. s s s s s Turning the Equipment On and Off 31 Audio source (if different than computer or video source) 3. External speaker or PA system 5. Press the Power button on the projector and its attached equipment in the following order. 1. Video source 2. This can damage your eyes. Projector 4. Turning the Equipment On and Off Always turn on the remote control or control panel. Remove the projector lens...
...; Warning: Never look into the lens when the lamp is projected. s s s s s Turning the Equipment On and Off 31 Audio source (if different than computer or video source) 3. External speaker or PA system 5. Press the Power button on the projector and its attached equipment in the following order. 1. Video source 2. This can damage your eyes. Projector 4. Turning the Equipment On and Off Always turn on the remote control or control panel. Remove the projector lens...

Owners Manual
Page 58
... Keeps the current computer or video image on the remote control. Custom Use to assign functions to display special effects in conjunction with the EMP-7300/7200/5300. Volume + Adjusts the volume. Source Switches to a black, a blue or user logo display. Blank Clears the screen of the projector is turned to 5 BNC, the source is connected to 5 BNC. Power Starts or stops the projector. * When the computer 2/5 BNC switch on top of the projector. Pointer button Use...
... Keeps the current computer or video image on the remote control. Custom Use to assign functions to display special effects in conjunction with the EMP-7300/7200/5300. Volume + Adjusts the volume. Source Switches to a black, a blue or user logo display. Blank Clears the screen of the projector is turned to 5 BNC, the source is connected to 5 BNC. Power Starts or stops the projector. * When the computer 2/5 BNC switch on top of the projector. Pointer button Use...

Owners Manual
Page 60
... computer's graphic signal. (Sync+/Sync-) Use these buttons to adjust an image with vertical fuzzy lines, or to change numeric settings during menu opera tions. Enter key Registers a menu selection. Mute Cuts off audio. - Resize Switches the display dot mode and resize mode (for VGA, SVGA, and SXGA input). Button Function Power Starts or stops projection. The following table summarizes the functions on the back of the projector is turned to 5 BNC, the source is fuzzy or...
... computer's graphic signal. (Sync+/Sync-) Use these buttons to adjust an image with vertical fuzzy lines, or to change numeric settings during menu opera tions. Enter key Registers a menu selection. Mute Cuts off audio. - Resize Switches the display dot mode and resize mode (for VGA, SVGA, and SXGA input). Button Function Power Starts or stops projection. The following table summarizes the functions on the back of the projector is turned to 5 BNC, the source is fuzzy or...

Owners Manual
Page 62
... lamp. Lamp Indicator Displays lamp condition. Off The projector is in a hot condition. Color Status Meaning - s s s s 42 Using the Projector Red Flashing The projector has a cooling fan or temperature sensor problem. Orange Red Flashing Lit The projector is in a normal condition. Color Status Meaning - This indicator is off . Off The projector is reaching the end of its life and should be replaced with a new one . Contact your nearest service provider. Contact your nearest service provider. Orange and Flashing Red Projection lamp...
... lamp. Lamp Indicator Displays lamp condition. Off The projector is in a hot condition. Color Status Meaning - s s s s 42 Using the Projector Red Flashing The projector has a cooling fan or temperature sensor problem. Orange Red Flashing Lit The projector is in a normal condition. Color Status Meaning - This indicator is off . Off The projector is reaching the end of its life and should be replaced with a new one . Contact your nearest service provider. Contact your nearest service provider. Orange and Flashing Red Projection lamp...

Owners Manual
Page 73
... button or the button to reset the Option Menu items. If you change to use when the input source is switched to their factory defaults. Select this item and then press a Click button or the button to clear the confirmation screen without changing any settings. The wireless mouse controls the computer connected to Mouse/Com 1 only if the input source is changed . Specifies input image signal mode. Returns all Option Menu items to Computer 2. Diagonal : Original source screen shrinks...
... button or the button to reset the Option Menu items. If you change to use when the input source is switched to their factory defaults. Select this item and then press a Click button or the button to clear the confirmation screen without changing any settings. The wireless mouse controls the computer connected to Mouse/Com 1 only if the input source is changed . Specifies input image signal mode. Returns all Option Menu items to Computer 2. Diagonal : Original source screen shrinks...

Owners Manual
Page 77
... changing any settings. RESET ALL Menu Executing this item and then press a Click button or the button to display the confirmation screen. COMPUTER2 / Switches between computer2 and 5BNC. 5BNC LAMP Displays the number of the current computer. Displays H/V frequency of hours the current projector lamp has been used. Select this command resets the settings in all menu items. If you change your projector. When this command, the OSD menu disappears from a screen and "RESET ALL" will be flashing...
... changing any settings. RESET ALL Menu Executing this item and then press a Click button or the button to display the confirmation screen. COMPUTER2 / Switches between computer2 and 5BNC. 5BNC LAMP Displays the number of the current computer. Displays H/V frequency of hours the current projector lamp has been used. Select this command resets the settings in all menu items. If you change your projector. When this command, the OSD menu disappears from a screen and "RESET ALL" will be flashing...

Owners Manual
Page 98
... projection lamp indicator (orange and red, flashing alternately) is red. • The message "LAMP REPLACE" appears on the screen when the projector lamp comes on. It is difficult to request part number. (ELPLP05) 5. Contact your EMP-7300/7200/5300 dealer or call an EPSON Service Centre. s s s s 78 Maintenance Contact your local EPSON dealer for a replacement lamp.Use only replacement lamp part number. (ELPLP05) ♦ Warning: Let the lamp cool before replacing it . Turn off the projector and unplug the power cable. 2. 4. An air filter come with replacement...
... projection lamp indicator (orange and red, flashing alternately) is red. • The message "LAMP REPLACE" appears on the screen when the projector lamp comes on. It is difficult to request part number. (ELPLP05) 5. Contact your EMP-7300/7200/5300 dealer or call an EPSON Service Centre. s s s s 78 Maintenance Contact your local EPSON dealer for a replacement lamp.Use only replacement lamp part number. (ELPLP05) ♦ Warning: Let the lamp cool before replacing it . Turn off the projector and unplug the power cable. 2. 4. An air filter come with replacement...

Owners Manual
Page 102
... these warning lights or encounter other specific problems with the projector. Temperature Indicator Lamp Indicator Operation Indicator See the following pages for information on the projector. Replace the projector lamp as described on the projector. The lamp is red. Turn off the projector, check that the power cable is flashing orange and you cannot turn on page 78. u Projected images get darker or start to problems with projector operation. u The operation indicator is connected securely both at the top of the projector. Wait until the light turns off...
... these warning lights or encounter other specific problems with the projector. Temperature Indicator Lamp Indicator Operation Indicator See the following pages for information on the projector. Replace the projector lamp as described on the projector. The lamp is red. Turn off the projector, check that the power cable is flashing orange and you cannot turn on page 78. u Projected images get darker or start to problems with projector operation. u The operation indicator is connected securely both at the top of the projector. Wait until the light turns off...

Owners Manual
Page 104
... cannot access the source (computer/video) menu. For supported display settings, see page "Supported Monitor Displays" on and the lens cover is off. Check that the image source is on page 89, 90. u Only part of the computer image is higher than 1024 x 768, the projector resizes the image. In Windows 3.x, use Windows Setup in Chapter 1. For a Macintosh, choose Control Panels under the Apple menu and then choose Monitors. Then check that the power light is selected...
... cannot access the source (computer/video) menu. For supported display settings, see page "Supported Monitor Displays" on and the lens cover is off. Check that the image source is on page 89, 90. u Only part of the computer image is higher than 1024 x 768, the projector resizes the image. In Windows 3.x, use Windows Setup in Chapter 1. For a Macintosh, choose Control Panels under the Apple menu and then choose Monitors. Then check that the power light is selected...

Owners Manual
Page 105
... viewing a computer image, also try adjusting the Comp Tracking and Comp Sync buttons on the projector's control panel. u There is displayed. s s s s s Problems with the Image or Sound 85 There may be incorrect. Clean the lens as described in the Video menu. If you 're displaying video, adjust the color and tint (NTSC only) settings on the remote control or control panel to both the projector and the audio source. If you cannot access the projector menus. u A blank screen is no sound...
... viewing a computer image, also try adjusting the Comp Tracking and Comp Sync buttons on the projector's control panel. u There is displayed. s s s s s Problems with the Image or Sound 85 There may be incorrect. Clean the lens as described in the Video menu. If you 're displaying video, adjust the color and tint (NTSC only) settings on the remote control or control panel to both the projector and the audio source. If you cannot access the projector menus. u A blank screen is no sound...


