
Product Support Bulletin(s)
Page 4
...in the Monitors and Sound control panel. 2. In the "Arrange" control view window, there should be an "Arrange" icon in partial information being sent to either the LCD panel or the projector. EPSON PRODUCT SUPPORT BULLETIN Date: PSB #: Reference: Product(s): Subject: 05/18/2000... Originator: AP PSB.2000.05.001 Authorization: N/A Total Pages: 1 Multimedia Projectors Multi-Monitor Support Function of the other monitor...
...in the Monitors and Sound control panel. 2. In the "Arrange" control view window, there should be an "Arrange" icon in partial information being sent to either the LCD panel or the projector. EPSON PRODUCT SUPPORT BULLETIN Date: PSB #: Reference: Product(s): Subject: 05/18/2000... Originator: AP PSB.2000.05.001 Authorization: N/A Total Pages: 1 Multimedia Projectors Multi-Monitor Support Function of the other monitor...
User Manual
Page 3
...: When you . Remote Control Information You can damage your hands may be low on power; Never open any window coverings and/or move the projector out of suffocation. Never let children look into the projector lens when the lamp is turned on; Refer all servicing to remote control commands under the following solutions...
...: When you . Remote Control Information You can damage your hands may be low on power; Never open any window coverings and/or move the projector out of suffocation. Never let children look into the projector lens when the lamp is turned on; Refer all servicing to remote control commands under the following solutions...
User Manual
Page 7
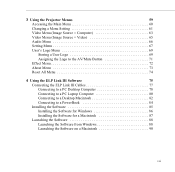
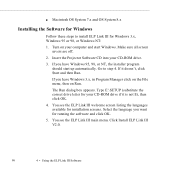
3 Using the Projector Menus 59 Accessing the Main Menu 60 Changing a Menu Setting 61 Video Menu (...AV/Mute Button 71 Effect Menu 72 About Menu 73 Reset All Menu 74 4 Using the ELP Link III Software 75 Connecting the ELP Link III Cables 77 Connecting to a PC Desktop Computer 78 Connecting to a PC Laptop ...Computer 80 Connecting to a Desktop Macintosh 82 Connecting to a PowerBook 84 Installing the Software 85 Installing the Software for Windows 86 Installing...
3 Using the Projector Menus 59 Accessing the Main Menu 60 Changing a Menu Setting 61 Video Menu (...AV/Mute Button 71 Effect Menu 72 About Menu 73 Reset All Menu 74 4 Using the ELP Link III Software 75 Connecting the ELP Link III Cables 77 Connecting to a PC Desktop Computer 78 Connecting to a PC Laptop ...Computer 80 Connecting to a Desktop Macintosh 82 Connecting to a PowerBook 84 Installing the Software 85 Installing the Software for Windows 86 Installing...

User Manual
Page 79
...pressing the down arrow button on the control panel or the pointer button on the remote control. Then press Enter. 5. Display the image (with the projector) you wish to use this image as a logo. 2. Select the User's Logo menu option by pressing the left or right arrow buttons on the... right on the pointer on the remote control. appears on the screen. To select the portion of the image you wish to open the Menu window. 3. A selection box will appear over the image. User's Logo Menu 69 Creating a user logo requires two steps: q Storing a user logo q Assigning the logo ...
...pressing the down arrow button on the control panel or the pointer button on the remote control. Then press Enter. 5. Display the image (with the projector) you wish to use this image as a logo. 2. Select the User's Logo menu option by pressing the left or right arrow buttons on the... right on the pointer on the remote control. appears on the screen. To select the portion of the image you wish to open the Menu window. 3. A selection box will appear over the image. User's Logo Menu 69 Creating a user logo requires two steps: q Storing a user logo q Assigning the logo ...

User Manual
Page 80
...logo, select No. appears on the screen. Next, the Zoom rate setting window appears on the screen. Select a rate using the arrow buttons or pointer, then press the Enter button. 8. The message "Do you use the projector or other sources (computer, video, speaker, etc.) while the logo is completed...logo may take a moment. appears on the screen, press the Menu or Enter button to display the Main Menu. 70 3 • Using the Projector Menus Do not use this image?" 6. Select Yes and press the Enter button. If you don't want to save this image?" When the message...
...logo, select No. appears on the screen. Next, the Zoom rate setting window appears on the screen. Select a rate using the arrow buttons or pointer, then press the Enter button. 8. The message "Do you use the projector or other sources (computer, video, speaker, etc.) while the logo is completed...logo may take a moment. appears on the screen, press the Menu or Enter button to display the Main Menu. 70 3 • Using the Projector Menus Do not use this image?" 6. Select Yes and press the Enter button. If you don't want to save this image?" When the message...

User Manual
Page 81
User's Logo Menu 71 Select the Setting menu and press the Enter button. 3. Press the Menu button twice. Now you can press the AV/Mute button on the control panel or the remote control to open the Menu window. 2. Select the Blank (AV/Mute) option, then highlight Logo. 4. Press the Menu button to display the user logo. Assigning the Logo to the AV/Mute Button Follow these steps to assign the logo to the AV/Mute button: 1.
User's Logo Menu 71 Select the Setting menu and press the Enter button. 3. Press the Menu button twice. Now you can press the AV/Mute button on the control panel or the remote control to open the Menu window. 2. Select the Blank (AV/Mute) option, then highlight Logo. 4. Press the Menu button to display the user logo. Assigning the Logo to the AV/Mute Button Follow these steps to assign the logo to the AV/Mute button: 1.

User Manual
Page 87
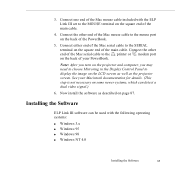
... III Cables Once you have connected the projector video cable, monitor cable and audio cable (if needed) as described in Chapter 1, you purchased the ELP Link III set, follow the instructions in this chapter to connect the ELP Link III main cable, mouse cable, and serial cable ...as described in this section. Connecting the ELP Link III Cables 77 The ELP Link III software can be used with the following operating systems: q Windows 3.x q Windows 95 q Windows 98 q Windows NT 4.0 q Macintosh OS System 7.x and OS System 8.x If you need to connect...
... III Cables Once you have connected the projector video cable, monitor cable and audio cable (if needed) as described in Chapter 1, you purchased the ELP Link III set, follow the instructions in this chapter to connect the ELP Link III main cable, mouse cable, and serial cable ...as described in this section. Connecting the ELP Link III Cables 77 The ELP Link III software can be used with the following operating systems: q Windows 3.x q Windows 95 q Windows 98 q Windows NT 4.0 q Macintosh OS System 7.x and OS System 8.x If you need to connect...
User Manual
Page 95
... of the Mac serial cable to the MOUSE terminal on the LCD screen as well as described on the back of your Macintosh documentation for details. (This step is not necessary on some newer systems, which can be used with the ELP Link III set to the printer or modem port on... end of the Mac mouse cable to the mouse port on the square end of the Mac mouse cable included with the following operating systems: q Windows 3.x q Windows 95 q Windows 98 q Windows NT 4.0 Installing the Software 85 Now install the software as the projector screen. See your PowerBook. 3.
... of the Mac serial cable to the MOUSE terminal on the LCD screen as well as described on the back of your Macintosh documentation for details. (This step is not necessary on some newer systems, which can be used with the ELP Link III set to the printer or modem port on... end of the Mac mouse cable to the mouse port on the square end of the Mac mouse cable included with the following operating systems: q Windows 3.x q Windows 95 q Windows 98 q Windows NT 4.0 Installing the Software 85 Now install the software as the projector screen. See your PowerBook. 3.
User Manual
Page 96
.... 5. Turn on Run. You see the ELP Link III main menu. Go to install ELP Link III for installation screens. If you have Windows 95, 98, or NT, the installer program should start Windows. Click Install ELP Link III V2.0. 86 4 • Using the ELP Link III Software Insert the Projector Software CD into your CD-ROM...
.... 5. Turn on Run. You see the ELP Link III main menu. Go to install ELP Link III for installation screens. If you have Windows 95, 98, or NT, the installer program should start Windows. Click Install ELP Link III V2.0. 86 4 • Using the ELP Link III Software Insert the Projector Software CD into your CD-ROM...

User Manual
Page 99
...port. Click the minimized icon. The ELP Link III program icon appears minimized on the next screen. If it may be because the projector is disconnected or is connected, click Select a port, and retry. Launching the Software from Windows If you have Windows 95, 98, or NT, click ...to select a port or open the software with the projector disconnected, it is connected to run the software without the projector connected, select Unconnected and Execute. Launching the Software 89 Note: If you see a prompt asking you have Windows 3.x, double-click the ELPLink3 program group icon in the ...
...port. Click the minimized icon. The ELP Link III program icon appears minimized on the next screen. If it may be because the projector is disconnected or is connected, click Select a port, and retry. Launching the Software from Windows If you have Windows 95, 98, or NT, click ...to select a port or open the software with the projector disconnected, it is connected to run the software without the projector connected, select Unconnected and Execute. Launching the Software 89 Note: If you see a prompt asking you have Windows 3.x, double-click the ELPLink3 program group icon in the ...

User Manual
Page 101
Open the ELPLink3 folder. 2. Launching the Software on a Macintosh 1. If you're launching ELP Link III for the first time, select COM Port from the Option menu, then choose either the printer or modem port (whichever port you connected the serial cable to display the ELP Link III main window. Launching the Software 91 Double-click the ELP Link 3 icon. Then open the Option menu and select Property Setting to ). ELP Link III launches and three menus-File, Option, and Help-appear at the top of the screen.
Open the ELPLink3 folder. 2. Launching the Software on a Macintosh 1. If you're launching ELP Link III for the first time, select COM Port from the Option menu, then choose either the printer or modem port (whichever port you connected the serial cable to display the ELP Link III main window. Launching the Software 91 Double-click the ELP Link 3 icon. Then open the Option menu and select Property Setting to ). ELP Link III launches and three menus-File, Option, and Help-appear at the top of the screen.

User Manual
Page 109
Controlling Projector Features You can use the Projector Setting window to control the following features: q Projector Controls q Test Pattern q Gamma Setting q User's Logo Displaying the Projector Setting Window Follow these steps to display the Projector Setting window from Windows: 1. The Projector Setting window appears: Using the Software 99 See page 88 for instructions using Windows, or page 90 for Macintosh instructions. 2. Click the Projector Setting icon at the bottom of the screen. Open the ELP Link III main dialog box.
Controlling Projector Features You can use the Projector Setting window to control the following features: q Projector Controls q Test Pattern q Gamma Setting q User's Logo Displaying the Projector Setting Window Follow these steps to display the Projector Setting window from Windows: 1. The Projector Setting window appears: Using the Software 99 See page 88 for instructions using Windows, or page 90 for Macintosh instructions. 2. Click the Projector Setting icon at the bottom of the screen. Open the ELP Link III main dialog box.

User Manual
Page 110
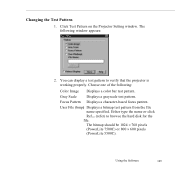
The following window appears: 100 4 • Using the ELP Link III Software Using the Quick Change Toolbar To quickly change some basic projector settings, click one of the toolbar buttons described below: Power On, Off Volume Up, Down Contrast Up, Down Brightness Up, Down Blank, Freeze Auto, Resize Video, Computer Changing Projector Settings 1. Click Projector Control on the Projector Setting window.
The following window appears: 100 4 • Using the ELP Link III Software Using the Quick Change Toolbar To quickly change some basic projector settings, click one of the toolbar buttons described below: Power On, Off Volume Up, Down Contrast Up, Down Brightness Up, Down Blank, Freeze Auto, Resize Video, Computer Changing Projector Settings 1. Click Projector Control on the Projector Setting window.
User Manual
Page 115
...... (refer) to verify that the projector is working properly. Focus Pattern Displays a character-based focus pattern. Gray Scale Displays a grayscale test pattern. The following : Color Image Displays a color bar test pattern. The bitmap should be 1024 × 768 pixels (PowerLite 7500C) or 800 × 600 pixels (PowerLite 5500C). Click Test Pattern on the Projector Setting window.
...... (refer) to verify that the projector is working properly. Focus Pattern Displays a character-based focus pattern. Gray Scale Displays a grayscale test pattern. The following : Color Image Displays a color bar test pattern. The bitmap should be 1024 × 768 pixels (PowerLite 7500C) or 800 × 600 pixels (PowerLite 5500C). Click Test Pattern on the Projector Setting window.

User Manual
Page 117
Click Gamma on the Projector Setting window. The Gamma Setting window appears. 2. Provides a natural image. 3. Specifying an Image Gamma 1. Select the desired gamma: Gamma 1 Gamma 2 Gamma 3 Provides a dynamic and contrastive image. Then click Close. Using the Software 107 Provides an image between Gamma 1 and Gamma 3. Click Pattern Display to display the test pattern selected.
Click Gamma on the Projector Setting window. The Gamma Setting window appears. 2. Provides a natural image. 3. Specifying an Image Gamma 1. Select the desired gamma: Gamma 1 Gamma 2 Gamma 3 Provides a dynamic and contrastive image. Then click Close. Using the Software 107 Provides an image between Gamma 1 and Gamma 3. Click Pattern Display to display the test pattern selected.

User Manual
Page 118
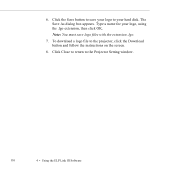
The User's Logo Setting window appears. 108 4 • Using the ELP Link III Software Click User's Logo on your hard disk or download it to the projector. 1. Creating a User Logo You can create or edit a logo from the Projector Setting window, then save it to a file on the Projector Setting window.
The User's Logo Setting window appears. 108 4 • Using the ELP Link III Software Click User's Logo on your hard disk or download it to the projector. 1. Creating a User Logo You can create or edit a logo from the Projector Setting window, then save it to a file on the Projector Setting window.

User Manual
Page 119
Click the Edit button. The User's Logo Setting window reappears. 5. Click the Open the File icon to accept the changes. To increase or decrease the size at which the logo displays, select a zoom percentage from the Zoom list box. 2. Using the Software 109 The selected image appears in the display area. 4. To crop the image, click the Select Area button and position the crop marks. The following window appears. 3. Click OK to locate and open a bitmap (or TIFF, JPG, PSO) file.
Click the Edit button. The User's Logo Setting window reappears. 5. Click the Open the File icon to accept the changes. To increase or decrease the size at which the logo displays, select a zoom percentage from the Zoom list box. 2. Using the Software 109 The selected image appears in the display area. 4. To crop the image, click the Select Area button and position the crop marks. The following window appears. 3. Click OK to locate and open a bitmap (or TIFF, JPG, PSO) file.
User Manual
Page 120
To download a logo file to the Projector Setting window. 110 4 • Using the ELP Link III Software Click Close to return to the projector, click the Download button and follow the instructions on the screen. 8. Note: You must save your logo to your logo, using the .lgo extension, then click OK. 6. Type a name for your hard disk. The Save As dialog box appears. Click the Save button to save logo files with the extension .lgo. 7.
To download a logo file to the Projector Setting window. 110 4 • Using the ELP Link III Software Click Close to return to the projector, click the Download button and follow the instructions on the screen. 8. Note: You must save your logo to your logo, using the .lgo extension, then click OK. 6. Type a name for your hard disk. The Save As dialog box appears. Click the Save button to save logo files with the extension .lgo. 7.

User Manual
Page 134
... for more information. Replace them. If necessary, you are using the ELP Link III set up the optional ELP Link III software. See page 92 (Windows) or page 91 (Macintosh) for details. Move the projector out of fluorescent lighting may affect the projector's infrared receivers. Dim the ambient lighting and turn off any fluorescent lighting...
... for more information. Replace them. If necessary, you are using the ELP Link III set up the optional ELP Link III software. See page 92 (Windows) or page 91 (Macintosh) for details. Move the projector out of fluorescent lighting may affect the projector's infrared receivers. Dim the ambient lighting and turn off any fluorescent lighting...
User Manual
Page 136
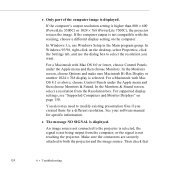
... selected. In Windows 3.x, use the dialog box to modify existing presentation files if you want. In the Monitors & Sound screen, select a resolution from the computer, or the signal is not reaching the projector. Make sure the connectors are securely attached to the projector is selected, the...and make sure Macintosh Hi-Res Display or another 1024 × 768 display is higher than 800 × 600 (PowerLite 5500C) or 1024 × 768 (PowerLite 7500C), the projector resizes the image. You also may need to select the resolution you created them for specific information. ◗ The...
... selected. In Windows 3.x, use the dialog box to modify existing presentation files if you want. In the Monitors & Sound screen, select a resolution from the computer, or the signal is not reaching the projector. Make sure the connectors are securely attached to the projector is selected, the...and make sure Macintosh Hi-Res Display or another 1024 × 768 display is higher than 800 × 600 (PowerLite 5500C) or 1024 × 768 (PowerLite 7500C), the projector resizes the image. You also may need to select the resolution you created them for specific information. ◗ The...


