
Epson Scan ICM Updater v1.20 (PSB.2008.07.001)
Page 1
... installed, an error message occurs when attempting to select ICM Adobe RGB, Apple RGB or ColorMatch RGB color profiles from the Epson website (www.epson.com). • Double-click on the filename. The files will self extract and automatically start the installation process. Description of Problem... download from www.Adobe.com) on a computer that fixes a problem with using Epson Scan 3.5xA or later already include the latest ICM module and are not affected. Description of Change: ICM module updater for Windows XP/XP x64 / Vista (32bit & 64bit) This bulletin was created to inform...
... installed, an error message occurs when attempting to select ICM Adobe RGB, Apple RGB or ColorMatch RGB color profiles from the Epson website (www.epson.com). • Double-click on the filename. The files will self extract and automatically start the installation process. Description of Problem... download from www.Adobe.com) on a computer that fixes a problem with using Epson Scan 3.5xA or later already include the latest ICM module and are not affected. Description of Change: ICM module updater for Windows XP/XP x64 / Vista (32bit & 64bit) This bulletin was created to inform...
Product Brochure
Page 2
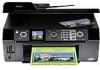
...settings, paper type, frequency of paper feed. See www.epson.com/cartridgeinfo for more information about cartridges. ††† Adapter required Packaging Specifications Epson Stylus CX9400Fax Single Carton Dimensions 21.1" x 18.7" x 11.7" ...Storage: 18.1" x 16.1" x 9.3" Weight: 16.8 lb Case Color Black and gray Connectivity Hi-Speed USB 2.0 Operating Systems Windows Vista®, XP, XP x64, 2000, Mac OS® X ... will vary based on . Epson CX9400Fax All-in-One Specifications Printer Specifications Printing Technology 4-color drop-on-demand MicroPiezo®...
...settings, paper type, frequency of paper feed. See www.epson.com/cartridgeinfo for more information about cartridges. ††† Adapter required Packaging Specifications Epson Stylus CX9400Fax Single Carton Dimensions 21.1" x 18.7" x 11.7" ...Storage: 18.1" x 16.1" x 9.3" Weight: 16.8 lb Case Color Black and gray Connectivity Hi-Speed USB 2.0 Operating Systems Windows Vista®, XP, XP x64, 2000, Mac OS® X ... will vary based on . Epson CX9400Fax All-in-One Specifications Printer Specifications Printing Technology 4-color drop-on-demand MicroPiezo®...
Product Information Guide
Page 13
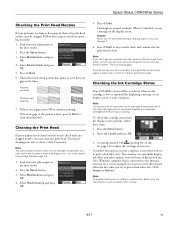
... least six hours to clean it only if necessary. Select Ink Levels and press OK. 3. See page 14 to see page 14). 1. This window can clean the print head. Select Maintenance and press OK. 4. Cleaning the Print Head If print quality has declined and the nozzle check indicates clogged...cleaning the print head three times, turn off your computer. Note: If you do not use your all -in-one often, it is clean. Epson Stylus CX9400Fax Series Checking the Print Head Nozzles If your printouts are faint or have gaps in them, the print head nozzles may damage it. 6. Select ...
... least six hours to clean it only if necessary. Select Ink Levels and press OK. 3. See page 14 to see page 14). 1. This window can clean the print head. Select Maintenance and press OK. 4. Cleaning the Print Head If print quality has declined and the nozzle check indicates clogged...cleaning the print head three times, turn off your computer. Note: If you do not use your all -in-one often, it is clean. Epson Stylus CX9400Fax Series Checking the Print Head Nozzles If your printouts are faint or have gaps in them, the print head nozzles may damage it. 6. Select ...
Product Information Guide
Page 15
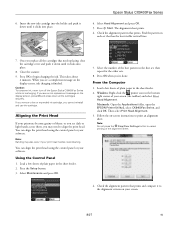
... you 're done. Then select Print Head Alignment. 3. Press OK to align the print head. Caution: To conserve ink, never turn off the Epson Stylus CX9400Fax Series while ink is finished. You can align the print head using the control panel or your software. Press Start. Aligning the Print Head If...taskbar) and select Print Head Alignment. Close the scanner. 9. You can align the print head using the control panel or your screen. 8/07 15 Windows: Right-click the printer icon in each set , then repeat for the other sets. 8. Follow the on the display screen, press OK and press...
... you 're done. Then select Print Head Alignment. 3. Press OK to align the print head. Caution: To conserve ink, never turn off the Epson Stylus CX9400Fax Series while ink is finished. You can align the print head using the control panel or your software. Press Start. Aligning the Print Head If...taskbar) and select Print Head Alignment. Close the scanner. 9. You can align the print head using the control panel or your screen. 8/07 15 Windows: Right-click the printer icon in each set , then repeat for the other sets. 8. Follow the on the display screen, press OK and press...
Quick Reference Guide
Page 2
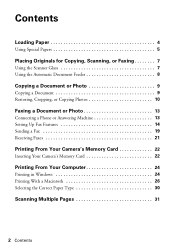
... a Fax 19 Receiving Faxes 21 Printing From Your Camera's Memory Card 22 Inserting Your Camera's Memory Card 22 Printing From Your Computer 24 Printing in Windows 24 Printing With a Macintosh 26 Selecting the Correct Paper Type 30 Scanning Multiple Pages 31 2 Contents
... a Fax 19 Receiving Faxes 21 Printing From Your Camera's Memory Card 22 Inserting Your Camera's Memory Card 22 Printing From Your Computer 24 Printing in Windows 24 Printing With a Macintosh 26 Selecting the Correct Paper Type 30 Scanning Multiple Pages 31 2 Contents
Quick Reference Guide
Page 24
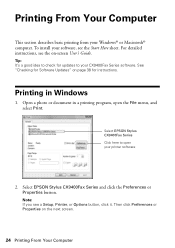
.... Open a photo or document in Windows 1. Note: If you see the on-screen User's Guide. See "Checking for instructions. Printing From Your Computer This section describes basic printing from your CX9400Fax Series software. Printing in a printing program, open your software, see the Start Here sheet. Select EPSON Stylus CX9400Fax Series and click the Preferences or...
.... Open a photo or document in Windows 1. Note: If you see the on-screen User's Guide. See "Checking for instructions. Printing From Your Computer This section describes basic printing from your CX9400Fax Series software. Printing in a printing program, open your software, see the Start Here sheet. Select EPSON Stylus CX9400Fax Series and click the Preferences or...

Quick Reference Guide
Page 25
... contrast, and saturation. 3. To reduce or enlarge your on-screen User's Guide. 6. If your photo includes a face with an intentional color cast, such as Auto Photo Correction). On the Main tab, select the basic print settings. Note: For more printing options, click the ...Advanced tab. Click OK to retain the special color effects. 4. PhotoEnhanceTM uses a sophisticated face recognition technology to work, both eyes and the nose must be visible in Windows 25 Printing in the subject's face. For more information about print settings,...
... contrast, and saturation. 3. To reduce or enlarge your on-screen User's Guide. 6. If your photo includes a face with an intentional color cast, such as Auto Photo Correction). On the Main tab, select the basic print settings. Note: For more printing options, click the ...Advanced tab. Click OK to retain the special color effects. 4. PhotoEnhanceTM uses a sophisticated face recognition technology to work, both eyes and the nose must be visible in Windows 25 Printing in the subject's face. For more information about print settings,...
Quick Reference Guide
Page 26
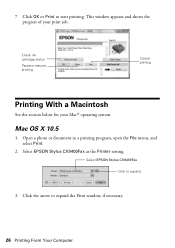
This window appears and shows the progress of your Mac® operating system. Open a photo or document in a printing program, open the File menu, and select Print. 2. Click the arrow to start printing. Check ink cartridge status Pause or resume printing Cancel printing Printing With a Macintosh See the section below for your print job. Click OK or Print to expand the Print window, if necessary. 26 Printing From Your Computer 7. Mac OS X 10.5 1. Select EPSON Stylus CX9400Fax as the Printer setting. Select EPSON Stylus CX9400Fax Click to expand 3.
This window appears and shows the progress of your Mac® operating system. Open a photo or document in a printing program, open the File menu, and select Print. 2. Click the arrow to start printing. Check ink cartridge status Pause or resume printing Cancel printing Printing With a Macintosh See the section below for your print job. Click OK or Print to expand the Print window, if necessary. 26 Printing From Your Computer 7. Mac OS X 10.5 1. Select EPSON Stylus CX9400Fax as the Printer setting. Select EPSON Stylus CX9400Fax Click to expand 3.
Quick Reference Guide
Page 27
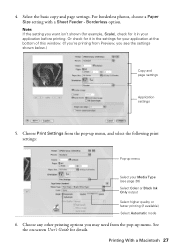
...settings 5. Choose any other printing options you want isn't shown (for example, Scale), check for it in your application at the bottom of this window. (If you're printing from the pop-up menu, and select the following print settings: Pop-up menu. Printing With a Macintosh 27 Borderless ... setting with a Sheet Feeder - Or check for it in the settings for details. Choose Print Settings from Preview, you see page 30) Select Color or Black Ink Only output Select higher quality or faster printing (if available) Select Automatic mode 6. See the on-screen User's Guide for your ...
...settings 5. Choose any other printing options you want isn't shown (for example, Scale), check for it in your application at the bottom of this window. (If you're printing from the pop-up menu, and select the following print settings: Pop-up menu. Printing With a Macintosh 27 Borderless ... setting with a Sheet Feeder - Or check for it in the settings for details. Choose Print Settings from Preview, you see page 30) Select Color or Black Ink Only output Select higher quality or faster printing (if available) Select Automatic mode 6. See the on-screen User's Guide for your ...
Quick Reference Guide
Page 31
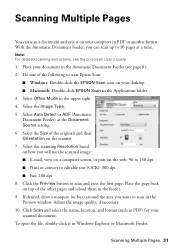
...first page. Select the Size of the other pages and reload them in the feeder. 9. Click the Preview button to scan in the Preview window. Click Scan and select the name, location, and format (such as the Document Source setting. 6. Select Office Mode in PDF or another ...marquee (or box) around the area you can scan a document and save it in Windows Explorer or Macintosh Finder. Scanning Multiple Pages 31 Do one of the following to start Epson Scan: ■ Windows: Double-click the EPSON Scan icon on your scanned document. Adjust the image quality, if necessary. 10. Select...
...first page. Select the Size of the other pages and reload them in the feeder. 9. Click the Preview button to scan in the Preview window. Click Scan and select the name, location, and format (such as the Document Source setting. 6. Select Office Mode in PDF or another ...marquee (or box) around the area you can scan a document and save it in Windows Explorer or Macintosh Finder. Scanning Multiple Pages 31 Do one of the following to start Epson Scan: ■ Windows: Double-click the EPSON Scan icon on your scanned document. Adjust the image quality, if necessary. 10. Select...
Quick Reference Guide
Page 34
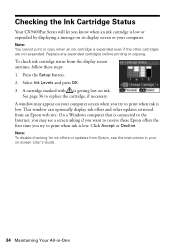
...or updates from the display screen anytime, follow these Epson offers the first time you try to replace the cartridge, if necessary. Replace any expended cartridges before printing or copying. Select Ink Levels and press OK. 3. A window may see the instructions in your on-screen User's... ink cartridge status from Epson, see a screen asking if you want to receive these steps: 1. A cartridge marked with is low. On a Windows computer that is connected to the Internet, you may appear on your computer. Checking the Ink Cartridge Status Your CX9400Fax Series will let you ...
...or updates from the display screen anytime, follow these Epson offers the first time you try to replace the cartridge, if necessary. Replace any expended cartridges before printing or copying. Select Ink Levels and press OK. 3. A window may see the instructions in your on-screen User's... ink cartridge status from Epson, see a screen asking if you want to receive these steps: 1. A cartridge marked with is low. On a Windows computer that is connected to the Internet, you may appear on your computer. Checking the Ink Cartridge Status Your CX9400Fax Series will let you ...
Quick Reference Guide
Page 38
...). You can also click Start or , select Programs or All Programs, select EPSON, and click EPSON Stylus CX9400Fax Series Driver Update. Problems and Solutions Check the solutions below if you can select Driver Update on the Maintenance tab in the printer settings window. Don't load paper above the arrow mark inside the guide. 38 Solving...
...). You can also click Start or , select Programs or All Programs, select EPSON, and click EPSON Stylus CX9400Fax Series Driver Update. Problems and Solutions Check the solutions below if you can select Driver Update on the Maintenance tab in the printer settings window. Don't load paper above the arrow mark inside the guide. 38 Solving...
Start Here
Page 5
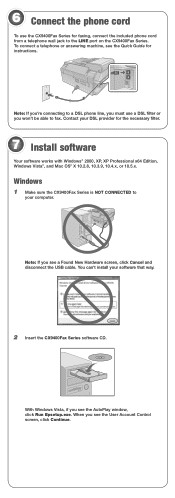
... DSL phone line, you must use the CX9400Fax Series for faxing, connect the included phone cord from a telephone wall jack to the LINE port on the CX9400Fax Series. Contact your DSL provider for instructions. Windows 1 Make sure the CX9400Fax Series is NOT CONNECTED to your software that... way. 2 Insert the CX9400Fax Series software CD. You can't install your computer. 6 Connect ...
... DSL phone line, you must use the CX9400Fax Series for faxing, connect the included phone cord from a telephone wall jack to the LINE port on the CX9400Fax Series. Contact your DSL provider for instructions. Windows 1 Make sure the CX9400Fax Series is NOT CONNECTED to your software that... way. 2 Insert the CX9400Fax Series software CD. You can't install your computer. 6 Connect ...
Start Here Book (with wireless print server)
Page 11
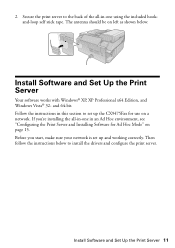
... CX9475Fax for Ad Hoc Mode" on left as shown below: Install Software and Set Up the Print Server Your software works with Windows® XP, XP Professional x64 Edition, and Windows Vista® 32- If you start, make sure your network is set up and working correctly. 2. and 64-bit. Follow the...
... CX9475Fax for Ad Hoc Mode" on left as shown below: Install Software and Set Up the Print Server Your software works with Windows® XP, XP Professional x64 Edition, and Windows Vista® 32- If you start, make sure your network is set up and working correctly. 2. and 64-bit. Follow the...
Start Here Book (with wireless print server)
Page 12
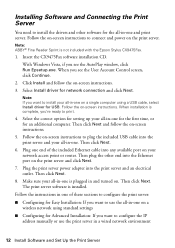
... Ethernet port on your all -in a wired network environment 12 Install Software and Set Up the Print Server When you see the AutoPlay window, click Run Epsetup.exe. Follow the on -screen instructions. 3. Follow the on-screen instructions to connect and power on . Plug the...the User Account Control screen, click Continue. 2. Then click Next. The print server software is not included with the Epson Stylus CX9475Fax. 1. Insert the CX9475Fax software installation CD. With Windows Vista, if you want to use the print server in -one on -screen instructions. 5. Select Install driver for ...
... Ethernet port on your all -in a wired network environment 12 Install Software and Set Up the Print Server When you see the AutoPlay window, click Run Epsetup.exe. Follow the on -screen instructions. 3. Follow the on-screen instructions to connect and power on . Plug the...the User Account Control screen, click Continue. 2. Then click Next. The print server software is not included with the Epson Stylus CX9475Fax. 1. Insert the CX9475Fax software installation CD. With Windows Vista, if you want to use the print server in -one on -screen instructions. 5. Select Install driver for ...
Start Here Book (with wireless print server)
Page 13
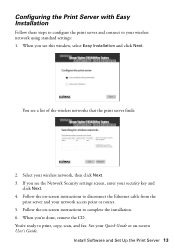
... your wireless network using standard settings: 1. Follow the on -screen User's Guide. Install Software and Set Up the Print Server 13 If you see this window, select Easy Installation and click Next. See your network access point or router. 5. You see the Network Security settings screen, enter your security key and...
... your wireless network using standard settings: 1. Follow the on -screen User's Guide. Install Software and Set Up the Print Server 13 If you see this window, select Easy Installation and click Next. See your network access point or router. 5. You see the Network Security settings screen, enter your security key and...
Start Here Book (with wireless print server)
Page 14
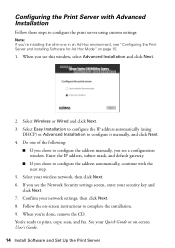
When you 're done, remove the CD. Select Easy Installation to configure the IP address automatically (using custom settings: Note: If you see this window, select Advanced Installation and click Next. 2. When you see the Network Security settings screen, enter your Quick Guide or on page 15. 1. Follow the on-.... 5. You're ready to configure the address manually, you chose to print, copy, scan, and fax. Do one in an Ad Hoc environment, see a configuration window. See your security key and click Next. 7.
When you 're done, remove the CD. Select Easy Installation to configure the IP address automatically (using custom settings: Note: If you see this window, select Advanced Installation and click Next. 2. When you see the Network Security settings screen, enter your Quick Guide or on page 15. 1. Follow the on-.... 5. You're ready to configure the address manually, you chose to print, copy, scan, and fax. Do one in an Ad Hoc environment, see a configuration window. See your security key and click Next. 7.
Start Here Book (with wireless print server)
Page 16
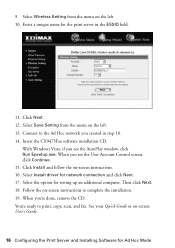
Click Next. 12. Insert the CX9475Fax software installation CD. When you see the User Account Control screen, click Continue. 15. With Windows Vista, if you 're done, remove the CD. Click Install and follow the on the left . 10. Then click Next. 18. Select Save Setting from ..., scan, and fax. Select Wireless Setting from the menu on -screen instructions. 16. You're ready to the Ad Hoc network you see the AutoPlay window, click Run Epsetup.exe. Select Install driver for setting up an additional computer. 9.
Click Next. 12. Insert the CX9475Fax software installation CD. When you see the User Account Control screen, click Continue. 15. With Windows Vista, if you 're done, remove the CD. Click Install and follow the on the left . 10. Then click Next. 18. Select Save Setting from ..., scan, and fax. Select Wireless Setting from the menu on -screen instructions. 16. You're ready to the Ad Hoc network you see the AutoPlay window, click Run Epsetup.exe. Select Install driver for setting up an additional computer. 9.

Start Here Book (with wireless print server)
Page 17
Select your all-in-one in the MFP Server List and click Disconnect. Double-click the MFP Manager icon in -one : 2. You see a window like this one using MFP Manager. Using the Scanner and Card Reader 17 Using the Scanner and Card Reader Before you can use your all-... to connect and disconnect your all -in-one in the MFP Server List and click Connect. 3. When you're done, select your all -in the Windows taskbar. Follow the steps below to it using the MFP Manager software: 1.
Select your all-in-one in the MFP Server List and click Disconnect. Double-click the MFP Manager icon in -one : 2. You see a window like this one using MFP Manager. Using the Scanner and Card Reader 17 Using the Scanner and Card Reader Before you can use your all-... to connect and disconnect your all -in-one in the MFP Server List and click Connect. 3. When you're done, select your all -in the Windows taskbar. Follow the steps below to it using the MFP Manager software: 1.


