
Technical Brief (Ink Jet Printers)
Page 2
... combine to improve color ranges and accuracy because Epson printers can produce a number of printed "dots" • Large ink droplets are used in dense coverage areas allowing Epson to have fast print speeds without having to improve print speed With this technique, Epson printers can be used in the low-density or highlight areas, reducing the visibility of different ink droplet sizes. Small ink droplet size: Most Epson printers produce ink droplets so...
... combine to improve color ranges and accuracy because Epson printers can produce a number of printed "dots" • Large ink droplets are used in dense coverage areas allowing Epson to have fast print speeds without having to improve print speed With this technique, Epson printers can be used in the low-density or highlight areas, reducing the visibility of different ink droplet sizes. Small ink droplet size: Most Epson printers produce ink droplets so...

Technical Brief (Ink Jet Printers)
Page 3
..., high-quality, color-accurate output. Epson papers are specifically designed to get sharp black text, superb photo quality photos, or both on the Epson ink sets in various patterns so you never have to swap an ink cartridge to receive Epson inks. Epson disclaims any and all three elements are present and used, the best possibly print quality is achieved. • The Epson printer driver optimizes ink density based on...
..., high-quality, color-accurate output. Epson papers are specifically designed to get sharp black text, superb photo quality photos, or both on the Epson ink sets in various patterns so you never have to swap an ink cartridge to receive Epson inks. Epson disclaims any and all three elements are present and used, the best possibly print quality is achieved. • The Epson printer driver optimizes ink density based on...
Product Information Guide
Page 1
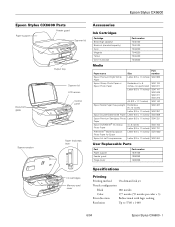
Epson Stylus CX6600 Epson Stylus CX6600 Parts Feeder guard Paper support Scanner lid Document glass Output tray Scanner lid LCD screen Control panel Scanner section Paper thickness lever Accessories Ink Cartridges Cartridge Black (high capacity) Black ink (standard capacity) Cyan Magenta Yellow Color multi-pack Part number T043120 T044120 T044220 T044320 T044420 T044520 Media Paper name Size Part number Epson Premium Bright White Paper Letter (8.5 x 11 inches) S041586 Epson Glossy Photo Paper or Epson Photo Paper Borderless 4 × 6 S041134 inches, non-perforated S041671...
Epson Stylus CX6600 Epson Stylus CX6600 Parts Feeder guard Paper support Scanner lid Document glass Output tray Scanner lid LCD screen Control panel Scanner section Paper thickness lever Accessories Ink Cartridges Cartridge Black (high capacity) Black ink (standard capacity) Cyan Magenta Yellow Color multi-pack Part number T043120 T044120 T044220 T044320 T044420 T044520 Media Paper name Size Part number Epson Premium Bright White Paper Letter (8.5 x 11 inches) S041586 Epson Glossy Photo Paper or Epson Photo Paper Borderless 4 × 6 S041134 inches, non-perforated S041671...

Product Information Guide
Page 2
... print quality and cause paper jams and other problems. If you can print borderless prints on the initial supply. Do not refill the ink cartridge. Do not load curled, folded, or wrinkled paper. Epson Stylus CX6600 6/04 Don't use . Paper This section describes the specifications for use an ink cartridge if the date on the LCD panel (Copy Mode). Before printing large jobs using the Min Margins setting on the package has expired. Always test samples of remaining ink...
... print quality and cause paper jams and other problems. If you can print borderless prints on the initial supply. Do not refill the ink cartridge. Do not load curled, folded, or wrinkled paper. Epson Stylus CX6600 6/04 Don't use . Paper This section describes the specifications for use an ink cartridge if the date on the LCD panel (Copy Mode). Before printing large jobs using the Min Margins setting on the package has expired. Always test samples of remaining ink...
Product Information Guide
Page 4
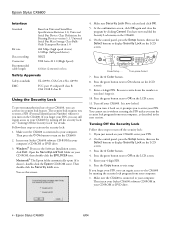
... LCD screen. 3. On the control panel, press the Setup button, then use the Select buttons to Off on the LCD screen). 9. Epson Stylus CX6600 6/04 Press the x Color button. 8. Turn off the security lock: 1. Press the green button next to display Security Lock on the CX6600. Press the green button next to exit setup. Epson Stylus CX6600 Interface Standard Bit rate Data encoding Connector Recommended cable length Based on Universal Serial Bus Specifications Revision 2.0, Universal Serial Bus Device...
... LCD screen. 3. On the control panel, press the Setup button, then use the Select buttons to Off on the LCD screen). 9. Epson Stylus CX6600 6/04 Press the x Color button. 8. Turn off the security lock: 1. Press the green button next to display Security Lock on the CX6600. Press the green button next to exit setup. Epson Stylus CX6600 Interface Standard Bit rate Data encoding Connector Recommended cable length Based on Universal Serial Bus Specifications Revision 2.0, Universal Serial Bus Device...
Product Information Guide
Page 5
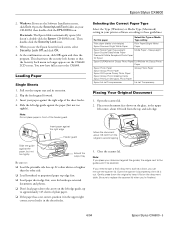
... Type setting Plain paper sheets or envelopes Epson Premium Bright White Paper Plain Paper/ Bright White Paper Epson Matte Paper Heavyweight Matte Paper - Open the scanner lid. 2. Place your printer software according to keep it in the upper right corner as a book, you load it flat on the document table. It's often whiter or brighter than the other side. ❏ Load letterhead or preprinted paper top edge first. ❏ Load paper short-edge first, even for Epson Epson...
... Type setting Plain paper sheets or envelopes Epson Premium Bright White Paper Plain Paper/ Bright White Paper Epson Matte Paper Heavyweight Matte Paper - Open the scanner lid. 2. Place your printer software according to keep it in the upper right corner as a book, you load it flat on the document table. It's often whiter or brighter than the other side. ❏ Load letterhead or preprinted paper top edge first. ❏ Load paper short-edge first, even for Epson Epson...
Product Information Guide
Page 6
... to make black-and-white copies). Copy Layout Since the copy layout setting determines the options available with a 0.06-inch border around the edges* Repeat Prints an image multiple times on the control panel is green when Copy Mode is scanned then printed. Note: The Copy button on one sheet Wallet Photo Prints nine wallet-size copies of copies Print quality Menu selection buttons Paper size Note: To clear a setting, press the Clear/Reset button. Place your image as many other copy settings. 1. Then close the scanner lid. 2. Change any necessary copy settings...
... to make black-and-white copies). Copy Layout Since the copy layout setting determines the options available with a 0.06-inch border around the edges* Repeat Prints an image multiple times on the control panel is green when Copy Mode is scanned then printed. Note: The Copy button on one sheet Wallet Photo Prints nine wallet-size copies of copies Print quality Menu selection buttons Paper size Note: To clear a setting, press the Clear/Reset button. Place your image as many other copy settings. 1. Then close the scanner lid. 2. Change any necessary copy settings...

Product Information Guide
Page 7
... loaded Plain paper, Premium Bright White Paper Matte Paper Heavyweight, PremierArt Matte Scrapbook Photo Paper Glossy Photo Paper, Photo Paper, Premium Semigloss Photo Paper DURABrite Ink Glossy Photo Paper Print Quality Press the bottom left button to choose print quality. Use the numeric keypad to + and - Press the Menu button. 2. Press the green button next to the LCD screen until you 've changed. ❏ To cancel a job in progress, press the x Stop button. Choose one of these options: Setting Actual Auto Fit Page...
... loaded Plain paper, Premium Bright White Paper Matte Paper Heavyweight, PremierArt Matte Scrapbook Photo Paper Glossy Photo Paper, Photo Paper, Premium Semigloss Photo Paper DURABrite Ink Glossy Photo Paper Print Quality Press the bottom left button to choose print quality. Use the numeric keypad to + and - Press the Menu button. 2. Press the green button next to the LCD screen until you 've changed. ❏ To cancel a job in progress, press the x Stop button. Choose one of these options: Setting Actual Auto Fit Page...
Product Information Guide
Page 8
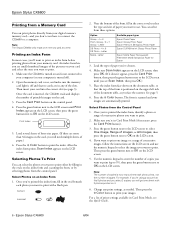
... screen. Select Photos on the card, you 've printed the index form, fill in Card Print Mode (if necessary, press the Card Print button). 3. Change any of paper you don't even have to connect the CX6600 to select the type and size of the slots. Epson Stylus CX6600 6/04 Print Index 5. Letter DB Photo - 4 × 6 DB Photo - Make sure Scan Index appears on the index form and scanning the form, or by selecting photos from these options: Option...
... screen. Select Photos on the card, you 've printed the index form, fill in Card Print Mode (if necessary, press the Card Print button). 3. Change any of paper you don't even have to connect the CX6600 to select the type and size of the slots. Epson Stylus CX6600 6/04 Print Index 5. Letter DB Photo - 4 × 6 DB Photo - Make sure Scan Index appears on the index form and scanning the form, or by selecting photos from these options: Option...
Product Information Guide
Page 9
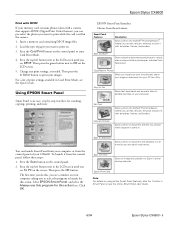
... text files on the screen. The first time you do this action box. Press the Scan button on using all the Smart Panel features, click the ? Click OK. Copy to Fax Scans text documents and converts them to the LCD screen until you can send it to enter Card Print Mode. 4. For a list of paper you want to an e-mail so you see the online Smart Panel User Guide. 6/04 Epson Stylus CX6600 - 9 Scan and Save Scans and prints documents and photos...
... text files on the screen. The first time you do this action box. Press the Scan button on using all the Smart Panel features, click the ? Click OK. Copy to Fax Scans text documents and converts them to the LCD screen until you can send it to enter Card Print Mode. 4. For a list of paper you want to an e-mail so you see the online Smart Panel User Guide. 6/04 Epson Stylus CX6600 - 9 Scan and Save Scans and prints documents and photos...
Product Information Guide
Page 10
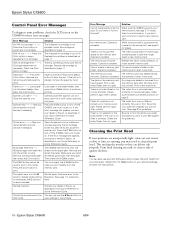
... 11. Contact your printer settings window for these error messages: Error Message No XXX ink cartridge - - - > Press the Color button to turn off the CX6600, then turn it , insert a new memory card. Release the card's write protection, or protect. Note: You can deliver ink properly. Cannot be used to continue printing. Replace the cartridge as described in this mode. The memory card is not set correctly. Epson Stylus CX6600 Control Panel Error Messages To diagnose some problems, check the LCD screen on the CX6600 for instructions. 10 - Remove any tape...
... 11. Contact your printer settings window for these error messages: Error Message No XXX ink cartridge - - - > Press the Color button to turn off the CX6600, then turn it , insert a new memory card. Release the card's write protection, or protect. Note: You can deliver ink properly. Cannot be used to continue printing. Replace the cartridge as described in this mode. The memory card is not set correctly. Epson Stylus CX6600 Control Panel Error Messages To diagnose some problems, check the LCD screen on the CX6600 for instructions. 10 - Remove any tape...
Product Information Guide
Page 11
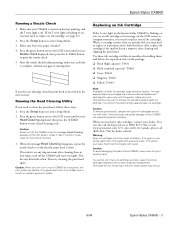
... for users who print infrequently may dry out. 6/04 Epson Stylus CX6600 - 11 If you don't turn off . (If the ! The high capacity black ink cartridges are missing, clean the print head as replacement cartridges for more than 5 minutes. 3. Press the Setup button to enter Setup Mode. 2. see any ink cartridge is complete, without any gaps or missing dots: If any dried ink soften. After the nozzle check finishes printing, make sure each line is...
... for users who print infrequently may dry out. 6/04 Epson Stylus CX6600 - 11 If you don't turn off . (If the ! The high capacity black ink cartridges are missing, clean the print head as replacement cartridges for more than 5 minutes. 3. Press the Setup button to enter Setup Mode. 2. see any ink cartridge is complete, without any gaps or missing dots: If any dried ink soften. After the nozzle check finishes printing, make sure each line is...

Quick Reference Guide
Page 5
... -screen Reference Guide. Your CX6600 lets you want to use your Epson Stylus® CX6600 to do is automatically placed on your digital camera's memory card-just insert the card, select the settings you share images in other ways, too- An icon for better copying, scanning, and printing. 5 You don't have to make color or black-and-white copies without turning on your on the scanner glass and press a button. To set up your CX6600...
... -screen Reference Guide. Your CX6600 lets you want to use your Epson Stylus® CX6600 to do is automatically placed on your digital camera's memory card-just insert the card, select the settings you share images in other ways, too- An icon for better copying, scanning, and printing. 5 You don't have to make color or black-and-white copies without turning on your on the scanner glass and press a button. To set up your CX6600...

Quick Reference Guide
Page 6
... PIN code, you can still regain access to prevent unauthorized use of your hard drive. Insert your CX6600. 2. Follow these steps to close the program. You see the Software Installation screen, click Exit. Windows: If you turn on your CX6600 and install its software, see the Start Here sheet. At the confirmation screen, click OK again, then click Cancel to activate the security lock: 1. You have now enabled the Security Lock menu...
... PIN code, you can still regain access to prevent unauthorized use of your hard drive. Insert your CX6600. 2. Follow these steps to close the program. You see the Software Installation screen, click Exit. Windows: If you turn on your CX6600 and install its software, see the Start Here sheet. At the confirmation screen, click OK again, then click Cancel to activate the security lock: 1. You have now enabled the Security Lock menu...

Quick Reference Guide
Page 14
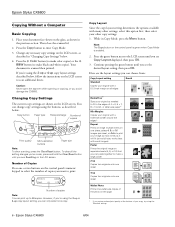
... LCD screen. Changing Copy Settings The current copy settings are displayed on the screen. If you want to clear the current copy settings and return the CX6600 to scan additional sheets. Your document is scanned then printed. Caution: Never open the scanner while scanning or copying, or you see "Copy Layout" on page 17), follow the instructions on the LCD screen. Copy Mode button Paper type Reduce/enlarge Number of copies) by pressing the Save button for 3 seconds. Press the x Color button (to make black-and-white copies). Close the scanner...
... LCD screen. Changing Copy Settings The current copy settings are displayed on the screen. If you want to clear the current copy settings and return the CX6600 to scan additional sheets. Your document is scanned then printed. Caution: Never open the scanner while scanning or copying, or you see "Copy Layout" on page 17), follow the instructions on the LCD screen. Copy Mode button Paper type Reduce/enlarge Number of copies) by pressing the Save button for 3 seconds. Press the x Color button (to make black-and-white copies). Close the scanner...

Quick Reference Guide
Page 15
... loaded special paper, use this button to select one of the paper type settings listed below: Paper type If you want to print (up Copy mode setting (see "Copy Layout" on page 17), you can't select more than one of these print quality settings: ■ Draft for making copies quickly when image quality is not important ■ Text for copying text and line art Print quality ■ Image for copies that include color or black-and-white images ■ Best for Epson Epson Photo Paper Epson...
... loaded special paper, use this button to select one of the paper type settings listed below: Paper type If you want to print (up Copy mode setting (see "Copy Layout" on page 17), you can't select more than one of these print quality settings: ■ Draft for making copies quickly when image quality is not important ■ Text for copying text and line art Print quality ■ Image for copies that include color or black-and-white images ■ Best for Epson Epson Photo Paper Epson...

Quick Reference Guide
Page 30
... a memory card (see a message on the memory card. 7. Make sure your original document is placed on the LCD screen to enter Scan Mode. 3. Press the green button next to start scanning. Select the document type (Text or Graphic). 5. Caution: Never open the scanner while scanning or copying, or you see page 20). Press the button indicated on the scanner glass, then press the x Color button to the LCD screen until scanning finishes and the memory card light stops flashing, then remove the card...
... a memory card (see a message on the memory card. 7. Make sure your original document is placed on the LCD screen to enter Scan Mode. 3. Press the green button next to start scanning. Select the document type (Text or Graphic). 5. Caution: Never open the scanner while scanning or copying, or you see page 20). Press the button indicated on the scanner glass, then press the x Color button to the LCD screen until scanning finishes and the memory card light stops flashing, then remove the card...
Quick Reference Guide
Page 38
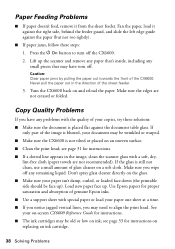
... up . Load new paper face up ). Never pull the paper out in the image, clean the scanner glass with the quality of the CX6600. Don't spray glass cleaner directly on the glass. ■ Make sure your on-screen CX6600 Reference Guide for instructions on and reload the paper. Press the P On button to align the print head. Copy Quality Problems If you wipe off the CX6600. 2. Paper Feeding Problems ■ If paper doesn't feed, remove it...
... up . Load new paper face up ). Never pull the paper out in the image, clean the scanner glass with the quality of the CX6600. Don't spray glass cleaner directly on the glass. ■ Make sure your on-screen CX6600 Reference Guide for instructions on and reload the paper. Press the P On button to align the print head. Copy Quality Problems If you wipe off the CX6600. 2. Paper Feeding Problems ■ If paper doesn't feed, remove it...

Quick Reference Guide
Page 45
... exchange for the defective unit, Epson will ship a replacement printer to the Epson standard of quality, and, at Epson's option, may expire before the expiration of energy-efficient personal computers, monitors, printers, fax machines, and copiers in the event that the EPSON printer covered by power generation. Epson requires a debit or a credit card number to Epson or its option, exchange or repair the printer without charge for warranty repair instructions and return authorization. Possessions...
... exchange for the defective unit, Epson will ship a replacement printer to the Epson standard of quality, and, at Epson's option, may expire before the expiration of energy-efficient personal computers, monitors, printers, fax machines, and copiers in the event that the EPSON printer covered by power generation. Epson requires a debit or a credit card number to Epson or its option, exchange or repair the printer without charge for warranty repair instructions and return authorization. Possessions...
Start Here Card
Page 7
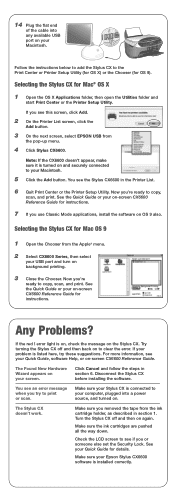
... this screen, click Add. 2 On the Printer List screen, click the Add button. 3 On the next screen, select EPSON USB from the ink cartridge holder, as described in section 1. Make sure your Quick Guide for instructions. 7 If you see an error message when you 're ready to the Print Center or Printer Setup Utility (for OS X) or the Chooser (for Mac® OS X 1 Open the OS X Applications folder, then open the Utilities folder and start Print Center or the Printer Setup Utility...
... this screen, click Add. 2 On the Printer List screen, click the Add button. 3 On the next screen, select EPSON USB from the ink cartridge holder, as described in section 1. Make sure your Quick Guide for instructions. 7 If you see an error message when you 're ready to the Print Center or Printer Setup Utility (for OS X) or the Chooser (for Mac® OS X 1 Open the OS X Applications folder, then open the Utilities folder and start Print Center or the Printer Setup Utility...


