

Epson Scan ICM Updater v1.20 (PSB.2008.07.001)
Page 1
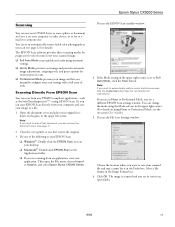
... few seconds. • Open Epson Scan. You can choose any of Change: ICM module updater for Windows XP/XP x64 / Vista (32bit & 64bit) This bulletin was created to inform you can now choose your preferred profile. Description of these color profiles. Installation: • Download ...epson12688.exe from the Epson website (www.epson.com). • Double-click ...
... few seconds. • Open Epson Scan. You can choose any of Change: ICM module updater for Windows XP/XP x64 / Vista (32bit & 64bit) This bulletin was created to inform you can now choose your preferred profile. Description of these color profiles. Installation: • Download ...epson12688.exe from the Epson website (www.epson.com). • Double-click ...

Product Information Guide
Page 7
...make 10 or more copies, see the correct number of copies in the Copies window. Copying a Document 1. Make sure the CX5000 Series is turned on the glass as described to 9 copies at a time this way. Epson Stylus CX5000 Series Placing Large or Thick Documents When you scan a large or thick document, ...size as described on . 2. Load up to stop copying, press the y Stop button. To make a color copy, press the x Start Color button. The On light flashes and after a moment the CX5000 Series starts printing. You can select up to 20 sheets of letter-size plain paper (see the next ...
...make 10 or more copies, see the correct number of copies in the Copies window. Copying a Document 1. Make sure the CX5000 Series is turned on the glass as described to 9 copies at a time this way. Epson Stylus CX5000 Series Placing Large or Thick Documents When you scan a large or thick document, ...size as described on . 2. Load up to stop copying, press the y Stop button. To make a color copy, press the x Start Color button. The On light flashes and after a moment the CX5000 Series starts printing. You can select up to 20 sheets of letter-size plain paper (see the next ...

Product Information Guide
Page 8
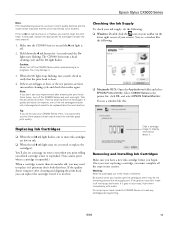
...cover. 3. Open the memory card door. 3. it is being printed; Press the x Start Color or x Start B&W button. If you see "-" in black and white). This tells the CX5000 Series to print up to copy in the Copies window. Place the photo on page 6. For example, to select Letter, 4"x 6", or 5"x ... 2. Epson Stylus CX5000 Series To make . Note: The copies may not be ejected automatically to your computer (or your card into the correct slot. Do not pull out paper that no cards are ready to copy, press and hold down the y Stop button, then press the x Start Color button ...
...cover. 3. Open the memory card door. 3. it is being printed; Press the x Start Color or x Start B&W button. If you see "-" in black and white). This tells the CX5000 Series to print up to copy in the Copies window. Place the photo on page 6. For example, to select Letter, 4"x 6", or 5"x ... 2. Epson Stylus CX5000 Series To make . Note: The copies may not be ejected automatically to your computer (or your card into the correct slot. Do not pull out paper that no cards are ready to copy, press and hold down the y Stop button, then press the x Start Color button ...
Product Information Guide
Page 10
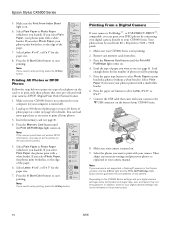
...Color button to stop printing, press the y Stop button. Note: If you select Photo Paper, your photos print borderless, to the USB connector on . 4. Connect the USB cable that were pre-selected with a white border. Then adjust any necessary settings and print your photos print with your CX5000 Series. 8. Epson Stylus CX5000...the paper type button to select Photo Paper to use (see page 8). 4. Select Plain Paper if you 'll be reflected in the Copies window, and the b Error light and the Print All/PictBridge flash. Press the paper size button to select Letter, 4"x 6", or 5"x 7"....
...Color button to stop printing, press the y Stop button. Note: If you select Photo Paper, your photos print borderless, to the USB connector on . 4. Connect the USB cable that were pre-selected with a white border. Then adjust any necessary settings and print your photos print with your CX5000 Series. 8. Epson Stylus CX5000...the paper type button to select Photo Paper to use (see page 8). 4. Select Plain Paper if you 'll be reflected in the Copies window, and the b Error light and the Print All/PictBridge flash. Press the paper size button to select Letter, 4"x 6", or 5"x 7"....
Product Information Guide
Page 11
... from any TWAIN-compliant application-such as you scan, click the Customize button (see the File Save Settings window: Choose the location where you want to automatically restore a color photo as ArcSoft PhotoImpression™-using EPSON Scan. If the Mode setting in the upper right corner is scanned and you scan (see page... Mode scans quickly and easily using Home or Professional Mode, see its icon in an open the File menu, choose Import or Acquire, and select Epson Stylus CX5000 Series. You see a different EPSON Scan settings window.
... from any TWAIN-compliant application-such as you scan, click the Customize button (see the File Save Settings window: Choose the location where you want to automatically restore a color photo as ArcSoft PhotoImpression™-using EPSON Scan. If the Mode setting in the upper right corner is scanned and you scan (see page... Mode scans quickly and easily using Home or Professional Mode, see its icon in an open the File menu, choose Import or Acquire, and select Epson Stylus CX5000 Series. You see a different EPSON Scan settings window.
Product Information Guide
Page 12
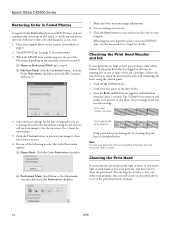
... Click the Preview button to step 4. ❏ Full Auto Mode: click the Customize button, click the Color Restoration checkbox, and click OK. When the EPSON Scan window appears, do one of original(s) you are unexpectedly light or faint, or you notice light or dark bands...as described below to see the on-screen User's Guide). Print head needs to -life color and sharpness as necessary. 9. Epson Stylus CX5000 Series Restoring Color in Faded Photos Using the Color Restoration feature in EPSON Scan, you can automatically transform an old, faded, or badly exposed photo into one ...
... Click the Preview button to step 4. ❏ Full Auto Mode: click the Customize button, click the Color Restoration checkbox, and click OK. When the EPSON Scan window appears, do one of original(s) you are unexpectedly light or faint, or you notice light or dark bands...as described below to see the on-screen User's Guide). Print head needs to -life color and sharpness as necessary. 9. Epson Stylus CX5000 Series Restoring Color in Faded Photos Using the Color Restoration feature in EPSON Scan, you can automatically transform an old, faded, or badly exposed photo into one ...
Product Information Guide
Page 13
... runs a head cleaning cycle and the On light flashes. You see a window like the following : ❏ Windows: Double-click the icon on , you may damage it. 3. Do not put your eyes, flush them immediately with soap and water. Epson Stylus CX5000 Series Note: Print head cleaning uses ink, so clean it only if quality declines...
... runs a head cleaning cycle and the On light flashes. You see a window like the following : ❏ Windows: Double-click the icon on , you may damage it. 3. Do not put your eyes, flush them immediately with soap and water. Epson Stylus CX5000 Series Note: Print head cleaning uses ink, so clean it only if quality declines...
Product Information Guide
Page 16
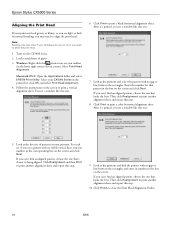
... see a window like this step. 10. Look at the printout and find an aligned pattern, choose the one that pattern in the box on your taskbar (in the box on the screen and click Next. Look at the five sets of paper. 3. Then click Realignment to print a color horizontal alignment ...pattern with no gap or line between the rectangles and enter its number in the printer list, click OK, and select Print Head Alignment. 4. Epson Stylus CX5000 Series Aligning the Print Head If your cartridges are low on ink or you need to align the print head. Note: Banding may need to...
... see a window like this step. 10. Look at the printout and find an aligned pattern, choose the one that pattern in the box on your taskbar (in the box on the screen and click Next. Look at the five sets of paper. 3. Then click Realignment to print a color horizontal alignment ...pattern with no gap or line between the rectangles and enter its number in the printer list, click OK, and select Print Head Alignment. 4. Epson Stylus CX5000 Series Aligning the Print Head If your cartridges are low on ink or you need to align the print head. Note: Banding may need to...
Quick Reference Guide
Page 2
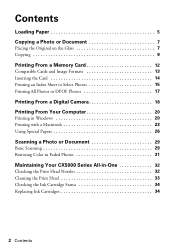
... 17 Printing From a Digital Camera 18 Printing From Your Computer 20 Printing in Windows 20 Printing with a Macintosh 23 Using Special Papers 26 Scanning a Photo or Document 29 Basic Scanning 29 Restoring Color in Faded Photos 31 Maintaining Your CX5000 Series All-in-One 32 Checking the Print Head Nozzles 32 Cleaning the...
... 17 Printing From a Digital Camera 18 Printing From Your Computer 20 Printing in Windows 20 Printing with a Macintosh 23 Using Special Papers 26 Scanning a Photo or Document 29 Basic Scanning 29 Restoring Color in Faded Photos 31 Maintaining Your CX5000 Series All-in-One 32 Checking the Print Head Nozzles 32 Cleaning the...
Quick Reference Guide
Page 4
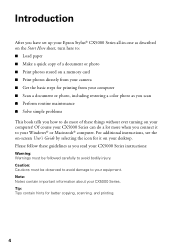
...Windows® or Macintosh® computer. For additional instructions, see the on-screen User's Guide by selecting the icon for it to avoid bodily injury. Caution: Cautions must be observed to avoid damage to do a lot more when you connect it on your desktop. Introduction After you have set up your Epson Stylus...® CX5000 Series all-in-one as described on the Start Here ...a document or photo, including restoring a color photo as you how to your equipment. Of course your CX5000 Series can do most of a document or...
...Windows® or Macintosh® computer. For additional instructions, see the on-screen User's Guide by selecting the icon for it to avoid bodily injury. Caution: Cautions must be observed to avoid damage to do a lot more when you connect it on your desktop. Introduction After you have set up your Epson Stylus...® CX5000 Series all-in-one as described on the Start Here ...a document or photo, including restoring a color photo as you how to your equipment. Of course your CX5000 Series can do most of a document or...

Quick Reference Guide
Page 9
... Epson Stylus CX5000 Series all-in the Copies window. You can make more than 9 copies, see the desired number of letter-size plain paper (see page 5 if you need to select Plain Paper. The light indicates which type is being printed; The On light flashes and after a moment the CX5000 ...button. Copying 9 If you need instructions). 4. Press the paper type button to stop copying, press the y Stop button. To make a color copy, press the x Start Color button. it will be exactly the same size as described on . 2. Place the document on the glass as the original. Copying You can...
... Epson Stylus CX5000 Series all-in the Copies window. You can make more than 9 copies, see the desired number of letter-size plain paper (see page 5 if you need to select Plain Paper. The light indicates which type is being printed; The On light flashes and after a moment the CX5000 ...button. Copying 9 If you need instructions). 4. Press the paper type button to stop copying, press the y Stop button. To make a color copy, press the x Start Color button. it will be exactly the same size as described on . 2. Place the document on the glass as the original. Copying You can...

Quick Reference Guide
Page 10
... as the original. 10 Copying a Photo or Document Note: The copies may not be ejected automatically to the output tray. Make sure the Epson Stylus CX5000 Series all-in the Copies window. You can select up to 20 sheets of copies in -one is being printed; If you want borderless photos (printed without a white... Copies button until you need to 9 copies at any time, just press the y Stop button. Otherwise, photos are printed with a small white border. 8. To make a color copy, press the x Start...
... as the original. 10 Copying a Photo or Document Note: The copies may not be ejected automatically to the output tray. Make sure the Epson Stylus CX5000 Series all-in the Copies window. You can select up to 20 sheets of copies in -one is being printed; If you want borderless photos (printed without a white... Copies button until you need to 9 copies at any time, just press the y Stop button. Otherwise, photos are printed with a small white border. 8. To make a color copy, press the x Start...

Quick Reference Guide
Page 11
For example, to select Plain Paper or Photo Paper. 6. The CX5000 Series makes copies until you see "-" in the Copies window. Load plain, letter-size paper and select Plain Paper and Letter size on page 7. Press the x Start Color or x Start B&W button. When the On light starts flashing, release both ...making a lot of paper. Then the red b Error light comes on . 2. Be sure to select Letter, 4"x6", or 5"x7". 7. Make sure the Epson Stylus CX5000 Series all-in black and white). Making 10 or More Copies 1. The print quality is reduced, but the copy is a good idea to copy in...
For example, to select Plain Paper or Photo Paper. 6. The CX5000 Series makes copies until you see "-" in the Copies window. Load plain, letter-size paper and select Plain Paper and Letter size on page 7. Press the x Start Color or x Start B&W button. When the On light starts flashing, release both ...making a lot of paper. Then the red b Error light comes on . 2. Be sure to select Letter, 4"x6", or 5"x7". 7. Make sure the Epson Stylus CX5000 Series all-in black and white). Making 10 or More Copies 1. The print quality is reduced, but the copy is a good idea to copy in...
Quick Reference Guide
Page 19
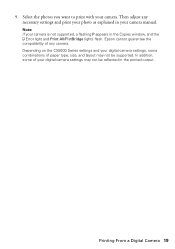
... the photos you want to print with your camera manual. Depending on the CX5000 Series settings and your digital camera settings, some of your camera is not supported, a flashing P appears in the Copies window, and the b Error light and Print All/PictBridge lights flash. In addition..., some combinations of any necessary settings and print your photo as explained in the printed output. Printing From a Digital Camera 19 Epson cannot guarantee the compatibility of paper ...
... the photos you want to print with your camera manual. Depending on the CX5000 Series settings and your digital camera settings, some of your camera is not supported, a flashing P appears in the Copies window, and the b Error light and Print All/PictBridge lights flash. In addition..., some combinations of any necessary settings and print your photo as explained in the printed output. Printing From a Digital Camera 19 Epson cannot guarantee the compatibility of paper ...
Quick Reference Guide
Page 20
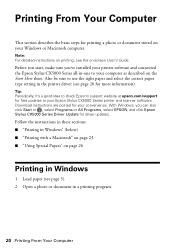
Open a photo or document in -one to check Epson's support website at epson.com/support for your Windows or Macintosh computer. Also be sure to your Epson Stylus CX5000 Series printer and scanner software. Printing From Your Computer This section describes the basic steps for printing... are posted for free updates to use the right paper and select the correct paper type setting in Windows 1. With Windows, you 've installed your printer software and connected the Epson Stylus CX5000 Series all-in a printing program. 20 Printing From Your Computer Tip: Periodically, it's a good ...
Open a photo or document in -one to check Epson's support website at epson.com/support for your Windows or Macintosh computer. Also be sure to your Epson Stylus CX5000 Series printer and scanner software. Printing From Your Computer This section describes the basic steps for printing... are posted for free updates to use the right paper and select the correct paper type setting in Windows 1. With Windows, you 've installed your printer software and connected the Epson Stylus CX5000 Series all-in a printing program. 20 Printing From Your Computer Tip: Periodically, it's a good ...

Quick Reference Guide
Page 21
... print settings: Select the type of document you see a window like this one: Select EPSON Stylus CX5000 Series Click here to open your document Orientation Click here for borderless photos Select your printer software 4. Then click Preferences or Properties on the next screen.) 5. Make sure Epson Stylus CX5000 Series is selected, then click the Preferences or Properties...
... print settings: Select the type of document you see a window like this one: Select EPSON Stylus CX5000 Series Click here to open your document Orientation Click here for borderless photos Select your printer software 4. Then click Preferences or Properties on the next screen.) 5. Make sure Epson Stylus CX5000 Series is selected, then click the Preferences or Properties...
Quick Reference Guide
Page 23
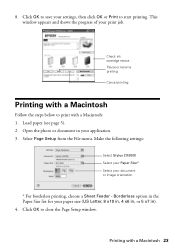
... 5 x7 in). 4. Open the photo or document in the Paper Size list for your settings, then click OK or Print to close the Page Setup window. Make the following settings: Select Stylus CX5000 Select your Paper Size* Select your application. 3. Click OK to start printing. Load paper (see page 5). 2. 8. This...
... 5 x7 in). 4. Open the photo or document in the Paper Size list for your settings, then click OK or Print to close the Page Setup window. Make the following settings: Select Stylus CX5000 Select your Paper Size* Select your application. 3. Click OK to start printing. Load paper (see page 5). 2. 8. This...
Quick Reference Guide
Page 24
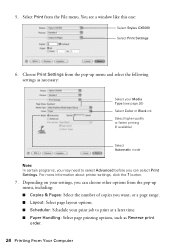
... Print from the pop-up menu and select the following settings as Reverse print order. 24 Printing From Your Computer You see page 26) Select Color or Black ink Select higher quality or faster printing (if available) Select Automatic mode Note: In certain programs, you may need to select Advanced before.... Depending on your print job to print at a later time. ■ Paper Handling: Select page printing options, such as necessary: Select your Media Type (see a window like this one: Select Stylus CX5000 Select Print Settings 6.
... Print from the pop-up menu and select the following settings as Reverse print order. 24 Printing From Your Computer You see page 26) Select Color or Black ink Select higher quality or faster printing (if available) Select Automatic mode Note: In certain programs, you may need to select Advanced before.... Depending on your print job to print at a later time. ■ Paper Handling: Select page printing options, such as necessary: Select your Media Type (see a window like this one: Select Stylus CX5000 Select Print Settings 6.

Quick Reference Guide
Page 25
...9. To monitor the progress of your print job, click the printer icon when it appears in the Printer List window. Click the Advanced button to change the gamma setting, or turn off color adjustments in the printer software. ■ Cover Page (OS X 10.4.x only): Add a cover page before or... adjust the color controls, change additional settings. Select Print Quality and other options as necessary Note: For more information on advanced settings, or instructions on saving them as a group so you 're using OS X 10.2.x, click the Print Center icon instead, then double-click CX5000 Series in ...
...9. To monitor the progress of your print job, click the printer icon when it appears in the Printer List window. Click the Advanced button to change the gamma setting, or turn off color adjustments in the printer software. ■ Cover Page (OS X 10.4.x only): Add a cover page before or... adjust the color controls, change additional settings. Select Print Quality and other options as necessary Note: For more information on advanced settings, or instructions on saving them as a group so you 're using OS X 10.2.x, click the Print Center icon instead, then double-click CX5000 Series in ...

Quick Reference Guide
Page 26
When you're finished, close the printer window or Print Center. For projects that showcase your photos, presentations, and creative projects. You see a screen like this: Cancel printing Select the print job 11. Using Special Papers Epson offers a wide array of high quality papers, making it easy to professional portraits. Available in glossy...
When you're finished, close the printer window or Print Center. For projects that showcase your photos, presentations, and creative projects. You see a screen like this: Cancel printing Select the print job 11. Using Special Papers Epson offers a wide array of high quality papers, making it easy to professional portraits. Available in glossy...


