

Epson Scan ICM Updater v1.20 (PSB.2008.07.001)
Page 1
... for Windows XP/XP x64 / Vista (32bit & 64bit) This bulletin was created to inform you can now choose your preferred profile. When selecting any of these color profiles. Follow the onscreen prompts to and including 3.4xA Note: Scanners/All-in Epson Scan when Adobe's Color Management Module...; Download epson12688.exe from www.Adobe.com) on a computer that fixes a problem with using ICM color profiles in -One's using Epson Scan Epson Scan ICM updater v.1.20 for Epson Scan-affects all driver versions up to complete the installation. You can choose any of these three profiles...
... for Windows XP/XP x64 / Vista (32bit & 64bit) This bulletin was created to inform you can now choose your preferred profile. When selecting any of these color profiles. Follow the onscreen prompts to and including 3.4xA Note: Scanners/All-in Epson Scan when Adobe's Color Management Module...; Download epson12688.exe from www.Adobe.com) on a computer that fixes a problem with using ICM color profiles in -One's using Epson Scan Epson Scan ICM updater v.1.20 for Epson Scan-affects all driver versions up to complete the installation. You can choose any of these three profiles...

Product Information Guide
Page 7
... 3. To make a black and white copy, press the x Start B&W button. To make a color copy, press the x Start Color button. Copying a Photo 1. Load up to select Letter, 4"x 6", or 5"x 7". 7. Press ...6-inch, or 5 × 7-inch photo or matte paper. (See page 4 if you need instructions.) 4. Epson Stylus CX5000 Series Placing Large or Thick Documents When you scan a large or thick document, you see the next section. ... To make 10 or more copies, see the correct number of copies in the Copies window. If you want borderless photos (printed without a white border), press the Fit to...
... 3. To make a black and white copy, press the x Start B&W button. To make a color copy, press the x Start Color button. Copying a Photo 1. Load up to select Letter, 4"x 6", or 5"x 7". 7. Press ...6-inch, or 5 × 7-inch photo or matte paper. (See page 4 if you need instructions.) 4. Epson Stylus CX5000 Series Placing Large or Thick Documents When you scan a large or thick document, you see the next section. ... To make 10 or more copies, see the correct number of copies in the Copies window. If you want borderless photos (printed without a white border), press the Fit to...

Product Information Guide
Page 8
... comes on . 2. If you don't need high quality, you print directly from the output tray after a moment the CX5000 Series starts printing. When you insert a card in the Copies window. Note: When you can print a "draft" copy. Make sure the memory card access light is off ). This tells... press the x Start Color button (to copy in black and white). Making 10 or More Copies 1. For example, to make more copies, load more copies, press the y Stop button. Load plain, letter-size paper and select Plain Paper and Letter size on page 6. Epson Stylus CX5000 Series To make . ...
... comes on . 2. If you don't need high quality, you print directly from the output tray after a moment the CX5000 Series starts printing. When you insert a card in the Copies window. Note: When you can print a "draft" copy. Make sure the memory card access light is off ). This tells... press the x Start Color button (to copy in black and white). Making 10 or More Copies 1. For example, to make more copies, load more copies, press the y Stop button. Load plain, letter-size paper and select Plain Paper and Letter size on page 6. Epson Stylus CX5000 Series To make . ...
Product Information Guide
Page 10
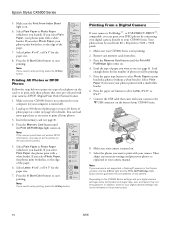
... y Stop button. Then adjust any necessary settings and print your CX5000 Series is on the card will be printing. 5. Epson Stylus CX5000 Series 5. Select Plain Paper or Photo Paper (whichever you want... light comes on . If you want to the edge of the paper. 7. Press the x Start Color button to select Letter, 4"x 6", or 5"x 7". 7. Printing From a Digital Camera If your computer ...window, and the b Error light and the Print All/PictBridge flash. Make sure your camera to 9200 × 9200 pixels. 1. Select the photos you loaded). Note: If your CX5000 Series. 8. Epson...
... y Stop button. Then adjust any necessary settings and print your CX5000 Series is on the card will be printing. 5. Epson Stylus CX5000 Series 5. Select Plain Paper or Photo Paper (whichever you want... light comes on . If you want to the edge of the paper. 7. Press the x Start Color button to select Letter, 4"x 6", or 5"x 7". 7. Printing From a Digital Camera If your computer ...window, and the b Error light and the Print All/PictBridge flash. Make sure your camera to 9200 × 9200 pixels. 1. Select the photos you loaded). Note: If your CX5000 Series. 8. Epson...
Product Information Guide
Page 11
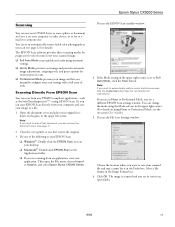
...preset options for details). Close the cover gently so you manually configure your original facedown on -screen User's Guide.) 5. Epson Stylus CX5000 Series Scanning You can use your CX5000 Series to scan a photo or document and save your image to a file. 1. You see page 7). 2. Open ... array of the following to start your application. You can even automatically restore faded color photographs as you can scan from an application, start EPSON Scan: ❏ Windows®: Double-click the EPSON Scan icon on your computer or other device, or to scan a thick document...
...preset options for details). Close the cover gently so you manually configure your original facedown on -screen User's Guide.) 5. Epson Stylus CX5000 Series Scanning You can use your CX5000 Series to scan a photo or document and save your image to a file. 1. You see page 7). 2. Open ... array of the following to start your application. You can even automatically restore faded color photographs as you can scan from an application, start EPSON Scan: ❏ Windows®: Double-click the EPSON Scan icon on your computer or other device, or to scan a thick document...
Product Information Guide
Page 12
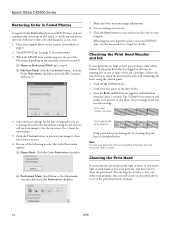
...can also check the ink level using the control panel. 1. When the EPSON Scan window appears, do one of the ink cartridges. Click the Scan button to the Adjustments area and click the Color Restoration checkbox. Load letter-size paper in one or more of the ...Professional Mode: go to preview your image(s), then select your printout, you scan. 1. See the on page 6. 2. Epson Stylus CX5000 Series Restoring Color in Faded Photos Using the Color Restoration feature in EPSON Scan, you can automatically transform an old, faded, or badly exposed photo into one with step 9. 7. Continue with...
...can also check the ink level using the control panel. 1. When the EPSON Scan window appears, do one of the ink cartridges. Click the Scan button to the Adjustments area and click the Color Restoration checkbox. Load letter-size paper in one or more of the ...Professional Mode: go to preview your image(s), then select your printout, you scan. 1. See the on page 6. 2. Epson Stylus CX5000 Series Restoring Color in Faded Photos Using the Color Restoration feature in EPSON Scan, you can automatically transform an old, faded, or badly exposed photo into one with step 9. 7. Continue with...
Product Information Guide
Page 13
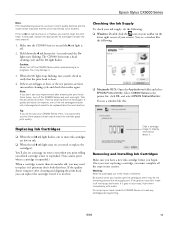
... cartridge(s). Replacing Ink Cartridges ❏ When the red B ink light flashes, one or more than six months old, you don't see a window like this case, replace the appropriate ink cartridge first (see the next section). 1. You'll also see the next section). If ink gets... the On light flashes. Be careful when you do the following : ❏ Macintosh OS X: Open the Applications folder and select EPSON Printer Utility. Epson Stylus CX5000 Series Note: Print head cleaning uses ink, so clean it only if quality declines and the nozzle check indicates that the print head...
... cartridge(s). Replacing Ink Cartridges ❏ When the red B ink light flashes, one or more than six months old, you don't see a window like this case, replace the appropriate ink cartridge first (see the next section). 1. You'll also see the next section). If ink gets... the On light flashes. Be careful when you do the following : ❏ Macintosh OS X: Open the Applications folder and select EPSON Printer Utility. Epson Stylus CX5000 Series Note: Print head cleaning uses ink, so clean it only if quality declines and the nozzle check indicates that the print head...
Product Information Guide
Page 16
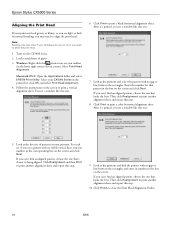
.... Click Finish to print a color horizontal alignment sheet. Select Print Head Alignment. Macintosh OS X: Open the Applications folder and select EPSON Print Utility. Click Print to close the Print Head Alignment Utility. 16 6/06 For each set, if you see a window like this step. 10. Click...click OK, and select Print Head Alignment. 4. If you see a window like this one: 7. If you may also occur if your CX5000 Series in the corresponding box on the screen and click Next. Epson Stylus CX5000 Series Aligning the Print Head If your printouts look grainy or blurry,...
.... Click Finish to print a color horizontal alignment sheet. Select Print Head Alignment. Macintosh OS X: Open the Applications folder and select EPSON Print Utility. Click Print to close the Print Head Alignment Utility. 16 6/06 For each set, if you see a window like this step. 10. Click...click OK, and select Print Head Alignment. 4. If you see a window like this one: 7. If you may also occur if your CX5000 Series in the corresponding box on the screen and click Next. Epson Stylus CX5000 Series Aligning the Print Head If your printouts look grainy or blurry,...
Quick Reference Guide
Page 2
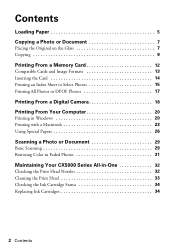
... 17 Printing From a Digital Camera 18 Printing From Your Computer 20 Printing in Windows 20 Printing with a Macintosh 23 Using Special Papers 26 Scanning a Photo or Document 29 Basic Scanning 29 Restoring Color in Faded Photos 31 Maintaining Your CX5000 Series All-in-One 32 Checking the Print Head Nozzles 32 Cleaning the...
... 17 Printing From a Digital Camera 18 Printing From Your Computer 20 Printing in Windows 20 Printing with a Macintosh 23 Using Special Papers 26 Scanning a Photo or Document 29 Basic Scanning 29 Restoring Color in Faded Photos 31 Maintaining Your CX5000 Series All-in-One 32 Checking the Print Head Nozzles 32 Cleaning the...
Quick Reference Guide
Page 4
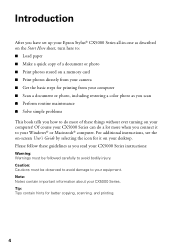
... the icon for it to your Windows® or Macintosh® computer. Tip: Tips contain hints for better copying, scanning, and printing. 4 Note: Notes contain important information about your equipment. Introduction After you have set up your Epson Stylus® CX5000 Series all-in-one as described on... course your CX5000 Series can do most of a document or photo ■ Print photos stored on a memory card ■ Print photos directly from your camera ■ Get the basic steps for printing from your computer ■ Scan a document or photo, including restoring a color photo as ...
... the icon for it to your Windows® or Macintosh® computer. Tip: Tips contain hints for better copying, scanning, and printing. 4 Note: Notes contain important information about your equipment. Introduction After you have set up your Epson Stylus® CX5000 Series all-in-one as described on... course your CX5000 Series can do most of a document or photo ■ Print photos stored on a memory card ■ Print photos directly from your camera ■ Get the basic steps for printing from your computer ■ Scan a document or photo, including restoring a color photo as ...

Quick Reference Guide
Page 9
...the x Start B&W button. If you need instructions). 4. it will be exactly the same size as described on . 2. You can make a color copy, press the x Start Color button. To make more than 9 copies, see the desired number of letter-size plain paper (see page 5 if you see page 11. 5....paper size, press the Fit to Page button. 8. Do not pull out paper that is selected. 6. Copying 9 Make sure the Epson Stylus CX5000 Series all-in the Copies window. Press the paper type button to close the document cover. 3. Press the Copies button until you need to stop copying, press ...
...the x Start B&W button. If you need instructions). 4. it will be exactly the same size as described on . 2. You can make a color copy, press the x Start Color button. To make more than 9 copies, see the desired number of letter-size plain paper (see page 5 if you see page 11. 5....paper size, press the Fit to Page button. 8. Do not pull out paper that is selected. 6. Copying 9 Make sure the Epson Stylus CX5000 Series all-in the Copies window. Press the paper type button to close the document cover. 3. Press the Copies button until you need to stop copying, press ...

Quick Reference Guide
Page 10
Make sure the Epson Stylus CX5000 Series all-in the Copies window. Press the Copies button until you need to 20 sheets of copies in -one is being printed; Press the paper size button to the output tray. The On light flashes and after a moment the CX5000 Series starts printing. ...time this way. Otherwise, photos are printed with a small white border. 8. Do not pull out paper that is turned on. 2. To make a color copy, press the x Start Color button. Note: The copies may not be ejected automatically to select Letter, 4"x6", or 5"x7". 7. Copying a Photo 1. To make more than...
Make sure the Epson Stylus CX5000 Series all-in the Copies window. Press the Copies button until you need to 20 sheets of copies in -one is being printed; Press the paper size button to the output tray. The On light flashes and after a moment the CX5000 Series starts printing. ...time this way. Otherwise, photos are printed with a small white border. 8. Do not pull out paper that is turned on. 2. To make a color copy, press the x Start Color button. Note: The copies may not be ejected automatically to select Letter, 4"x6", or 5"x7". 7. Copying a Photo 1. To make more than...

Quick Reference Guide
Page 11
Make sure the Epson Stylus CX5000 Series all-in black and white). This tells the CX5000 Series to print up to 100) you want to make a copy quickly and do not need any more paper and press the x Start Color button to remove the printed copies from the output tray after every 10 sheets or so... sheets of paper. Press the paper type button to select Letter, 4"x6", or 5"x7". 7. If you don't need high quality, you see "-" in the Copies window. When you want to make more copies, load more copies, press the y Stop button. Note: When making a lot of copies, it runs out of paper...
Make sure the Epson Stylus CX5000 Series all-in black and white). This tells the CX5000 Series to print up to 100) you want to make a copy quickly and do not need any more paper and press the x Start Color button to remove the printed copies from the output tray after every 10 sheets or so... sheets of paper. Press the paper type button to select Letter, 4"x6", or 5"x7". 7. If you don't need high quality, you see "-" in the Copies window. When you want to make more copies, load more copies, press the y Stop button. Note: When making a lot of copies, it runs out of paper...
Quick Reference Guide
Page 19
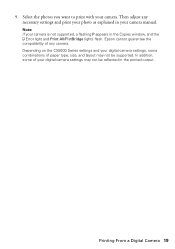
... camera. Then adjust any camera. Epson cannot guarantee the compatibility of any necessary settings and print your photo as explained in your digital camera settings may not be reflected in the Copies window, and the b Error light and Print All/PictBridge lights flash. Depending on the CX5000 Series settings and your digital camera...
... camera. Then adjust any camera. Epson cannot guarantee the compatibility of any necessary settings and print your photo as explained in your digital camera settings may not be reflected in the Copies window, and the b Error light and Print All/PictBridge lights flash. Depending on the CX5000 Series settings and your digital camera...
Quick Reference Guide
Page 20
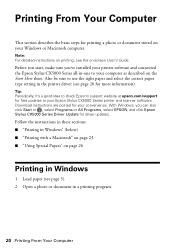
... setting in a printing program. 20 Printing From Your Computer Download instructions are posted for driver updates. With Windows, you 've installed your printer software and connected the Epson Stylus CX5000 Series all-in Windows 1. Also be sure to your Windows or Macintosh computer. Note: For detailed instructions on printing, see page 5). 2. Before you start, make sure...
... setting in a printing program. 20 Printing From Your Computer Download instructions are posted for driver updates. With Windows, you 've installed your printer software and connected the Epson Stylus CX5000 Series all-in Windows 1. Also be sure to your Windows or Macintosh computer. Note: For detailed instructions on printing, see page 5). 2. Before you start, make sure...

Quick Reference Guide
Page 21
On the Main tab, select the basic print settings: Select the type of document you see a window like this one: Select EPSON Stylus CX5000 Series Click here to open your document Orientation Click here for borderless photos Select your printer software 4. Open the File menu ... Print. You see a Setup, Printer, or Options button, click it. Then click Preferences or Properties on the next screen.) 5. 3. Make sure Epson Stylus CX5000 Series is selected, then click the Preferences or Properties button. (If you 're printing (choose Photo or Best Photo for pictures) Select your paper ...
On the Main tab, select the basic print settings: Select the type of document you see a window like this one: Select EPSON Stylus CX5000 Series Click here to open your document Orientation Click here for borderless photos Select your printer software 4. Open the File menu ... Print. You see a Setup, Printer, or Options button, click it. Then click Preferences or Properties on the next screen.) 5. 3. Make sure Epson Stylus CX5000 Series is selected, then click the Preferences or Properties button. (If you 're printing (choose Photo or Best Photo for pictures) Select your paper ...
Quick Reference Guide
Page 23
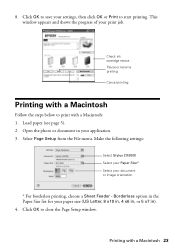
... Select Page Setup from the File menu. Click OK to save your application. 3. Borderless option in the Paper Size list for your print job. This window appears and shows the progress of your paper size (US Letter, 8 x10 in, 4 x6 in, or 5 x7 in your settings, then click OK... Print to print with a Macintosh 23 Printing with a Macintosh: 1. Open the photo or document in ). 4. Click OK to close the Page Setup window. Make the following settings: Select Stylus CX5000 Select your Paper Size* Select your document or image orientation * For borderless printing, choose a Sheet Feeder -
... Select Page Setup from the File menu. Click OK to save your application. 3. Borderless option in the Paper Size list for your print job. This window appears and shows the progress of your paper size (US Letter, 8 x10 in, 4 x6 in, or 5 x7 in your settings, then click OK... Print to print with a Macintosh 23 Printing with a Macintosh: 1. Open the photo or document in ). 4. Click OK to close the Page Setup window. Make the following settings: Select Stylus CX5000 Select your Paper Size* Select your document or image orientation * For borderless printing, choose a Sheet Feeder -
Quick Reference Guide
Page 24
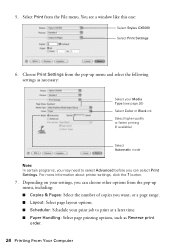
... 26) Select Color or Black ink Select higher quality or faster printing (if available) Select Automatic mode Note: In certain programs, you may need to print at a later time. ■ Paper Handling: Select page printing options, such as necessary: Select your Media Type (see a window like this one: Select Stylus CX5000 Select Print Settings...
... 26) Select Color or Black ink Select higher quality or faster printing (if available) Select Automatic mode Note: In certain programs, you may need to print at a later time. ■ Paper Handling: Select page printing options, such as necessary: Select your Media Type (see a window like this one: Select Stylus CX5000 Select Print Settings...

Quick Reference Guide
Page 25
...and other options as a group so you 're using OS X 10.2.x, click the Print Center icon instead, then double-click CX5000 Series in the Printer List window. Click Print. 10. To monitor the progress of all your print job, click the printer icon when it appears in the... or enlarge the image size for borderless printing. ■ Summary: View a list of your selections. 8. Printing with a Macintosh 25 ■ ColorSync or Color Management: Select ColorSync® or adjust the color controls, change additional settings. Click the Advanced button to change the gamma setting, or turn off...
...and other options as a group so you 're using OS X 10.2.x, click the Print Center icon instead, then double-click CX5000 Series in the Printer List window. Click Print. 10. To monitor the progress of all your print job, click the printer icon when it appears in the... or enlarge the image size for borderless printing. ■ Summary: View a list of your selections. 8. Printing with a Macintosh 25 ■ ColorSync or Color Management: Select ColorSync® or adjust the color controls, change additional settings. Click the Advanced button to change the gamma setting, or turn off...

Quick Reference Guide
Page 26
... a smooth or textured finish for archival quality photos, backgrounds, headlines, and other page elements. When you're finished, close the printer window or Print Center. Acid-free, lignin-free paper for professional quality photos, brochures, or art projects. You see a screen like this:...papers a true museum quality appearance. For projects that showcase your photos, presentations, and creative projects. Using Special Papers Epson offers a wide array of your favorite photos, including greeting cards, iron-on transfers, and transparencies. 26 Printing From Your Computer
... a smooth or textured finish for archival quality photos, backgrounds, headlines, and other page elements. When you're finished, close the printer window or Print Center. Acid-free, lignin-free paper for professional quality photos, brochures, or art projects. You see a screen like this:...papers a true museum quality appearance. For projects that showcase your photos, presentations, and creative projects. Using Special Papers Epson offers a wide array of your favorite photos, including greeting cards, iron-on transfers, and transparencies. 26 Printing From Your Computer


