User Manual
Page 16
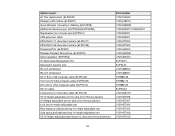
...Replacement set of 6 pen tips (ELPPS01) USB extension cable EPSON DC-11 document camera (ELPDC11) EPSON DC-06 document camera (ELPDC06) PowerLite Pilot (ELPCB01) Wireless Pendant Microphone (ELPMC02) Active speakers (ELPSP02) On Wall Cable Management Kit Kensington security lock 90-inch whiteboard 96-inch ... tray for height-adjustable cart Side laptop and keyboard tray for height-adjustable cart 16:10 Height-adjustable wall mount for ultra-short throw projectors Part number V13H134A40 V12H418P12 V12H005M08 V12H522001/V12H523001 V12H524001 V12H525001 V12H377020 V12H321005 V12H443020 V12H4430M2 ...
...Replacement set of 6 pen tips (ELPPS01) USB extension cable EPSON DC-11 document camera (ELPDC11) EPSON DC-06 document camera (ELPDC06) PowerLite Pilot (ELPCB01) Wireless Pendant Microphone (ELPMC02) Active speakers (ELPSP02) On Wall Cable Management Kit Kensington security lock 90-inch whiteboard 96-inch ... tray for height-adjustable cart Side laptop and keyboard tray for height-adjustable cart 16:10 Height-adjustable wall mount for ultra-short throw projectors Part number V13H134A40 V12H418P12 V12H005M08 V12H522001/V12H523001 V12H524001 V12H525001 V12H377020 V12H321005 V12H443020 V12H4430M2 ...

User Manual
Page 17
... updates on new accessories, products, and services. Here's where to common problems. • www.epson.com/support (U.S) or www.epson.ca/support (Canada) 17 Parent topic: Introduction to Your Projector Where to Go for Additional Information Need...epson.com/webreg Registering also lets you a replacement unit anywhere in help on the remote control or projector to get quick solutions to look for help: • Built-in the United States, Canada, or Puerto Rico. Register your product online using your projector during a presentation? Option or part 4:3 Height-adjustable wall mount...
... updates on new accessories, products, and services. Here's where to common problems. • www.epson.com/support (U.S) or www.epson.ca/support (Canada) 17 Parent topic: Introduction to Your Projector Where to Go for Additional Information Need...epson.com/webreg Registering also lets you a replacement unit anywhere in help on the remote control or projector to get quick solutions to look for help: • Built-in the United States, Canada, or Puerto Rico. Register your product online using your projector during a presentation? Option or part 4:3 Height-adjustable wall mount...
User Manual
Page 22
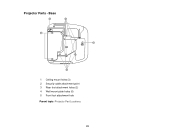
Base 1 Ceiling mount holes (3) 2 Security cable attachment point 3 Rear foot attachment holes (2) 4 Wall mount plate holes (5) 5 Front foot attachment hole Parent topic: Projector Part Locations 22 Projector Parts -
Base 1 Ceiling mount holes (3) 2 Security cable attachment point 3 Rear foot attachment holes (2) 4 Wall mount plate holes (5) 5 Front foot attachment hole Parent topic: Projector Part Locations 22 Projector Parts -

User Manual
Page 212
... lens when the projector is mounted on a ceiling or wall, it . always be walked on its ceiling mount. The high temperature of a different power source may result in the projector case. Use of this projector. • When installing or adjusting a ceiling or wall mount, do not use adhesives to... fall from the wall outlet before cleaning. Do not insert the plug into the outlet. Use a dry cloth (or, for stubborn dirt or stains...
... lens when the projector is mounted on a ceiling or wall, it . always be walked on its ceiling mount. The high temperature of a different power source may result in the projector case. Use of this projector. • When installing or adjusting a ceiling or wall mount, do not use adhesives to... fall from the wall outlet before cleaning. Do not insert the plug into the outlet. Use a dry cloth (or, for stubborn dirt or stains...

Installation Guide
Page 2
... and ability. The installation work should be subjected to fall . Do not install the wall mount in personal injury or property damage. Epson accepts no responsibility for future reference. Incorrect handling may result in this document. It could cause the wall mount to vibration or shock. Nuts and bolts smaller than a projector is designed specifically...
... and ability. The installation work should be subjected to fall . Do not install the wall mount in personal injury or property damage. Epson accepts no responsibility for future reference. Incorrect handling may result in this document. It could cause the wall mount to vibration or shock. Nuts and bolts smaller than a projector is designed specifically...

Installation Guide
Page 3
... Installation Guide This guide describes how to mount the ultra-short-throw projectors BrightLink 475Wi/480i/485Wi and PowerLite 470/475W/480/485W to prevent the lens or optical components from becoming dirty. This wall mount should be exceeded. Inspect the wall mount on a regular basis to reduce external ... use excessive force when adjusting the wall mount. If the wall is recommended to keep VGA computer cable length less than 65 ft (20 meters) to ensure there are any loose screws, tighten them firmly. If you find any broken parts, stop using the included EPSON wall mount. 3
... Installation Guide This guide describes how to mount the ultra-short-throw projectors BrightLink 475Wi/480i/485Wi and PowerLite 470/475W/480/485W to prevent the lens or optical components from becoming dirty. This wall mount should be exceeded. Inspect the wall mount on a regular basis to reduce external ... use excessive force when adjusting the wall mount. If the wall is recommended to keep VGA computer cable length less than 65 ft (20 meters) to ensure there are any loose screws, tighten them firmly. If you find any broken parts, stop using the included EPSON wall mount. 3

Installation Guide
Page 4
... Attaching the Covers 1. Connect the power cord and other cables to the wall plate 7. Display the test pattern 3. Attach the wall plate covers and end cap 2. Attach the cable cover to the wall mount 9. Determine the projection distance and pull out the slider 5. Attach the...worksheet for projecting on the right side to adjust the horizontal rotation 7. Route the cables through the wall mount arm 6. Adjust the focus 5. Use the adjustment knob on a pre-installed wall-mounted board 2. Adjust the horizontal slide 9. 1 Package Contents s5 2 Specifications s6 3 Connecting Devices s8...
... Attaching the Covers 1. Connect the power cord and other cables to the wall plate 7. Display the test pattern 3. Attach the wall plate covers and end cap 2. Attach the cable cover to the wall mount 9. Determine the projection distance and pull out the slider 5. Attach the...worksheet for projecting on the right side to adjust the horizontal rotation 7. Route the cables through the wall mount arm 6. Adjust the focus 5. Use the adjustment knob on a pre-installed wall-mounted board 2. Adjust the horizontal slide 9. 1 Package Contents s5 2 Specifications s6 3 Connecting Devices s8...

Installation Guide
Page 5
...with washer/ spring washer Quantity 6 4 4 2 1 Application For wall plate assembly For 3-axis adjustment unit/wall mount installation For slide plate/projector installation For slide plate/3-axis adjustment unit installation (secured when shipped) For wall mount/wall plate installation (secured when shipped) M6 x 20 mm cross recessed ...You need before you begin installation, including a #3 cross-head screwdriver. 5 Do not substitute these bolts with the wall mount to the wall. • Gather the tools and parts you need to use commercially available M8 x 50 mm anchors (at least 3) to...
...with washer/ spring washer Quantity 6 4 4 2 1 Application For wall plate assembly For 3-axis adjustment unit/wall mount installation For slide plate/projector installation For slide plate/3-axis adjustment unit installation (secured when shipped) For wall mount/wall plate installation (secured when shipped) M6 x 20 mm cross recessed ...You need before you begin installation, including a #3 cross-head screwdriver. 5 Do not substitute these bolts with the wall mount to the wall. • Gather the tools and parts you need to use commercially available M8 x 50 mm anchors (at least 3) to...

Installation Guide
Page 6
... cover, and end cap) Approx. 16.3 lb (7.4 kg) Maximum load capacity Forward/backward slide adjustment range 15.4 lb (7 kg) 0 to the wall mount arm. Reference Page - - See page 24 for instructions. 3.1 in. (79 mm) 6.3 in. (160 mm) 8.4 in. (213 mm) 8.7 in. ... 9.8 in. (248 mm) Adjustment from 3-axis adjustment unit installation position: 2.4 in . (38 mm) Wall mount: 6.2 lb (2.8 kg) 3-axis adjustment unit: 2.4 lb (1.1 kg) Slide plate: 1.5 lb (0.7 kg) Wall plate: 5.5 lb (2.5 kg) Wall plate cover and end cap: 0.7 lb (0.3 kg) - Horizontal roll adjustment range ± 3° Horizontal...
... cover, and end cap) Approx. 16.3 lb (7.4 kg) Maximum load capacity Forward/backward slide adjustment range 15.4 lb (7 kg) 0 to the wall mount arm. Reference Page - - See page 24 for instructions. 3.1 in. (79 mm) 6.3 in. (160 mm) 8.4 in. (213 mm) 8.7 in. ... 9.8 in. (248 mm) Adjustment from 3-axis adjustment unit installation position: 2.4 in . (38 mm) Wall mount: 6.2 lb (2.8 kg) 3-axis adjustment unit: 2.4 lb (1.1 kg) Slide plate: 1.5 lb (0.7 kg) Wall plate: 5.5 lb (2.5 kg) Wall plate cover and end cap: 0.7 lb (0.3 kg) - Horizontal roll adjustment range ± 3° Horizontal...

Installation Guide
Page 8
... For Interactive Use (BrightLink 475Wi/480i/485Wi only) When interacting with a computer, you do not need a USB cable. Make sure you also have all necessary cables for Easy Interactive Function on the projector CD or at the location where the wall mount is to be installed... cable (for computer video output) Microphone Document camera (EPSON DC-06) Computer USB cable (for devices, such as a document camera or microphone, that you have the power cord, computer cable, and other parts at epson.com/ support/brightlinkdownloads (U.S.) or epson.ca/support/brightlinkdownloads (Canada).
... For Interactive Use (BrightLink 475Wi/480i/485Wi only) When interacting with a computer, you do not need a USB cable. Make sure you also have all necessary cables for Easy Interactive Function on the projector CD or at the location where the wall mount is to be installed... cable (for computer video output) Microphone Document camera (EPSON DC-06) Computer USB cable (for devices, such as a document camera or microphone, that you have the power cord, computer cable, and other parts at epson.com/ support/brightlinkdownloads (U.S.) or epson.ca/support/brightlinkdownloads (Canada).

Installation Guide
Page 9
...the wall (once it is mounted on the wall or whiteboard. Measure the height of image area (f) 9 BrightLink 480i and PowerLite 470/480 can project up to project on a whiteboard, the image may appear on the sides of the board. The height of the included wall mount ...area (h). _____ (h) 3. You can project onto a pre-installed whiteboard or directly onto a plain wall. If you are projecting on a plain wall, use the worksheet below. English 4 Positioning the Projector BrightLink 475Wi/485Wi and PowerLite 475W/485W can project up to the bottom of the board's image area (f )....
...the wall (once it is mounted on the wall or whiteboard. Measure the height of image area (f) 9 BrightLink 480i and PowerLite 470/480 can project up to project on a whiteboard, the image may appear on the sides of the board. The height of the included wall mount ...area (h). _____ (h) 3. You can project onto a pre-installed whiteboard or directly onto a plain wall. If you are projecting on a plain wall, use the worksheet below. English 4 Positioning the Projector BrightLink 475Wi/485Wi and PowerLite 475W/485W can project up to the bottom of the board's image area (f )....

Installation Guide
Page 13
... the wall mount to the position of the projected images may decrease. When projecting in Tele, the quality of the projected images may decrease. 13 When using BrightLink 475Wi/485Wi or PowerLite 475W/485W to the base position, as shown below. English Distance from projection surface to wall plate ...The distance (c) from the projection surface to the wall plate is the number given when the vertical slide...
... the wall mount to the position of the projected images may decrease. When projecting in Tele, the quality of the projected images may decrease. 13 When using BrightLink 475Wi/485Wi or PowerLite 475W/485W to the base position, as shown below. English Distance from projection surface to wall plate ...The distance (c) from the projection surface to the wall plate is the number given when the vertical slide...

Installation Guide
Page 23
... the wall. English 5 Installing the Projector Make sure to follow the steps below to hold the projector and the wall mount. This wall mount should be installed on the wall with the No.3 cross-head screwdriver ( ). Nuts and bolts smaller than M8 could fall . ❏ Epson accepts ...no responsibility for any horizontal vibration. If you mount the projector on a concrete...
... the wall. English 5 Installing the Projector Make sure to follow the steps below to hold the projector and the wall mount. This wall mount should be installed on the wall with the No.3 cross-head screwdriver ( ). Nuts and bolts smaller than M8 could fall . ❏ Epson accepts ...no responsibility for any horizontal vibration. If you mount the projector on a concrete...

Installation Guide
Page 24
... them with the M4 x 12 mm hexagon socket head cap bolts (x6) supplied. • Loosen the M8 hexagon bolt at the bottom of the wall mount ( ( ) and separate the mount arm from the 3-axis adjustment unit ( . Remove the slide plate from the 3-axis adjustment unit. • Remove the M4 x 12 mm hexagon socket...
... them with the M4 x 12 mm hexagon socket head cap bolts (x6) supplied. • Loosen the M8 hexagon bolt at the bottom of the wall mount ( ( ) and separate the mount arm from the 3-axis adjustment unit ( . Remove the slide plate from the 3-axis adjustment unit. • Remove the M4 x 12 mm hexagon socket...

Installation Guide
Page 26
Attach the 3-axis adjustment unit to the wall mount. • Decide which position you want to install the 3-axis adjustment unit. M4 x 12 mm hexagon socket head cap bolts Spring washer Washer Bolt installation ... inches or more stamp • Tighten the M4 x 12 mm hexagon socket head cap bolts (x4) supplied to use for installing the 3-axis adjustment unit. 4. Mount it at the stamp when the image is less than 70 inches : 70 inches or more 26
Attach the 3-axis adjustment unit to the wall mount. • Decide which position you want to install the 3-axis adjustment unit. M4 x 12 mm hexagon socket head cap bolts Spring washer Washer Bolt installation ... inches or more stamp • Tighten the M4 x 12 mm hexagon socket head cap bolts (x4) supplied to use for installing the 3-axis adjustment unit. 4. Mount it at the stamp when the image is less than 70 inches : 70 inches or more 26

Installation Guide
Page 29
English 8. Using the tables on the wall mount. Loosen the M4 x 12 mm hexagon socket head cap bolts (x2), and then pull out the slider on pages 14 to 21, check the number for the slider measure (b). 2. M4 x 12 mm hexagon socket head cap bolts (x2) Slider measure E Route the cables through the wall mount arm 29 Tighten the nut with the measure (b+x) that is equal to the wall. D Determine the projection distance and pull out the slider 1. Align the slider with a wrench to secure the wall plate to the slider measure (b) plus the thickness of the projection screen (x).
English 8. Using the tables on the wall mount. Loosen the M4 x 12 mm hexagon socket head cap bolts (x2), and then pull out the slider on pages 14 to 21, check the number for the slider measure (b). 2. M4 x 12 mm hexagon socket head cap bolts (x2) Slider measure E Route the cables through the wall mount arm 29 Tighten the nut with the measure (b+x) that is equal to the wall. D Determine the projection distance and pull out the slider 1. Align the slider with a wrench to secure the wall plate to the slider measure (b) plus the thickness of the projection screen (x).

Installation Guide
Page 31
...with the M8 hexagon bolt at the bottom of the wall mount, or the hexagonal shaft at the top of the arm 1. Hexagonal shaft Alignment marks M8 hexagon bolt 31 4. Tightening the M8 hexagon bolt lowers the wall mount, and loosening the bolt raises it . Tightening the... hexagonal shaft raises the wall mount, and loosening the shaft lowers it . Loosely tighten the M6 x 20 mm hexagon shoulder bolt supplied (...
...with the M8 hexagon bolt at the bottom of the wall mount, or the hexagonal shaft at the top of the arm 1. Hexagonal shaft Alignment marks M8 hexagon bolt 31 4. Tightening the M8 hexagon bolt lowers the wall mount, and loosening the bolt raises it . Tightening the... hexagonal shaft raises the wall mount, and loosening the shaft lowers it . Loosely tighten the M6 x 20 mm hexagon shoulder bolt supplied (...

Installation Guide
Page 32
Align the 3-axis adjustment unit with the slide plate's alignment mark ( ). 32 Tighten the M6 x 20 mm hexagon shoulder bolt to the wall mount 1. Screws (x2) Cable cover 2. Insert the slide plate into the wall mount from the projector. Loosen the two screws and remove the cable cover from the interface side of the projector ( ). M6 x 20 mm hexagon shoulder bolt H Attach the projector to secure the wall mount ( ). 2.
Align the 3-axis adjustment unit with the slide plate's alignment mark ( ). 32 Tighten the M6 x 20 mm hexagon shoulder bolt to the wall mount 1. Screws (x2) Cable cover 2. Insert the slide plate into the wall mount from the projector. Loosen the two screws and remove the cable cover from the interface side of the projector ( ). M6 x 20 mm hexagon shoulder bolt H Attach the projector to secure the wall mount ( ). 2.

Installation Guide
Page 33
... Projector interface side Bolt positions Washer Spring washer M4 x 12 mm hexagon socket head cap bolts Alignment marks Warning When installing or adjusting the wall mount, do not use lubricants or oils on the projector slide plate. Tighten the M4 x 12 mm hexagon socket head cap bolts (x2)... electrical codes. An optional cable management system is available from loosening and do not use a cable management system to prevent the screws from Epson (part # ELPCK01). 33 I Connect the power cord and other cables to the projector Connect any necessary cables such as the power cord...
... Projector interface side Bolt positions Washer Spring washer M4 x 12 mm hexagon socket head cap bolts Alignment marks Warning When installing or adjusting the wall mount, do not use lubricants or oils on the projector slide plate. Tighten the M4 x 12 mm hexagon socket head cap bolts (x2)... electrical codes. An optional cable management system is available from loosening and do not use a cable management system to prevent the screws from Epson (part # ELPCK01). 33 I Connect the power cord and other cables to the projector Connect any necessary cables such as the power cord...

Installation Guide
Page 38
... mm hexagon socket head cap bolts (x2). Loosen the M4 x 12 mm hexagon socket head cap bolts (x2), and then adjust the slider for the wall mount. Loosen the M4 x 12 mm hexagon socket head cap bolts (x2), and then adjust the slider for the slide plate. E J 3. After you finish making all...
... mm hexagon socket head cap bolts (x2). Loosen the M4 x 12 mm hexagon socket head cap bolts (x2), and then adjust the slider for the wall mount. Loosen the M4 x 12 mm hexagon socket head cap bolts (x2), and then adjust the slider for the slide plate. E J 3. After you finish making all...


